CHECKMATE
There are things that cannot be bought, but can be made with your own hands.
This is our elegant chess table
it is durable, light, comfortable, beautiful and safe.
Self-esteem
The product is made in-house, easy to use, and much cheaper than in the store. Improves the interior of the room, does not take up much space. All technological operations have been followed. The manufactured product fully corresponds to the intended purpose.
Bibliography
- Samorodsky P.S., Tishchenko A.T., Simonenko V.D. Technology. Technical work: 7th grade: Textbook for students of general education institutions.-3rd ed., revised/Ed. V.D. Simonenko.-M.: Ventana-Graf, 2008.-160 pp.: ill.
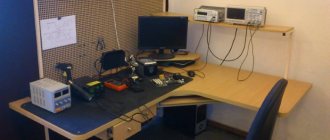
Making an exclusive chess table from an old IKEA table
This master class is doable for a beginner in decorating, but it is complicated because it requires:
- different tools (grinder, for example);
- a lot of time;
- premises for noisy and dirty work (such as a garage);
- clean room, WITHOUT children and animals.
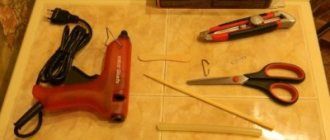
So, to work you will need:
- Old table. We had a table from IKEA, tabletop 55*55 cm (Top: chipboard, fiberboard, ABS plastic, Acrylic paint. Filling: Paper. Leg: chipboard, fiberboard, Film).
- Grinding machine with nozzle P80 - P120.
- Sandpaper P180.
- Primer for wood.
- Water-dispersion paint + tinting paste.
- Water based varnish.
- Two rollers of different sizes.
- Tray for varnish, paint and so on.
- Brushes.
- Stencils.
- Self-adhesive tape for nail design.
Working hours:
- Primary surface cleaning - 6 hours.
- Final cleanup - 3 hours.
- Two layers of soil - 2-4 hours.
- Three layers of paint (underpainting) - 6 hours.
- Applying the design in two layers - 4 hours.
- Three layers of varnish, until completely dry 24 hours (layer 1 hour).
The work itself took place in nine stages)
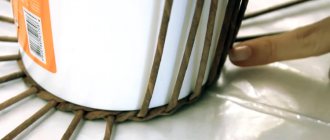
1. We took an old table (for the first attempt, we advise you to take not only an old, but also an unnecessary table). In our case, the table is made of chipboard, but it can also be made of natural wood.
2. Use coarse sandpaper (80) to sand the table to a smooth surface, thereby smoothing out noticeable scratches and chips.
3. At the second stage, we discovered that our table was covered with a film that needed to be removed to the chipboard. The film could not be removed with a knife, so we turned to our brother for help.
4. My brother removed the film using a sanding machine, and also removed the remnants of the melted glue with acetone. After this, we sanded the surface of the table and legs by hand with finer sandpaper.
5. The table was primed in two layers. You need to be careful in areas of scratches and chips - if you leave a lot of primer there, the table will swell in this place.
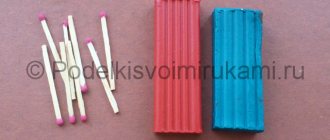
6. Mixed water-based paint with chocolate-colored tinting paste. We added just a drop to give it a nice creamy tint.
7. Cover the table with three layers of foam roller. A “velvety” structure of the surface is created, in contrast to application with a brush.
8. Using the same paint, but with a larger amount of tinting paste (almost 1:1), we painted cells, chess pieces on the legs, and applied letters and numbers through a stencil.
9. After the paint had dried (preferably the next day), we applied three coats of varnish to the tabletop and four to the legs.
Additionally, you can stick rubber pads on the legs to prevent them from scratching the floor.
For fine lines, you can use nail art tape. It doesn't come off under the varnish.
Finished work:
And once again regarding materials and time:
News:
". During the preparation for the award ceremony, I met talented and decent people - representatives. They understood my thoughts without further ado and completed the order flawlessly. "
Recent products for a corporate customer, Moscow.
Slides of gems. A series of handmade products.
An excellent gift and worthy interior decoration.
Interior table with mosaic.
Coffee table with mosaic made of natural stones.
Various options for interior items made from colored natural stones are possible. High-quality, reliable delivery to all regions.
Recent products. Gift for the director.
Coffee pair “Inspiration”
Metal engraving, brass, gilding, nickel plating, jewelry stones. Congratulatory inscription and company logo. Gift wrap.
Customer reviews.
. The hero of the day was beside himself with joy.
Round table options
We will not list all the variations of the round table, because there are countless of them. However, there are several classic variations that are always relevant:
- A small round table with one massive leg in the middle.
- Classic table with 4 legs.
- A table with 4 legs that has several “floors” for storing books and magazines.
Article on the topic: Decorating the table with your own hands
However, tables are not limited to legs alone. Furniture stores in our country offer models with hidden recesses and folding shelves.
Presentation. Manufacturing technology of the “Chess table”
I have a friendly family. My dad and mom are teachers at the Yasnaya Polyana gymnasium, where I study. Our family spends a lot of time together: we relax, read, talk, play chess, receive guests, make crafts together and improve our home. My dad is a first-class carpenter, he constantly creates interesting things from wood with his own hands: souvenirs, pieces of furniture (benches, shelves, stools, etc.). Such things give our home comfort and personality. I really wanted to learn this skill too. In technology lessons we have already learned how to create simple crafts from wood. And I had an idea.
Our family really likes to play chess, we have several chess boards, we usually sit somewhere on the sofa or at the table, but there is no special chess table. My idea is to make such a table myself from oak. The knowledge and skills acquired in technology lessons will be quite enough for me to realize my idea. Moreover, just recently, my classmates and I were making oak benches for the junior grade students of our gymnasium during technology lessons.
Information sheet
There are hundreds of ordinary things around us that we know almost nothing about. Only the most inquisitive and inquisitive things can tell their story. And for this you need very little: you just need to think, ask, find. Each thing, like a person, has its own biography, its own amazing destiny. And every thing carries a piece of our history. Life will be interesting and not boring if we ask as many questions as possible and look for answers to them. Even if you learn something new every day, the questions will not disappear. On the contrary, there will be more and more of them.
DIY multi-level chess
Translated by SaorY for
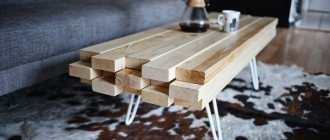
Greetings, brainiacs ! Sometimes, in order for something interesting not to become boring, it’s worth diversifying it, so let’s do the same with ordinary chess - we’ll make a 3D board for it with our own hands
chess board consists of walnut wood blocks, which have different lengths, which creates the original effect of a multi-level board. Just some basic instrument skills and a little time, and you can test your playing skills from a different perspective.
: Design
According to my brain, the design of the chessboard should be original, but not pretentious, so as not to complicate the game process itself. Therefore, I studied various versions of chess on the Internet, and I decided to create mine from ordinary wooden blocks of various sizes.
: Calculations
Based on the dimensions of the chess pieces, I, together with my friends, “developed and calculated” the design of the board and the necessary materials. And it turned out that the difference between neighboring levels is 2.
5cm, that is, the shortest block will have a height of 2.
5 cm, and the height of others is found by multiplying this value by the corresponding number from the brain table presented in the photo, the number of blocks of equal length is also indicated there.
- So, materials and tools:
- • Woodworking tools • Lumber • Wood glue • Clamps and clips • Blowtorch
- • Protective fire gloves
Homemade paper chess
You can make chess using the origami technique from ordinary office or colored paper. True, the creator will need to have skills in this area of handicraft, as well as a developed imagination for making fabulous chess game figures.
Origami chess looks very interesting, the process of creating it is relatively quick, the only drawback is that such paper figures require careful handling. To familiarize yourself with the process, we offer step-by-step master classes on creating chess pieces using the origami technique:
- origami pawn:
- origami horse:
- origami boat:
- origami king:
Chessboard frame
1. From 12 mm walnut planks, cut out the side walls E
, top/bottom
F
, shelf
G
,
cornice
H
, base
I
and false panel
J. Select a 6mm deep tongue on the inside of the sides, top and bottom to insert backdrop C (Fig. 1 and 2)
. Then cut 12mm rebates along the ends of the side walls.
2. Insert the playing field A-D
into the tongue of the side wall
E
, aligning the top row of cells
A, B
with the shoulder of the upper fold.
Mark the position of shelf G (photo E).
Cut grooves in both side walls to insert the shelf.
3. Dry assemble the housing (without glue) to check all the parts surrounding the playing field and adjust them if necessary. If dry assembly was successful, apply glue and secure the body with clamps.
Quick tip!
To glue the case together, you will need a lot of clamps, so it is advisable to divide this operation into stages: first glue the shelf and the playing field to the side walls, and then insert the top and bottom into place.
Add a figure box
of K from 6 mm walnut planks
, front and rear walls
L
and bottom
M (Fig. 3).
Make 3 mm tongues and grooves in the walls of the box
(Fig. 3
and
3a, photo F ).
Then cut 3mm folds along the ends of the front and back walls, as well as along the perimeter of the bottom. After assembling the box dry, check the connections of the parts, then glue and secure with clamps.
2. When the glue has dried, tilt the saw blade at an angle of 35° and saw the back of the box from above (Fig. 3a).
Having placed the saw blade vertically again, take the previously cut panel
J
and make a transverse cut in the middle with a depth of 3 mm
(Fig. 3).
Glue the false panel to the front
wall L.
Wrap a piece of masking tape around the drill bit, 19mm from the tip. When the flag touches the board, the desired hole depth has been reached.
With one setting of the sawing machine, you can cut out not only tongues in all walls of the box K, L, but also grooves in the side walls K.
3. Insert the drawers into the body AG
and drill holes for the axle pins that will be installed later.
To ensure that the box rotates freely, place a 1.5-2.0 mm thick spacer under it (we used a steel ruler) and secure one side with small wedges. Using a 6mm center point drill, make a hole 19mm deep (Figure 4, Photo G ).
Then make the same hole on the other side.
Drill 3mm holes in the bezel J to install the knob handles (Figure 3).
Add decorative details
1. Mill fillets with a radius of 10 mm along the ends and the front edge of the cornice H
.
Glue it on top to the body, aligning the side overhangs (Fig. 1).
Mill 10mm fillets on the outer edges of base
I
and glue it to the body underneath.
2. Make two N
, sawing a piece of board measuring 19x152x406 mm lengthwise at an angle of 45°.
Glue one of the strips to the backdrop (Fig. 2).
3. Apply a colorless coating by spraying (we used semi-matte nitro varnish), and after drying, install the button handles.
Quick tip!
Before installing the brass axle pins , insert wood dowels in their place and make sure the drawer rotates freely.
Prepare two 19mm brass pins with a diameter of 6mm and insert them through the holes in the walls E
into the axial holes of the
J-M
.
N
mounting plate to the wall to hang your game board, arrange the chess pieces (no more than 76mm high) and invite your opponents to the tournament!
Requirements for a homemade table
In production conditions, furniture is tested for compliance with the quality guarantee and recommended standards. When working independently, the master himself monitors the compliance of new furniture with safety requirements:
- Sufficient strength. Any furniture, even decorative, must withstand the slightest load. It is especially important to check the strength of fasteners and joints on dining and student tables.
- Environmental safety of the materials used. You should not build a table from materials containing harmful resins or toxic impurities. Also, such compositions cannot be used for decorative processing.
- Moisture resistant. If the table being manufactured is intended for eating and preparing dishes, care should be taken to ensure high-quality and timely impregnation of the surfaces with appropriate compounds.
- Mobility, compactness, possibility of transformation. The presence of such qualities will only play into the hands of owners of small apartments, houses, and summer cottages. After being used for its intended purpose, the folding table can be stored in the pantry.
In the process of independent work, it is important to strictly follow the prepared drawing and plan, because the quality and possible service life of the future product directly depend on this parameter.
Design options
The first question that arises for a home craftsman is what is the best material to make a table from. Many rightly believe that wooden tables are the best option.
The design can be made:
- made of wood;
- laminated chipboard;
- from plywood;
- made of metal;
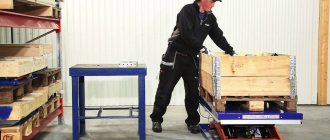
- from pallets;
- boxes;
- from chipboard;
- from boards, etc.
Article on the topic: How to decorate your desktop with your own hands
Make it simply from scrap materials, or specially purchase the same wooden boards of the required size and quality, decide for yourself.
Wooden tables can be used for different purposes and spaces, but not only. Usually tables are made:
- for the street;
- to the gazebo;
- kitchen table;
- writing;
- dining;
- tennis;
- to the dacha;
- for the living room, etc.
When planning to make a table yourself, decide in advance where it will be located. The same tabletop for an outdoor table must be treated with protective coatings such as stain or varnish. Like the legs themselves, if they are also wooden. You can even coat it with epoxy resin, but that's a different topic for another day. If you have a metal support in your design, give preference to stainless materials.
But I propose to tell you about a fairly simple dining table based on natural wood.
Mark the playing field
Press cells A and B one at a time, using a separate clamp for each of them. A piece of MDF board secured with clamps parallel to the edge of the backdrop C will help to align them.
1. To determine the width of the backdrop C
, join four dark and four light cells
A, B
, measure the length of the row and add 12 mm.
From a 6-mm MDF board, cut out a backdrop C of
the indicated dimensions
(Fig. 1).
Draw lines parallel to one short and two long edges, 6 mm apart, to mark the boundaries of the playing field.
Glue the first row of checkerboards along the top edge of the backdrop, starting with the light colored square in the top left corner (Photo C).
2. Cut seven 6mm strips for shelves D
.
Glue the edge of one shelf to the backdrop C close to the first row of cells A, B (Fig. 1).
Carefully install the clamping device so that cells A and B do not move, and, squeezing its ends with clamps, leave until the glue dries.
The dimensions of cages A, B and shelves D may differ from those shown, so the position of shelf G may change. Mark it on the walls of the case after assembling the AD playing field.
3. To glue the next row of cells A, B
, make a clamp by gluing two bars measuring 38x76x457 mm with a 12 mm spacer at one end
(photo D ).
Continue gluing squares and shelves
D
to backdrop
C
until the game board is complete.
Note. Apply a thin layer of glue to avoid squeezing out excess, which could cause the clamp to stick to the cells.
Figuratively speaking. 35 unusual chess sets
Mathematicians have calculated that the number of possible positions of 32 figures on 64 cells is greater than the number of atoms in the Universe. The number of chess sets is, of course, smaller, but their diversity is amazing. The blog “About Chess” offers its own version of the “best of”, leaving the list far from complete...
Since we are on a sports site, we will start with this topic.
Football is represented by a set of American football, the "just" football ones that I found are inferior to this:
The most automobile:
The kit is made from the same materials as the Renault Formula 1 car: titanium, steel and aluminum. The figures are made in the form of bushings, pendants, a pilot's seat, and the board creates the illusion of a track. The clean, minimalist lines of the Renault Formula 1 kit symbolize the simplicity and austerity of modernity. Cost: $42,000.
Hockey:
Sumo:
Another question that interests many is the maximum price for a set.
The most expensive chess set in the world was sold in Britain by Jewel Royale. It is made of gold, platinum, diamonds, rubies, sapphires, emeralds, black and white pearls.
Each figurine is decorated in the middle with a spiral of precious stones. The largest chess piece - the king - costs 100 thousand dollars. Despite the fact that the figures look airy and light, they are quite heavy.
So, the king weighs 165.2 grams. The total cost of the kit was $9.8 million.
The cost, perhaps, could rival Faberge chess,
It’s difficult to say the exact cost, but I was estimated at “from $5 million”
Let's continue the money topic.
Sometimes people come up with very strange ideas, and some even implement them. So, one eccentric, apparently a chess lover, decided to make himself a board and pieces out of money. He collected enough change and took out brand new bills from the bank.
He began to assemble a chessboard from banknotes, bending the pieces of paper in a certain way, and from coins - chess pieces. The playing field was made up of 20-pound and 50-pound notes, and the rim was made up of 10-pound notes.
To prevent the field from starting to unfold on its own, it was kept under pressure for some time.
The figures from the coins turned out to be recognizable. The pawns are 1 penny coins. The cost of the chess was 2402 pounds and 68 pence.
Another value in the “most” category is of interest.
The largest chess set (or rather, one piece) was made by order of Rex Sinquefield in 2012 for the start of the first cup named after him.
The height of the king is almost 4.5 meters, the base is 1.8 meters. The figure is listed in the Guinness Book of Records.
- You can even watch how the record was prepared.
- 1
- The smallest ones, apparently, were made by master Anatoly Konenko:
Miniature wooden chess pieces are turned under a microscope on a miniature lathe. The height of the chess pieces is 2.0 – 3.8 mm. Playing field 17.0 x 17.0 mm. Checkerboard squares from different types of trees. Birch bark ornament. The bumblebee is real.
The theme of alcohol is popular in chess, and there are many “drunk” sets. My choice fell on this one:
- I don’t recommend playing these, but you can admire them.
- I understand that you don’t heed the advice, so I suggest using the most stable chess in the world:
This set was invented and developed by industrial engineer Adin Mumma, who back in 1970 was inspired by the roly-poly toys, or, simply put, tumblers, for this masterpiece. The result of the work was so successful that it was awarded the International Design Award.
A picky chess player will notice that the a1 square here is white, but we will not be so strict and note the beauty and originality of the idea. And after alcoholic chess, who will pay attention to such a trifle?!
- Just in case, a video explanation is also included.
- 2
- It’s impossible to ignore the topic of food, namely sweets, so I consider these the most delicious figures:
- You can even make them yourself. The main thing is not to over-salt, then this will be the “spiciest” batch:
- However, such games are not a problem for the tough Chelyabinsk chess players who are credited with this set:
- Computer scientists also have their own style.
The board is made from the bottom of the motherboard, and 32 pieces are made from chips of various types in two colors - green and black (painted by hand if necessary). Stands in the form of bolts screwed into holes along the edges.
How to make chess with your own hands: manufacturing options
One of the most popular options for homemade chess technology is cutting them out of plywood.
- Take sketches of the shapes, a ruler, a pencil, a strip, plywood and carbon paper. You will need to transfer the images onto the plywood first. To do this, place copy paper under the sketch and carefully trace all the figures in full using a pencil.
- The next step is to cut out the flat shapes that you have drawn with a jigsaw. The holes will also have to be cut out, having first marked them: their thickness should correspond to the thickness of the plywood, and their length should match the length of the other product. The hole can be made using a drill or awl. It is better to leave a margin of 1 mm at the joints so that the figures fit more tightly.