The production of this product for profit is prohibited by copyright without the consent of the author! Posting, copying and other actions related to this product without reference to authorship are PROHIBITED by the author!
Due to my work, I have to travel a lot and spend a lot of time in the car. On the road, it is not always possible to have lunch, drink tea somewhere in a cafe, etc., you have to do everything on the go, in the car, so to make life easier on a long journey, I came up with a small device for myself. Let me clarify right away, I mostly travel alone, without passengers. To avoid possible injuries to passengers in the event of an accident, the table is designed to be easily removable. It is located quite high above the knees, and does not interfere with entry or exit at all (the Next cabin is quite spacious in this regard). How I did it, everything is clear from the photo. I will say right away that I am not a cabinet maker, a carpenter, a joiner, or even an engineer. I take criticism correctly, I will take all comments into account.
Due to my work, I have to travel a lot and spend a lot of time in the car. On the road, it is not always possible to have lunch, drink tea somewhere in a cafe, etc., you have to do everything on the go, in the car, so to make life easier on a long journey, I came up with a small device for myself.
PionerAltaya › Blog › Car universal folding table (manufacturing)
Good day everyone! In the logbook I posted only the finished table
and its functionality, so as not to overload it with manufacturing details. It is in one of the Communities, but not everyone reads it, and perhaps some of the readers of the blog and BZ will find it useful.)) Here I am posting how to do it step by step:
I looked at many options for tables for cars: most of them are made of plywood & chipboard - painted & varnished & covered with leatherette & plastic. In a word - whoever is closer to what, he sculpts it. Gradually, the terms of reference formed in my head. Basic requirements for my “work of wooden architecture No. 2”
(p.d.z. No. 1 DIY sleeping bag made of wood): 1.
The maximum possible size
(we love to eat): along the length from the front edge of the sleeping bag to the dashboard panel, and along the width between the seats.
Initially it was planned that the table would move out on telescopic runners from the sleeping bag frame, but the idea remained on paper. It would be necessary to make changes to the sleeping bag frame; it would be “tied” to the sleeping bag. And in this case, the table would lose its versatility and mobility. 2. Ease of use
: easy to install and remove.
3. Possibility of universal/mobile use
- between seats, on top of a sleeping bag, in the back of a car, in a camp, on a hike in the mountains, etc.
4. It follows from point 3 - folding
!
5. The table should be light
(if possible), but
durable
– by definition!
6. Possibility of further repair and modification
.
Therefore, made of wood and “leather”. 7. Requirements for aesthetics - so that I like it
!
The table should be organic in the car’s interior, at least in color. 8. It is advisable that it does not interfere with the functioning of other cabin equipment
- a sleeping bag, opening the armrest, moving/tilting seats, etc.
9. To serve as an armrest
(duplicating the standard armrest on top) when folded - if possible. And, accordingly, so that while on the move it does not block access to the standard cup holders, since we are lovers of drinking coffee throughout the trip!
I don’t even remember how many tables I had to put in the interiors of different cars. They made their own designs, but more often for tuning they used ready-made ones from the interior of another car. The most convenient to install and suitable sized table can be borrowed from the Volkswagen Multivan.
Of course, such a table will not fit in a passenger car, but in a minibus it will fit “like at home.” I’ll tell you how we installed it in the cabin using the example of tuning the Chevrolet Express.
This Chevrolet is a big bus, there is plenty of space inside and you don’t have to think too hard about where to put the table. Typically, when tuning a car interior, a table for passengers is placed on the side or between the seats. The transformation mechanisms of such tables differ in the trajectory of unfolding and fixing the tabletop.
Photo 01. The design of the Volkswagen Multivan table is designed for a wall position, which means that all we have to do is lean it against the side trim in the right place. In addition to the table, on the side of the car I placed a thermoelectric cooler (also known as a heater) for a bottle or glass.
I have already given an example of installing an electric drive on a bar movement mechanism in tuning a car interior. So, in stock, the mechanical Volkswagen Multivan tuning table can also be equipped with an electric drive. We often do this - we mount the window lift mechanism with minor modifications on the table frame. There is, however, one trick to opening the table lid...
Photo 02. In order to firmly fix the table on the car and flush it with the side trim, you have to cut the original Chevrolet Express interior trim. When tuning a car interior, locksmith work probably takes up a third of all resources and time. That's why I work only with proven professional guys. A good craftsman does not need to explain what piece of iron to make - he will explain everything to you himself (in an accessible language).
The table is screwed to the floor and wall of the car body through steel brackets.
Photo 03. The overlay covering of the table and thermal glass can be started only after the additional equipment has been completely fixed. Especially in my case, when the trim involves a movable panel mounted on a free-standing table, and not on the trim itself. These details hide the complexity of tuning the car interior. But if you do everything in order, securing the structural elements and cladding, then distortions and gaps can be avoided.
I make the body of the table's overlay casing from hardboard (fibreboard) with the expectation of attaching it to the original side casing using external self-tapping screws. I immediately mark and cut out a window for the rotating hatch of the table.
Photo 04. I cover the inside of the hardboard casing of the car table with fiberglass. This will strengthen the piece as a whole and allow me to cut the corners of the hardboard from the outside without losing strength. This method of tuning a car interior allows you to save on time and materials. Moreover, very complex shapes can be made from hardboard and even with a tense (rounded) surface. Therefore, I choose plastic, smooth hardboard on one side. And the reverse, fleecy side absorbs polyester resin well, bonding “to death” with fiberglass.
Photo 05. Tuning the interior of a car made of hardboard can be modified with automotive putty. Where possible, I always round the front panels and smooth the surface with sandpaper. The covering of the table in the car is adjusted to the location using putty. I fill the gaps between the table skin and the original side skin of the car with “hairy putty.”
Photo 06. The car table from Volkswagen Multivan has a design feature. At the top of the table, when opened, the lid first folds back and turns. From the outside, in the closed position, the lid is flush with the front panel of the table casing. Therefore, I make a separate part that resembles a hatch from the outside.
Hardboard will work well here as a base for fiberglass.
Photo 07. I roll up the inner fluffy surface of the hardboard with fiberglass and, after polymerization, trim it along the edges. Just be careful not to mold too thick a layer of plastic so as not to deform the side walls of the part. They may tilt inward relative to the surface of the lid.
Hardboard tuning of a car interior, in places such as the rectangular cover of a table in a car, is difficult to distinguish from parts made of fiberglass or sheet plastic.
Photo 08. Not the last specialist in tuning the car interior is an electrician. A good electrician with extensive experience in tuning is not easy to find. But to revive the table in the car, I ask a proven pro, whom I have known for a long time.
In general, some inconsistencies almost always happen with electrics. It is normal to assemble and disassemble the interior a couple or three times due to electrical problems when tuning the interior of a car.
Photo 09. And so, in order not to pull the trim on the finished interior, we pre-pump and test the operation of the table in the car. The overlay trim has already been covered with leather and Alcantara and screwed to the original Chevrolet Express side panel. I’m in no hurry to paste over the hatch cover, because I’m going to refine its contour, finally setting the gaps. At this stage, it is advisable to start the table from the button, and not just by attaching wires to the screwdriver battery.
Photo 10. Beauty! The table in the car works like a clock. It’s a pity that you don’t hear the sound with which this tongue falls out into the car’s interior.
There is, however, one not very pleasant, it seems to me, moment in tuning the table. Before you press the button to close the table into the car, you need to fold it manually. And you can forget... however, I have not yet heard any reproaches from the owners of the tuning car showrooms we made.
Photo 11. The issue with control buttons for interior tuning functions, and in particular the table, is solved in different ways. Typically, buttons from cars of other models are used, for example Mercedes 220. A panel is cut out for them and the buttons are arranged in the required order. This time the remote control with buttons was made of a piece of plexiglass, but more on that in the next part.
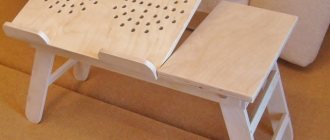
Car table made of plywood for a car steering wheel
Making a universal, portable table (for a laptop, a work desk, for a snack), with mounting on the steering wheel or on the back of the seat of your car.
Initially, you need to make a table template from paper or cardboard.
Download car table template:
A standard sheet of A4 paper has a size of 21.59 x 27.94 cm. That is, if you connect two A4 sheets together, you get the size required for the template: 43.8 x 27.9 cm.
After printing out 2 sheets of the template, we connect them with tape.
We cut out blanks from plywood using a jigsaw.
We carefully sand and coat with paint and varnish.
This is how you can transport our car table.
Steering table in use.
DIY canopy over the front door
Construction of an inexpensive frame country house from Artur Khalilov
Choosing a children's table for a car seat
Every motorist will agree that road safety is paramount!
Children's car seats appeared about 30 years ago and managed to quickly prove their practicality and functionality. Many crash tests have been carried out indicating that only a car seat, especially when combined with a child car seat, can provide the child with adequate protection from injury in the event of an emergency. But experienced motorists know that a child can get injured even during emergency braking. Why you can’t go on a trip without additional children’s equipment, read in this material.
Copying materials
The use of any materials posted on the Labuda.blog website is permitted only if you provide a direct indexed link (hyperlink) to the copied page of the Labuda.blog website. A link is required regardless of the full or partial use of materials. Some authors may prohibit copying of their materials with a warning at the end of the article.
ATTENTION! We do not allow third-party resources to embed links to image files hosted on our hosting. All images are protected from hotlinking. Regular copying and saving of images to third-party resources is permitted!
Peculiarities
Today, little more is known about children's car seats than about car tables. They are designed for a certain age, weight and height of the baby. If we talk about maximum safety, then the correct installation of this seat in the car is not enough. The most important aspect is securing the young passenger directly to the seat. Most often, manufacturers offer products with five-point harnesses for children aged 5–6 years.
For younger children, a protective table is more suitable, which in a critical situation will replace the airbag and protect the child from injury.
What to look for when purchasing?
Almost all children's travel car seats are equipped with tables. When choosing products, it is better to give preference to global manufacturers, proven brands and well-known brands. In this case, the risk of purchasing a low-quality, poorly made or inconvenient product is much less than when purchasing cheap, little-known brands.
All conscientious manufacturers not only use hypoallergenic materials, but also conduct crash tests of their products, identifying their weaknesses for further modernization.
Selection tips:
Minibus conversion: salon or garage?
The modern service market is saturated with companies that refurbish minibus interiors. Of course, you can convert the minibus yourself. There is only one plus in this option - you will save some of your savings. Otherwise, you can subsequently have a lot of problems with re-registration of the minibus in the traffic police.
Specialized companies have a certificate. In case of any problems in the traffic police, it is not you, but the company that will be responsible for violating technical regulations. The traffic police officers themselves do not really welcome independent modifications and are quite picky about inspecting the vehicle. The choice, of course, is up to the owner. If you are confident in your abilities, save money and do everything yourself.
Photo source: bluesmobile.ru Re-equipment in full swing
Table in the car for a child car seat
When traveling, the car almost becomes home. Here we feed the child and play with him. Therefore, it was necessary to think about how to do this conveniently. We were helped out by a table that fits on a child's car seat.
We decided to see how convenient this device is and ordered the economy version on Aliexpress.
The first table that came to us was a little surprising and upsetting. On the way to Nizhny Novgorod from China, he apparently split a little inside.
The appearance did not inspire confidence. Inside there is thin plywood, with a small layer of padding polyester, along the edges there are sides with a thin layer of padding polyester, and pockets for small items. The material is similar to thin jacket fabric, apparently it is convenient to wipe off dirt. The table is placed on the armrests of the car seat (preferably straight armrests) and attached to the car seat with a small strap with fastex, which is barely enough for the car seat.
As a result, we quickly sewed such a table ourselves before leaving, using as a basis the table that came from Aliexpress.
Before our next car trip with a child, we booked another table, which you can see in the video below. It turned out to be much better quality and even prettier than the previous table (here is a link to it). Now we don’t go anywhere in the car with a child without this table! Watch the video about this table:
And we recommend everyone to buy the same or similar table - this is a very useful and really necessary thing, especially if your children like to draw or play on their own. And if they don’t like it, then you can play a bunch of different games with them at this table. Our website https://kidsinbags.ru shows many such games, and also watch them on our channel.
Useful
By the way, we also bought a small table for mom and dad that attaches to the headrest of the front seat of the car (here is the link). A very convenient and functional item. You can always put a glass of tea or something to eat on this table.
If you need a video review of this table, write in the comments.
Follow our updates!
Subscribe to new articles on the site (form on the right), watch our videos and receive useful information about traveling with children!
And remember: anyone can travel with children!
Source
Great solution for long trips
I am one of those parents who put safety in the car above the child’s desire to break it. Therefore, we, like many, were faced with the problem of ensuring, first of all, safe comfort for our son on long trips.
Our main entertainment is books, small toys, and drawing with safe square crayons (so that in the event of a collision the pencil does not end up in the child’s eye). And of course, snacks or lunches if you can’t stop. Before we got acquainted with our miracle table and the cover for the back of the chair, the car was a complete mess, the chair was strewn with crumbs, and toys were looked for under the seats when washing the car.
The solution is truly amazing in its thoughtfulness!
Size 48 cm wide, 37 cm deep. Sufficient for a snug fit to the child (to prevent crumbs from spilling) and room for activities. It is fixed to the car seat with a lock on an elastic band, it holds quite tightly, but in case of an accident, with a sharp movement of the hand it will free your baby from the table.
There are spacious mesh pockets on the sides, which can fit the entire arsenal of a child’s entertainment for a long journey.
The material on top can be easily wiped with a cloth and is water-repellent. Inside is a layer of material made with safety in mind in case of an accident and your baby’s nose flying into it from the full span. At the same time, it is comfortable enough for drawing, for example.
Separately about the cover on the back of the front seat. It is possible to buy as a set with a table in one color. This thing is an incredible lifesaver for our seat! And if it seems that without it it’s easier to just wipe the seat, then you can’t wipe away scratches from sand. The cover protects the back from dirt and can be easily wiped with a cloth or damp cloth. It still has the same spacious mesh pockets for storing all the baby’s needs and just temporary storage with quick access to something needed.
We are absolutely delighted with our set and consider it an excellent gift for new car parents.
Source
Reviews
Today there are many well-known manufacturers providing a wide range of children's tables for car seats. Their design is almost always identical, but the design, dimensions and material used may differ. When starting to make a choice, we often need advice from those who have already tested the products in practice.
Having studied the reviews on the Internet, we can say with confidence that the children's table is an excellent help while the baby is in the car. Firstly, this is another way to protect the child from injury during an accident or emergency. Secondly, having a table, you can come up with many ways to entertain your child on the road. The baby will be able to draw, read, play, watch cartoons and even assemble Lego.
Many mothers note that such tables are a godsend for a trip with very tiny babies: you can put baby supplies (towel, pacifier) on the table. The feeding process becomes more comfortable and simpler, which will be appreciated by many young parents who have already experienced feeding in the car.
The variety of assortment allows each parent to choose the best option suitable for the child’s age, car brand and financial capabilities. In any case, we recommend that you pay attention to a certified product, which will not just be a beautiful element of the car, but will become a real airbag.
To learn how to choose a children's table for a car seat, see the following video.
Source
Functionality
A child car seat with a safety table reliably protects the baby during braking or a collision. In such a situation, part of the inertial energy is dispersed through the table cushion and is absorbed by the standard belt, thus eliminating the load on the child’s body.
Modern children's tables have higher protective functions. Some manufacturers offer tables equipped with Isofix fixation - a fastening scheme where the chair is fastened directly to the car frame. This mounting option is considered the most reliable, since the child’s movement by inertia during an accident will be excluded.
Car hand-made
A table for a car seat is a fairly simple product that, if desired, can be made with your own hands. The best material to use is polyester: it is easy to wash. Foamed PVC is suitable for the filler: it has the proper strength and at the same time makes the table soft. It is also better to use a mesh for the table made of 100% polyester.
It will be comfortable to play on such a table, and thanks to the elasticity of the outer material, you can even draw on it.
Often, such tables are equipped with side pockets, where important things for a trip can easily fit: a bottle, toys, books, felt-tip pens.
The presence of sides is mandatory: they protect objects lying on the table from falling.
It is unlikely that it will be possible to replicate a professional fastening system, so the simplest and most effective way is to attach the table to the chair using fasteners.
Do-it-yourself children's table for the car
Here's a photo of the pocket I found.
to photo hosting →
Here's another useful and simple fleece item:
to photo hosting →
A very big problem. The child is one year old, the car seat has been changed. “The head dangles in your sleep.” Girls, please, if you have any ideas for donut pillows or headrests, post them on the forum. I'm really looking forward to it.
Here are the bells and whistles I found on the Internet:
Organizer for a child seat in a car
to photo hosting →
Organizer for children's small items on car seats
special protection against dirty shoes
a car organizer that can be either in the form of a pillow, that is, two in one, or attached to the back of the front seat.
Making a table-bar
You can make the design not only beautiful, but also more functional. So, alcohol will be stored in the engine cylinders. Paired with cool-toned lighting, this will be a unique design. To create a bar table from an engine we will need:
- The block itself.
- Glass (thickness - 1 centimeter, as in the previous case).
- Steel rods (8 pieces) with a diameter of 12 millimeters and a length of 50.
- 8 M6 nuts and rubber washers in the same quantity.
- Furniture wheels and bolts for them.
Construction details
The car table is an elastic bumper, on the inside of which there is a soft pillow that corresponds to the height and parameters of the child. That is why it is very important to select products strictly according to age, otherwise the protective functions of the table will weaken.
The material used is energy-absorbing textiles, which are absolutely harmless to the baby’s health. Despite the dense structure, it has high air exchange, so even on long trips the child will feel comfortable.
The outer side of the table is reinforced with high-strength plastic with built-in elements for fixing a standard car belt, which is threaded through them when attaching the seat.