In this article I will tell you how to use a ruler, a pen and an eraser (found in any pencil case) and use simple stationery items to make a simple bow and blowpipe for school battles. It’s better not to use a bow on people (my brother almost accidentally shot a physicist), because if it hits the eye, the eye can, in fact, fail; if it hits a soft spot, a very noticeable wound remains in that very spot, sometimes with blood . The blowpipe does not cause any noticeable harm, but more on that later.
The idea and implementation are the author's.
1. Making a bow.
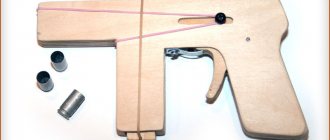
For a successful business, we will need these items (only instead of scissors, we use a stationery knife, and we don’t need electrical tape at all (smiley)). The ruler in the photo is half a meter long, but in this case the bow will have simply monstrous strength, therefore, in order to avoid accidents, we will build a shorter bow - from a 30-centimeter ruler, always wooden. Such a bow is not only easier to make, it is easier to hide and the elastic bands stretch to its length.
Ideal arrows are ballpoint pen refills. I was lucky - I found cheap handles with a thicker nose - the arrow will fly straight and have more kinetic energy.
When cutting a hole, it is very important to prevent cracks from forming. You also need to make sure that the arrow goes freely, but not too much.
The elastic bands need to be stretched well before tightening. When stretched, they have a larger diameter and are less likely to tear.
Before tensioning, they must be combined and twisted several times.
We do not pierce the rubber bands themselves. Not the best way, but there is another - more convenient.
On the other hand, I made it both simpler and more reliable (I used part of a pen cap). If the rubber band breaks, it can be easily removed and replaced.
That's it, the onion is ready! Be careful, don't shoot at people. Okay, the physicist was kind. The prototype shoots right through a cardboard box and the base of a toilet paper roll.
Another advantage of such arrows is that they limit the maximum tension on the bow and do not jump out, and are also fixed in a tense position.
2. Blowpipe.
But that's not all! We still have ballpoint pen cases! So...
Not a very useful photograph, but with chewed pieces of paper shooting continues and is more accurate. The main thing is to roll the projectile tightly so that it passes freely along the barrel of the handle.
The barrel should be straight, and it would be very good if it tapers/changes shape at one end so that if you accidentally inhale, you won't inhale the projectile. The prepared projectile should be pushed into the barrel from the end (exit), then blown into the tube from the same side so that it moves to the beginning of the barrel. If it doesn’t work, compact it more, because the projectile, pushing the walls, will fly slower, and it will take more force to blow it out.
The photograph clearly shows that the trunk is tapering. It is from this side that you need to blow. The projectile gets a little stuck in the narrow walls of the constriction, so to get it out you need to reach a certain pressure - after which it flies out like a cork. We blow sharply and strongly, not with our cheeks, but with our abs.
If the projectile is softened, it will flatten on the target upon impact and splash it with your own saliva (bah!). If you make it hard, it will noticeably hit the target. It is possible (and especially effective!) to shoot with shot. You can shoot notes, but only if the recipient will be pleased to unwrap the wet piece of paper and make out the blurry scribbles. Source
Review of popular models
Nowadays, the market offers a huge selection of slingshots for every taste, but among them there are the most popular factory-made models, and not homemade slingshots:
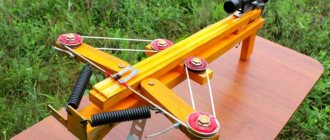
- Dankung Hunting Slingshot is a powerful hunting slingshot. Simple in design, it perfectly performs its functions. Made of aircraft-grade aluminum, its weight is about 200 g. Its main advantage is shooting accuracy, which is ensured by a narrow spear. Ideal for hunting.
- Gloveshot Combat Slingshot is made of anodized aluminum and can be disassembled for easy portability. The rod is wide, which reduces shooting accuracy, however, with constant training, accuracy increases significantly.
- Pocket Predator Hathcock Target Sniper – this combat slingshot fits perfectly in the hand and does not cause any discomfort when shooting. The base is made of steel, which is surrounded by a layer of rubber on top. Can be classified as a sports slingshot.
- Survival Slingshot Archer Complete is a tactical slingshot designed for hunting. It is distinguished by its equipment, which includes a flashlight that helps with night hunting. You can also use arrows as ammunition.
- The FS-1 model from Truemark has been on the market for more than half a century. It is lightweight and has a clip for charges. The hand rest can be removed.
Principle of operation
So, on what principle does this compact and fairly powerful type of hunting weapon work? A classic-sized slingshot can easily fit in a hunter’s fist.
We’ve already figured out what a slingshot consists of, but how it works needs to be studied in more detail. A projectile is placed in a tourniquet or elastic band. After the projectile is inserted, you need to stretch the elastic on the sides, then take aim and release the leather insert with the projectile in one movement.
The shot itself occurs according to the following principle: with a sharp contraction of the rubber band, kinetic energy from it is transferred to the projectile. This energy is enough for the projectile to reach a speed of up to 80 m/s, and the range can reach up to 200 m. These figures will depend on what material the slingshot is made of, what its design is and the type of ammunition.
The types of ammunition are quite varied. It can be:
- Plastic balls of various sizes - used for training and practicing shooting skills. Multiple uses.
- Shot, buckshot made of metal of various sizes. Used directly for hunting.
- Small and medium stones.
Instructions for creating an arrow
To use a crafted bow, you need arrows. They are made of wood. Pine and birch are ideal. Although birch is more difficult to process, arrows from it are of higher quality. To make arrows, you can use a board, branches and wooden slats. When making it, it is important to ensure that the tip is sharp, since it must cut through the air and could stick into the object.
Arrows and tips
Often a nail is attached to the arrows. It is fixed with copper wire. But experts recommend cutting a square out of thin steel as a tip and bending it onto the arrow. If the bow is of high quality, then one arrow will not be enough; it is better to make about 5. Arrows are often made from boards or slats.
Manufacturing process:
- Marking. Using a tape measure, 1.5 cm squares are marked on the board. After marking, they are cut into arrows.
- Using a file or a sharp knife, the square pieces are ground to hexagonal. Next, they are processed with a file or a grinding machine until they are rounded, with a diameter of approximately 0.8 cm.
- Upon completion of processing, feathers are often attached to the arrow.
Feathering on a bow arrow
The crow ones are better suited, in the amount of 3 pieces per unit. The feather pile is trimmed using scissors. They are attached with threads. - Then it is made mainly from tin, a triangular tip. Fasten it with threads. It is necessary to make a cut on the arrow for the bowstring.
Arrow for a bow with a metal tip
If you follow all the recommendations and follow the order of work, you will use a homemade bow for a long time.
Safety precautions
When shooting with a slingshot, it is important to follow safety precautions so that you don’t get hurt instead of the animal:
- When hunting with a slingshot, you should always wear safety glasses;
- You should not aim at animals if you do not intend to shoot at them;
- you always need to see who or what is behind the animal you are aiming at;
- do not shoot into the air over hills and buildings if the target is not clearly visible;
- beware of ricochet.
The same rules apply when shooting from a sports slingshot.
Advantages and disadvantages
Every hunter will ask the question, what are the advantages of this type of weapon?
The advantages are quite enough to choose this type of weapon for hunting:
- This is a very inexpensive weapon.
- High shot power with minimal noise.
- The damage radius is up to 10 meters, and there are models with a damage radius of up to 70 meters.
- It is difficult to carry a gun or bow unnoticed by people, and a slingshot for hunting, given its small size, few will notice.
- If the hunter is well prepared, then a shot from a slingshot can be carried out in an instant, and due to the lack of noise, a second attempt can be realized in a few seconds.
- A hunting slingshot can be used in any conditions, even while walking or fishing, because you can hit any target within reach.
But there are several disadvantages to this type of weapon:
- Short aiming range and small killing range compared to a shotgun.
- Due to the low shot force, it is not possible to hunt large animals.
- The harness wears out very quickly.
- For a successful hunt, the hunter must have extensive experience and good aiming skills.
Unusual weapons. Shooting Stinger Pen Gun
Back in 1839, the English playwright Edward Bulwer-Lightton uttered a phrase that became an aphorism: “The pen is mightier than the sword.” Of course, he put a different meaning into his words, but they perfectly fit the definition of what the Stinger Pen Gun is. The first shooting pens appeared in the 1920s. They looked the same as ordinary filler pens, but could also fire rimfire cartridges.
Quite quickly, gunsmith designers realized that reducing the sound of a shot was not the only option for camouflaging firearms. It was much more important to camouflage the entire weapon. Most often, such weapons were called hidden weapons. A variety of standard items were used for camouflage, which is how the cigarette case pen, pistol pen, pistol buckle, shooting cane, etc. appeared. All of them were not the figment of the imagination of the screenwriters of spy films, they existed in reality. Naturally, the effectiveness of such weapons was significantly limited by the short range of use and small caliber, but this was compensated by the ability to secretly carry it to places where conventional weapons are prohibited, as well as the surprise of use, which was of great importance.
In 1942, representatives of the Office of Strategic Services (the predecessor of the CIA) determined that easily camouflaged small weapons would be needed to carry out covert operations that involved “inflicting extreme damage.” At the same time, the English Sedgley shooting fountain pen was tested in the United States, and a disposable, inexpensive weapon the size of an ordinary pencil was created, called the “Scorpion.” The weapon used only one short 5.6 mm rimfire cartridge. After one shot, the weapon could be thrown away. Soon renamed the Stinger, this weapon was produced in 5 different versions by several companies from July 1943 to July 1944. In total, about 40 thousand of these simple shooting pens were manufactured. Later, a reusable version of the weapon was created.
In 1990, inventor Bob Braverman patented his own design of a shooting pen, and a year later his weapon went on sale. It was produced by the American Derringer Company (Waco, Texas) under the name Model 2 Pengun. Braverman soon severed his relationship with the American Derringer Company, simultaneously founding his own company, called RJ Braverman Corporation (Meredith, New Hampshire). Then he decided to use the name Stinger, which had previously been applied to shooting pens. His model, called the Stinger Pen Gun, was produced from 1991 to 1997 in various cartridges: .25 ACP (initial version, 11.43 mm), .22 LR (long rifle 5.6 × 15.6 mm) and .22 Magnum ( 5.6 mm) rimfire. In 2002, Braverman opened another company, Stinger Manufacturing Company, in Michigan, which continued producing pistol pens, but it closed in 2004. Today it is difficult to say exactly how many Stingers were produced by the three different companies in total, but the count is definitely in the thousands. When the pistol pen was mass-produced, its cost was slightly more than $100, but now it can be bought almost only from collectors and prices start at $500 and above.
Although this unusual weapon weighs only 142 grams, the Stinger Pen Gun looks significantly more reliable than most of its counterparts. The pistol consists of 3 main parts: a tube-shaped bolt made of 303 stainless steel, a handle made of 416 stainless steel and a barrel made of 4140 barrel steel. The internal parts of the weapon were made of tool steel with a subsequent heat treatment procedure. In the "handle" position, the overall length of the firearm is 142 mm, and the outer diameter ranges from 13 to 16 mm; in the "pistol" position, the overall length of the firearm is reduced to 107 mm. Small arms of this type can be carried in a jacket or shirt pocket in the same way as ordinary pencils and pens.
The pistol barrel is 51 mm long and contains 6 right-hand rifling, the number of rifling is the same for all three calibers. Both .22 Magnum and .22 LR rimfire pen pistol barrels are freely interchangeable, but the .25 ACP centerfire barrel cannot be used in this version of the Stinger Pen Gun. Likewise, rimfire barrels cannot be used with the centerfire option.
An interesting feature of the model is that in order to fire a shot from the Stinger Pen Gun, the shooter needs to transform the weapon from a “pen” to a “pistol”. In order to do this, you need to pull the spring-loaded barrel with the bolt and the handle of the weapon in different directions by about 30 mm, and the trigger will appear. While holding the barrel, bolt and handle in the extended position, you need to rotate the barrel and handle approximately 70 degrees down towards the trigger. If you release the weapon handle, it will rise up by about 5 mm, and the weapon will lock in the firing position. The whole procedure takes no more than three seconds. However, the Stinger can only be considered a one-shot weapon. Firstly, after the first shot, the effect of surprise will completely disappear. Secondly, reloading a weapon takes much longer than it takes for the transformation itself.
The weapon's safety was made in the form of a sleeve with a slot covering the front end of the bolt. A small slotted screw on the head protrudes into a slot in the bushing, thereby limiting its rotation. When this sleeve is turned clockwise, if the muzzle of the weapon is directed away from itself, the bolt mirror rises so that the firing pin can be exposed from the groove on the left side of the bolt mirror or from the central hole, depending on the model, and locks the barrel. A small protrusion, located on the breech end of the barrel, fits into two semi-circular grooves in the lower and upper parts of the shutter mirror. If the fuse is turned off, the shutter mirror is raised so that the semi-circular grooves are not aligned with it. By turning the safety sleeve counterclockwise, the Stinger Pen Gun's bolt mirror lowers, thereby blocking the forward movement of the firing pin and allowing the shooter to unscrew the barrel. Among other things, if the barrel is unscrewed, it cannot be fully screwed in when the safety is off. If the pistol grip is moved to the “handle” position, the safety should turn on automatically.
The process of loading a pen pistol is a somewhat intricate task. After the shot is fired, the spring-loaded firing pin remains in the forward position, protruding above the surface of the shutter mirror. To cock the striker, the Stinger must be moved to the "handle" position, and then back to the firing position. At this time, the striker will pull back, after which, for safety reasons, it is better to fold the pistol back into its handle. Using the knurl located on the breech of the barrel, it can be unscrewed, after which the spent cartridge case can be removed from the weapon and a new cartridge inserted.
To fire from the Stinger Pen Gun, the shooter must first turn the safety sleeve fully clockwise and grasp the handle of the weapon, if possible, in the same way as you hold any other weapon. You need to rest your thumb on the back surface of the handle, and place all the rest under the trigger, which you use your index finger to press. The trigger of the pistol handle turns forward a steel sear, which fits into a slot on the cocked striker and releases it. The drummer, moving forward, punctures the cartridge primer. The force required to break the capsule is just over 1.8 kgf.
The Stinger Pen Gun does not have any sights. There is nothing strange in this, since weapons of this class simply do not need them, they are used only when all other measures have not brought the desired result, and the firing distance has decreased to physical contact with the enemy. At the same time, tests show that it takes more than two seconds to take out the Stinger Pen Gun, put it in firing position, turn the safety sleeve and fire - and this is the result of a trained person.
At ultra-short ranges of use, which is where the Stinger is most likely used, you can be more confident of success than at other ranges by trying to shoot an opponent in the head, even if he is moving. When using 5.6 mm cartridges, this is a more effective solution than shooting into the body.
Sources of information: https://www.dogswar.ru/oryjeinaia-ekzotika/strelkovoe-oryjie/3942-rychka-pistolet-stin.html https://warweapons.ru/strelyayushhaya-avtoruchka-braverman-stinger-pen-gun https http://ohrana.ru/articles/4717
What is a hunting slingshot?
First you need to figure out what parts the slingshot consists of.
At first glance, it may seem that its structure is elementary:
- Handle or base. A tourniquet is attached to the handle, which helps to hold the slingshot in your hands when firing;
- Tourniquet – when pulled, it accumulates energy for a shot;
- Kozhetok - holds the projectile in its grip during the shot.
The first material used to create homemade slingshots was wood (cherry, oak, apple tree and others). To do this, they selected the densest and tightest branch in the tree, then tied the slingshot supports together with twine. This structure was left for three months so that it acquired the desired shape and secured it. Only after acquiring the shape, the branch was sawed off from the tree and the bark was cleared. The form was fired over an open fire and polished with a cloth.
The main element is the elastic band; it is necessary that it quickly returns to its original position after the shot. An elastic band up to 30 cm long was put on the base, and it was pulled not in one, but in several layers. The tourniquet is attached in small strips to the base, they are called “harnesses”. The ends of the elastic are attached to the leatherette. A leatherette is a small piece of leather with two holes for a tourniquet. Tanned leather, for example, from an old belt, is suitable.
Video on how to make a paper gun that shoots rubber bands
This is the same design as in my photo master class. If something was not clear, you can watch the video. The only difference is that the author of the video cuts the protruding part where the elastic bands are attached. This will make it less likely to come off, although both options work! It’s just that in the first one you need to more carefully tighten and fix the “bullet”.
Another option, but a little more complicated. If you learned how to do the first lesson, then you will be able to do this one too. Here you will need a heat gun - it hardens quickly and glues firmly. Yes, you can’t make it during a lesson at school, but you can make it at home and bring it ready. And the peculiarity of this interesting option is that it shoots when you pull the trigger. Just like the real thing!