When people think of Viking Age weapons, they usually think first of an axe, and the image that forms in their minds is of a huge weapon that could only be wielded by a big, strong man. In reality, axes in the Viking Age were light, fast and well-balanced, and were good for quick, precise, deadly attacks, as well as a variety of clever moves. The battle ax was used by the poorest people during the Viking Age. In general, the ax was used in the household, but in the event of any military operations, the ax was a wonderful weapon for the Vikings.
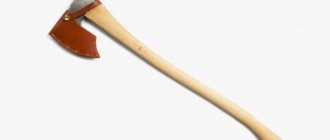
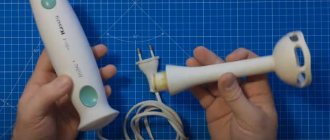
Let's take a break from history and get down to business. If you are a big fan of Viking Age weapons or just liked the shape of this tool, then we will tell you how to make a Viking ax from an ordinary ax. This tool is very elegant and functional. The ax has a unique shape due to which this tool was first used as a carpenter's tool.
They used such an ax to build their own boats (drakkars). And then, on these boats they set sail and attacked their enemies, killed them and plundered settlements. Now, in peacetime, there is no such need, and such an ax can be made as a decorative element in your country house. We find an old ax in the barn and set out to give it a new life.
What types of axes are there?
This tool will help you perform various types of work. But specialization in one area makes it of little use in another matter. One is good at carpentry, while the other is better at chopping wood. These axes will have differences in the length of the axe, the shape of the head, and the sharpening.
Lumberjack
This ax makes it easier to fell trees and easily cuts branches. Requires a large inertia of the slashing blow. This effect is achieved due to:
- long axe;
- heavy head;
- sharp sharpening;
- shifting the center of gravity to the blade.
All this together saves the effort of the person who works with the tool.
Lumberjack's axe.
Cleaver
Sharpening is not important to him. It splits the log using mass and inertia. A heavy butt adds efficiency to the strike. The long handle allows you to grasp the tool with both hands and make a strong swing. The cleaver has a blunt blade, with a large convergence angle and a shift in the center of gravity towards the blade. This shape allows the log to be torn apart with sufficient swing.
Cleaver ax.
Plotnitsky
This tool is used for trimming logs; it is used instead of a plane. Most often held with one hand. They do not need to chop wood, so a strong swing and great inertia are not required. But what is important is a sharply sharpened blade and a smooth blade that smoothly transitions into it.
Carpenter's axe.
Srednerus
A universal ax suitable for many types of work. It does not have a clear specialization, therefore it combines the features of several types. It is also called taiga.
On a hike, you need to chop firewood, make tent pegs, cut up the hunter's kill, trim it, and use it as a lever. It is important not to carry too much weight. All of the above are features of this ax. It is small in size, sharply sharpened, has a moderately wide blade and a small strong axe.
Taiga axe.
Combat
This is already in the category of cold steel. If you decide to do it yourself, then this weapon will need to be taken for examination and subsequent registration. These include axes, Viking axes, tomahawks, celts and others.
Battle axe.
Sturdy
Hiking handy tool. The short handle and lightweight head make it lightweight. It has a wide, sharply sharpened blade. For farming, such a hatchet is useless, but on a hike it will come in handy.
The camping ax is sturdy.
Work process
Materials and tools for work
Handmade axes require at least basic plumbing and carpentry skills. We will make a DIY Viking ax from a simple ax that can still be used to chop wood. For this we need:
- A block of wood. No, regular pine or spruce will not work. Below is a list of acceptable breeds. There is one requirement for all of them - there must be longitudinal fibers, not transverse ones.
- Paper with pencil for sketch.
- Wedges.
- Varnish or oil (linseed, tung, teak).
- A small piece of leather or leather substitute.
- Ax blade. Any one will do, even one that is corroded.
From the tools:
- Angle grinder.
- Welding machine. Regular MMA welding is sufficient.
- Grinding machine.
- Bormashinka.
Separately, we need to talk about the tree. We will need a little bit - a 40x40 block. But what breed? There is a choice:
- Beech. In principle, inexpensive and beautiful material. Of all hardwoods, it is the cheapest. The only thing that needs to be taken into account is the intensity of moisture absorption. It needs to be covered with a thick layer of oil.
- Oak. Probably the best material for a handle. Strong, durable, reliable.
- Maple. Its advantage is elasticity. Where oak cracks under stress, maple will remain intact. By the way, one of the most beautiful types of wood.
- Ash. The hardest rock of the list, and inexpensive.
Now we can make a Viking ax with our own hands.
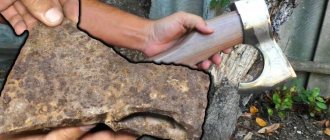
Cleaning corrosion
It will also need to be divided into several stages. And the first of them is cleaning:
- Before you make an ax handle with your own hands, you need to remove the old one. The easiest way is to knock it out. We cut straight along the beard of the blade and knock it out using a chisel or drift.
- Now let's move on to processing the blade. You need to remove the rust from it using a grinder. For this, a regular petal circle is enough. We'll do the polishing later.
- Now we look for cracks and grooves on the blade. If there are any, we simply brew them and clean them with a grinder. There is nothing complicated here.
Components of an ax
The ax consists of 2 main parts. Each of them is important and performs its own functions. The type of ax and whether it will be suitable for work depends on their combination.
Complete diagram of the axe.
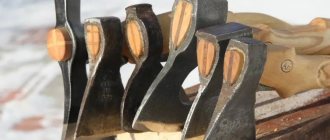
Metal head
The head has several parts. The butt and the canvas are separated. The blade has a blade, cheeks and an eye. In some types of axes, the butt can be massive. It will give additional inertia to the tool. The length and thickness of the blade, blade width, vanishing angle, sharpening, each type has its own parameters.
Ax head.
Toporische
Much depends on its length and strength. The axe, cleaver and lumberjack are made with a long axe. Carpenter's and universal types like a handle of medium length. And for a tourist or chopping kitchen hatchet, a short ax is enough. But each ax must be made of hard wood that absorbs vibration well and fits comfortably in the hand.
Ax handle.
Adviсe
There are quite a few subtleties in the process of performing each operation. You should pay attention to the main ones:
- cutting metal will take a long time due to its thickness;
- be sure to wear personal protective equipment; Viking battle axe.
- when shaping the ax handle, you should perform cutting movements away from you;
- work with paint and other toxic substances should be done outside or in a well-ventilated room;
- It is advisable to use a welding machine that is in working order;
- Applying patterns requires considerable perseverance and time.
The rest will become clear as we work.
Beautiful do-it-yourself ax from a simple ax
It is important to understand what type of ax you need to make. Because not every option will come out of the head of an ordinary ax. They can have different masses and shapes. Usually they undertake to make a sturdy, middle-class or carpenter's one.
Ax handle
The handle, first of all, should be comfortable and strong. It will be good if the ax handle does not dry out, because this affects the tightness of the head. Will make her beautiful:
- correctly selected block, with a beautiful pattern;
- unusual shape;
- impregnation of the desired color;
- ferric chloride solution;
- pattern burned into wood.
You can come up with many options, it is important that they are technically feasible and leave the handle strong and comfortable.
Beautiful ax handle.
Braid for ax handle
It is made to strengthen the ax handle and protect it from destruction upon impact. Also, when doing carpentry, gripping your hand near your head will be more convenient.
Paracord is used for this. This cord is wound around the ax handle in its upper part up to the head. The winding is done tightly so that the paracord does not slip.
An ax covered in leather.
cloth
In the “Photoideas” section there are interesting options for the shape of the head canvas. Most ideas can be done without a lot of time and special equipment. If you take up forging, then any option is possible. What is important here is only an understanding of the scope of application of the ax and compliance with the requirements for this type. After choosing the type of canvas, you will need:
- make a sketch or life-size drawing;
- transfer the sketch to the workpiece;
- cut out the desired contour with a small gap;
- process initially with a grinder, machine or file;
- bring the workpiece to the desired form;
- shape the blade and sharpen it;
- if necessary, anneal, harden and temper.
- final grinding and sharpening of the tool;
- drawing the design and etching it completes the process.
There is nothing complicated, but it will require a little skill and ability to work with a tool.
The ax head can be decorated.
Making a storage case
The case is made for storing and safely carrying the instrument. He can:
- hold the entire axe;
- just cover your head;
- cover only the blade.
The sheath material protects the blade and, in some cases, the entire tool. Suitable for making genuine leather, plastic, thick fabric such as tarpaulin.
Making a case with your own hands will not be a problem, just follow a simple algorithm step by step:
- the tool is placed on cardboard or fabric;
- contours are applied to the material;
- a pattern is cut out and a mock-up of the cover is pre-assembled;
- after fitting, if necessary, correction is made;
- the pattern is transferred to the selected material;
- the cover is assembled or sewn.
Belt case for an axe.
Assembly of the canvas
Assembly algorithm:
- The head of the tool is made of 4 parts of the fittings.
- Before cutting, the workpiece is bent into an arc. At the base of the blade there will be 2 pieces folded together.
- The workpiece intended for a pointed butt is cut from the side at such an angle that a wedge is formed when connected.
- They try on the ax handle and the head.
- Weld a piece of handle reinforcement at a distance of 4–8 cm to the blade.
- Spread the ends of the handle to the sides and cut them off.
- All elements are welded.
- By welding the 2 sections that make up the blade, a thick seam is made to fuse and fill all the recesses.
- Paint is applied.
Ready-made ax from reinforcement.
Photo ideas
The head and its handle may have an original appearance. A drawing is made on the head and the shape of the canvas is changed. If the ax handle is aged, burned or treated with colored impregnation, the overall appearance of the product will change greatly.
Blade sharpening
Sharpening technique:
- The blade is sharpened, but not completely. A blade that is too sharp becomes deformed when hardened.
- When forming slopes, they are hardened. The cutting edge is heated.
- The blade turns orange. It is then cooled by immersing it in water.
- After hardening, they sharpen to the required sharpness.
- The blade is blued.
A sharpened ax made of rebar.
Etching is the most important stage in hatchet making
For etching, it is best to use an inverter welding machine at a minimum current (30 A). As an electrolyte, a solution of water (3.5 l) and salt (700-750 g). Before starting work, it is better to check the intensity of etching on any piece of metal.
PHOTO: YouTube.com The electrolyte is ready, the welder is in place, you can start
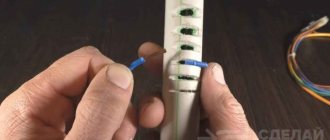
Connecting elements to welding wires
First of all, a hatchet is attached to the positive cable, which is completely immersed in the electrolyte. But the negative contact needs some work. To increase the area immersed in the electrolyte, you can use a mounting plate for a metal profile. It should be curved so that the contacts are on both sides of the hatchet.
PHOTO: YouTube.com The mounting plate is perfect for etching
Etching procedure, inspection, protection of the welding machine
Having lowered the negative plate into the electrolyte, you need to make sure that both its sides are equidistant from the hatchet. Only after this can the welding machine be turned on. A violent reaction will begin almost instantly. It looks as if the electrolyte is boiling. In fact, this is not far from the truth; electrolysis does its job. Unpainted metal is etched away. No harm is caused to the painted surface; it remains untouched.
Etching is carried out in 5 passes. The welder turns off every 2 minutes to allow it to rest. It turns out that the total etching time is about 10 minutes. After this, the ax can be removed from the electrolyte.
PHOTO: YouTube.comThe electrolyte first boils and then turns dark
After the required time has passed, the hatchet can be removed from the container and the result can be assessed. If the etching depth seems shallow, you can continue. If everything is in order, then it’s time to remove the paint.
PHOTO: YouTube.comIf the etching depth is satisfactory, you can move on to the next stage
The final part of working with metal
The ax needs to be washed off the salt under running water and dried, then remove the paint from it. This can be done with fine sandpaper or acetone. Next, the entire surface must be polished. A felt circle mounted on an emery board or drill is perfect for this purpose. Only after polishing can you fully evaluate what the result of the work done is.
PHOTO: YouTube.com We can say that it turned out very well