It is believed that candles first appeared in Ancient Egypt. There they were made from papyrus soaked in fat. For several centuries, fat has been used as the main ingredient for candle production. When burned, it produced a lot of soot and smelled unpleasant. Much later, wax was extracted from insects and plants in India, Japan and China. We made candles with our own hands. In the 19th century, they began to be prepared from paraffin, which greatly simplified their handling.
Currently, many methods have been invented for making candles, including at home. Many ingredients and methods have become available. Some experienced and talented needlewomen create real works of art using their skills and available materials.
New crayons
To avoid spending money on buying new crayons, you can make them from old pieces. First you need to take silicone molds and grind the pencils as finely as possible. It's better to grate them. In this case, the mixture will be more homogeneous. Next, place the material in molds and place in the microwave for 5-7 minutes. An oven with a baking sheet is suitable for this work. After melting the wax, it needs to be cooled. This is best done in cold water. To do this, you need to immerse the products in cold water so that the wax does not directly touch the water. Then all that remains is to remove the finished crayons from the molds. The procedure can be repeated again later.
Methods for removing wax marks from wallpaper
When choosing a method for cleaning a wax pencil, at the initial stage it is recommended to give preference to the least aggressive methods.
Mechanical
You can clean non-woven, vinyl or paper wallpaper using an eraser. To do this, just gently rub the pencil mark with an eraser. You should not press hard on the eraser, because... excessive mechanical stress can cause abrasion of the surface of the finishing material. On plain, light-colored wallpaper, such a defect will not stand out as much as on dark or patterned wallpaper.
If the surface of the wall is heavily drawn with a wax pencil, then for bulk work you can try using a spatula or other scraper. They carefully scrape off the thick layer, and erase the residue with an eraser.
Thermal cleaning methods
If you can’t wipe the wax pencil off the wallpaper, you can try to get rid of the marks using the thermal method. To work, you will need a hair dryer (if you use a construction tool, you need to monitor the temperature so as not to burn the wallpaper). A stream of hot air must be directed to the contaminated area. When heated, the wax turns into a liquid state, so it can be easily wiped off with a clean napkin.
Another thermal method involves using an iron. A clean piece of fabric is applied to the wall, which should completely cover the pencil stain. The top is ironed with a hot iron. The wax melted from the heat will be absorbed into the rag, and the wallpaper will become clean.
Chemical exposure
You can try to erase the pencil from the wallpaper using a product designed for nail polish remover. An alternative option is gasoline or acetone. The chemical is applied to a cotton pad and the stain is wiped off. These substances are considered aggressive because may damage the wallpaper. If they are colored, it is possible that the area exposed to chemicals will become discolored.
In addition to the above remedies, you can try to remove pencil marks from wax using a stain remover or glass cleaner.
Decor on a T-shirt
If you want to revive your home T-shirt with an original print, then scraps from old wax crayons will do the job perfectly. To work you need to take:
- crayons;
- T-shirt;
- grater;
- cardboard;
- clamps;
- paper stencil;
- baking paper;
- iron.
First, you should grate the wax. Place cardboard inside the T-shirt and secure it with the fabric with clips. Next, you need to print the pattern on paper and make a stencil. Place the stencil on the fabric and fill it with pieces of wax. Place baking paper on top and iron the pattern with an iron. Then all that remains is to remove the stencil and paper and you will get an original print.
Crafts made from wood shavings
Simple wood shavings can be no less decorative. The cut layer of wood has a slightly curved shape and thin, uneven edges. This material often resembles feathers and is suitable for simulating animal fur and tree leaves, flower petals, etc.
DIY fox sculpture
This master class is intended for making crafts by high school students or adults who have mastered the skills of working with waste materials. To work you will need:
- wire;
- newspaper, paper napkins and tape (or thread);
- wallpaper glue;
- glue gun and rods for it;
- wood shavings.
Before you make a fox, you need to prepare the frame. Bend the fox's paws from wire: right and left. Wrap the frame in newspaper and secure with paper tape or thread. Connect pairs of paws, securing them along the body. Make the frame of the head and tail: form thickenings of the desired shape at the opposite ends of a long wire from newspaper, wrap the middle part a little with newspaper. Attach the part with the head and tail to the frame of the paws and body (wrap it with thread or tape).
Candles
Wax crayons make beautiful candles for home romance. In order to make a beautiful craft, you will need to melt three types of pencils in different silicone or paper forms. Next, you need to place a wick with a metal weight in a glass for a candle and fill it alternately with wax of different colors. To get an interesting pattern, you must first pour wax of the same color at an angle and cool it. Then repeat the procedure two more times.
As a result, if you still have old wax crayons in your house, you shouldn’t throw them away. They can be given a second life with a little effort. With their help, you can make useful things for decoration, home improvement, clothing styling and original accessories.
Gel Variety
In recent years, gel candles have become especially popular. They are valued primarily for their diversity, stylish creation options and practicality. When burning, they do not crack and do not emit an unpleasant odor. You can use absolutely any decor to decorate these candles.
They differ from ordinary candles in that they cannot exist without a candlestick, since the gel does not have a dense structure and cannot hold its shape on its own.
Transparent containers, glasses, wine glasses, and glass vases can be used as candlesticks. Due to the transparency of the gel in a glass, it is possible to create an entire composition of a beautiful garden, shady forest or seabed. The most commonly used decorations are shells, starfish, beads, beads, dried citrus fruits or any other fruits, artificial twigs, flowers, small toys or figurines. You can make a gel candle scented.
Gel candles, made with taste and imagination, will be an excellent interior decoration and an exquisite gift for family and friends. Simple and accessible recipes will help you create this beauty without spending a lot of money and time.
Related article: Openwork rose from beads: master class with diagrams and video
For work we will need:
- ready-made gel from natural ingredients;
- glass candlestick. It must be perfectly clean and dry;
- wick. You can buy it ready-made, or you can make it yourself from natural threads. For colorfulness, floss is suitable;
- tweezers;
- container for heating the gel.
It is advisable to heat the gel to 60-80°C in a water bath, or over an open, quiet fire. It is very important not to overheat, otherwise it will lose its transparency.
The container for the candle should not have a too narrow neck. Before pouring the gel into it, it must be heated so that it does not burst when exposed to hot temperatures.
If you want to make a colored candle, use food coloring or colored gel, which is added to the colorless one when melted.
Step-by-step preparation
Careful study of the step-by-step master class will make the process of your work pleasant and peaceful. In addition, the method of making gel candles is so simple that it is suitable even for beginner needlewomen.
- We fill the selected vase or wine glass with decorative elements. It is better to place them closer to the walls of the container and take into account the distance between them and the wick. It should be at least 1 cm. It is also advisable to glue objects so that they do not float up or move from their original location.
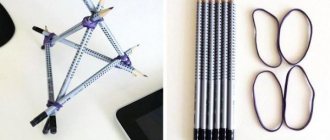
- Place the wick in the container, secure it outside with a pencil, as shown in the photo:
- Heat the gel in a water bath until the lumps disappear. Do not bring to a boil. The composition itself is quite oily, so it is better to use a spoon when pouring it. Do not allow water to get into the container with the gel. Even a small drop of it can ruin everything. When the gel becomes completely liquid, pour it into a vase so that all decorative elements inside are completely covered. When the gel cools, it can be heated again.
Related article: Knitted blouses for newborns with descriptions and patterns for beginners
In this master class we used a ready-made composition. But you can make candles from the gel you prepare yourself. To do this, combine 10 g of gelatin and 40 ml of water, leave to swell, then add 50 g of glycerin. Heat this composition until dissolved, without bringing to a boil.
While this mixture is cooling, we make another: mix 20 g of heated glycerin with 4 g of tannin. If the composition becomes cloudy, simply boil it. Then you need to mix the two resulting mixtures. Homemade candle gel is ready!
In this way you can make a great variety of interesting candles. Even with the simplest coffee decor, they will look impressive and expensive.
Decorative crafts from pencils
DIY pencil crafts can be an excellent decor for a child's room. This stationery item can be used to create many small items; we will describe the most popular ones.
Vase or stand for office
Materials:
- a jar, glass or other container that is suitable for the idea;
- pencils;
- hot or stationery glue.
Manufacturing:
- First you need to align all the writing utensils in length so that they will have the same height in the future. To do this, use a knife and sandpaper for processing.
- Glue them tightly to each other on the surface of the glass.
- Let our craft dry and can be used for various decorations.
Wooden pencil holder
In order to independently assemble a container for pencils from wood, it is preferable to use rowan, linden, cherry or cedar. You should refrain from using birch or hazel, as this is a fragile and hard base that is difficult to work with. The following materials and tools are used:
- drill equipped with an 8 mm drill bit;
- varnish;
- chisel;
- sandpaper;
- napkins for decoupage;
- wood paints;
- canvas threads.
The procedure begins with the selection of a suitable material, which can be used as a cube cut from a wooden pallet, or a large branch from a tree. After this, it is given the required shape using a chisel. Usually the material is made square or cylindrical, although other options are possible. The surface is sanded with sandpaper.
The required number of holes is drilled on the top of the workpiece. They should not be through, as in this case the paste from ballpoint and gel pens and pencil leads will stain the table surface. You can also make one hole using a Forstner drill.
After this, you can move on to decorating the pencil holder. First, it is coated with 1–2 layers of varnish and allowed to dry. Next, decoupage is most often carried out. To do this, apply a primer to the wooden surface and dry it again. Using PVA glue, glue a napkin with the image you like and cover everything with varnish again.
You can paint the pencil holder in bright colors. This option is most popular with children. The surface of the pencil container can be generously coated with glue and then tightly wrapped with canvas threads. Tie a small decorative bow on top.
Pencil holder made from a jar
When it comes to do-it-yourself pencil holder models from a jar, there are countless options!
For girls
You will need a pineapple tin, scissors, glue, and decorating materials.
Cover the tin can with pink corrugated paper or fabric. Girdle the top, bottom and center of the jar with beautiful lace or ribbons, gluing them.
For boys
Cover the jar with shirt fabric with a thin stripe or small check print. On the front side, from top to bottom, glue a row of shirt buttons.
Cut a plain rectangle from felt with a length equal to the circumference of a tin can - this is a collar. Glue the collar along the inner edge of the can, bend it outward. You can complement the composition with a mini tie!
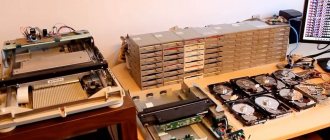
The above examples of organizers made from scrap materials are just the beginning of a long list of possible models. Ice cream sticks, stale markers, floppy disks, toilet paper tubes, shampoo bottles, plastic bottles - photos of various pencil holders show that the list of available materials can be continued endlessly. Create, move from simple to complex, and who knows what masterpiece you will be able to create one day!