The weight of the most commonly used gas block measuring 600*200*300 mm is 28 kg, and the largest 600*250*500 mm is 58 kg. For a man, three dozen kilograms is not an unbearable weight, but considering that at a construction site in a day you have to “shovel” more than one cubic meter of masonry material, and even lift it to the height of a wall or to the second floor, the task becomes very tiring. It’s expensive to take an assistant, and it’s inconvenient for two people to carry, and to solve this problem, you need a grip for aerated concrete blocks. Let's consider what kind of device this is, and whether it is possible to make it yourself.
Construction conditions
The design is the end wall of the attic floor, protecting the attic from natural phenomena (wind, rain, frost).
The most common form of pediments is considered to be triangular, but there are also trapezoidal, pentagonal and polysyllabic types, depending on the design of the house. The pediment can be a continuation of the aerated concrete wall or be built on frame sheathing, which is the rafter part of the roof (aluminum, board).
The wall pediment is more durable, so it is used much more often as the main option.
The gable structure is installed on both sides of the house. It must have geometrically correct dimensions on each side, identical to each other, so that there is no distortion of the roof slope.
The construction of pediments begins from a reinforced monolithic belt (mauerlat), and is always secured with anchors during construction, in the last row of the upper wall. The basic rules for the construction of all aerated concrete structures are contained in SP 339.1325800.2017.
The main features of pediments are that they depend on:
- size and configuration of the future roof;
- wall strength (continuation of the structural external load-bearing part);
- load distribution from the roof and attic;
- presence of windows in the attic and attic entrance.
Suitable blocks
Requirements for all blocks made of cellular aerated concrete are determined by a number of standards (GOSTs):
- R 57334-2016/EN 771-4:2011;
- 25485-89;
- 31360-2007;
- 12852.5-77;
- 21520-89;
- 12852.6-77;
- 27005-86;
- 31357-2007;
- 31359-2007;
- SN 277-80.
Of the existing types, the most preferable for the pediment would be a material with density markings D500-D700 (and higher), a structural series that is considered to be the best for the construction of load-bearing walls.
Different shapes of cellular concrete divide it into rectangular, with grooves, U-shaped, and with handles. For gables, blocks with standard dimensions according to GOST can be used - 600 x 400 (300) x 200 (300) mm or 400 x 400 (300) x 300 mm.
To make the pediment structure strong, it is reinforced with spacers and lintels. At the same time, the roof frame is made as strong and reliable as possible. The required thickness of the aerated concrete block is standard (for all external load-bearing walls) - 375 mm.
Correct calculation
In order not to make mistakes in construction, in a pre-drafted project, the necessary parameters are calculated, according to which the ratios of the parallel sides must be identical. When carrying out independent calculations, the following parameters are taken into account:
- Height. Represented by the distance from the base of the structure to its top point. This indicator is always included in the design documentation.
- Width. Shows the distance along the base of the structure - in the widest part.
- Roof slope angle. To determine it, you can use the photograph table below, created according to regulatory requirements. To find out its value, you need to measure 1 m from the edge of the pediment and the height of the slope - this will be the angle of inclination:
- Area of a triangle.
It is determined by the standard formula: the height is multiplied by the width and divided by 2. If there is asymmetry of the slopes, then the area of each half is calculated separately and then summed up. The basic formula for calculating the pediment: S= L /2 x H, where: L is the base of the triangle (width of the building), H is the height. The use of the formula is shown in the picture below: - Area of the pediment-trapezoid. Here the height is multiplied with the middle line (half the sum of the lengths along the upper and lower bases). Additionally, the area of the triangular area of the top is calculated using the formula described in the previous paragraph. The resulting amounts are added together to obtain the exact area of the structure.
Subtleties of using reinforcement when laying blocks
Installation diagram of a foam block wall: 1 – clamp, 2 – wall, 3 – foam block.
To give stability to the masonry and protect it from cracking, reinforcement is laid every three to four block rows. To do this, choose the appropriate method from two possible ones:
- Laying on a cement-sand mortar involves placing masonry welded mesh in the interblock area. Use ready-made wire mesh (d - 4-5 mm).
- Laying with glue: the reinforcement is laid in grooves (or grooves) pre-cut for these purposes. Scoring is carried out using a wall chaser (saw), while the foam block material is easy to process. A circular saw or grinder will be needed in addition to the specified tool for possible sawing of foam blocks.
The rows of foam blocks are completed by a special concrete-reinforced monolith belt, reaching a height of 10 to 20 cm. It is designed to take the weight from the floor slab and create a uniform distribution. Its width is made smaller than that of block masonry, since the cold belt made of reinforced concrete provides additional insulation. To install the ceilings of door and window openings, blocks are prepared that have a U-shaped cutout, the width parameters of which are determined by the ceiling together with the insulation. Overlappings for openings are pre-filled in wooden formwork or purchased ready-made with internal voids.
Planer for aerated concrete based on sandpaper
The basis of this version of the plane is moisture-resistant sandpaper 20 cm wide with an abrasiveness of about 40 (for rough work). In addition to this, you will need:
- a piece of flat multi-layer plywood;
- board for making a pen;
- screws, jigsaw, drill, stapler.
The handle can be cut with a jigsaw and then sanded. It is more convenient if it is higher on one side than on the other. The dimensions of the narrow side of the plywood base are determined by the width of the sandpaper strip, and its length can be made equal to the transverse size of the block or slightly larger.
The handle is screwed to the base with two screws. A countersink should be made for the screw heads, and it is advisable to drill holes in the handle so that it does not crack. Then a piece of sandpaper of the required length is cut and stapled to the ends of the base. The paper fastening may be different. The planer-grater for aerated concrete is ready.
Drill (screwdriver)
If it is necessary to make holes in aerated concrete for fasteners, for example, for anchors or dowels, then it is necessary to use non-impact tools so as not to destroy the already fragile material.
It is better not to use a hammer drill; a regular drill or screwdriver will be quite sufficient.
Let's make it ourselves: drawings and descriptions
In some cases, purchasing a ready-made trowel can be difficult for a number of reasons. You can get out of this situation by making a trowel yourself, which is quite possible. There are many options for manufacturing the device, from a complete copy of an industrial design made of sheet steel, to the use of a notched trowel, bent to obtain the desired width. If possible, you can make a tool pattern (reamer), which is applied to a sheet of metal. The development is cut along the contours, fold lines are drawn and teeth of the required size are cut out. To do this, you can use a hacksaw and a file. After this, the workpiece is bent along the intended lines until the required shape is obtained, the joints in the right places are secured by welding. All that remains is to attach the handle, and the tool is ready.
Tip: To make a drawing, take a sheet of paper and paper glue. Make the pattern by trial and error. When you are satisfied with the result, transfer the pattern to a metal sheet.
This video shows a version of the pattern and an example of applying glue using a manufactured device:
https://youtube.com/watch?v=0eNswmynAK4
If there are no materials or welding, you can get by with a regular notched trowel of a wider size than the blocks used. It bends along the edges, forming the desired width. The bent sections will serve as stops that do not allow the tool to be moved to the side. The volume of glue is applied using a regular ladle and immediately leveled with a spatula. This option is somewhat slower in operation, but it allows you to get out of the situation.
In conclusion, we should note the ease of working with the trowel, the speed of learning and the quality of work. The simplicity and efficiency of using the tool, combined with its necessity, makes the trowel for foam blocks the main device for high-quality laying of blocks, which determines the operational properties of the entire building.
I recommend that you immediately decide on a set of tools for aerated concrete and buy it in one place.
Overview of tools for laying gas blocks
Instructions for laying aerated concrete require the use of a large number of tools. In accordance with their purpose, they are divided into main and auxiliary. It is not necessary to use the second group of tools when working. But, with their help, the construction process is facilitated.
Carriage
This is a convenient tool for aerated concrete, which speeds up the laying process. The carriage makes it possible to obtain the thinnest seam possible. When working, masonry glue is poured into the carriage. The tool is carried out along a number of gas blocks. During the manipulation, aerated concrete adhesive is evenly distributed along the jagged edge of the carriage and over the aerated concrete. There are different sizes of carriages that completely correspond to the width of the blocks.
Regular trowel and notched trowel
Trowel ladle for aerated concrete is widely used in the construction of buildings from this material. Using a tool, an adhesive solution is applied and distributed over the surface of the block. There are a number of teeth on the edge of the trowel, which ensures uniform application of the solution to the aerated concrete and high-quality adhesion of the blocks to each other.
The production of tools is carried out from polished galvanized rough metal sheet. Thanks to this material, the trowel can fully withstand heavy mortar. The tool is used for thin masonry - up to 3 millimeters. The trowel ensures uniform coverage of the surface with glue. When using the tool, the possibility of the solution spreading over the surface is eliminated.
The trowel is intended for applying glue, and the notched trowel is intended for evenly distributing it over the surface. When using these tools, it may be difficult to adjust the thickness of the glue, which depends on the inclination of the spatula. That is why when working with a tool it must be kept at the same angle at all times.
An ordinary spatula can be used for putty. This is a thin metal spatula, the material of which is durable metal. Thanks to this material, the likelihood of tool deformation during use is minimized. Using the tool ensures that the adhesive mixture is applied to the surface in a thin layer. The spatula is used for grouting chips, seams, and also for cleaning small protrusions. The tool is necessary for leveling corners in hard-to-reach places.
Bucket with teeth
A ladle for aerated concrete is used to apply the adhesive mixture to the surface of the block. Thanks to the universal design of the tool, it is possible to distribute the mixture evenly over the surface.
Aerated concrete grater
If, during the construction of walls made of aerated concrete, unevenness is observed in the material, then the use of this tool is recommended. It can also be used to equalize the height of blocks, which differ by several millimeters.
The tool is made in the form of a small board, which is equipped with a handle, which provides a strong grip. Using this tool, minor irregularities can be eliminated. The grater is intended for grinding the surface before applying plaster and putty. This tool is intended for grinding the material before laying each new row.
Wall chaser
A wall chaser for gas silicate blocks is used when there is a need to make grooves for laying communications. This tool can be electric or manual. The second option is more convenient, as it is characterized by low noise production and does not create dust. Its use is recommended if there are cells in the material.
An electric wall chaser is designed for making grooves in solid building materials. In appearance, this tool is similar to a grinder. Special discs are used to cut grooves. The device is noisy and also requires the use of protective equipment - headphones, glasses and a respirator.
Hacksaw
Part of a block is often required to complete a row. Its sawing is carried out using a hacksaw for aerated concrete. If there is a need to cut a large number of blocks, it is recommended to use an electric band saw. In appearance, the tool is similar to a regular saw. But for its production, the most durable materials are used, which eliminates the possibility of deformation of the plate.
Square
In order to apply smooth and straight lines to the aerated concrete before cutting, it is recommended to use a square. It consists of a base and a ruler, which has an inch metric scale. Tools are made from a variety of materials. Most often, builders use metal or wooden squares.
Rubber mallet hammer
To ensure an even layer of glue and laying aerated concrete blocks on the same plane, it is recommended to use a rubber hammer. Due to the versatility of the production of the tool, the possibility of damage to aerated concrete blocks while working with it is eliminated. A rubber hammer is used to ensure high-quality removal of irregularities.
Grab on aerated concrete
To ensure convenient carrying of the material, a special grip is used. The tool is made of metal, which ensures its long-term operation. Ease of use of the device is ensured by the presence of special handles.
Drill screwdriver
If there is a need for holes for fastenings in aerated concrete, it is recommended to use a drill and screwdriver. This is a non-impact tool when working with which the possibility of destruction of the material is excluded.
To make holes in aerated concrete blocks, it is recommended to use an electric drill. It is best to use a tool that has medium or maximum power. To make holes in aerated concrete, it is recommended to use only high-quality drills. It is recommended to first purchase a set of drills, which can be used to achieve various purposes. In order to mix the solution during its preparation, you can put special attachments on the drill. This will ensure the ability to prepare a high quality adhesive mixture.
Construction cord
Using this device, walls are checked for evenness and distortion. There is a small loop at one end of the cable and a weight at the other, which makes it easy to use. The cord is used to check vertical and horizontal surfaces. To check the evenness, the cable is hooked into a loop on a peg and tensioned.
Construction level
The instrument belongs to the category of electronic devices and emits two lasers - vertical and horizontal. Distinctive features between levels of different brands are laser power and accuracy classes. The tool ensures the construction of planes at right angles.
How to prepare a solution for laying foam blocks: step-by-step instructions
Before constructing a building from foam concrete blocks, you should first prepare all the necessary materials and tools for mixing the solution.
Required materials and tools
In the case of preparing a solution for foam concrete blocks, you won’t need much. If you make the mixture yourself, then from the materials you need to prepare Portland cement, quartz sand, the necessary additives, slaked lime and water. You will also need to prepare the following tools:
- a concrete mixer, or if it is not available, a large trough for preparing the solution;
- metal buckets;
- shovels and bayonet shovels.
Stages of mixing the solution
To make your task easier, you can simply purchase ready-made masonry adhesive. It can be found at any construction market or in a store. The rules for preparing the mixture are as follows:
- It is diluted with clean water in a ratio of 1 kilogram of dry solution per 200 ml of liquid. Or 5-6 liters of water per 25 kilograms of mixture (standard bag).
- Mixing is done in a bucket using a drill with a whisk attachment. This must be done carefully so that there are no unmixed dry lumps of the mixture left.
- When the solution is ready, it should be allowed to mature for 7-10 minutes. Next, you need to mix it again.
- The result should be a solution with a creamy consistency. It must be made plastic so that it does not spread when distributed over blocks using a notched trowel.
- The solution is applied to the foam blocks in a layer, the thickness of which should be 2-5 millimeters.
- If the mixture thickens, add a little water to it and mix well. The diluted glue must be used within 40 minutes.
The ready-made mixture is quite expensive, so it is better to save money and prepare the masonry mortar for foam concrete blocks with your own hands. How it's done:
- If you do not have a concrete mixer, then place the dry mixture in a trough or other large container. Do this at the rate of one scoop of Portland cement to four shovels of sand.
- Mix the ingredients thoroughly.
- Then add water with additives diluted in it - foam additive and plasticizer.
- After this, mix the solution until you get a homogeneous mass without lumps.
The resulting mixture should have a creamy consistency. If the solution is too liquid, add a little dry mixture to it; if it is thick, add water.
About foam concrete blocks
If you decide to build walls with foam blocks, you need to choose the right building material. Building structural units made of porous concrete in most cases have dimensions of 60x30x20 cm (length, width, thickness, respectively), although other dimensions are possible. When choosing a building material, you should pay attention to the uniformity of the structure, the correctness of the geometric shapes, the presence of chips, broken corners, and other damage. High-quality building blocks must be free of visible defects.
Standard blocks are produced with a continuous structure and a smooth surface on all sides. Larger foam blocks may have technological voids, side pockets for easy hand grip, and tongue/groove type joint locks. These elements make the building material lighter and make it easier to work with it yourself
In addition to the main masonry blocks, you will need special U-shaped foam blocks for the construction of a reinforcing reinforced belt, the total length of which should slightly exceed the perimeter of the building for one-story construction and two perimeters for the construction of two floors (the first reinforcement of the structure for the interfloor ceiling, the second for the roof structure).
How is it permissible to unload pallets?
YTONG only allows three pallet loading and unloading options:
A forklift with a lifting capacity of at least 1.5 tons, provided that the distance between its forks is 800-870 mm (that is, it corresponds to the dimensions of the pallets that leave the YTONG factory). Only one pallet at a time is allowed to be unloaded.
C-shaped fork mounted on a manipulator or crane. The gripping capacity is at least 1.5 tons, the distance between the forks is 800-870 mm. Only one pallet at a time is allowed to be unloaded. If possible, YTONG recommends moving pallets only with a forklift or C-clamp, as they are the easiest way to ensure the safety of the cargo.
A crane (or manipulator) with two soft and wide lifting slings (chucks). In this case, each pallet is lifted with two loops hooked to a hook. The load capacity of each beam is at least 600 kg. The wider the line, the better. In addition, the sling must be of such a length that it extends beyond the pallet by at least 1 m. The chaffs must wrap around the bottom of the wooden pallet from opposite ends of the pallet. Each sling is inserted from the inside of the outermost bar of the pallet (on the corresponding side of the pallet) to prevent the sling from falling off the edge of the pallet. Soft slings can be extended with chains or steel cables with a load capacity of at least 600 kg each. But only on the condition that the chains or cables do not touch the corners of the pallet.
Attention: only one pallet at a time is allowed to be unloaded! If you move the entire row (3 pieces) at once, then the outer pallets will put pressure on the central one, and, as a result, the blocks in all three may be damaged. Unloading with chains or steel cables is strictly prohibited. It is also unacceptable to extend soft slings with chains, provided that the chains touch the pallet
The last unloading method (that is, a crane with two rigging slings) is the most common in Russia, but also the most problematic from the point of view of ensuring the integrity of the blocks. What's the problem? Typically, three pallets can be stacked in a row in the back of a truck. In this case, the pallets stand close to each other (the gap between them is no more than 2 cm). Therefore, with each delivery to the site, the question arises: how to spread the pallets in order to pick them up with chucks and take them out one at a time? And at the same time do not damage the cargo.
There are solutions to the problem, but they are valid only if they do not lead to deformation of the blocks:
- You can use a crowbar as a lever. Use it to hook a wooden pallet and carefully move it away from its neighbors until it becomes possible to thread slings under it.
- You can hook the pallet with a sling onto the outermost bar and carefully move it to the side with a crane. And then thread both straps under the pallet. In this case, the pallets should only be moved so that there is no skewing or deviation from the horizontal surface (when the sling is tensioned, the corner of the pallet should not rise).
Please note: the body may be equipped with anti-slip strips or other devices that prevent the load from moving along the floor while the vehicle is moving. What makes it difficult to move the pallets apart?
Check this point with the carrier in advance.
Be prepared for the fact that in the back of a truck, pallets are installed three in a row, and the distance between them is minimal. At the same time, unloading three pallets at the same time is unacceptable. If this rule is ignored and the crane removes three pallets from the body at a time, then the manufacturer is not responsible for possible defects in the blocks.
Examples of the problem below are unloading two or three pallets at the same time - this causes the pallets to press against each other, which can lead to cracking of the blocks.
How the device works
The tool works as follows. The two arms, arranged symmetrically, are bolted together like scissors. The upper parts of the ends, coming together, transmit forces to the opposite (lower) lever ends, which grip the block ribs on both sides.
Under the influence of gravity (its own mass of the foam block material), the compression intensifies, the reliability of the grip creates the opportunity to carry the block, rearrange it or raise it to a certain height.
If the levers are long, or two tools are connected transversely by a handle, it becomes possible to carry several blocks at once. True, in this case you will need the help of a partner.
In an adjustable gripper for foam blocks, the length of the upper or lower arm can be changed, taking into account the upcoming use of the tool.
For individual construction, standard blocks with rectangular shapes are used, so the conventional design of the gripping device is most often used.
What is better - buy or make a grip yourself?
Buying, of course, is always easier, especially when you don’t have the necessary metal or the skills to work with it at hand. Factory-made devices are often adjustable; they can be used to carry both blocks with a width of 100 and 400 mm. This is the first and very big plus. The second is that the metal from which the grip is made is coated with an anti-corrosion compound or made of galvanized steel.
If the tool is non-adjustable, and the required size is also not on sale or it is too expensive (the Itong grip, for example, costs 4,800 rubles as of August 2020), you will have to make the grip yourself or order it from a workshop.
Flaws
The main disadvantage of the device is the fragile attachment of the handle to the body of the bucket. During operation, this unit is subjected to multiple loads, which loosen the connection, causing breakdowns. This deficiency is observed in almost all types of trowels, both steel and plastic.
The main method of troubleshooting is a rivet connection using an additional plate, which increases the connection area and makes it possible to install several rivets. A repaired instrument will last for a very long time, so such modernization makes sense.
Main types of unloading belts
Depending on the location of the armored belt, it can have different names and take on certain functions:
- Grillage - placed between the columnar or pile foundation of the house and the walls. However, they don’t build it out of brick - it’s too important a site.
- The plinth is the second level of unloading and reinforcement, which is used in the construction of houses on a foundation made of concrete blocks. It provides the base with greater rigidity on moving soils and is also made of reinforced concrete. Although a fairly common option is brickwork, which serves as permanent formwork for subsequent pouring.
- Unloading is an intermediate reinforced belt under the floor slabs, which not only takes on their weight, but also ensures the rigidity of the building above one floor at each level. When building from lightweight concrete blocks, you cannot do without it, and here the best way is brick.
- A support under the Mauerlat is a mandatory element of a house made of aerated concrete or other porous blocks that do not easily absorb point and multidirectional loads. In addition, fastening the timber itself with studs in such walls turns out to be unreliable even when using chemical anchoring. Here, the reinforced belt for walls made of aerated concrete turns into a kind of connection between the blocks with which it is connected with mortar, and the roof truss, reinforced through a mauerlat beam.
Features of laying on aerated concrete
As a rule, the brick belt is made 4-7 rows high and the width of the wall being strengthened. Reinforcement must be performed in each horizontal seam using a steel mesh with a cell size of 3-4 cm or rigid wire with a thickness of at least 5 mm. Installation is carried out in the same way as in the case of conventional brick walls:
- with seams offset by 1/3 of the length;
- with tie dressing in every third row.
If the reinforced belt for aerated concrete made of brick serves as a support for the mauerlat, you can immediately wall up vertical pins - metal threaded rods with a diameter of 12-16 mm - into the masonry. They are installed in increments of 1-1.5 m, and the depth of their embedding will depend on the thickness of the beam - it should be twice as long as the free end for attaching the Mauerlat. However, many builders advise immediately embedding cuttings to the entire height of the armored belt.
After the mortar has set, roofing felt or two layers of roofing felt are spread on the surface of the masonry. This is waterproofing that will protect the timber itself and the brick superstructure from the accumulation of condensing moisture. Next, the Mauerlat is outlined and drilled at the required points, threaded onto the stud releases and fixed on the reinforcement belt with nuts for wide washers.
Since ceramics have greater thermal conductivity than the main wall material, it turns into a kind of cold bridge (although monolithic reinforced concrete in this case behaves even worse). To avoid problems during the further operation of the building in winter, you can try to “close” the contour of the cellular blocks in parallel with laying the bricks. To do this, a thin GB partition is removed from the side of the premises, as if hiding the armored belt inside the aerated concrete wall. If a gap has formed between the surfaces, experts recommend additional thermal insulation.
What mistakes can occur when installing foam concrete walls?
When constructing walls made of aerated concrete, mistakes can be made such as:
- Carrying out masonry work in wet weather, as well as at negative temperatures. High humidity and low air temperature contribute to the destruction of masonry, making it of poor quality.
- Incorrect filling of joints and application of mixture. If the seams are not completely filled, this can lead to a loss of masonry strength, as well as an increase in heat loss.
- Poor setting of elements due to poorly carried out preparatory work. If construction debris is not removed from the surfaces of the foam blocks or the foundation is not cleaned of dust and dirt, or impregnated with a primer to increase adhesion forces, then the material will not have strong adhesion, cracks may occur and, as a result, the masonry will collapse in a short time.
- Incorrect laying of foam blocks on the first tier. In this case, there is a possibility of overusing the adhesive solution when constructing subsequent rows so that the structure does not move vertically.
- Insufficient displacement of foam blocks relative to the previous tier. The minimum shift of masonry elements should be ¼ of the length of one product. The most suitable should be to offset the products by half the size of the brick.
- Shifting masonry elements along the line 20 minutes after laying. It is recommended to make all amendments no later than 15 minutes after laying, until the adhesive composition has set.
- Unreinforced masonry. If the wall is not reinforced, its strength decreases and the structure is easy to destroy.
When laying foam blocks, it is advisable to check the evenness of the lines on each tier. Reinforcement of walls, window and door openings must be carried out due to future shrinkage of the building foundation, so that the load-bearing walls do not crack in the near future.
The most common mistake is covering foam block walls with impermeable materials without leaving air gaps. A house made of U-shaped blocks has one important requirement: cellular concrete must “breathe”, so it is advisable to use a ventilated curtain cladding system to finish the façade of the building.
When erecting walls made of aerated concrete, it is necessary to remember that shrinkage of the structure occurs within six months, so it is undesirable to plaster the walls and proceed to finishing before this period has expired. In this case, it is recommended to first carry out the interior finishing to prevent the accumulation of moisture in the pores of the concrete, and then the façade.
Devices for applying glue to aerated concrete
Separately, it is worth noting a tool for quickly and uniformly applying glue to aerated concrete blocks. The durability and strength of the masonry largely depends on it.
The material used to manufacture the device is a metal sheet made of polished galvanized steel. The thickness of the sheet allows you to work with heavy solutions when distributing them vertically and horizontally. In this case, the shape and width of the trowel depends on the type of work being performed.
The advantages of the device include the following:
- ability to apply a thin layer of glue – up to 0.3 cm;
- provides a uniform adhesive layer over the entire surface;
- When applied, it prevents the composition from getting on the side surfaces of the blocks.
The carriage allows you to evenly distribute the adhesive solution of the required thickness onto a horizontal straight plane. During work, you may need a 6 cm long spatula. Use it to rub chips and seams on the surface of the tub.
“Adaptation” for forming an adhesive layer
The essence of this product is very simple - maximum acceleration of the application of the adhesive layer for laying blocks. To do this you need:
- Make a box on a skid. It should move easily along the row of the wall and will not move off it. To do this, the side walls should hang from the row by 1-2 cm
- The device is equipped with a spatula for uniform application of the solution - it is better to use a notched trowel. At the same time, fix it at an angle of 40-50° - this way it will be better to apply glue to the row
- Since the width of the adhesive layer is needed to be somewhat narrower than the block row - excess glue will not be squeezed out when installing the block - the device must be equipped with restrictive bars from the inside.
To make it you will need:
- Notched trowel
- Board 100-150 mm wide and about 1 m long
- 10-20 mm block, about 40-50 cm long
- Fastening: self-tapping screws
- Wood hacksaw
- Screwdriver
- Axe
Stages of manufacturing a device for laying glue
- Preparation of blanks
To make the sidewalls of the device, you need to prepare two boards of the same length, 30 cm each, on one side the boards are cut at an angle of 40-50°.
You also need a back wall made of wood with a length corresponding to the width of the stacked blocks, plus 5 mm for a technological gap - so that the box does not get stuck on the row.
For limiters, cut two 10-20 mm bars. Their length corresponds to the length of the side planks minus the thickness of the back wall. Don't forget on one side at an angle the same as the sidewalls.
- Assembling the adhesive spreader
One limiting block is attached to the side walls lengthwise with self-tapping screws. To do this, the block is applied to the side board so that it is located from the end of the sidewall at a distance of the thickness of the rear wall, and from below - at a distance of 1-2 cm.
Next, the back wall of the device is attached to the sidewalls so that it is between the side walls. The bottom of the board should correspond to the boundary bars along their lower edge.
The result should be a U-shaped structure with legs sawn off at an angle. A notched trowel is attached to these legs at the same level as the back wall with limit bars.
The equipment for laying the glue is ready. To protect yourself from skidding while working, the sharp edges of the device can be trimmed with an ax and sanded.
Reinforcement bender
This device will come in handy at the very first stages of construction. Someone bends reinforcement with their bare hands, but you can quickly make a homemade mini-machine for bending reinforcement.
There are many versions of this device; in essence, it is just a lever with stops for fittings. The simplest option can be made from a piece of pipe, a garage hinge and a corner.
The pipe is welded to the corner. A hole is made into which half of the garage hinge will be inserted. A handle from a corner is welded to the loop. A bend limiter is welded from corner cuttings.
Hook for tying reinforcement
The hook is made from 50 cm of round timber with a diameter of 5-6 mm. The end is sharpened and curved. The handle is made from a piece of PVC pipe. To prevent the hook from falling out of the pipe, the heel is bent. A similar hook can be made for a screwdriver.
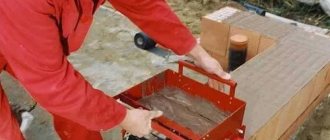
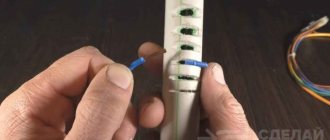
Clamp-gripper for gas silicate. | Do It Yourself www.sdelay.tv
Construction season is starting soon.
For ease of laying and moving the gas silicate block, a gripping clamp is required. or buy a block with an existing grip, which is quite more expensive. although in most cases people work hard with their bare hands and the flag is in their hands :)
Like all my homemade products, this one was made from what I had on hand.
in this case, the mounting plate is 120*270*6mm
the plate is level.
divided into two equal parts
and was cut. This resulted in 2 equal plates with approximate dimensions: 2720*60*6mm, from which a direct gripper and pliers will be made.
We weld a nut to one of the plates, exactly in the center. to another profile, in my case 20*40*1.5mm.
We take the nut based on the internal space of the profile. in my case 30mm. core and drill in the center with an 8.5mm drill. we make “curtains”.
mark, core and drill the profile. On one edge the curtain with a plate will be fixed; on the other, a plate will be attached.
We take the profile size (length) based on the width of the gas silicate. in my case, 400*625*250-gas silicate means profile = 400mm.
This is how the “curtain” should be positioned
Well, something like this. For those who did not understand from the description, I hope they will figure it out based on the assembled structure. The general process of assembling the tool.
after painting it looks like this. To work with two hands you need two clamps :)))
The principle of work is this))):
- we take it in our hand like this)))
lower it onto the block. and take the handle with your hand.
lift and carry. everything is very reliable, extremely convenient and practical))) for laying the block, due to the large weight, two grips are required for convenience.
The little girl doesn't have any trouble with her arms or shoulders.
Good luck to all, friends “crazy”
sdelay.tv
Do it yourself
In order to produce all the necessary devices for creating foam blocks, you should study the production process in detail, and based on it, select the necessary units. It should be borne in mind that not all elements should be made independently, since certain parts are easier to buy ready-made. It will be much faster and cheaper.
Manufacturing process
Typically, equipment for cutting foam blocks is only needed during installation, since this building material is produced in special forms.
- First you need to prepare the mixture. It is made from sand, cement, water and a special foam substance.
- First, a cement mortar is created, which is prepared in the proportion indicated on the instructions to the foaming agent.
- Next, the purchased composition is diluted with water in a foaming agent and the finished foam is added to the solution.
- After this, it is necessary to stir the resulting mixture for a few more minutes until a homogeneous mass is obtained.
- As a result, the resulting mixture is poured into molds and allowed to harden.
It is worth noting that foam blocks and equipment for their production may have different technical characteristics, so the description of production is given approximate in order to understand its basics.
Advice! The basis of the technical process for producing foam blocks is the foaming agent. That is why its choice must be approached very responsibly.
Form
It is best to make this piece of equipment yourself.
In this case, you can set any dimensions for future products or give them a specific shape.
- For manufacturing, it is best to use sheets of metal, since other materials wear out very quickly.
- From these, a foam block mold is welded into several cells, each of which corresponds to a block.
- It is worth remembering that the welds must be located outside so that the finished product can be removed without interference.
- It is worth noting that if used equipment for foam blocks is sold, then the form made of metal will be the most efficient part, which will retain all its original qualities.
Advice! When creating a mold, it is better to set any dimensions for the final product, but it is better to adhere to standard parameters, which are designed in accordance with strength and ease of installation.
Mixer
To create this unit, you may need a lot of different devices, the price of which is quite high. That is why craftsmen recommend using a regular concrete mixer as a replacement. It is worth noting that it is useful not only for the manufacture of blocks, but also for their subsequent installation .
The mixer can also be replaced with a container into which a drill with a special mixer attachment is installed. However, the performance and quality of such a device leaves much to be desired.
Advice! It is worth purchasing a concrete mixer of such a volume that it can fill all the cells in the form at once. This way you can perform one cycle without interruption.
Difficulties with long vehicles getting to the site
Some cottage villages do not allow long vehicles to enter their territory, while the most popular way of transporting aerated concrete is using trucks (standard trailer length is 13.5-14 m, total length with a tractor is up to 24 m). In addition, it is often difficult or even impossible for trucks to enter an old holiday village with narrow roads. The customer must inform the distributor or carrier about these features in advance in order to jointly select the optimal delivery method.
Among these methods:
- The truck stops at a site outside the village. And from there to the site, the pallets are transported by a small truck with a manipulator.
- The cargo is delivered on a tractor and semi-trailer equipped with a manipulator. The car is also parked outside the village. Then only the tractor drives to the site, unloads, and then returns to the semi-trailer, transfers the pallets from it to its body, drives up to the site again and unloads.
Building level
Simply an irreplaceable tool that no construction site can do without. Construction levels can be mechanical (bubble) or electronic. Different levels differ in accuracy. Often, the more expensive the level, the more accurately it shows. For laying aerated concrete, models of levels in the middle and low price range are quite suitable.
The optimal length of a building level for masonry is 80 cm. But it is not always convenient to use a long level; there are situations, especially inside the house, when a short level (40 cm) would be preferable.
Of the specific manufacturers of building levels, we would recommend Kapro. These levels do not need to be double-checked and calibrated; the accuracy is excellent.
Types of grips
The device is a universal claw-type device. It is used in construction work and in other industries. With the help of such a grip, you can easily carry loads to their destination. The gripper cheeks are equipped with linings that prevent mechanical damage to the material. In accordance with GOST, the gripper is made of high-quality steel material and coated with yellow paint.
The tool is divided into two groups:
- transverse - you can use it to hold and move the block alone, using both hands. Carrying is possible with one hand;
- longitudinal - compresses the material, which you have to carry with a partner. The tool is larger in size; you can move several blocks at the same time.
The first group can have one of 3 grip sizes - 25 - 30, 35 - 40, 45 - 50. The second group is made in only one version - 60 - 65.
It should be noted that each type of device differs. The transverse set consists of two symmetrically located grips. The mechanism is such that one block of a certain size can be grasped and carried, corresponding to the range of the device.
It is more important to use hand grips for blocks with smooth surfaces. Their configuration reduces the consumption of adhesive, but there are some difficulties in moving the material. The gripping device will not only make your work easier, but will also help you create high-quality masonry thanks to the high precision of installation of the block material.
When choosing a suitable tool, it is recommended to first determine the thickness of the gas silicate walls.
Device design, operating principle
The device consists of four curved levers with a hinge connection. It can be hung on a lift hook if there is a special earring, and several blocks can be moved at once.
The load is clamped automatically at the moment of lifting. The clamping force depends on the weight and ratio of the gripping arms. Spontaneous loss of blocks is excluded.
To grab material:
- hang the device on the beam hook and place it under the load;
- move the locking hook to the upper position;
- lift the device along with the load and move it to the desired location.
To release cargo:
- the device is lowered to the surface;
- the stopper is moved down;
- The gripper rises without blocks.
Tool for working with aerated concrete blocks
It is faster to build a house from aerated concrete blocks than from bricks. In order for the material to retain its thermal insulation properties, the thickness of the seam between the masonry elements is reduced to 2–5 mm. With the help of properly selected glue and tools for its application, you can save time and nerves. In the article we will tell you what is best to use and when, and whether there is a difference between the quality of specialized and universal equipment.
To cut blocks, you need a sharp, fine-toothed hacksaw. There are special saws for aerated concrete. They are thicker than other types in order to saw high-strength elements, but builders also use non-specialized saws, the main thing is that they are sharp and have tipped teeth. It is faster and more convenient to cut with a reciprocating or band saw. They cost starting from 10 thousand rubles. Apply markings to the gas blocks or cut them with a square so as not to spoil the geometry. You can solder the angle yourself.
You need to lay grooves for communications and fittings with a special cutter. They are manual and electric. If you want to save money, you can attach a second disk to the grinder, which would remove dust during operation.
2. How to apply glue?
For glue, use a trowel one block wide with teeth. Manufacturers of aerated concrete such as Aerok, H+H and Itong produce it according to the dimensions of their products. But scooping up glue with a wide tool is inconvenient. The trowel is easy to break, so it is better to buy a spare one so as not to interrupt construction at the wrong time.
If these companies are not represented in your region, finding a suitable trowel can be a problem, but it’s easy to find templates on the Internet to make your own from a sheet of metal or attach a trowel to a ladle for scooping mortar. Some articles advise applying the glue with a trowel and leveling it with a notched trowel, but if you have little experience in masonry, this will lead to excess consumption of the adhesive solution. To increase the speed of work on straight sections, it is convenient to use a carriage. Its size should correspond to the width of the blocks to create a thin seam.
3. How to level the wall?
The edges of aerated concrete blocks must be smooth and even. To do this, use a sanding board if the flaws are minor and concrete planes in more serious cases. Products with good geometry do not need much adjustment, so by choosing high-quality building material, you will simplify all the work. To increase the speed, use a grinder. You can use a rubber mallet to fit one block tightly to another. A metal hammer will damage the wall, although there is also a way out - pick up a rubber nozzle.
Do not forget to check the levelness and the building cord after each laid block. After 10-20 minutes, depending on the glue, it will be difficult to change the situation
It is especially important to place the first row correctly
If you have blocks without special handles, it is inconvenient to lay them evenly in a row, which is why large aerated concrete manufacturers sell grips for different sizes.
- trowel, carriage, spatula;
- hand saw for aerated concrete or electric saw;
- square;
- wall chaser;
- level and rope.
In addition to the basic set you will need:
- brush for cleaning blocks from dust before laying;
- pencil;
- bucket, mixer or drill with an attachment for stirring glue.
When choosing equipment, you need to take into account the period of time (it is better to lay blocks in the summer, in clear weather) and the number of workers. It is difficult to build a box of a two-story house with hand tools in one season, unless you work all day. Electric saws and a grinding machine increase the pace of construction significantly.
Not everyone can make a high-quality instrument with their own hands, so if you have the opportunity to purchase everything in a store, do not neglect it.
The table shows average prices current at the beginning of 2016. The data was collected on the websites of official suppliers and large construction stores in Russia.
Consumables, tools and accessories for construction
When deciding to build a house from foam concrete yourself, the first step is to purchase blocks of the required density and size. For load-bearing walls, sections of cellular concrete D600 will be needed, and for internal partitions - D500.
When purchasing building materials, you should pay attention to the same shape and size of the product. The more regular the sections are shaped, the easier it will be to work with them and the minimum amount of mortar will be required to fill the joints.
It is the solution that guarantees the strength of the masonry, so you need to determine for yourself what binder will be used. The material for coupling the sections should be such that the thickness of the seam is minimal in order to save material and retain heat in the future.
There are two options for materials that are used as a binder mixture:
- cement-sand mortar, to which a plasticizer and foam-forming material are added - it is used if there is an error on the edges of the blocks of more than 2 mm;
- a special industrial adhesive designed specifically for laying foam concrete blocks, used to work with perfectly smooth blocks that have the appropriate characteristics according to GOST, sold in the form of bulk mixtures.
In addition to materials for work, you will need tools:
- a perforator attachment designed for mixing the solution;
- construction level;
- plane, sanding board;
- grater and wall chaser;
- rubber hammer for leveling sections;
- electric milling cutter or hacksaw;
- trowel and notched trowel;
- carriage for applying glue;
- brushes and cord.
Device for laying blocks
A homemade device was invented to simplify the laying of cinder blocks. In the absence of experience, it is quite difficult to maintain a seam line of the same thickness. Therefore, we constantly had to remove cinder blocks, throw up or level the layer of mortar. Taking into account the weight of the cinder block, the result was a labor-intensive operation, and it took a lot of time.
I wanted to come up with a device that would make laying blocks easier. The result was a sled made of two pipes with a diameter of 15 mm, secured by two 40x20 mm profiles. One profile is welded at the ends of the pipes, the second - with a slight indentation so that the device is firmly fixed. The length of the pipes from the free edge to the first profile is approximately 150 mm longer than the length of the cinder block.
Laying cinder blocks using a device
We lay the device with its profiles facing up.
We pour the solution and align it with the height of the pipes of the device.
The solution should be of medium thickness so that the weight of the block does not squeeze it out. Then we lay the cinder block indented onto the finger.
We pull the sled to the side without any extra effort.
Using a level, tapping a hammer to level the cinder block (it will not lie flat on its own). The outer side is aligned with the stretched cord. Perfect accuracy is not needed because the wall will be tiled.
Note: when pulling out the slide, the block must be held with your hand.
Lay the next block and level the mortar level with a trowel. After this, fill the seams between the blocks with mortar. When laying with the help of such a device, the problem of setting the corners is also solved - the blocks do not move horizontally.
Wall chaser
Such a wall chaser will be useful for reinforcing rows of aerated concrete blocks. A corner is assembled from two boards and handles are screwed on. At the required distance, 5 self-tapping screws are screwed through; they will serve as a cutter.
The side guide board allows you to make grooves strictly parallel to the wall.
What materials are used?
The classic reinforcement of aerated concrete wall structures is the installation of steel rods with a smooth or profiled surface. The Russian construction market offers new, more effective reinforcing materials:
- Knitting steel wire “Kazachka” is produced in the form of short pieces and technological rings. The use of this modification saves time on cutting rods.
- Composite mesh is an innovative building material.
In structure, it resembles a steel reinforced mesh, only it is produced on the basis of fiberglass or basalt threads. Weighing 6 times less than traditional mesh, it is twice as strong as traditional mesh. It is environmentally friendly and has increased resistance to aggressive elements, is not conductive and has no magnetic properties. Its very important advantage is low thermal conductivity, and therefore it is not capable of creating “cold bridges”. The material is non-corrosive and can be successfully used for more than 100 years. - Steel punched tape for installation is made from a strip with holes punched out on the surface. For aerated concrete walls, such a strip is used with a thickness of at least 1 mm and a width of 16 mm. Its main advantage is ease of installation, since there is no need to groove the surface; fixation occurs with self-tapping screws. Minus - the tape does not work with polyurethane foam, only on an adhesive solution.
- Fiberglass reinforcement in the form of a cord wrapped in a spiral with a thread made of a similar material to ensure reliable adhesion to the masonry mortar. During the installation process, fiberglass reinforcement is connected to each other with special sleeves, forming an effective reinforced belt with low thermal conductivity, low weight and long service life.
The use of this type of reinforcing material reduces shipping costs for delivering the material to the construction site. The downside is the fact that it is not recommended for use in seismically active areas.
Construction technology from gas silicate blocks
The work of laying gas silicate is not very difficult, the main thing is to adhere to a few rules.
- The blocks must be smooth and have a homogeneous structure; if necessary, the surface can be cleaned with a plane;
- Each installed block is checked for evenness using a building level;
- It is better to use tongue-and-groove blocks, they provide a stronger connection;
- First of all, the corner elements are installed with the tenon facing outward;
- The gas silicate block is laid using cement mortar or special adhesive for cellular concrete;
- On every third or fourth row a layer of reinforcement is laid;
Below is a detailed description of step-by-step instructions for laying gas silicate blocks with your own hands.
Instructions for use
Device for laying blocks
The procedure is elementary. To work you need an adhesive solution, the consistency is normal. The adhesive spreader is placed at the end of the wall row and work begins.
Step No. 1 - loading the device with adhesive solution
Using a spatula, glue is loaded inside the box. There is no need to put a lot of solution - it will be difficult to work with.
Step No. 2 - forming an adhesive layer
Pull the device away from the comb. If the glue spreader gets stuck, then you need to move it back and forth a little, and it will go easier.
Apply glue to the end of the block
Don’t forget about treating the end of the previous block in the row with glue. Apply glue.
Forming the layer thickness
Excess should be removed with a notched spatula.
Step No. 3 - install the block
Place a block along the cord
We install gas silicate locally. Align with the cord. The block installation cycle is completed.
Step #4 – repeat the cycle
We follow the cycle algorithm shown in the steps in the photo below.
Installing a gas silicate block
If necessary, we knock
Step No. 5 – quality control of installation, elimination of defects
After laying several blocks (3-4), until the glue has set, we check the quality of installation.
Using a bubble level, we check the level of the laid out blocks in two planes.
We hit the block with a mallet
If necessary, we eliminate defects. We use a mallet.