Larisa Gromova’s wonderful master class on how to make a person out of paper . From ordinary paper napkins you get “ Gentleman with a Newspaper ”.
Human hands, coupled with fantasy and imagination, are sometimes capable of creating the most seemingly incredible things in complexity. Particularly striking are products made from some simple and at first glance unnecessary items, so-called waste: newspaper, pieces of wire or leatherette, paper napkins or toilet paper. And the technology for manufacturing some things is simply amazing in its simplicity. For example, this composition of two elements, although not done quickly, is quite simple.
Figurine based on papier-mâché
The fake man made from paper is designed for early adolescence (11-12 years). But preschoolers and primary schoolchildren are recommended to work together with adults.
To create the product you will need:
- leatherette or wire at least 0.5 meters long;
- pliers;
- liquid paper glue (preferably PVA);
- toilet paper or paper napkins of any color;
- paints for painting, brush, container with water.
How and what to paint
Beautiful New Year's crafts are also made from materials with a natural color, i.e. brown, but work made from specimens painted in different colors or bleached looks unusual and original.
Coloring agents:
Sprays. The cones are placed on newspapers and sprayed from a can at a distance of 15-20 cm. The procedure is carried out in the open air due to the strong unpleasant odor or a respirator is used.
Acrylic paints, gouache. They are painted by hand with a brush or sponge if you plan to imitate snow. After the paint has dried, apply a layer of varnish or attach a string to it and lower it into a can of paint. Dry vertically.
Applying glitter. The dry material is sprayed with strong hold hairspray and dipped in glitter. Shake off the excess. The procedure is repeated several times to obtain a uniform coating.
PVA glue is diluted with water to a liquid consistency, glitter is poured into it, stirred and the cones are dipped. Allow the glue to drip and leave to dry. If you only need to make a couple of shiny strokes, then apply glue with a brush and sprinkle it a little.
"White". The raw materials are completely filled with “Whiteness” and hermetically sealed. Leave for 18 hours, wash in running water. The cones will turn white and close. Once dried they will bloom again. However, you should not expect the material to become completely white. It will get an uneven yellowish tint. For complete bleaching, the procedure is repeated several times. But there is a significant disadvantage here - the chlorine contained in “Whiteness”, with prolonged exposure, begins to corrode the wood, and the scales fall out en masse.
Preparing the base of the product
The most difficult part of the work is forming a solid frame. Use pliers to shape the wire into the shape of a human skeleton. To prevent the fake from being fragile, all limbs should consist of two parts of wire. This will happen as a result of its bending in the area of the feet, palms, and head.
Create the little man in the pose in which you plan to see him as a result of your work.
Making gingerbread
To prepare the gingerbread, we will use a proven recipe for gingerbread men. First, melt honey and butter in a water bath. Then pour granulated sugar into them and stir until all the sugar has dissolved. The resulting mixture should be set aside to cool.
When the mixture has cooled, you can add dry ginger, two eggs, cognac and mix everything again. The next ingredient that needs to be added to the resulting mixture is good quality sifted wheat flour. Add flour in small portions and stir. After all the flour has been added, you need to thoroughly knead the dough and wrap it in cling film.
Place the dough in the refrigerator and leave it there for about five hours. Remove the chilled dough from the refrigerator. Place it on the work surface of the table and roll it out into a layer no more than five millimeters thick. Using cookie cutters, cut out gingerbread man figures from the dough. Line a baking tray with baking paper and place the cut out figures on it. Place them in the oven, which has been preheated to one hundred and seventy degrees. Bake for ten to twenty minutes maximum. Remove the finished cookies, prepared according to the classic gingerbread man recipe, from the oven, cool, and then decorate with icing.
Work details
If desired, you can fashion a hat, elements of a coat, glasses, an umbrella and other accessories. Separately, you can prepare a chair, bench or pet.
It is easier to form additional objects, because only part of the production will need to be molded. Papier-mâché covers the seat of a chair/bench, individual parts of an umbrella and an animal.
Photos of the man's crafts can be seen on the website.
Cipollino is Italian.
0
Cipollino is a brave onion boy who gets into complicated stories and helps his friends in trouble. A simple boy Cipollino confronts the rich and greedy Signor Tomato. Cipollino and his friends. Illustration from 1956
×
0
It was invented by the Italian writer Gianni Rodari. A book about the adventures of Cipollino was published in 1951 under the title “The Romance of Cipollino,” then in 1957 the title changed to “The Adventures of Cipollino.” There is another Italian in the team of Merry Men - Buratino. Funny Pictures - 1960
Add color
It is not recommended to use watercolor - the product turns out pale and loses color faster. When using gouache, the color will turn out bright, matte, and lightens as it dries.
However, there is a high probability of unwanted mixing during subsequent application. Acrylic adds shine to the product, as its structure is similar to oil paints. It dries quickly, which reduces the possibility of mixing shades, but darkens as it dries.
We recommend reading:
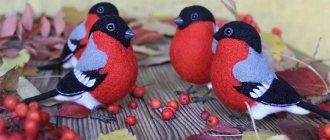
- Craft bullfinch: detailed description of how to make a bird with your own hands (115 photos)
- Crafts from vegetables: 100 photos of the best crafts for children and a review of recipes for adults
- Craft ship: 120 photos, templates, drawings and step-by-step instructions on how to make a boat
To apply the palette, it is recommended to have a medium to fine brush. This will help convey the details of the character's image.
Preparation
Initially, you need to prepare syrup for cookies from granulated sugar, syrup and the spices included in the recipe. Place all these ingredients in a saucepan with a thick bottom, put on fire and boil. Mix wheat flour with baking powder and freshly grated orange zest. After the syrup has cooled, pour the flour into the pan in small parts and pour in the butter.
Stir and place on a floured surface. Knead the lean dough until it stops sticking to your hands. If necessary, you can add flour a little. Roll out the finished dough into a layer five to six millimeters thick and cut out figures of men from it. Place them on a baking sheet lined with parchment and place in the oven at a temperature of one hundred and eighty degrees. The products should be baked for about fifteen minutes. After cooling, the cookies need to be decorated.
Sculpting the body
Choose a piece of plasticine of your favorite color and roll it in your hands so that an oval is formed. We make a cut along the oblong part (1/3 of the total size of the workpiece). From the resulting two halves we sculpt the legs. The future limbs need to be moved apart a little and given a roundness.
To make the arms, we fashion 2 cylinders that will decrease at one end. Then we press the workpieces to the body so that they are firmly secured.
Characteristics and compatibility with other materials
Any cones collected in the forest on the ground are suitable for crafts. There is no need to specifically pick them from the trees, as they contain a large amount of moisture and may not dry well. This is fraught with damage to work in the future. It may become moldy or begin to smell unpleasant.
In addition to cones, chestnuts, acorns, dried flowers, and leaves are collected. They look organic with a wide variety of materials: artificial pine branches, textiles, yarn. If you are planning to make New Year's crafts from pine cones with your own hands, take out all your supplies and start creating.
Additional items
There are many master classes on making figurines, but if you understand how to make a person, fakes are easy. Departing from the subtleties of the instructions, the figure can be diversified with glasses, a scarf, a vest, a dog on a leash or a parrot on the shoulder.
You can make a scarf from a long flat plasticine “canvas”. It is twisted 2-3 times and wrapped around the neck. To make the figure stand firmly, they make boots. To do this, just make 2 ovals and flatten them a little.
Let's begin:
- To begin with, we mold the parts we need from plasticine. We make 2 flat circles and a large flat figure in the shape of a red drop. We also make a white ball
- Let's stick a red “drop” on a white ball, making a tall hat with a rounded top from it.
- Next, take black plasticine and sculpt 2 eyes and a smile.
- Attach to a white ball
- Attach the head with a cap to the top of the cone
- On the sides of the cone we add the remaining red parts from plasticine, these are handles
Absolutely anyone will like this toy and can serve as a gift for the New Year holidays. See you again, friends!
For this we will need: Cone Colored plasticine
To begin with, we mold the parts we need from plasticine. We make 2 flat circles and a large flat figure in the shape of a red drop. We also make a white ball
Let's stick a red “drop” on a white ball, making a tall hat with a rounded top from it.
Next, take black plasticine and sculpt 2 eyes and a smile.
Attach to a white ball
Attach the head with a cap to the top of the cone
On the sides of the cone we add the remaining red parts from plasticine, these are the handles. Absolutely anyone will like this toy and can serve as a gift for the New Year holidays. See you again, friends!
Alternative option
In addition to the invented character, the child will be delighted with the crafts of Spider-Man, the Little Mermaid, Shrek and even a doll. Thus, completing the task will provide not only the student’s self-development and silence for the parent, but also high motivation to complete it.
Spider-Man is made according to the above procedure, but the bottom part should be blue and the top red. It is not necessary to make a nose and mouth; instead, the emphasis is on the large white eyes.
If a student is interested in history, primitive people will arouse a lot of interest. Crafts of a historical nature require accuracy and diligence.
The basis will be plasticine, from which leather is made (white, pink, brown). The body is made according to the above procedure, but the area where the arms are attached must be greased so that it is not visible. To do this, the attachment point is smoothed in the direction from the arm to the body.
The palms do not come off the hand; to form them, it is enough to press the end of the hand until a plane is formed. The legs and feet are done at the same time. You need to make the limb longer, bend it and flatten it at the end to form a foot.
Features of the body proportions of primitive man are shortened legs and long arms, as well as an elongated jaw. In order for changes in the usual shape of the head to be successful, one part of the oval must be made larger than the other, and then extended on one side. This will give you a massive chin.
Movable cardboard man
Movable dolls have been known to us since the early Middle Ages.
They accompanied the buffoons of Ancient Rus', the minstrels of Western Europe and the magicians of the East. Fascinating the public, the dolls personified parables, epics, sagas, ballads, and epics, continuing the history of mixed cultural genres spread before our era by the imperial ambitions of the Great Alexander.
Century after century, puppets were improved, obeying the technical genius of man, but the essence remained unchanged - the soul of the puppeteer.
Perhaps someone was lucky enough to attend live performances by the great artist of the 20th century, Sergei Vladimirovich Obraztsov. He is a master of artistic expression, puppet theater, and to this day the standard for expressing the emotions of papier-mâché puppet characters. ( State Academic Central Puppet Theater named after Sergei Vladimirovich Obraztsov )
.
In my opinion, this kind of true skill is lacking in today's animators, despite their technological capabilities in software animation. 3D dolls began to be able to do a lot, but they forgot how to be alive. Passed stage.
I think I smoothly shifted the topic to the topic of the school curriculum.
I'll start like a blockbuster. May, 2022. Subject "Technology". Pandemic. The task was difficult and remote. Everyone wanted to make a dog, but they received a photo of a drawing of templates for the parts of a man. I and other parents were obliged to make a craft with the children, give it a dance form, draw any national costume, glue it, photograph it, send it... I pointedly put an ellipsis. Difficulties bring people together, and school ones also push heads together. Collective discussion on social networks: how to do it, what to fasten it with, why the head can’t hold on, is it possible to move the fastening points, otherwise everything will break, etc. The grueling manufacturing process wasn’t even made easier by grandpa’s pliers. When the cardboard martyr was ready to be tortured by dancing, we had no time for them. Download a template of a moving man made of cardboard. To ensure that you and your child have only positive emotions when making crafts, we have developed our own template and master class for making a movable figurine of a mannequin from cardboard. The files are distributed free of charge in electronic PDF format, and only on the website www.asreda.com.
Not for commercial use. The downloaded man template (in PDF format) contains assembly instructions. ONLINE VIEWING: manikin.pdf How to fasten the moving parts of a paper man? Neither fishing line nor thread are suitable. Grandfather pulled the wire out of the wire, but when twisting it, it turned out to be rigid, and it seemed impossible to do without a man’s endurance, but Victor’s ingenuity helped (see comment) - where to get suitable wire, and how to easily connect it to the moving parts of the paper man’s body.
From that moment on, not only me, but other parents, among other things, began to collect pins from bread bags.
We take a plastic clothespin, pressing the scissors to the wire edge, cut it off on one side and the other. Master - class for making a movable paper man.
To make a movable man from cardboard we will need:
— Thick cardboard (not thick!);
— Printed parts template; — Wire; — A thick needle or a thin nail (an awl will not work!); — Scissors, glue stick; Optional: side cutters (tweezers). There is an option! You can use regular cardboard instead of colored cardboard, coloring the little man to your taste.
Cut the printed sheet with the details of the man along the lines of the blocks.
Photo-1.
Glue the blocks of parts onto the back side of the colored cardboard using a glue stick.
Place under the press for five minutes and let the cardboard dry. Photo-2.
(Don't be surprised, in our example we used a sheet from a set of double-sided colored cardboard).
We don't cut out any details!
Using the marks in the template details, we pierce holes with a thick needle or a thin nail, slightly making holes with the tip.
Photo-3.
Let's carefully examine the cardboard sheet.
Have all the holes been punched? Then we will cut out all the details of the cardboard man along the contour. Photo-4.
I mentioned above where to get wire.
To fasten all the parts of the man together, we need 14 wires, that is, we cut it out of 7 clips. Photo-5. Let's first fasten the parts of the limbs, and then attach them to the body.
We offer you a simple and reliable fastening, just for women.
Photo-6.
Nothing complicated. We insert the wire into the holes of the parts. We bend it in half. At the bend, squeeze the wire with your fingers. Then we bend the ends of the wire in half again with the letter “M”
and squeeze again with your fingers.
Such fastening not only presses the parts, but leaves them movable and fixes them. Photo-7.
If you want to make the craft more elegant, then cut off the folds of the ends of the wires in half with pliers on the front side of the man.
Photo-8.
Attaching the “forearm” or “shin” to the front or back does not affect the length of the arms and legs. Add your own touches to the figure of the man. For a visual example, in dance one arm is forward, the other is thrown back. Photo-9.
The moving cardboard man is ready!
Photo-10. The height of the finished man figurine is 22 centimeters.
The toy is interesting for educational purposes; it can be used to demonstrate the movement of the human body when performing sports exercises or positions of dance styles, their basic elements.
Don't forget to draw the doll's face.
Article on the topic: “ About the Puppet Museum in St. Petersburg .” Article on the topic: “ Portrait made of felt .”
___________________ Information source: www.asreda.com
Photo diy man
0
2
Thumbelina - Danish
0
The only girl in the male team of Merry Men.
0
Thumbelina (Tommelise) is known to all children from Andersen's fairy tale, which was published in 1835. The story of Thumbelina is based on the plot of a Danish folk tale, which was presented in the author's adaptation.
Dunno - Canadian
0
This hero has been known to everyone since childhood. A funny hooligan in a wide-brimmed hat and canary trousers, he constantly gets into strange stories and becomes the subject of ridicule.
0
The character was invented at the end of the 19th century by Canadian artist Palmer Cox, who created an illustrated tale (analogous to a modern comic book) about little people - “brownies”. Brownie people
0
Dunno appeared among the brownie men. Also in the company of Brownie was his Znayka - Russian professor Kotchakoff. The first stories about Baruni were published in 1883.
0
The book about brownies was translated into Russian in 1889 by Anna Khvolson and was called “The Kingdom of Little Ones.” The version of the writer Nikolai Nosov about “The Adventures of Dunno and His Friends” was published in 1953-1954 in the Ukrainian magazine “Barvinok”.
Conclusion
As you can see, making crafts with people from vegetables is not difficult, but very exciting. This activity does not require a lot of money, since the material is always available in the refrigerator of any housewife. To create masterpieces from the gifts of autumn, you do not need fastening elements. It will be enough to use small toothpicks.
Crafts can have a variety of types. These are voluminous figures that can be brought to a crafts exhibition at school, and a beautifully presented plate for a capricious child who does not like to eat vegetables. Have fun with your children too! Creative success!
Paper gymnast
This original toy is made from hard cardboard. The gymnast's torso is cut out together with the head, and the legs and arms are cut out separately. The legs and arms are attached to the body using thin wire. The legs are fixed at the bottom of the body on both sides. A wire is passed through the torso and legs. The edges of the wire are insulated with droplets of quick-drying glue. The figurine is hung on the slats of the horizontal bar, as shown in the photo above. Before hanging, the athlete’s figurine is painted with acrylic paints, the face and sports uniform are drawn. The posts of the horizontal bar and the spacer at the bottom can be coated with varnish or bright paint. The principle of operation of the toy: the child takes the toy with one hand below the spacer and squeezes it. The thread crossbar of the horizontal bar is stretched, the twisted part tends to unwind, transferring kinetic energy to the hands of the figure. Depending on the effort applied, the athlete swings or rises above the horizontal bar. To get this effect, you don't need to twist the thread too much. When assembling the toy, all you need to do is simply thread the thread through the holes in the figurine’s arms crosswise: the bottom thread into the top hole, the top thread into the bottom. The figurine is ready, you can use it.
Mr. Potato Head's facial features
How to make a man out of vegetables? It is not difficult. Select small details to shape your facial features from products that suit your shape. The eyes are made round, so to create them you can take small blueberries or blueberries, currants or honeysuckle.
The nose can be made either round or long. In our sample, a small circle is cut out of peeled carrots. You can make it from chili peppers or a stalk of celery, any berries or a piece of a small gherkin.
The mouth looks great from a thin strip of red bell pepper, from half a cucumber or a circle of carrots, from a semicircle of radish, zucchini or eggplant. Attach all parts with toothpicks. If they are too big, take a stick and cut it to the size you need, leaving a pointed part at the end.