/Accessories and decor/Decoration/
Sometimes, in order to decorate the house or keep your child creative, all you need to do is look in the kitchen cabinet where the groceries are stored. After all, from cereals, beans, spices, grains and seeds you can make decor in eco or rustic style, as well as educational children's crafts. The main thing is to show your imagination and set aside some free time. In this material you will find 10 ideas and step-by-step instructions for making DIY grain crafts for children and adults, as well as a master class on coloring them with food coloring.
Cereal topiary
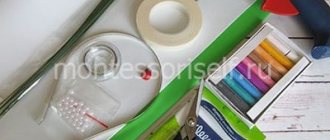
You will need: 1 package of green peas (split and polished), a foam ball, PVA glue and a glue gun, a package of dry moss, a clay pot, a wooden stick or skewer, a brush, floral foam or polystyrene foam, paints, a stationery knife.
Master Class
- Paint the pot and trunk to suit your taste.
- Paint half of the foam ball green and wait until it dries completely.
- Repeat the painting process with the other half of the ball and wait until it dries completely.
- Make a hole for the trunk 3 cm deep.
- Apply pva glue to a small area of the ball using a brush, then sprinkle over the peas.
- Fill the entire bowl with peas in the same way. Do this gradually - in small sections and let it dry.
- Leave the pea ball overnight to dry completely.
- When the ball is dry, fill in the gaps by gluing peas.
- Apply a bead of hot glue into the hole and insert a stick as a stem.
- Place floral foam in the pot and insert the stem.
- Fill the surface of the pot with moss.
Cereal topiary is ready!
Craft materials
Regardless of what the crafts made from grains are called, the following materials can be used to create compositions:
- various grain crops;
- legumes;
- cereals;
- coffee beans;
- seeds.
All of the listed elements can be used in their natural form or painted in the desired color, varnished, heat treated, etc.
Frame magnet for refrigerator
You will need: various cereals, cardboard, pencil, ruler, scissors, glue gun, 2 magnets.
Master Class
- Draw a frame on the cardboard.
- Cut it out.
- Cover with cereal to your taste.
- Glue the magnets on the back side.
The cereal magnet frame for the refrigerator is ready! I recommend viewing a photo gallery of ideas for decorating frames with cereals!
Photo frame with magnets
To make the photo look much brighter, you can make a photo frame with your own hands, using cereals. And if you add magnets, then such products are attached to the refrigerator.
On the surface of the cardboard, the boundaries of the frame are outlined with a ruler and pencil. It should be cut out. It is necessary to think over a drawing that will decorate it. To make it easier to navigate, you can mark out the areas and imagine what type of material will be suitable.
After this, glue is applied and cereals, grains, and beans are glued.
Magnets are glued to the back side.
Cereal wreath
You will need: split green peas, 2 straw wreaths with a diameter of 20 cm, PVA glue, brush, foil, twine or ribbon, baking sheet.
Master Class
- Cover the baking sheet with foil, then fill with peas.
- Apply glue to a small area of the inside of the wreath using a brush, then sprinkle with peas and wait until dry.
- In the same way, fill the entire inner part of the eyelid (in sections).
- Apply glue to a small area of the outside of the wreath, roll it in the pan with the peas and wait until dry.
- Fill all parts of the wreath in the same way.
- Tie the twine to the wreath for further hanging.
The cereal wreath is ready!
Animals, people
Cereals will make magnificent objects of wildlife. Children can be asked to create any simple animal. Kids love familiar cats, dogs, and birds.
Note!
- Mushroom craft - reviews of ready-made DIY crafts + step-by-step instructions and diagrams for children (180 photos)
Crafts from toilet rolls: step-by-step instructions for creating crafts. Master classes with simple work schemes (140 photos)
- Crafts from corrugated paper - step-by-step master classes on how to create crafts from corrugated paper with your own hands + photo diagrams
The kids are great at owls, bullfinches, bears and hares. It is better to choose pictures for children’s creativity that are close to cartoon ones. Adults can tackle more complex objects.
Silhouettes of cats, herons in the reeds, exotic animals and birds are popular. The creation of portraits is not excluded. Similarity with real prototypes is not required.
Table of cereals
You will need: various grains, a ruler, a simple pencil, chipboard or plywood, liquid nails or wood glue, a large photo frame, a bar stool, a drill or drill bit, a primer, 4 small screws, a brush, paints, PVA glue, epoxy resin, film to protect the floor.
Master Class
- Separate the frame from the back panel.
- Cut a panel from plywood or chipboard the size of the frame.
- Glue the panel to the frame using liquid nails or wood glue.
- Seal the joints using wood putty.
- Place the frame on the stool and secure with 4 screws.
- Cover the floor with film.
- Cover the table with primer and wait until it dries completely.
- Paint with 2 layers of paint.
- Draw a marking for the location of the croup.
- Apply a thick layer of PVA glue to a certain area and cover with cereal.
- In the same way, fill the entire table with various cereals.
- Apply a layer of PVA on top of the cereal and leave for a day.
- Make sure the table is on a level surface, then fill the framed cereal with epoxy resin. If bubbles form, blow on them through a straw.
- Leave overnight to dry.
- Pour a second layer of epoxy resin and leave it for a day.
The cereal table is ready!
How to make a vase from paper. Colored stripes.
You can use corrugated paper to cover glassware with stripes.
- corrugated paper in several colors
* First you need to choose a suitable range of colors for the vase - these can be only cool colors or only warm ones. Or you can choose colors that symbolize something, for example, a flag.
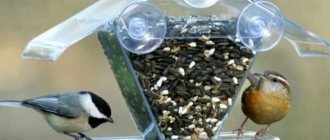
Grain feeders
You will need: 3 cups of birdseed, a packet of gelatin, a quarter cup of water, molds, baking paper, saucepan, spoon, bowl, twine.
Master Class
- Bring water to a boil and add gelatin.
- Boil for 5 minutes, stirring constantly.
- Remove the mixture from the heat and mix the food.
- Place baking paper on the table and place the ramekins on it.
- Fill the molds with food and insert the twine.
- Place the figures in the freezer for 20 minutes, remove, then leave to dry for 10 hours.
- Hang food on tree branches.
Figured grain feeders are ready!
Autumn applications
Autumn crafts made from cereals rarely consist only of grains. Typically, the composition includes colorful dry leaves, berries, acorns, and grass. It is possible to use tree branches and small stones. Additionally, you can add colored paper or drawn objects to the composition.
Children love to make funny hedgehogs, mushrooms or deciduous trees. Adults are not against making beautiful autumn bouquets, vegetable still lifes, and paintings of wildlife.
Decorative bean ball
You will need: foam ball, beans, brush, PVA glue, paint.
Master Class
- Paint the floor of the ball in the desired color and wait until dry.
- Paint the other half and wait for it to dry.
- Apply glue to part of the ball, glue the cereal and wait until it dries completely.
- Thus, fill the entire ball with cereal.
- If desired, paint the ball over the cereal.
The decorative bean ball is ready!
Developmental activities
If you have small children, then introduce them to arts and crafts. This is a very useful and entertaining activity. It develops fine motor skills of the hands, creates interest in the creative process and significantly increases the child’s perseverance. With kids you can make applications on a variety of topics. For example, let's make a “chicken”.
For it we will need:
- colored cardboard;
- a simple pencil;
- scissors;
- plasticine;
- PVA glue;
- beans, corn kernels and seeds.
On a sheet of paper, draw the silhouette of a chicken and cut it out along the contour.
Glue the cut out shape onto cardboard of a different color and begin placing the beans. We will attach it using plasticine. We glue a small piece onto the bean and then attach it to the chicken. Gradually fill out the entire form. The beak will come out of the corn kernel, and the paws will come out of the seeds. Don't forget to make an eye out of plasticine. Our chicken is ready. Now you know how to make various crafts and decorative interior items from beans and cereals, and you can easily create many useful things. These works will be a wonderful gift for your friends and family.
Bean crafts
Christmas toys made from cereals
You will need: plastic balls, various cereals, PVA glue, brush, ribbons, acrylic varnish for crafts, plastic plate.
Master Class
- Place the cereal into a plastic plate.
- Cover the ball with a thick layer of PVA.
- Roll the ball in the cereal.
- Gently adjust the grain.
- It is better to make a rice ball in 2 layers, and a buckwheat ball in one.
- Dry the balls, then coat with varnish.
- Leave the balls for a day to dry completely.
- Decorate with ribbons.
Christmas tree decorations made from cereals are ready!
DIY decorative vase
This example uses bamboo shaped straws, but you can use any shape of plastic straws.
It is desirable that the tubes be dense.
Mushroom from cereals
You will need: A4 colored cardboard, boletus mushroom template, pencil, scissors, brush, PVA glue, red lentils, corn grits, semolina, green split peas.
Master Class
- Cut out the mushroom template.
- Trace the template on colored cardboard with a simple pencil.
- Apply glue to half of the mushroom cap.
- Sprinkle in the red lentils and spread out gently.
- Apply glue to the rest of the cap and fill with lentils in the same way.
- Apply glue along the edges under the cap and sprinkle with corn grits.
- Apply glue to the stem of the fungus and sprinkle semolina.
- Apply glue under the leg and add green peas.
- Wait until completely dry.
The cereal mushroom is ready! I recommend watching the video master class!
DIY mushroom craft for kindergarten
I recommend viewing a photo gallery of ideas for creating applications from cereals!
DIY vase (master class)
You can very easily make an original vase from a jar. You just need clothespins and the tin itself.
In addition to the fact that such a vase looks beautiful, you can also put a small glass of water in it, and put small forest flowers in it.
* It is better not to pour water into the jar itself.
*You can add a flower or a heart made of colored cardboard to decorate the craft.
Bean painting
You will need: black and white beans, canvas, PVA glue, black and white paint, brush, pencil.
Master Class
- Draw an image.
- Color it.
- Glue the beans, taking into account the color elements of the design.
The bean painting is ready! I recommend watching the video master class!
PANNO FROM BEANS “CATS”
Using the same principle, you can create original paintings, portraits and original panels. Look through the photo gallery of cereal paintings and get inspired!
Crafts from coffee beans
Crafts using coffee beans look great. This is an excellent material that allows you to turn your wildest creative ideas into reality. Coffee beans can be used to decorate bottles, cups, jars, create original paintings, decorative balls and much more.
The coffee color scheme goes well with fabrics of lighter colors. Particular attention should be paid to ordinary burlap, which often serves as a backing for a coffee panel or as the basis for other products.
Craft mug: 135 photos and video master class on how to make beautiful crafts with your own hands- Crafts from spoons - 125 photos and videos, tips and tricks with step-by-step instructions on how to make crafts
Crafts from cotton pads - 125 photos of beautiful crafts, features and videos of new cotton crafts
Also, nylon or wool thread of beige or gray color is often used in compositions.
Decorating eggs with cereals
You will need: boiled eggs, various cereals at your discretion, PVA glue, brush, felt-tip pens if desired.
Master Class
- Apply glue to the egg or part of it using a brush.
- Dump the egg into the cereal.
- If desired, draw a face and decorate it to your taste.
The Easter egg made from cereal is ready! You can use buckwheat, rice, semolina, coffee beans, Easter sprinkles and even pasta. Fantasize and surprise everyone!
Idea 5. Easter egg decor
Small cereals, grains, spices, star pasta, seeds and dried herbs can be used to decorate Easter eggs. You can simply apply PVA glue to the egg and roll it into grains, or create some mosaic-like patterns by first drawing a marking or sketch on the shell. To depict more precise shapes and figures, use stencils.
- To decorate these Easter eggs we used: sesame seeds, poppy seeds, dried basil, cumin, dill, parsley, salt and whole grain mustard.
- To decorate these Easter eggs we used: sesame seeds, poppy seeds, dried basil, cumin, dill, parsley, salt and whole grain mustard.
Napkin rings
You will need: various cereals, toilet paper roll, PVA glue. brush, stationery knife, paints.
Master Class
- Cut the bushing into 3 parts.
- Paint them.
- Apply a thick layer of PVA glue to a small area, sprinkle with cereal and let dry.
- Fill the entire space of the sleeve with cereal in the same way.
- Decorate to your taste.
The napkin rings are ready!
Interior items
By combining a high stool and a large photo frame, you can make a table and decorate it with multi-colored squares of cereals.
To do this, fill the flat areas with grains, spread with glue, and fill the entire surface of the future table with two layers of epoxy resin.
Decor with cereals
Cereals are perfect as a filler. They are used for vases, bottles, candlesticks, and other containers. Browse the photo gallery and get inspired!
I recommend watching this video!
DIY: DIY Decorative Bottle! Original Kitchen Decor!
DIY winter vase
1. Apply a spray primer to the bottle (it is better to do this outdoors, on a balcony or in a well-ventilated area).
2. Pour coarse salt onto previously laid paper (newspaper).
3. Apply sticky spray to the bottle.
4. Place the bottle on the salt and start rolling it so that the salt sticks to the surface of the bottle. You have a vase covered with snow.
* For beauty, add a few twigs (natural or artificial) to the vase and you have a beautiful decoration for the holiday.
* You can make a couple more vases in a similar way, place them on a tray, add a candle and sprinkle salt around the bottles (fallen snow) - a beautiful decorative composition.
How to paint cereal?
Each cereal has its own natural color. Of course, any grain can be dyed, but it is better to use light rice, white beans and pumpkin seeds for best results. If you want to get a rich, bright color to create crafts or unusual decor, then the next master class is just for you.
You will need: thick plastic bags or ziplock bags, alcohol or vinegar, food coloring in desired colors, cereal, plastic plates for drying, measuring cup.
Master Class
- Fill the bag with two grains of cereal.
- Add 2 tablespoons of alcohol or 4 tablespoons of vinegar to it.
- Add a couple of squirts of food coloring.
- Close the bag and shake it until all the grains are colored.
- Place the cereal on plates and leave to dry.
The cereal is colored! I recommend watching the video master class!
How to Dye Rice or Other Grains to Create Educational Sensory Bins
It is worth noting that grains in crafts go well with seeds, pasta and nuts. Create the most original crafts from cereals with your own hands. Experiment and surprise others with masterpieces!
Decorating Easter eggs
Celebrating Easter is not complete without the tradition of decorating eggs. You can involve children in this work and make a craft for Easter with cereal:
- Boiled eggs must be used. Take one and apply glue to everything with a brush.
- It should be dipped into a plate of cereal, which was chosen at personal discretion.
- For example, you can roll it in millet.
- Not the entire surface can be filled. If you use your imagination, you can make a hat on the egg using cereal, and use felt-tip pens to draw a face.
- It is also possible to make different patterns on them. The main thing is to fantasize and not be afraid.
The design can be bean flowers, pea lines, alternating strips of rice and buckwheat, and so on. There are no limits to ideas.
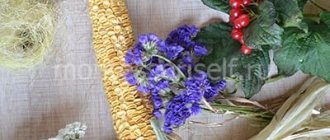
Idea #5: Florist-worthy flower arrangement
You need not only to be able to grow flowers, but also to present them beautifully
To create flower arrangements you will need a floral sponge (oasis). It comes in different shapes and sizes. First of all, soak it in water, then place it in a bowl or any other container in which you will create the composition. Use only fresh flowers, cutting the stem at an angle. Insert the flowers into the sponge, trying to cover as much of the surface as possible. Combine flowers and branches of ornamental shrubs and evergreens at your discretion. Not a single celebration is complete without such compositions (they look good and last a long time), so skills in this matter will be in great demand.
Craft process
The base on which the main object of work will be located is first cut out according to pre-designated dimensions and shape. Then they are covered with green colored paper. This shade will make it look like the grass on which the well stands. Instead of paper, you can use natural material. Leaves from trees are perfect. But some even use moss. It looks very organic, but gluing it to cardboard is much more difficult.
While the base dries, you can proceed to the actual creation of the well. The mine is made from cardboard or a plastic jar left over from cosmetics. A plastic cup is also quite suitable for these purposes, but it is better to cut off the bottom so that the future well is not too high and narrowed at the bottom.
The easiest way is to apply plasticine to the entire area of the improvised mine. It will help correct minor shape imperfections and serve as a bonding agent for finishing elements, which will be ordinary beans.
After the shaft is ready, you need to attach the upper part of the well to it, including the roof and the turn with the bucket. The frame supporting the protective visor is made from toothpicks or skewers. They can simply be stuck into the plasticine that covers the main structure.
The roof can be made of paper or cardboard. To do this, just cut out a rectangle of the desired size and simply bend it in half and attach it to the skewers. If the canopy is stylized to resemble wooden samples still found in villages, then it should be installed after all finishing work.
The turning mechanism is made from twigs or toothpicks. Its central part can also be decorated with plasticine, this will make it easier to attach an impromptu handle to it. A woolen thread is tied to a crossbar created and glued between vertical skewers with a bucket made from the smaller part of a chocolate egg container. To give it the usual shape for a tin container, the case can be covered with dark-colored plasticine.
Finishing the structure with beans and matches
When the individual elements of the well are ready, you can proceed to its design using natural materials. The mine is decorated with beans. The choice of bean size depends on the total volume of the craft. If it is small, then the grains should be small. If the base of the structure is large enough, then you can take regular-sized beans.
It is carefully glued to the plasticine with which the shaft is processed. This should be done in a staggered pattern so that the bean grains resemble the stonework you see around real wells.
The canopy can also be made “stone”, but it is possible to decorate it “like wood”. To do this, plasticine is evenly applied to the cardboard and laid out with matches, tightly pressed to each other. They can easily be replaced with toothpicks or wooden skewers. The roof can be painted any color or left in its original form.
To make the resulting well look more attractive, it is recommended to cover it with silicone varnish, but regular colorless nail polish is also suitable for this. When the main structure is ready, you can add a few additional details to it, for example, lay out a path of beans, install trees from twigs and colored paper.
In voluminous crafts, beans can serve as a material for creating other structures. Their design is limited only by the imagination of the authors. Natural elements provide unlimited scope for creativity. They not only help the child explore the world and develop various skills. Working together on crafts brings all family members closer together, unites them and allows them to have fun and useful time with family and friends.