Leather embossing is an incredibly interesting process that you can easily organize at home and put words or designs on the cover of a wallet, key case, belt, bag, or slippers. The main thing in achieving results is perseverance and following the rules that the old craftsmen developed for themselves.
The main material for work is a clean piece of leather, preferably tanned with vegetable substances. According to experts on the issue, the material tanned with chemical compounds such as chromium is more suitable for making shoes designed for cold wet weather than for embossing on leather at home. The reason is that the leather, which has become more elastic, will not hold the embossing for long, trying to straighten out. And this makes all the work a waste.
Once you have stocked up on a suitable piece of high-quality leather, we recommend that you think in detail about what will be depicted on it. It is better to first draw an ornament, drawing or inscription on a sheet of paper in full size. This way you will visually imagine how your creation will look after embossing.
Required Tools
The main set of tools consists of:
- A rotary knife with replaceable blades of different sizes and shapes, it is needed to create patterns, logos and all kinds of images on the top layer of leather;
- Sets of various stamps, impressions and clichés are purchased in special stores; they can also be created with your own hands or ordered from professionals who work with metals;
- A specialized hammer for stamps that absorbs most of the vibrations when struck;
- Styluses made of durable plastic or hard wood for pressing out image borders;
- Wheel markers for marking curved landmarks;
- Lots of files for adjusting the shape of stamps if necessary;
- Smooth platform made of good wood for embossing work;
- A soft sponge for soaking the skin with various liquids before starting work;
- Other useful tools for various types of leather processing.
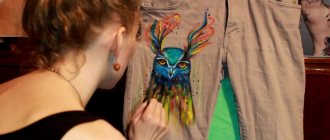
We study leather embossing in a combination of design and inscription
The first step in making such embossing will be to first soften the leather with a sponge soaked in water. Then, using a stylus, apply light pressure to apply the design, resulting in a light imprint on the surface of the skin.
The next stage in this kind of embossing is cutting out an image on the skin with a special scalpel. You need to cut carefully, the result should be slices that are identical on both sides.
Stamps with several head sizes are used to create cuts and lines using a hammer to give them a 3-D effect.
After the desired volume is achieved, the rotary knife removes all imperfections on the surface of the leather product and smoothes out all roughness. The embossed image is created using special leather paint.
When the leather paint has completely dried, the leather product is carefully polished with a soft cloth.
Leather embossing methods
All methods of blundering can be divided into 2 groups - cold and hot.
The cold method is usually applicable in situations where a simple pattern, inscription or brand should be made on the treated leather. For this method, only skin whose thickness is in the range of 0.8 to 1.2 millimeters is suitable.
In general, thickness does not play a special role here, since the most important evaluation criterion is how well the print will hold its shape.
Leather processing using hot stamping technology is carried out with a stamp, which is preheated from 60 to 140 degrees Celsius. The best material for the job is a material whose thickness ranges from 1.1 to 1.4 millimeters.
When creating a relief print, 4 methods are mainly used:
- Blind embossing. Used to produce a drawing or inscription with a perfectly flat surface. The imprint is made using a stamp, which is struck with a hammer; the result largely depends on the force of the blow. Sometimes the dies get hot, but usually not above 80 degrees Celsius, as there is a high probability of damage to the material.
- With foil. The secret of the method is that between the stamp and the material a foil in the shape of a picture or logo is placed, which is pre-impregnated with wax-based glue. When the stamp is struck, the foil is imprinted into the impression and then firmly bonds to the skin. In this case, the stamp necessarily warms up.
- Embossing. Embossing is carried out using a press, the impression is created with or without foil.
- Texturing. The essence of this option is also extrusion, only now the pattern is created on a specific place, and on the entire material.
Features of the craft
In the modern world, leather embossing is characterized by industrial scale. Original patterns are knocked out at factories using special presses. Stamps or cliches are also used. They have a pattern on them that appears on the skin when pressed.
On an industrial scale, patterns are applied to both natural and artificial leather. To emboss leather at home, it is important to be able to work with natural materials.
Step-by-step instructions for embossing leather
Let's look at a step-by-step example of working using the cold stamping method:
- First you need to decide what kind of leather and how thick you will use.
- Next, select a stamp; if you are applying a direct type stamp, then you should not forget to mirror the elements.
- If you are using vegetable tanned leather, you should soak it in warm water for half an hour before stamping. Then you should wrap it in a 10-degree terry towel to absorb excess moisture. If the skin is over-moisturized, the print will turn out shapeless.
- Tools (a hammer with a stamp) should be placed next to you so that you can always use them quickly. A wooden base or rubber backing should be placed under the material.
- Touch the skin after drying; it should feel like slightly moistened suede.
- Then place the leather on the base, and place a stamp on top at a right angle to the surface. Next, a precise and strong blow is applied with a hammer, the power of the blow and accuracy play an important role. Since a slight shift of the hammer to the side, the impression may remain deeper on one side, while on the other there will be a barely noticeable dent.
- Then the embossed blanks are hung to dry at room temperature. To prevent the skin from becoming deformed when drying, a small weight must be attached to the bottom. Next, you can begin work on fixing the print.
Useful tips
If you are purchasing a new batch of leather, then for the hot method you should select the temperature again. Since each type of skin can react differently to a very hot tool.
- It is permissible to use gold leaf for emboldening, but it must first be glued with regular foil, since without a reliable base the gold will quickly peel off.
- Experienced craftsmen in leather embossing know that it is easy to over-wet the material, for this reason they use factory-made water impregnations with a spray bottle to moisturize.
- To better preserve the print, after drying, you can impregnate the design with a special fixing compound, and the reverse side can be treated with PVA glue.
- For foil stamping, only special thermofoil can be used. Regular food grade is not suitable, as it can tear and does not hold its shape well.
- When cold embossing, just pour hot water over the leather and then iron it through 4 layers of newspaper, and the workpiece can be used for work again. This advice will be relevant for beginners, because this way you won’t have to spend a lot on purchasing materials.
- If you want the print to last longer after hot stamping, you can polish the front part using GOI paste.
All steel tools should be degreased after use and then stored in a dry, warm place.
We are sure that the prepared material was informative and interesting for you, and now you are familiar with the basics of leather embossing. We wish you success!
Making inscriptions
First, a piece of leather should be softened with a wet sponge. Next, you need to apply the desired image with a stylus. The design will appear as a faint imprint. Then, using a rotary knife, carefully cut out the contours of the image, identical on all sides. If the knife cuts right through the workpiece, the work can be considered rejected.
To give the design a three-dimensional effect, use a hammer to press the image along the same contour with stamps with different attachments. Finally, all defects are removed with a rotary knife. At the end of the work, the drawing is covered with a special paint for leather. When the product has dried, it is polished with a soft cloth.