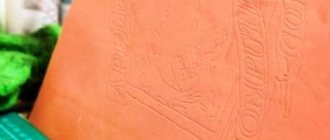
Leather embossing is an incredibly interesting process that you can easily organize at home and put words or designs on the cover of a wallet, key case, belt, bag, or slippers. The main thing in achieving results is perseverance and following the rules that the old craftsmen developed for themselves.
The main material for work is a clean piece of leather, preferably tanned with vegetable substances. According to experts on the issue, the material tanned with chemical compounds such as chromium is more suitable for making shoes designed for cold wet weather than for embossing on leather at home. The reason is that the leather, which has become more elastic, will not hold the embossing for long, trying to straighten out. And this makes all the work a waste.
Once you have stocked up on a suitable piece of high-quality leather, we recommend that you think in detail about what will be depicted on it. It is better to first draw an ornament, drawing or inscription on a sheet of paper in full size. This way you will visually imagine how your creation will look after embossing.
Embossing Tools and Getting Started
If you are seriously puzzled by the question of how to emboss leather, we are approaching the point of choosing tools. First of all, a non-professional will need a hammer, an iron for heating leather or foil, scissors, an ordinary kitchen sponge, a stylus, and tools for stamping. The latter can be purchased in specially sold embossing kits. These stamps will allow you to apply standard designs to items. Place a flat board or sheet of plywood under the leather so as not to damage the home surface on which you are going to work and be sure to moisten the leather with water. In a softer form, the material will be more elastic and softer. To imprint the design, apply blows with a hammer to the back of the stamp sharply, but not too hard. Before work, it is better to practice on unnecessary pieces of skin. If the leather is soft, the embossing will go on with the first blow, if it is hard, only with the second or third.
But if you have a special design in your head, you need to create a cliche that, when pressed sharply, will leave a deep impression with the finished design.
Such stamps are made to order in special companies. After you submit the draft of your drawing in electronic form, a neat cliché in a mirror image will be turned from it on a milling or laser machine. This will become the working part of your embossing. This method is the simplest, but a little expensive, considering that you planned to make no more than one print from it. However, experienced embossing experts advise another option: make a cliche from cardboard or rubber. They won't last long, but will be enough for one use.
Embossing method
Before starting work, the master must make a choice which processing method he will use and what technique he will use. Processing methods are hot and cold.
If the cold method is used, then the design is applied to the raw material using a strong blow to the cliche. Craftsmen use this method to emboss thin and thick leather. It is not difficult to understand the principle of operation: even a beginner can handle it. It is important to understand exactly what impact force is needed to imprint a design on the material. If the blow is not strong enough, the cliche imprint will be barely noticeable. If the impact is too strong, the raw materials may be damaged. You need to practice on a thicker canvas.
With the hot stamping method, the cliches are exposed to high temperatures. When heated, the upper layers of the skin are burned, resulting in a pattern with more distinct contours. During operation, it practically does not change. For thin fabric, the hot stamping method is not recommended. There is a high risk that the material will be damaged. This method makes it possible to produce spectacular products, because under the influence of high temperatures it is possible to change not only the relief of the image, but also its brightness.
Important! Beginner leather workers should start with the cold stamping method. It is safe and easy to learn: no experiments with high temperatures are required. The likelihood of injury during operation or damage to the canvas is much lower compared to the hot method.
Important! Beginner leather workers should start with the cold stamping method. It is safe and easy to learn: no experiments with high temperatures are required. The likelihood of injury during operation or damage to the canvas is much lower compared to the hot method.
Let's move on to working with cliches
If the cost of making clichés does not scare you and you still want to understand how to emboss leather with your own hands, you can begin the embossing process itself. Let's make a reservation right away: there are several ways to emboss leather. The simplest is cold blind embossing, which is achieved by sharp blows on the back side of the cliche, which is pressed into the surface of the product. Sharp blows create a reliable impression. However, if you have a good cliché and want the embossing to have a fashionable silver or gold coating, you should pay attention to foil stamping technology.
In this case, you will need special foil for hot stamping and a regular room iron. Place a sheet of foil on the leather item, cover it with a hot iron and let it warm up well. After this, store stamps or your original cliche come into play. With a sharp blow of a hammer, the cliche deepens the temperature-softened skin through the foil lying on it. Considering that the bottom layer of foil, covered with a film, melts quickly, the foil adheres tightly to the material at the point where the impact is applied to the object. By removing unused leftovers, you will get a convex
image covered with foil. After such an experiment, you will no longer be able to say that you have not seen how to do embossing on leather with your own hands.
But this is not the last way to perform embossing. Even the old masters thought that a convex, more prominent and interesting one would look much more beautiful than depressed embossing. This is how embossing appeared, in which two cliches are used, made in a mirror image of each other. When embossing, the cover of a diary or other product is placed between two clichés and pressure is applied with a press. The result is a beautiful voluminous result. True, at home, performing embossing would require significantly more costs.
Production of stamps for embossing using the electroplating method
Greetings, friends!
As promised in the comments, today I will show you the process of making stamps for blind leather stamping and foil stamping. Even though I have a store on Etsy and make stamps to order, I have never seen this method again. I will not make any secrets out of this and will tell you everything I know. The method, to be frank, is complex and requires knowledge from a variety of areas. It can hardly be put into production and mass production due to its labor intensity, and I am never a competitor to the guys who have CNC.
The undoubted advantages of the method • You are your own designer (you do whatever you like, the main thing is to find or make a template) • There is no need for expensive equipment and space (I have a window sill of a city apartment designated for the whole process). • Silence (can be done at night). • The cost of stamps is low
Disadvantages (where would we be without them) • The process is labor-intensive (a lot of manipulations and movements) • Constant adjustment of the electrolyte • Unpredictability of the process (I’m still not completely sure of a good result, from batch to batch it can be excellent or complete slag. Physical factors have more of an impact here -chemical properties of the electrolyte, its acidity, temperature, ratio of solution components, density and current strength and sometimes, it seems to me, the cycle and phase of the moon, as well as vibrations of the astral plane))) • Consumables. The electrolyte requires periodic adjustment, you need copper for the anodes (grade M-1 or AMF), you need solder.
The manufacturing process can be divided into stages. 1. Creating a matrix (what we will grow copper from). At this stage, we are looking for a template from which we will create a matrix. The template can be almost anything - anything you like, no matter what material it is made of, can be made of copper. 2. Galvanoplasty itself. 3. Foundry business. 4. Mechanical processing of the finished stamp.
1.Creating a matrix. I mainly use photopolymer stamps for scrapbooking as a template, but with skill you can hand-cut whatever you want from jewelry wax. I have enough of these purchased ones. I’ll show you the process using this corner stamp as an example.
To make the matrix, I use a two-component silicone compound with a Shore hardness of 60-70 units. It is sold by weight and lasts a long time. 2 kg of silicone costs around 1600 rubles + shipping. I have ordered twice in all this time. Despite the fact that I make forms not only for stamps.
I take a silicone impression. I try to fill in more details at a time. Doing each element separately is quite time consuming. So in this case, taking advantage of the writing of the article, I took a cast from several stamps.
To accompany the corner, I have identified two linear stamps (I will make a fillet, although I have not yet figured out how to give it a radius and attach it to the handle.) As soon as the silicone has hardened and stopped being affected by chemicals (it needs to be kept for about two weeks, preferably in the sun), we prepare it for bathing in electrolyte. The photo shows the matrix in the process of laying conductors. I stitch around the entire part with a regular needle using copper wire. I tried silicones of different hardness, but these were the most convenient to work with. Since silicone does not sink, you need to attach a weight. I tie a lead rod. The metal can only be used that is listed after hydrogen in the voltage table, otherwise contact copper will precipitate in the electrolyte and contaminate it. Lead is perfect for this and is heavy and intact.
To make the form electrically conductive, I use graphite spray from a radio parts store.
To load into the bath, I prepared several blanks at once. Buying one stamp there is a great luxury.
There are many ways to create a conductive layer. Graphite spray is the best option at the moment.
A few words about the required minimum for electroplating. Firstly, this is a current source . The laboratory power supply, which I purchased specifically for these purposes, did not work for various reasons, and I successfully bought a battery charger. It's just an unkillable thing. Enough for my modest level. You will need a bath heating element . The optimal solution temperature is 20-32 degrees. The most budget option turned out to be an aquarium heater. Magnetic stirrer . Well, I had to spend money here. There’s no way without her. Stirring the electrolyte is very important. I ordered a small 5 liter stirrer from the Chinese. Works very well, making a tornado in the bathroom easy. Actually the copper plating electrolyte . The most unpretentious and stable of all electrolytes. You will also need consumables in the form of thin copper wire and a copper anode (I buy it from companies that sell non-ferrous metal). Buy a high-quality anode of the M1 or AMF brand right away; you don’t need to shove all sorts of rubbish into the electrolyte. You can kill him in one go.
In general, we immerse our preparations in the bath, and for a couple of nights (during the day, when I’m at work, I don’t leave the device on, but you never know) they bathe there. At first I used scales to determine the thickness of the sediment, but now, as they say, only by eye. And the eye told me - it’s time to take it out.
Beautiful pink copper.
My favorite moment.
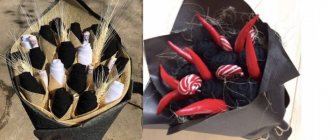
Next comes the foundry business. Again, I like to do everything in batches. And this time five stamps for leather and two stamps for wax seals fell into it.
This device was described in one of the MKs. Briefly, it is needed for precise positioning of the die mounting nut when filling it with solder.
I use this type of nuts. When pouring, the sleeve remains above the solder level.
I screw the nut onto the holder and prepare the stamp for pouring.
I melt solder on gas.
Using the movable corners of the structure, we make the formwork for pouring and actually pour it. It's not a tricky thing.
These are the bricks we got.
Now processing of the workpiece.
It is more convenient to sharpen the solder with a rasp like this.
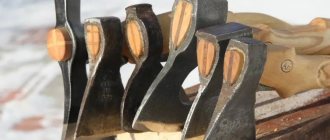
The handle is the most common wooden one. Suitable for all stamps with this thread.
Not the most filigree of my stamps, but the corner is neat :)
That's all, bye everyone!
| Sergey Salamatin is an active member of the “Manual Binding” community, a bookbinder. Nizhny Novgorod |
If you find a typo, please select the fragment of text with this error and press Ctrl+Enter
How to highlight embossing on leather.
Often, amateurs and experienced craftsmen come to the desire to highlight the resulting embossing on the skin with color if it looks faded. If the question concerns a handbag, there are no problems: a person with artistic taste will select interesting combinations of colors and paints to create the desired color scheme. If a man's briefcase, purse or belt is embossed, there is no need to talk about bright colors. In this case, some craftsmen, explaining how to highlight embossing on leather, advise using hot stamping, since it, by burning through the thinnest layer of the leather surface, makes the color of the embossing darker than other areas.
Sometimes, for such purposes, printing is used with an awl or other tools and stamps. By making additional patterns, which are provided by store stamps, you will make the embossing more noticeable. As a last resort, try foil stamping, which looks beautiful and solid on leather items. To do this, you will need the already described method of hot blind stamping.
What material is suitable for embossing?
Experts recommend using only special vegetable tanned leather at home (substances such as tannins are used during tanning). This material is particularly elastic, so any pattern can be applied to it. The relief of the pattern is preserved for a long time. In addition, the following advantages of leather that has been treated with tannins are highlighted:
- 100% natural;
- the material has not been exposed to harmful, non-ecological substances;
- the fabric is soft to the touch, gives a pleasant tactile sensation;
- pleasant natural shades (beige, cream, milky).
When dyeing, only safe emulsions of natural origin are used.
The thickness of the material is a characteristic that is important to know when choosing a processing method. When using cold stamping, choose a material whose thickness is in the range of 0.8 mm and above. You also need to consider how the raw material holds its shape and the applied relief.
When processing raw materials with hot stamps, workpieces are taken whose thickness is from 1.2-1.4 mm. Beginning craftsmen should not immediately start working with thin leather. You need to learn embossing on samples with a thickness of 2-2.4 mm.
To make different products, the leather must be special. What types are there:
- A wear-resistant and dense raw material is saddle cloth. It is used to make leather products such as sheaths, waist belts, bracelets and cases. Material thickness – from 1 mm.
- Masters call a plastic, well-bending material yuft (from 2 mm). Various accessories (keychains, animal figurines) are made from such leather.
- Strong leather with a smooth matte surface is called crust. Small bags, purses, wallets and key holders are made from it.
If you have any doubts about choosing leather fabric, you need to find out about the characteristics of the raw material from the person who distributes it. Experienced craftsmen on forums often share important information that may be useful when purchasing.
Treatment of leather after embossing
You already know how to emboss leather, but you are not yet familiar with the finishing process of the material. So, when the drawing is ready, you should go over each line with a stylus and try to make it smoother so that the drawing looks less rough. Then polish the product with a soft cloth. When the treatment is completed, it is advisable to wipe the skin with water and leave to dry.
When you first get involved with the work of a leatherworker, you will experience conflicting feelings. Firstly, you saw the immediate result of your work and realized that amazing designs on the skin are quite accessible to you with patience and some experience. On the other hand, it became obvious that this work is not as simple as it seemed at first glance. Applying each print requires precision of hand, care and certain skills.
Some remain a fan of leather embossing for many years, while others, realizing that it is safer to get a high-quality result from professionals, order embossing in workshops equipped with a press and other special equipment.
Burning stamp
| Wood burning stamp with a raised image | |
| Area up to 10 cm2 | 1800 rub. |
| Area from 10 to 25 cm2 | 180 rub./cm2 |
| Area from 25 to 50 cm2 | 150 rub./cm2 |
| Area from 50 to 80 cm2 | 130 rub./cm2 |
| Soldering iron 200 - 300 W (with adapter) | 2500 rub. |
| Soldering iron 500 W (with adapter) | 3500 rub. |
| Handle 150mm (brass + textolite) | 500 rub. |
| 350 rub. |
- Engraving depth over 1.5 mm + 50% for each additional. mm
- Coat of arms + 50%
- Complex image with high labor intensity from + 25% to +100% to the cost of the product
To order, contact us by phone +7 (499) 3940020, mail or use the online chat in the left corner of the screen.
- ———————————————————————————————————-
The process of burning a design on wood is known to us as an ancient art form that is found in the culture of various peoples.
For quite a long time, the process of burning was perceived only as folk art, and even now many people are interested in wood burning as a hobby.
But already at the end of the last century, wood burning firmly entered the professional environment, where this fascinating process began to be used for commercial purposes.
In a professional environment, wood, leather, plastic and other materials that can withstand high temperatures are processed using burning clichés.
The essence of his work is simple - an exclusive text or design is engraved of a wood cliche a stamp is obtained on the wood .
Using a burning cliché
At all times, they sought to protect their product from counterfeiting and, caring about preserving the authorship, tried to gracefully sign their work. Nothing has changed now. Artists, workshops and various enterprises use cliches for burning on wood - they leave a brand mark on objects and products, which serves to distinguish original products from fakes.
How to make an impact stamp with your own hands
Making a striking stamp for blacksmithing is not difficult, the main thing is to approach this issue competently. As a workpiece, you need to use a round or square rod made of tool steel (for example, 9ХС, ХВГ, etc.).
Using homemade impact stamps, you can apply different patterns, letters and ornaments not only to the surface of metal, but also to leather products. Typically, electrochemical etching or CNC mechanical engraving is used to transfer the pattern to the impact stamp.
However, in this case, we will consider the manual method - using metal files. At first glance, this procedure may seem complicated and time-consuming, but, as the saying goes: “You can’t catch a fish out of a pond without labor.”
The process of making an impact stamp
We clamp the workpiece that will be used to make the impact stamp in a vice and process it with a file, giving it the correct square shape. Then we mark the silhouette of the letters on thick paper, glue the stencil to the working surface of the stamp and “cut through” it with a file.