A wonderful day is approaching - a holiday of spring, love, tenderness and beauty! It is filled with care and warmth. Because on this day absolutely everyone congratulates women on their triumph. So, many people have a question: what to give? The main thing in a gift is not its cost, but its significance. And the most valuable gifts are those for which you have allocated precious time and invested your soul. That is why we have selected for you the best and most interesting DIY crafts for March 8th with step-by-step photo instructions. They will win the heart of any girl!
You can also make crafts from cotton pads
This article is also suitable for those who are puzzled by the need to make something for a holiday in educational institutions, such as a school or kindergarten. This is a great opportunity to create with your kids and for this you don’t need any special abilities or tools. Let's plunge into the bright world of paper gardening and floristry.
You'll like: Do-it-yourself corrugated paper tulips with candies: 8 detailed master classes
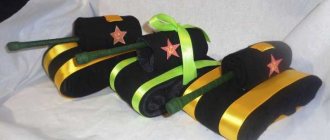
Sweet eight
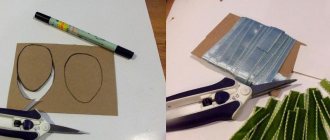
Let's make a sweet gift for International Women's Day - the number eight from Raffaello chocolates. These sweets with coconut sprinkles have already become an integral symbol of celebration. With the help of step-by-step instructions, you can make a surprise quickly and easily! Make it, surprise and delight your loved ones.
Required materials and tools:
- Thick cardboard
- Scissors
- Stationery knife
- Candies
- Ribbon 1cm wide
- Glue gun
- Red paper
Let's get started:
- First, print out the attached template. We transfer the silhouette of the figure eight onto thick cardboard, we need two pieces. Using a stationery knife, cut out round holes and the number 8 itself.
- Let's make a round stand with a diameter of 14.5 cm, cut out four such elements. On two of them we make a hole exactly in the middle to insert a figure eight.
- We glue the circles without a hole together, and attach the rest with a hole on top of them.
- We cover the number 8 and the stand with red paper, turning the ends towards the center so that the edges are also filled.
- Place it on the Raffaello glue gun around the perimeter of the product on both sides, leaving space at the bottom to insert into the stand. We decorate the sweet gift with a scarlet ribbon bow.
Our sweet eight is ready!
Rope necklace
This decoration is suitable for both girlfriends and mothers. It is created from simple materials found in every home.
All you need is:
- multi-colored yarn;
- thick clothesline;
- jewelry clasp;
- wire;
- glue.
Performance
- Take a rope, fix the thread with a knot, and glue it.
- Use different yarns. The areas with wound threads should be 2-3 cm. After this, the thread is fixed with glue.
- The same operation is performed with other threads. The dark thread is wound crosswise.
- It is secured using wound wire. Use pliers to press the ends to the rope.
- Make brushes: form a bun, tie it with thread at the top, cut the middle so that the ends dangle freely.
- Attach the lock.
- The decoration is ready.
Towel bunny
A set of towels is a useful and versatile gift, but what if you present it in the unusual shape of a cute animal? In the next master class you will learn how to fold any fabric into a wonderful bunny. Any girl will love this surprise.
We will need:
- Towel
- Rubber
- Double-sided tape
- Eyes and half beads for decoration
Progress:
First, fold the material so that you get an even square.
We raise the right corner to the left, but with a shift to the right.
Starting from the fold side, roll the towel into a roll. We bend it in the center and now we have bunny ears.
We wrap an elastic band around the part behind the ears to form a head. We take the tip of the material, cross it down and secure it with an elastic band, and also draw the other end under it. We got paws.
We attach toy eyes and a semi-bead for the nose to double-sided tape.
The cute animal is ready!
Flowers for female colleagues at work on International Women's Day
We continue to surprise our women, and I propose to once again make unforgettable souvenirs from fabric in the form of red tulip flowers, which are shown in this video. It looks like a soft toy, only it’s a bouquet.
Or use another option of biscuit edible roses, it’s very stylish and fashionable. Everyone at work and at home will be jealous of you later. Watch the recipe right now, by the way, your mother will also be delighted with such a wonderful and beautiful gift:
Well, again, since I’m familiar with beadwork, I suggest taking and weaving an orchid.
You will see a master class with step-by-step guidance just below:
Bouquet of roses
A very easy craft that everyone can repeat! You can make it together with children for mothers. Also, such a bouquet will be a pleasant addition to any gift set.
Prepare in advance:
- Colored and wrapping paper
- Colored cardboard
- Scissors
- Ribbons
- Sleeve
- Stationery knife
- Glue stick
- Glue gun
Let's get creative:
- Cut out 7 circles from paper, six centimeters in diameter. We put them together and carefully cut out the spiral.
- We coat the tip with glue and begin to roll up the bud, starting from it towards the center, and at the end we also fix it. We make flowers from all the preparations.
- We divide the sleeve in half and use only one of them for the bouquet. We seal one of the holes with a cardboard circle of suitable size. We fix all the roses on this side using a glue gun.
- Wrap the product in wrapping paper and tie a bow at the base.
Heart for mom on March 8 (template inside)
A child can express his love for his mother by giving her a heart-shaped craft. But not a simple one, but with the image of your own palm.
Of course, creating such a gift will require perseverance and patience, but it will turn out very touching. If the master class is held in a large group of children, you can involve their parents in helping.
Materials:
- Cardboard;
- Glue;
- Scissors;
- Ribbon;
- Red and white napkins.
- You will also need a heart template. You can use this.
Subsequence:
Cut out a heart from colored cardboard. Cut the napkins into small pieces and roll into neat balls. Using a simple pencil, trace the child’s palm on cardboard. Now you can proceed to the main part.
Lubricate the cardboard heart with glue and lay out a design from crumpled pieces of napkins. Let's start with the palm.
If desired, you can put an inscription out of balls of a third color in a free corner. Glue a loop of satin ribbon to the back of the work. The three-dimensional heart for mom for March 8 is ready.
If you don’t want to make a heart, you can use another bright symbol of the holiday instead – the number eight. Look how many design options there are.
The technique for making such crafts is quite simple. But the result is impressive!
Anything will do as a material. Look what a beautiful figure using the quilling technique.
Even sweets are used.
And you can make such funny eights with your own hands. If you glue a magnet to the back of them, the numbers can be attached to the refrigerator.
Interesting options for crafts from all sorts of things
You can create incredible surprises without having any special tools at hand. Handicraft is a wonderful hobby and it has many facets! It’s easy to make interesting fakes with your own hands from all sorts of things, so you don’t have to spend money on expensive consumables and materials. However, you can try different techniques and choose the one you like best. Or to captivate children with pleasant and useful creativity.
A useful and at the same time practical craft is a pencil organizer.
There are also many ideas for crafts from scrap materials, such as this stand made of clothespins
Here's a cute bouquet you can make from used caps that have been lying around the house for a long time.
Another idea for an organizer framed with a beautiful ribbon
Ideas for cute crafts made from disposable tableware:
How do you like this lamp? I'm sure it will look great in any decor.
Baskets for flowers or sweets from plastic bottles:
Good idea for crafts made from cotton swabs
You can also make a paper card and add your family photos to it.
A bouquet of buttons, a craft for real needlewomen
Didn’t you expect that even from the hard paper that remains after using toilet paper you can make something? Make simple butterflies from bushings with your children, they will definitely love it!
Or this flower made from cotton pads
Bright flowers made from paper clips will decorate your desktop
What do you think of these cute transparent cups?
Suitcase made of iron lids
A heart made of toothpicks is a great option for beginner needlewomen
And you can complement such a wonderful craft with a drawing or a postcard.
Edible gifts
This category includes all sorts of goodies, from unusually shaped sandwiches to homemade cake. Even the simplest recipe will help create a festive mood. Some of the goodies can be made very quickly, even without baking.
And holiday cookies can be placed on paper with written wishes or a beautiful openwork napkin cut out like a snowflake.
An excellent decoration for the holiday table will be a bottle of champagne, decorated in the form of a doll with a skirt made of a kitchen napkin with a small cap on a cork. For decoration, you can use artificial flowers, a necklace made of small beads or seed beads.
Chamomiles from napkins
Let's make a bouquet of daisies from a material that everyone will definitely have in their home! Both adults and children will enjoy the creative process, and cute flowers will pleasantly surprise anyone on International Women's Day.
Required materials and tools:
- Napkins (white and yellow)
- Threads
- Toothpicks
- Scotch
- Colored paper
- Scissors
Let's start creativity:
Using a toothpick and tape, we gradually roll a thin tube from a strip of paper, this will become the stem of the flower. Don't forget to secure the ends!
We straighten the white napkins and cut them into two even parts. Divide each yellow half in half and fold it to form a square. We cut its opposite sides with fringe.
We place the yellow element on the white base and fold the parts like an accordion.
We wrap the middle of the resulting accordion tightly with threads; the edges of the petals can be given a rounded shape and straightened. Next, we wrap the end of the stem around the thread and secure our chamomile with tape.
We straighten all layers of petals. Thus, we produce several products. We make an envelope for a bouquet from paper, we recommend putting a lace napkin inside, and decorate the rest to taste.
How to make a gift from paper for mom in kindergarten
Little hands have already done a lot of such work, remember last time in another post we created cards and crafts with which we delighted mothers and grandmothers. Today I’ll show you a few more options for what you can impress.
I suggest you start creating and take these wonderful mimosas as a basis, do them at home or in kindergarten with preschool children. This kind of work can also be done with schoolchildren in primary school. You will need napkins, roll them into balls and fix them with water, let them dry.
Then make leaf blanks from colored paper.
And then bend a sheet of office paper and glue it like this to make a mimosa.
The next work is dandelions. You will need small squares, which you will connect in several layers with a stapler.
Then cut out in a circle and make cuts along the edge.
Next, collect the flower with your hands.
Cut out leaves from green paper according to the template.
And this is what should happen in the end.
DIY craft for mom, easy and quick
Let's make a present for the main person in our life; it is for mom that we want to express boundless love on women's holiday. Don’t forget to take care of her and make surprises not only on significant days, but also just like that for no reason.
Rest assured, she will be extremely pleased. And we have prepared for you some simple DIY ideas that any child can do.
We will need:
- Paper of various shades
- Scissors
- Glue
- Rhinestones
- Stapler
Progress:
- We fold the green A4 sheet alternately with an accordion towards the center, each step will be one centimeter wide. Iron each fold thoroughly.
- We staple the resulting corrugated paper at the bottom with a stapler.
- We cut the scarlet square diagonally, fold the ends of the triangle upward so that we get the shape of a tulip.
- We make several buds of different tones and glue them along the perimeter of the green base. Wrap the fastening area with a paper strip. We complement the composition with a magnificent bow and rhinestones.