Many people enjoy spending their leisure time folding paper using the origami technique, a popular hobby for many people. The use of this technique extends to many areas, even to children's crafts.
When thinking about the holiday table, many people pay attention to its appearance. The art of origami will help you decorate your holiday table.
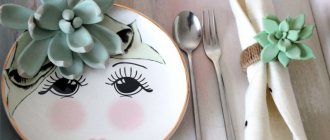
In everyday life, you can also often find origami on the table, which is folded from beautiful soft napkins. Such a simple decoration makes the table setting original.
Origami table napkin fan
This lesson will help you create a simple origami decor for any table. For needlework, use additional tools.
Buy an origami ring from a napkin in advance, or make it yourself. To do this, select colored cardboard that matches the tone of the paper. Make an oval figure out of it, as in the photo. A length of 7 cm is enough. Using a hole punch or awl, punch a hole on both sides of the cardboard.
Thread a beautiful ribbon through the holes in the workpiece. Fold the napkin itself like a regular accordion. Bend the corners of the paper material from the middle. Repeat folding as in the photo below.
Such napkins will decorate the holiday with their sophistication.
Lotus
Fold the corners of the napkin towards the center.
We turn the resulting square over to the other side.
Now fold the corners towards the center again. To prevent them from falling apart, it is better to hold them with your free hand.
Now we need to turn out the corners on the side that is now facing the table. We do this carefully so that the napkin does not tear. It is better to turn it with your right hand, holding the corner with two fingers of your left hand.
It turns out like this lotus.
You can place glasses in the center of these flowers.
Napkin “Peacock tail”
For this craft you will need a beautiful bright napkin.
Choose it so that it matches the overall idea of table setting. Fold the napkin in half. Make a paper accordion for two-thirds of its length.
Fold the napkin in half again, placing the accordion on the left. Take the origami craft by the untouched part and straighten the resulting “tail”. Using simple movements, create an angle between the accordion and the flat part. This will add stability to the work.
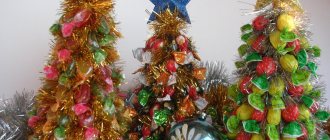
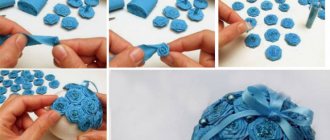
Beautiful flowers
It’s easy to make a festive decoration for a table or gift box in the form of flowers from paper napkins. For work we will need the following materials:
- Scissors;
- Glue stick or PVA glue;
- Strong thread;
- A tube that acts as a stem if you plan to make a bouquet.
Step-by-step master class
- The napkin is folded into an accordion with the width of each fold equal to one centimeter. To make the product neat, it is advisable to make markings on both sides.
- Without unfolding the accordion, you should place its flat side on the table and fold it in half to find the middle. Along this line, the folded napkin is tied with a strong thread.
- The free ends of the accordion are rounded off using scissors.
- All that remains is to fluff the flower and glue the folds together to create a spectacular corrugated circle.
You can fasten together several flowers of different sizes. The resulting terry version will look great as a decoration on a box, photo frame or in a bouquet, especially if you attach the flower to an improvised stem - a tube.
Napkin “Herringbone”
You will need a classic napkin, folded in four, as in the package. Taking 1 layer of paper, bend it, not reaching the edge by 10 mm on three sides.
Turn the napkin over and fold it on both sides, covering one another. Follow the instructions in the photo.
Rose
As with the lotus, fold the corners of the napkin towards the center.
Now fold the corners of the resulting square towards the center and carefully smooth the sides.
Turn over to the other side.
Fold the corners towards the center, level and smooth the sides.
As in the case of a lotus, we straighten the corners from the reverse side, “turning” them into petals.
Now we straighten the second row of corners.
We straighten each corner so that it looks like a petal.
The result is a rose like this.
Origami napkin holder made of modules
For those who want to use origami for daily table decoration, there are many options for creating napkin holders.
Triangular modules of 3 different colors were used for the lesson.
Choose shades to suit your own taste. This is what an origami napkin holder can look like.
- The assembly diagram for such a napkin holder for a table is simple. For the first and second row you will need 8 turquoise and 7 coral modules.
- The third row consists of 8 coral-colored pieces.
- To give the napkin holder an ornament, make columns from the modules. Place 3 small “towers” in the middle and 2 larger ones at the edges.
- Combine the central protrusions with corners of 11 elements. Close the outer columns with chains of 8 modules.
- For brightness, add 1 more color in different parts of the napkin holder.
- The second half is formed in a similar way. The only difference is the color design.
- Connect the halves to each other using regular toothpicks.
Thanks to such simple creative solutions, table decoration is accomplished.
Unusual vase with three-dimensional ornament
If you urgently need a tall vase for your favorite flowers, but the store does not have products that match the interior of the room, you can easily make it from scrap materials, spending a small amount of money. Materials for making a vase:
- PVA glue;
- Can-opener;
- Scissors;
- Paper towels that match the color of the wallpaper;
- Three or four cans of peas;
- Napkins of a contrasting color to the main background;
- A simple pencil.
Step-by-step master class
- First, empty jars are prepared. One remains with the bottom, and for the rest it is cut out.
- Next, the prepared jars are placed one inside the other, forming the desired height of the future vase.
- Using PVA glue, the structure is covered with paper towels. You will need at least three layers.
- After complete drying, a drawing is applied with a simple pencil. It is more convenient to make it from large geometric shapes that make up an interesting abstract composition. It can also be hearts, flowers, butterflies in accordance with your own creative ideas.
- From squares cut from napkins, balls are formed, which are filled with the depicted figures by gluing.
About materials
The basis for decoupage can be a wooden or ceramic, metal or glass, fabric or plastic object. For example, you can decorate photo frames, paintings, a tray, a vase, etc. with your own hands. An important condition is the smooth surface of the source material.
Consumables are:
Professional glue may only be required when working with a heat gun. In other cases, you can use regular PVA.
It is better to choose acrylic paints. They do not smell, dry quickly, do not yellow and are easily corrected in the “raw” state.
In this technique, it is advisable to use decoupage varnishes (matte or semi-gloss), which protect the image from mechanical influences.
The canvas is decorated with colored paper, stones and rhinestones.
You can borrow images directly from paper napkins, clippings from books, magazines, and postcards.
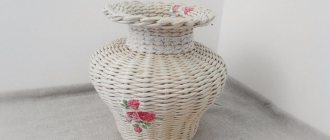
Refined spring vase
Crafts made from napkins are not limited to just flowers. From this wonderful material you can make or decorate almost anything, for example, a decorative flower vase. To make an unusual vase, you will need to stock up on the following materials:
- Napkins with elegant plant or animal patterns;
- Can – tin for coffee or juice;
- Acrylic white paint and putty;
- PVA glue;
- Stack;
- Brushes.
detailed instructions
The jar is coated with paint on both sides, and then dried in a well-ventilated area. The top thin layer, where the pattern is located, is carefully peeled off the napkin. Fragments of the picture necessary for the composition are cut off with your fingers
It is not advisable to cut them with scissors, as in this case the edge will be too smooth. The next one-color layer is glued to the outside of the prepared jar, tearing off small pieces according to the papier-mâché principle. Acrylic putty is applied in uneven strokes along the upper cut of the can, masking it. Next, on one side of the future vase, from top to bottom, a trunk and branches are formed using putty using a stack. The adhesive composition is diluted from one and a half parts PVA glue and one part water. Fragments with leaves, birds, butterflies, forest animals are placed on the surface of the jar in accordance with the compositional design and are carefully coated on top with a brush with an adhesive solution. During gluing, it is important to apply movements from the center of the fragment to the edges, carefully but carefully smoothing it, trying not to tear it. Having covered the entire surface of the vase, paint the neck to match the main background. To paint the branches and trunk, use brown paint to fill in all the irregularities. After the trunk has dried, decorative protrusions are highlighted with golden paint using a sponge. To do this, the sponge is lightly pressed onto the desired area of the improvised trunk without indentation. A slight golden effect can be created over the entire surface of the vase.
A DIY vase is a beautiful and affordable accessory that allows you to transform your interior.
To secure the decor, the dried surface is coated with colorless varnish. Bouquets of wild and garden flowers will look great in such a vase.
Step by step lesson #2
If you want to spice up the decoration a little, try using a suitable photograph or drawn image of a real ballerina as the base:
Print two mirror copies of the same picture (you can rotate it 180 degrees around the vertical axis using almost any graphics editor). Cut and glue them together so that the finished figure is double-sided. We used this vintage image (clicking on the image will open the photo in full size, which you can use in your work):
While the base dries, cut out two identical rectangles from thick paper. Fold them like an accordion, then bend the resulting workpiece in half:
Glue the edges of the paper to each other on the inside of the folded accordion. When opened, the resulting “fans” should completely cover the hem of the drawn ballerina. Now you need to glue the blanks to the figure. Slightly unscrew the outer edges of the accordion and give the pack a curved shape. Apply a little glue to the edges and press them to the edges of the base. Glue the second “fan” on the other side of the figure.
To give the pack even more volume, you can attach another thin tissue paper on top of the first skirt:
To make a pendant, poke a small hole in the top of the figurine and thread gold or silver thread through it.
Ballerina made from napkins
And finally, the most unusual lesson! If you have a piece of thin wire and a napkin on hand, you can make a model like this:
To begin, twist the wire into a basic silhouette of a man with his arms raised.
Next, divide a regular table napkin into layers (usually there are 2 or 3). If there was a bright design on the front side, use this layer for something else, it will not work for our project.
Set aside a few untouched layers of paper and tear the rest into strips about 3 cm wide
It is very important to do this by hand and not with scissors. Take the wire “skeleton” and start wrapping it with strips of paper
As the paper covers the figure, apply colorless office glue diluted with water over it.
By wrapping several additional layers of paper around the upper part of the body, make a slight thickening to make the figure of the toy ballerina more reminiscent of a human. After the figures are completely dry, you can start dressing.
Fold one of the set aside squares as if you were going to cut a snowflake out of it (see previous instructions), measure the desired length of the dress and trim off the excess paper from the wide side. It's better if you make the cut line slightly wavy.
Holding the paper at the intersection of all the folds, tightly roll and unfold the workpiece clockwise several times, and then do the same in the opposite direction:
Two-layer skirts look more delicate, so don’t be lazy to repeat this procedure with another layer of paper napkin.
After carefully making small holes in the paper for the ballerina's head and arms, put the dress on her. Using a white thread, tie it at the waist
And this is what happened:
If you still have any questions, watch this video for greater clarity and for new ideas:
https://youtube.com/watch?v=HXjznuqWpXU
Creativity as a learning process
The creative process is unique: its result is the creation of a unique product. There are many types of creative activities - drawing, music, making arts and crafts, etc. Making any products with children is a fascinating activity for an adult and especially important for children.
For an adult, this is a reason to be proud that a child did this. For a child, making crafts means gaining knowledge and skills in a playful way, such as learning the shades of colors and their combinations, honing fine motor skills, and developing imagination.
Classes are mainly held in kindergarten, because the child of working parents spends a lot of time there. But at home, mom and dad, together with the baby, can also make some products, and thereby contribute to the formation of the child’s personal characteristics.
Any type of creativity gives a child positive emotions, which in turn has an invaluable effect on personality development.