How to make?
To make a wooden watch with your own hands, follow these steps:
- Find a dead tree. Cut off part of the trunk and bring it to your home.
- Cut a 1.3 cm thick piece of the barrel. This will be the case of your watch.
- Clean the resulting piece of wood thoroughly. Use sandpaper to smooth the surface.
- Separate the mechanism from the old watch. You can use your old boring wall clock or find any cheap clock that you can upcycle.
- Mount the clock mechanism on the back of your piece of wood. To do this, take a hammer and chisel and cut out a rectangle, the dimensions of which are identical to the parameters of the clock mechanism. Also drill a hole on the front side of the future watch.
- Attach the clock mechanism to the wood using glue or double tape. This way your mechanism will be protected and will not fall.
- Attach the hands to your clock.
- Paint the numbers indicating the time on the clock.
- Attach the hook to the top or back of the clock.
- Hang a clock on the wall. Enjoy your new clock in a rustic style.
Manufacturing process
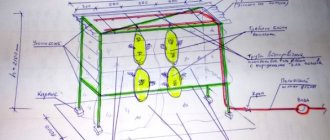
1. Although the wooden pancake was cut very carefully... the sides were not quite in the same plane and there were deep marks from the chainsaw chain. To make it easier to remove irregularities, I took a square piece of plywood slightly larger than the diameter of the pancake. I laid the cut on the plywood and traced it with a pencil (marking the common point and side).
I drilled a hole to fit the jigsaw blade. I cut out the core in a piece of plywood.
I placed a birch block into the cut out center of the plywood square and screwed in self-tapping screws at the ends to secure it:
2. Because After drying, the birch became like bone, so the hand sander wouldn’t take it, so I had to resort to using a belt sander:
3. Using a compass, I “found” the center of the disk and divided it into eight parts. Read here how to divide a circle into eight parts using a compass
4. For beauty, I made two circles with an engraver and applied divisions (at first I planned to make only four numbers “12”, “3”, “6”, “9”):
5. On the reverse side I marked a place for the clock mechanism and used a hand router to select a recess.
Read about choosing a watch mechanism here
6. On a thin wide strip (made of ash) I drew the future numbers, cut them out with an engraver and processed them with a sandpaper attachment:
7. To make the numbers stand out more noticeably on the dial, I decided to paint them with bronze paint (of course it would be better to darken them with some kind of stain, but it was not possible):
8. The next step was to return the bark to its place... it turned out that this was not at all easy to do.
A small piece had to be cut out of the bark ring because the diameter of the core had become much smaller. Having coated the glued areas several times with PVA (it was too absorbed too much), I pulled the bark together with plastic electrical clamps and in some places had to be pressed with small screws (after the glue had dried, I unscrewed the screws):
9. The next day, without removing the weights, I used a sander to level the protruding edges of the bark flush:
10. I puttyed the small gaps and sanded them again:
11. Bent the eyelet for hanging and marked its place:
12. To avoid being hit too hard with a failed cutting board, I made a subtle inscription on the back side:
13. I glued the numbers to their rightful places using the same PVA and placed them under the weight:
14. Inserted the clock mechanism, attached the hands, screwed the lug:
15. And finally they gave the parents a real watch:
They were sooo happy about such an unexpected gift!
Do you have a piece of wood lying around? Let's make a watch out of it.
All you need:
- Cross section of the tree.
- Acrylic paints.
- Clockwork.
- Burning device (optional).
- Tassels.
- Drill.
- Stickers in the form of numbers.
If your cut is not processed in advance, then do it yourself using sandpaper. Then, using a drill, drill a hole of suitable diameter for the clock mechanism.
We needed several coats of paint to achieve an even color.
Once the paint has dried, let's start with the numbers. Since the wood cut is not too large, we decided to make only 4 main numbers: 3, 6, 9, 12. For this we bought stickers in the form of numbers. Peel the numbers off the base and experiment with where to place them best. Use a pencil to mark the placement of the numbers. Don't glue numbers to wood.
When the placement of the numbers is thought out, take the remaining stencil and draw a number on the clock using acrylic paint. We chose black. Don't put too much paint on the brush so that it bleeds through the paper and ruins the outline of the numbers.
Draw all the numbers.
Then we took a burning machine and decided to make a small ornament. Before use, the device must be heated for a couple of minutes. To begin with, we made lines connecting the numbers.
This is what we got. As a finishing touch, you can coat the watch with a waterproof transparent coating. This will save the watch from dampness and extend its life.
The clock is ready, all that remains is to find a place for it in the house.
Wall clocks are a very practical interior detail. In the kitchen, they make it possible to keep track of time without being distracted from cooking or turning on the phone for this (especially since your hands may be covered in flour, oil or something else while cooking). Located in the room, they allow you to quickly find out the time without reaching into your pocket for your mobile phone. Eco-style lovers can make a watch out of wood with their own hands.
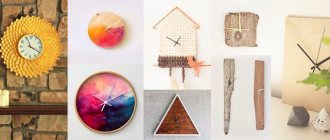
Other ideas
You can do it another way:
The woman with whom Anatoly Kot hid for several years
Lemon water: the right drinks to start your day with
Will harmony reign or will diseases be attracted? Various signs about seashells
- You can make watches from book volumes this way.
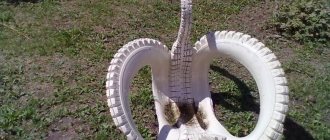
- Even an old bicycle wheel can make an impressive watch. To do this, remove the tire and attach arrows and numbers to the rim.
- A wonderful accessory in the shabby chic style will be made from boards. If you don’t have a round ready-made blank, just cut the boards according to the drawn stencil.
- A simple, boring watch can be updated with a bright knitted case, partially stretched over the front.
- You can paste an image of the moon onto a pre-made dial - this will create a very attractive art object.
- 12 favorite framed photographs will help you decorate a modern interior. Just hang the photo in a circle, and attach arrows and a mechanism to the middle of the composition.
What are the benefits of wooden watches?
Wood is a special material; objects made from it have a number of advantages:
- Naturalness.
- Low cost
(provided that the product is made by hand, because processing by a craftsman is often quite expensive, especially if it is an individual order). - Originality.
Many people like to look at interior items made of natural wood, but not everyone decides to keep such things in their home.
A watch made from juniper or other healing wood will disinfect the air. To do this, they should not be varnished. The look will be more natural if you carefully rub the sandpaper over the surface.
If you make a clock from a cut tree with your own hands, you can leave a layer of bark. This will give the product a more natural look.
Decoupage
If, in addition to woodworking, you know the decoupage technique, you can decorate the surface of the clock using special decoupage cards or napkins for decoupage:
- Cut out a couple of elements from a napkin that match the style of the interior.
- Place the parts on the surface of the sanded saw cut (you can cover it with acrylic primer for brightness).
- Using decoupage glue, glue the plot to the wooden surface. Smooth out to remove any air bubbles inside.
- Cover the surface of the watch with varnish.
In the same way, cutting boards, kitchen stands, and decorative tabletops can be made from wood cuts.
What is needed to create a creative clock from log cuts?
In fact, the work ahead is not troublesome. Despite the fact that you will need to use logs of various sizes, and you will also need wood varnish, the work ahead is not difficult. All you need is a little free time and creative thinking to get everything done in a couple of hours. If you have experience in creating crafts for the home, then the project implementation time will quickly be reduced to an hour.
It is necessary to make a reservation in advance that you should not leave wood without protection from moisture. Even if the clock will be in a room where there is no excess moisture, it is still extremely important to coat the clock made from log cuts with several layers of wood varnish.
There is a significant amount of moisture in the air of any apartment. It is in the air in the form of nanogranules, which easily settle on any wooden things. Humidity in the air is formed from the breathing of people and from the operation of air conditioning, which introduces a significant amount of moisture into the air.
To create a watch from saw cuts you will need:
- Several logs of different diameters.
- Hand saw.
- Hot glue with application tool.
- Decorative metal numbers.
- Jigsaw.
- Vise.
- Pencil.
- Compass.
- Wood varnish.
You can easily find everything you need at your dacha or order it to your home. Nowadays, when the coronavirus pandemic is raging outside, unfortunately, it is quite difficult to move freely. Therefore, everything you need to create creative clocks from saw cuts can be ordered online, including logs of different sizes.
Important! It is very important to understand that wood varnish is extremely non-toxic, so you should not be afraid to use it to coat wooden products!
Alas, the total ignorance of people scares them away from using wood varnish and hot glue. Many believe that these two substances are hazardous to health and release toxic substances into the air. Don't be afraid to use either wood varnish or hot glue, as they only provide great benefits and no harm.
Preparation of material
To prepare high-quality parts, you will need to know how to use a hacksaw or circular saw to get a neat cut of wood.
Material procurement procedure:
- selection of wood (knots, branches, logs),
- removal of bark and sawing in the transverse direction,
- grinding the cut, drying, polishing,
- treatment with compounds to reveal the texture of the pattern,
- treatment with anti-rot compounds, varnishing.
Working on blanks will require time and skill. The result will be beautiful parts for making a wide variety of products. There are many options for products made from end-cut wood, ranging from crafts for children to home or garden interior items.
For further work you need a jigsaw and glue, and additional decorative elements if necessary.
Material properties
For work, elements obtained as a result of end sawing of tree trunks are used. Tree stumps, trunks, branches and branches can be used as raw materials.
For blanks, you can take fresh wood. Drying parts at high temperatures promotes the formation of textured cracks on them.
The type of wood is selected depending on the type of product:
- Coniferous wood is excellent for making children's crafts, toys, trim, home interior parts,
- wooden elements of garden decor require hard wood species (birch, oak, beech) as raw materials.