Gift options
You can make a plant from corrugated paper and decorate it like a basket of flowers. On the World Wide Web you can find more than one photograph of decorative snowdrops, extremely delicate and elegant at the same time.
Necessary materials
The question may immediately arise: what can a snowdrop be made from? We can immediately reassure readers - there is no need to buy anything supernatural or unusual. To make the first spring flower you will need:
- wire;
- glue;
- cotton wool;
- paints;
- corrugated paper of two colors;
- semolina.
Let's consider step by step how to make a delicate plant with your own hands.
Unusual materials
The craft can turn out to be very unusual if you use pumpkin seeds as materials. At the same time, there can be a lot of options for such work. For example, an applique or plasticine craft. They have one thing in common - snowdrop petals are made from pumpkin seeds.
For those who want to make an original craft, you can use fabric or foamiran as the material. Felt snowdrops can be used to make a brooch, and foamiran snowdrops can be used to make a headband, wreath or hair tie.
Related article: Airplane made from candy: master class with step-by-step photos
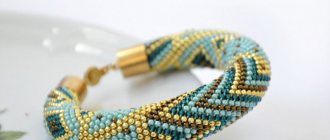
Beadwork looks very delicate and beautiful.
To work, you only need beads, thin copper wire, thicker wire for the stem, and thread.
One of the videos is shown below:
You can make a beautiful picture or decoration for a gift if you make snowdrops using the guilloche technique. It consists of burning the fabric using a special apparatus, finishing the products with openwork lace, and making appliqués.
Pictures embroidered with ribbons look original. To create them you will need satin ribbons, base fabric, floss thread, needle, scissors. You can also make a postcard using this technique. For this purpose, the basis may not be fabric, but cardboard.
Step-by-step instruction
Here's how the work is done step by step:
- First, petals, the base of a flower bud and leaves are cut out of paper.
- A long strip of green paper is smeared with glue and wound onto a wire.
- A small ball of cotton wool is glued to the tip of the wire.
- The cotton wool is smeared with glue, grains of semolina are sprinkled onto the glue and everything is painted yellow.
- The base of the bud is glued to the cotton wool.
- We fix the bud on a wire wrapped in green paper.
- We bend the wire slightly to give the “stem” the required shape.
- And lastly, glue several leaves to the stem.
You can make several of these flowers, arrange them as a bouquet and attach them to the gift being presented.
Beaded snowdrops
To weave snowdrops from beads, prepare:
- white beads 15-20 g
- salad beads 10 g
- green chop 15-20 g
- green beads 10 g
- wire
- small vase
- green threads
The material is designed for 11 snowdrops. One snowdrop consists of 1 flower (4 petals and 3 stamens) and 2 leaves.
1 step. Let's start making the petal. Parallel weaving. We string 3 pieces of salad beads onto a 50 cm long wire and pull the wire through 2 pieces of beads. You should get a triangle.
Step 2. We string 3 beads (1 white, 1 light green and 1 white) onto 1 end of the wire and pull the 2nd end of the wire through them.
Step 3. We string: 3rd row - 4 pcs. white beads; 4th row - 5 pcs. white beads; 5 row – 4 pcs. white beads; 6th row – 3 pcs. light green beads; 7 row – 2 pcs. beads of light green color.
We pull the ends of the wire together and twist them. The result is one petal.
Step 4 Let's move on to the 2nd petal. Repeat step 1, step 2. Carrying out step 3, we reach the 5th row and thread the wire to the first petal between the 4th and 5th rows.
We weave all the remaining rows, threading the wire to the first sheet.
Step 5 Let's move on to the 3rd petal.
Step 6 Create the 4th petal. We intertwine the petal on both sides.
Step 7 We make a stamen. Take a 20 cm wire, string 3 yellow beads and twist them. Next, we string together 6 light green beads onto two wires.
For one flower you need to make 3 such stamens.
Step 8 We insert the stamens into the middle of the flower and twist the wire.
Step 9 We weave a leaf. Parallel weaving. We take a wire about 35 cm long and collect 3 pieces of green beads. After this, we thread 1 end of the wire into 2 pieces of beads so that a triangle is formed. We put 2 pieces of green cuttings on 1 end of the wire, and pull the 2nd end of the wire through them.
Thus, it is necessary to make 11 small leaves (from 7 to 10 rows) and 11 large ones (from 10 to 15 rows).
Step 10 We collect a flower. We screw one small and then a large leaf to the stem of the flower at a short distance from each other.
We wrap the stem of the flower with green thread.
When all the flowers are ready, arrange them beautifully in a vase. Carefully straighten the resulting bouquet. Delicate beaded snowdrops are ready!
On the Melody of Beads channel, Melodiabisera also weaves snowdrops from beads, but they turn out completely different:
Another option
On the Internet you can find many ideas on how to make a beautiful snowdrop. Let's consider another interesting option.
For work you will need the following tools and materials:
- white and green corrugated paper;
- glue;
- scissors;
- wire;
- green threads;
- wax pencil.
The stages of work will be as follows.
Decoration or bouquet
First, let's look at a fairly simple way to make snowdrops, which can be arranged in a bouquet or decorated with a gift. Let's prepare everything you need:
- corrugated paper in white and green colors;
- wire;
- semolina;
- cotton wool;
- PVA glue;
- brush;
- paints.
Performing the work step by step:
- From corrugated paper we cut out petals, leaves, and the base of the bud, as in the photo:
- Take a long thin strip of green crepe paper, coat it with glue and carefully wrap it around the wire. Take just a little glue; you can lubricate it only at the beginning and end of the strip.
- Dip the tip of the wire in glue and attach a small piece of cotton wool.
- Paint the tip of the cotton wool with yellow paint or dip it first in glue and then in semolina tinted with yellow paint.
- Grease the base of the bud with glue and glue it onto cotton wool. Next glue the petals.
- Grease the bottom of the bud with glue, wrap the bottom of the petals and stem with a strip of green paper, and glue it.
- Give the desired shape to the stem and glue the leaves.
You can make a bouquet from several of these flowers, arranging it as for natural flowers. Can be attached with ribbon to a gift box. Or beautifully arrange it in a vase for interior decoration.
Related article: Large Kinder Surprise made of paper with your own hands according to the master class
Let's consider another option for such snowdrops.
For work you will need materials and tools:
- green and white corrugated paper;
- PVA glue;
- scissors;
- green wax pencil;
- green threads;
- wire.
Progress:
- Cut a rectangle out of white paper, fold it several times, cut out petals in a round, elongated shape.
- Cut out the base of the flower from white paper. Draw green stripes on one side of the rectangle with a pencil. Roll into a tube, making a flagellum from the bottom.
- Attach the base and petals to the wire with thread.
- Cut leaves from green corrugated paper, slightly rounding the upper ends.
- For the stem, cut a rectangle out of green paper and wrap it around the wire, brushing it with a little glue.
- Glue the leaves and give the flower shape.
There are a lot of options for making these colors.
It is worth noting that the stamens can be made of beads, pasted over the cotton wool with millet, or even inserted candy instead of them. You can arrange flowers in baskets, vases, decorative elements, or simply in wrapping paper.
Step-by-step instruction
Step #1. A rectangle is cut out of white paper, folded several times and oblong and rounded petals are cut from the blank.
Step No. 2. White paper is used for the base of the flower. The rectangle is rolled into a tube and green stripes are applied to one side with a pencil.
Step #3. The base of the flower is attached to the wire.
Step #4. Flower leaves are cut out of green paper.
Step No. 5. A narrow strip is cut out of green paper and attached to the wire with glue.
Step #7. The leaves are glued to the stem.
Another version of a flower peeking out from under the snow - ready!
Snowdrops made from paper for watercolor
MelMari shares another quick way to create DIY paper snowdrops.
Prepare materials from:
- sheet of white paper for watercolor
- hole punch for scrapbooking with a flower (5-6 petals)
- light green stamens
- tape
- thin wire
- scissors
- glue
Use a hole punch to cut the pieces.
Please note that you do not need to cut out a full flower, but only a part (slightly larger than half a flower)
Trim the ends of each flower and cut out the center.
To give the petals a convex shape, “curl” them inward using scissors. The stamens need to be prepared when assembling the flower: fold 2 stamens in half or take 4 ready-made stamens and glue them to the wire.
Apply glue to the edge of the petal and wrap the workpiece around the stamens:
For best gluing, hold the petals with your fingers for a while:
Then wrap the stem with tape or a narrow strip of corrugated paper:
Corrugated paper leaves are wound onto a stem and fixed with glue:
Original master class
Paper Crafts channel makes snowdrops from paper using the Origami technique:
Paper snowdrops can serve as skirts for tiny people) Look at this wonderful spring decor:
Photo https://burdastyle.ru
Sweets as a gift
Homemade bouquets with candy inside each flower are very popular today. The instructions for making such snowdrops are very similar in their methods, but differ in some nuances.
When deciding to make such a gift, you should remember that the candies should be round in shape, and the candy wrappers should have no tails. Otherwise, you will have to disturb the base of the bud.
Stages of work
Determine the number of flowers in your bouquet and, according to this, cut the required number of wires for the snowdrop stems. Make a small hook at the end of each wire.
A square (7x7 cm) is cut out of greenish paper. Slightly smooth the paper, place the candy in the center and bend the ends of the bud. Tie the bud with thread.
We wrap tape around the hook and insert the bud without piercing it. We wrap linden tape around both the wire and the paper. We cut petals from white paper, place one on top of the other and attach them to the bud with a thread.
Wrap tape around the bottom of the flower. Cut leaves from green paper. We wrap the wire with green paper and attach the leaves.
Make as many flowers as you think is necessary, tie them with a beautiful ribbon and give a sweet present to the girl.
Origami snowdrop for children: the easiest option
Making a flower
Prepare white paper in a square shape.
Fold it in half, from corner to corner.
This step is not shown in the photo, but children can fold the paper again to determine the middle of the triangle. You can skip this step and immediately raise the right and left corners up, placing them as symmetrically as possible with respect to the upper corner. The origami flower is already ready. If desired, you can cut out two green triangles or a quarter of a circle and glue it (them) to the base of the flower.
Making an origami snowdrop stem and leaf
Very young children can simply cut out an oblong sheet; older children can make an origami sheet.
Prepare a green square piece of paper.
Connect the opposite corners, turning the square into a triangle. This will mark the fold in the middle.
Unfold the paper, returning it to a square shape, and fold the sides, aligning them along the fold.
Align the bottom sides along the fold in the same way.
Repeat the steps again, although now it will be a little more difficult. Fold in the top sides, aligning along the center line. Right.
Then left.
Now make folds at the bottom. Right.
Left.
The origami sheet is ready. If desired, the folds can be glued so that they do not open in the future, especially if the children do not have enough strength to press them well.
The stem is made of a long strip folded into a thin tube.
Glue all the components together and you get this origami snowdrop.
You can twist the ends of the stem so that the flowers “look” down.
Spoon flowers
After reading the fairy tale “12 months” with your child, offer to help your poor stepdaughter and “collect” snowdrops in a basket. To work, in addition to traditional corrugated paper, you will need:
- several disposable spoons;
- green plasticine;
- glue and scissors;
- juice straws;
- small basket.
And now a master class on snowdrops with your own hands:
- A plasticine ball rolls out.
- Spoon handles break off.
- A flower bud is formed - spoons are inserted into plasticine.
- On the opposite side, a juice tube is stuck into the plasticine.
- We wrap the tube with corrugated paper - we get a flower stem.
- Glue a couple of leaves to the stem.
Thus, we make enough snowdrops to fill the basket and satisfy the appetite of the evil stepmother!
Snowdrops (scilla) from foamiran master class
In the spring, when the snow has just melted, delicate, touching snowdrop flowers (scilla) appear. They cover forest glades with a delicate blue carpet; it is impossible to stop admiring this spring beauty. I think that if you have witnessed this beauty, you will definitely want to create something similar for yourself. Today we will look at a master class on making a beautiful wreath of snowdrops (blues) from foamiran. The author of this master class is Olga Mubarakshina.
To make snowdrops you will need: * Blue foamiran. * Foamiran is white. * Foamiran is green. * Knitting needle. * Scissors. * Crepe or corrugated paper. * Iron. * Thermal gun. * Wire cutters. * Floral wire. * Green tape.
* White oil pastel.
Method for making snowdrops (blues): First, we need to make a pattern for our flower. The size of the flower will depend on your desire. Olga's flower template is approximately 2 cm high and a little more than 1 cm wide.
The size and shape of the petal are clearly visible on the marking board. To make a wreath of snowdrops you will need 30 flowers plus the same number of buds. To make one snowdrop flower we need six petals.
Therefore, we will need about 180 petals for a wreath.
When we make all the petals, we will have a small pile. Now we tint the petals with white oil pastels, but you can leave them unchanged. We tint the petals on the outside with random strokes using pastel.
Now we need to make our petals more alive, give them a texture. For this we need corrugated paper. We take corrugated paper and layer each petal with it, making a sandwich))).
Then we apply each side to a heated iron for a couple of seconds (we set the iron to two), and quickly, until it cools down, roll it up like an accordion and twist it. You can also rub the petals in the palms of your hands.
You can place three petals together and twist them, this way you will save your time (tested, everything curls well).
This is how you should do it. We take our petals out of the paper and slightly stretch them horizontally and vertically.
It turns out like this!!! Olga used pink and green corrugated paper; it practically does not stain.
The petals for making snowdrops (blues) are ready. Next we need this set. We take the wire and at the end of the wire, about 5 cm.
We make a loop, paste it with small pieces of green foam. Next, we paste a small strip of white foamiran around the circle, first cut it into terry strips.
If you don’t have white foamiran, you can use light yellow. It will also turn out very beautiful.
Now we take the stamens and glue them around. You can make stamens from threads or foamiran yourself. If we make stamens from foamiran, we will rub them between our fingers.
Next we start gluing the petals. First we will make the first row of three petals, and then we will make the second row in a checkerboard pattern. Our blueberry flower is ready, there is very little left to make another 29 exactly the same flowers, and then buds))).
We've made the flowers, now we'll make the buds. We also need 30 of them. Draw a petal template and cut out 90 pieces. Place each petal on the iron for a couple of seconds. That’s it, you don’t need to do anything else, the petals themselves will take the shape they need.
Now we begin to collect our bud, just like a blooming flower. We make a loop on the wire, glue pieces of green foamiran onto it and then attach the stamens.
Next, take the finished petals and glue them overlapping. We get a snowdrop bud.
You can simplify the process of making a bud a little and simply glue the stamens around the wire, and then the finished petals around it.
The flowers and buds of the snowdrops are ready, now all that remains is to make their leaves. We spontaneously cut out leaves from green foamiran (you can use a template). Place the leaves on the iron for a couple of seconds and quickly fold them in half, lightly run your fingers along the fold, press and pull them out. The leaves are ready.
We have everything ready to make the wreath, let's start assembling. We fold the flowers, bending the heads relative to the stem and fasten them with tape.
We collect flowers from the middle and to the sides. You can do at your own discretion, as you think is more correct. Olga fastened the flowers from the middle, and then alternately in both directions. That seemed more correct to her. Here in the photo you can see how the flower is curved.
We make small loops at the ends of the wire and tie a blue satin ribbon to them. We can use the tape to adjust the size to your liking. The wreath of snowdrops (blues) is ready.
We thank the author for an interesting master class on making snowdrop flowers and look forward to new master classes. In conclusion, I want to show you a wonderful poem about these wonderful spring flowers.
- ... The sun pierces the golden rays with the warmth awakening the spring meadows... And in the ravine there are small blue flowers
- They are already making their way through the melted snow...
- From under last year's stale leaves They peek timidly from the grass... Those blue-eyed blue-eyed woods on the lawn
- Shimmering with splashes of heavenly blue...
- Well, as if the sky is spreading over the slopes of the Hills, overgrown with the first greenery of spring... And with a graceful, so welcoming bow
- Meets new forest inhabitants...
...Oh, how touching are the cute bluebirds!!! Miniature! Elegant! And easy! How fragile are bell pendants?
Their bright blue lovely flowers!!!
- The pointed leaves are very gentle. They rush to cover the buds from direct rays... They don’t like it when the sun carelessly
- The beam touches... They prefer shade...
And the leafless stem is thin, graceful, Like a string from an awakened soul!!! Ringing with a radiant spring song,
What makes your head spin with spring euphoria...
... The woodland is full of the charm of love - a gallant symbol of the most tender, bright feelings!!! Its inflorescences are splashes of a blue sea...
- Or the sky’s reflections of pensive sadness...
- Awakened from sleep, in a half-asleep reverie, a blue snowdrop glows with a smile... And with a melodious silver chime, pours joy into the heart... Quenches the pain...
- Elena Butorina.
Copyright © Attention! The website mnogo-idei.com is protected by copyright law. Copying text and photographs can only be used with permission from the site administration and by indicating an active link to the site. 2022 All rights reserved.
Source: https://mnogo-idei.com/podsnezhniki-proleski-iz-foamirana-master-klass/