The moment when her child starts going to kindergarten is important for every mother. There the child begins to communicate with peers and acquires certain skills. It is very important that the child feels confident in a new environment. The baby takes with him a lot of his favorite toys that he is proud of or wants to show off to his friends. Everyone has their own drawer for personal belongings, and pockets on a locker in a kindergarten will solve the problem of their placement. This convenient organizer will help your child learn order and easily find the right item.
Purpose and features
A standard kindergarten locker does not meet the requirements that are placed on it. Children need to have a place for many important little things, and besides, a new environment is always stressful for a little person. Even if your baby always asks to go potty at home, during the first time in kindergarten he may unexpectedly need replacement things:
- panties;
- socks;
- T-shirt;
- t-shirt;
- handkerchief;
- warm sweater;
- tights.
In addition to the change, you need to provide where the comb will be, and for girls, also hair clips. A pocket will help you conveniently store all these accessories, which will save space in the locker, make it easier for staff to find the necessary supplies, and also teach your child to keep order.
It should be noted that all kindergartens provide mandatory physical education classes, so the child will have to store his sports uniform somewhere. Many gardens have their own swimming pool, but not always a separate room for bath clothes. This means that you should also take care of where the child will place his swimming accessories (cap, waterproof goggles, robe, bath accessories).
The dimensions of the locker in the kindergarten do not allow the installation of additional shelves for practical placement of everything necessary, but there is a way out and these are hanging pockets on the locker door.
This is interesting: How to make furniture for a dollhouse with your own hands, recommendations
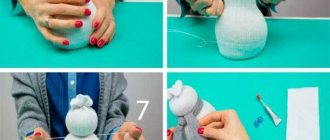
Master class using oilcloth and ribbons “Pockets for combs”
Chilikova Marina Pavlovna
Master class using oilcloth and ribbons “Pockets for combs”
Pocket for combs . Master Class .
I hope my master class will be useful and help in making a comb in kindergarten.
For work we will need:
2. Bias tape.
8. Lace for decoration.
We start work with a sketch and calculations .
The length and height of the pocket depends on the size of the comb . The length of my combs is approximately 18 centimeters, so I chose of the pockets
Next, we cut out the base of the main fabric. For extra strength, I folded the oilcloth in double layers. The size of my canvas is 60 centimeters by 43 centimeters and plus 1 centimeter for reserve.
We process the upper edge of the base with bias tape and a zigzag stitch.
We cut out two strips of oilcloth for the top and bottom row of pockets .
We process the upper edge of the strip with bias tape on both strips of oilcloth.
pockets to the base of the oilcloth pieces . I left 10 centimeters of space the pockets
We begin to sew pockets . We make a central line, then horizontal lines along the bottom side of the strips, bending the bottom edge. And then we sew each pocket .
We cut off all excess.
We process the edges with a zigzag and bias tape.
You can sew on lace for decoration.
And now the pockets are ready .
Flower made of satin ribbons. Master class Today I would like to present to your attention a master class on making a flower from satin ribbons. I saw how a bouquet of ribbons was made. Didactic game “Pockets with a secret” Didactic game for preschoolers “Pockets with a secret” Description of work: this material is recommended for preschool teachers. Master class “Christmas tree made from champagne ribbons” There is very little time left before the New Year and we have time to make a decoration for the festive table or as a gift to our loved ones. Master class “Christmas tree made of ribbons” On the eve of the New Year, I want some miracles. But you can do a miracle with your own hands. So I decided to make an unusual New Year's Eve. Master class “Christmas tree made from ribbons” Good day everyone. I really liked the Christmas trees made from ribbons. I also decided to make these for myself. Naturally, I made my own changes.)
Source
What material are pockets made of?
The material for the cabinet organizer can be different:
- thin flexible plastic;
- fabric with water-repellent properties (Bologna, raincoat fabric);
- ordinary textiles (calico, cotton, linen, felt, etc.)
Plastic sachets are easy to care for, they are easy to clean, and can be easily treated with suitable disinfectants without prior dismantling. It will not be easy to make such an accessory at home, but you can buy it in almost any specialized store.
In some preschool institutions, hanging pockets are purchased centrally. But making it with your own hands will not be difficult even for a person who has only basic cutting and sewing skills.
Materials
Suitable pocket materials for kindergarten are:
- water-repellent fabric (tarpaulin, raincoat fabric, bologna);
- any other textiles;
- thin flexible plastic.
Making plastic pockets can be challenging at home, but they are easy to purchase in specialty stores. They are easier to use - they are disinfected with a regular product for treating plastic surfaces without removing them from the cabinet. Sometimes gardens themselves purchase hanging pockets centrally. With some skills, a mother will be able to sew an original kindergarten organizer for her beloved daughter or son with her own hands.
Varieties
In order for the child to have everything he needs, there should be room in the pockets on the locker, for example, for the following things :
- socks;
- T-shirt;
- tights;
- sweater;
- handkerchief.
You may need not only these, but also many other things that are convenient to store in special pockets (for example, a comb, hairpins for a girl). Of course, these things can be folded into a neat pile or placed in a bag, but using pockets is much more convenient.
Usually they are sewn onto fabric and hung on the door of the cabinet in which clothes are stored.
Pockets with various methods of attachment to the door are used. The following options may apply:
- The most common is the use of eyelets or loops. They are hung on screws screwed into the cabinet door, or hooks attached to it.
- You can use an elastic band for fastening. In this case, there is no need to install hooks or hammer nails. Therefore, this method is convenient, but the elastic pockets will sag.
- Can be attached with adhesive tape. To secure it more securely, it is bent over the top edge of the door.
- You can use double-sided tape to hang the pockets. This method will be convenient in cases where it is not possible to screw screws into the door or attach hooks.
Each pocket can be made open or closed. The following options can be used:
- Using buttons or Velcro.
- Make sure that the elastic bands go through the top edge.
- Sometimes open pockets are suitable.
- It will be beautiful if they are decorated with embroidery or appliqués depicting your favorite cartoon characters.
- To attach to the door, it is convenient if the fabric with pockets is folded to the outside of the door. In this case, it will be possible to attach a recognizable picture on the outside for each child and write his name.
For your information! This will allow the kindergarten teacher to easily find the things of a particular child, and the child to find out at first glance where his things are stored.
The models used can be distinguished by pocket sizes:
- Large pockets can be used (for which old jeans are used, for example), occupying the entire door or most of it.
- Sometimes they are made of medium size, the size of half a door or a little larger.
- It is common to use models that use several small pockets.
Note! When choosing how to sew pockets for a kindergarten in a locker yourself, you need to take into account that a small number of pockets will not allow you to efficiently organize the storage of your baby’s things, and too small ones will not always allow you to find enough space for larger, replaceable things.
Types of pockets
Hanging sachets are divided into three groups:
- according to the method of fastening;
- by type of department;
- to size.
By mounting method
There are different ways to attach an organizer to a cabinet, each of which has its own pros and cons.
On loops - this is the strongest and most durable type of fastener, it will withstand any weight. The loops are put on hooks or screws. But not everywhere they allow such “desecration” of the kindergarten’s property, that is, you can’t screw anything into the doors.
The product with an elastic band is simply attached to the door and removed for washing. However, under the weight of things, the elastic band stretches and the structure sags.
Adhesive tape, usually with a folded edge. The pocket can be removed and hung in a matter of seconds. Such sachets are also convenient because on the bending part, which remains on the outside of the door, you can applique or embroider with the owner’s name. Or just sew a bright picture. Then the baby will never confuse his locker with the neighbor's.
Double sided tape. Fast and easy, but, alas, the most unreliable method of fastening.
By branch type
The compartments of the children's organizer have several options:
- open pockets:
- on an elastic band;
- with a closing flap (usually fastened with Velcro or a button, less often with a button);
- on a zipper.
Open compartments are good for small items, such as a comb. If the item is large, then in order to avoid unsightly bulging of the pocket and its contents falling out, you should think about a clasp or elastic band.
When choosing a clasp, focus on how easy it will be for your child to open and close it. Velcro and snaps are a great option. If you don’t want to fuss with fasteners, then just run an elastic band along the top of the pocket. A compartment with a zipper will keep small things safe: rubber bands, hairpins and even tiny toys.
And another important detail is the design. Pockets decorated with embroidery or applique with the image of your favorite cartoon character will look beautiful. Personalized accessories are especially popular.
If we talk about size, there are three types:
- large ones - for the entire door;
- medium - from half to three quarters of the surface;
- small ones - take up less than half.
If you want the pockets to serve your child for more than one year, give preference to large or medium ones. As the child grows, the size of the clothes will increase, so over time a small sachet simply won’t fit everything you need.
What are pockets for?
In addition to replacement T-shirts and panties, the baby will need a comb, shoes for dancing and physical education, sportswear, a jacket, tights, and socks. Very little babies need a bib, girls need hairpins and rubber bands. Keeping it all in order without taking up too much space is the main purpose of hanging pockets.
Hanging organizer
Method for making an organizer for needlewomen:
Necessary components for making a hanging fixture for the bathroom:
Design method:
Textile organizers with pockets
Organizers for storing things with pockets are not difficult to make. To make the basic version you will need simple materials.
Execution order:
Option for making an organizer for the hallway:
Required materials and tools
In order to begin production, you will need to prepare the necessary materials and tools. For the master class, you will first need to determine what model of organizer will be created and choose the method of attachment to the door.
The following materials can be used as a base:
- Thick fabrics: tarpaulin, raincoat fabric, fabric from old jeans or similar.
- Thin sheet of plastic.
- Almost any textile can be used, but its strength will be lower than in the cases discussed above.
You need to draw a diagram according to which the master will carry out the work. Based on this, the required materials are calculated. For example, for an organizer measuring 80 by 30 cm, you will need to prepare the following:
- 1 sq. meter of main and lining fabric;
- non-woven fabric in the required quantity;
- scissors, awl, threads and needles;
- sealing material will be required to increase rigidity;
- Velcro or buttons - for fastening pockets;
- a little elastic;
- materials for decoration.
You might be interested in Sewing a sheet with an elastic band for a mattress yourself
When thinking about how to sew pockets for a child’s kindergarten, it is better to try to make not just a place to store a change of clothes, but also a beautiful piece that can please the baby. For this purpose, you can use appliqués, embroideries, ribbons, braid or other similar materials.
Various options
When creating this product, it is necessary to ensure that it can be easily washed (regardless of size) and dried just as easily and quickly.
Note! It is not recommended to use cardboard to increase rigidity, as it can become deformed as a result of washing.
All things are laid out in order
You can use two wooden strips to decorate the top and bottom edges. Not only will they improve the appearance, but they will also prevent the structure from collapsing when the pockets are overfilled.
This is interesting: Tips for choosing and placing children's furniture in the room of two boys
How to do it yourself
First you need to come up with an idea; you can spy it on a photo or invent it and develop it yourself, carefully calculating all the details and thinking through the design. Homemade has a lot of advantages:
- manufactured exactly according to the dimensions of the cabinet;
- it can be sewn from leftover fabric;
- here you can vary the size and shape of the pockets;
- decorating a product is interesting, it’s fun to do even with a child!
Sometimes kindergarten cabinets have a rounded top, in this case we sew the base taking this feature into account. Here you can place an additional compartment for a children's book or other useful little things. An organizer for a kindergarten locker should be easy to wash and be safe for children: it is not allowed to decorate your creation with small details (beads, buttons, seed beads) that children can swallow.
Required materials and tools
To sew a pocket in a closet with a door area of 80x30 cm you will need:
- 1 meter of main fabric;
- 1 meter of lining;
- interlining;
- scissors;
- threads;
- sealant for rigidity (plastic, laminate backing, foam rubber);
- Velcro or buttons for fastening;
- rubber;
- decorative elements with a children's theme (ribbons, trim, appliques, embroidery)
The fabric should be easy to wash and dry quickly. It is better not to use cardboard to stiffen the pocket; it is short-lived and tends to deform during washing.
The organizer will not fold in half when all the pockets are full if you insert bamboo sticks 1-1.5 cm thick from the top and bottom. To do this, sew a drawstring or loops on the back side of the base. The sticks should be easy to remove, because the product will have to be washed often! If plastic is used for rigidity, additional fixation with sticks is not required, but it is necessary to provide the ability to remove it before washing, for example, provide the base with a zipper.
Cutting the product
From the selected fabric, 2 base pieces 80x30 cm are cut out, and several pockets are cut out: two 40 cm each for a sports uniform and a change of clothes, and one or more additional ones for other accessories. If the size of the locker allows, and the baby has not yet learned to fully control himself and sometimes wets his pants, another pocket would be useful - for used clothes that need to be taken home from the garden. All pocket details, except the base, are duplicated on the lining fabric and non-woven fabric.
We will make one pocket, for example, the top one, from mesh. This will make it easier for the little person to find a comb or handkerchief without looking into every pocket. Don't forget to add seam allowances: 1 cm on the sides and 2 cm on the top side of the pocket for inserting elastic.
We cut the material into 3 parts 33x38 cm
Branch processing
If desired, the pockets are decorated with embroidery or appliqués with favorite fairy-tale characters are glued on. It is better to do this before the part is sewn to the base of the pocket. Next, the corresponding parts of the main fabric, interlining and lining are combined and stitched together with a running stitch. Fold the top of the pocket compartment inward and stitch it - an elastic band is inserted here and secured along the edges, having previously pulled the workpiece to 30 cm. The lower edge of the pocket on both sides is placed in deep folds, they are necessary to create volume and to remove excess width. The pockets can be closed with flaps, which are cut out separately in the shape of a trapezoid or triangle. Velcro is used as a fastener - it is completely safe for children.
Fold the parts in half. Sew along the long side, 1 cm away from the edge. Turn the parts inside out and sew close to the fold.
Stepping back 0.5 cm from the edges, lay folds 2 cm deep and iron
Pockets are forming
Assembly order
The bottom of the pocket is sewn to the base using a hidden seam. It is turned over and the sides are sewn. Repeat this for all other pockets, slightly retreating from each other. An additional vertical stitch is laid along the upper compartment, marking a compartment for a comb. When all the pockets are ready, the main parts are stitched, folded with their right sides facing each other. The bottom side is left unstitched. Turn the product inside out, insert a seal between the base parts to stiffen the pocket, and sew up the remaining edge. The pockets around the perimeter can be trimmed with original braid with a children's theme, and along the edges, using an awl, you can pierce holes for eyelets or make loops from the same material as the product itself. Your child will certainly enjoy decorating his pocket with fabric self-adhesives with images of his favorite fairy-tale characters; don’t deny him the pleasure of helping you! The hanging organizer is ready, all that remains is to hang it in the baby clothes cabinet, securing it to the door with screws.
The baby will be able to be proud of the pocket that his mother sewed and decorated with him! A quality item will be useful to the child even after kindergarten is left behind. There will definitely be a place for the pocket in the nursery, bathroom or hallway.
We lay out the parts on a felt base and sew them on. Stitched pocket
Place the binding on the felt face down, pin or baste
We turn the binding to the wrong side of the base, turn it under and hem it
We install eyelets in the upper corners. We tie the cord. Velcro can be provided for pockets. Ready pocket
Master class on making a pocket
To sew a wardrobe for children's clothes with the chosen pattern, you first need to make the base and then sew the pockets to it. How to make this is described below.
Various design methods
Pattern
If we consider a pattern for a pocket for a locker in a kindergarten, made by ourselves, measuring 80 by 30 cm, then you need to start by preparing the base. To do this you will need to make two pieces of fabric of this size. You will need two large pockets and several smaller ones.
Material for cutting
Assembling (sewing) yourself
When sewing a pocket, you need to fold three pieces of the same shape:
- main fabric;
- non-woven layer;
- lining
They are placed in the order indicated and sewn with a running stitch to the base. The top of each pocket is folded inward. Then it needs to be stitched. In this case, a pre-prepared gum is passed inside. It is slightly pulled together and secured along the edges of the pocket.
The bottom of the pocket is sewn using a hidden seam. Then the sides are attached.
How to form pockets
How to make your own diagram
If you want to make pockets in a kindergarten locker with your own hands, you should use the manufacturing tips. There are many advantages to this process:
- you can make an organizer, taking into account the dimensions of a specific pencil case;
- if there are enough leftover fabrics, they can be used, which will not require extra costs;
- the organizer can be made of any size;
- decorate the product with what the child likes best.
Tools and materials:
- thick fabric (1 m), braid, interlining for compaction, calico for lining, padding polyester;
- scissors, threads, elastic bands, Velcro, decor.
Having prepared the material and decided on the pocket option, you can get to work. To get a beautiful product, you need to think through everything to the smallest detail, choose the fabric, choose the base.
Pockets are created according to the following scheme:
- Cut a strip of fabric 25-30 by 140-150 cm. Fold it in half, this will be the base. If you need to compact the product, insert interlining between the layers.
- We select blanks for pockets (3-4 pieces of colored or plain fabric, decorated with appliqué), the sizes depend on the quantity and width. Additionally, you need to make a provision for free placement of items.
- If the compartments are on an elastic band, cut it into pieces.
- We stitch the top of the pocket, insert an elastic band and secure it to the edges.
- We make a mark on the base and sew the pocket on three sides. The edges at the bottom of the compartment can be gathered, leaving room for larger items.
- At the top, above the last section, you can place an applique with a name. We cut out letters from felt. If the pockets are plain, they can be decorated, for example, by sewing on images of socks or T-shirts. Then not only the child, but also the kindergarten staff will understand where everything is located.
- If the organizer will be attached with elastic bands, you need to sew 35 cm of tape on both sides of the base.
- To finalize the edges of the product, cut the fabric or braid 3-4 cm wide and sew along the edge.
- The pockets are ready, such a high-quality item will be useful to the baby not only in kindergarten, but also at home. Creating an organizer will not take much time. In addition, the child will probably be interested in helping his mother decorate the new thing.
Photo
From boxes
To design a practical device for storing socks and underwear, you will need the following tools:
- shoe box;
- pen;
- ruler;
- glue;
- decorative paper;
- glue.
Step-by-step creation of crafts:
- First, you should decide on the size of the linen drawer, decide how many things will be placed in it. This determines what size box to choose and how many sections to divide it into.
- You need to put the lid of the package aside; you will need it later.
- On the side walls, mark the height of the future product. It is recommended to take into account the size of the closet in which the underwear will be stored.
- Next, mark the cut lines, then cut off the excess.
- Use the lid and remaining fragments of the box to form internal partitions. To do this, you need to calculate how many parts need to be made. Based on the calculation of the optimal section space, this will be 7-8 cm2.
- The height of the walls is made equal to the level of the box or slightly lower, and the length will be 2-3 mm less than the box itself. In this case, folded items will easily fit into the sections.
- Now it is advisable to decorate the blanks on all sides with wrapping paper or simple white sheets.
- Send them under a press for 2-3 hours to dry.
- Next, decorate the sides with fabric, thick multi-colored packaging or paper material for scrapbooking. For long-term operation, raw materials must be durable.
- For decoration, an allowance of 3-4 cm is made on both sides. It is better to glue the sheets after “trying on” to avoid unevenness and creases. First, for convenience, the sides are folded, then sections are made on the fold lines at the corners of the box so that the material lies evenly. Finally, the decor is glued on.
- Decorate the bottom in the same way.
- On the press-dried planks, mark the locations of future cells.
- On long strips, make a mark from the side of the glued edge, and on short parts, from the opposite edge. Then the assembled grille will take on a neat appearance.
- Make cuts along the outlined contours to the middle of the cardboard. The width of the section corresponds to the thickness of the strip.
- Finally, assemble the lattice and insert it into the box.
We sew pockets in a locker for a kindergarten with our own hands
To make pockets, you will need to take 2 types of fabric: elegant calico with a printed pattern for the visible sides, and white calico for the lining. Before starting work, it is advisable to wash, dry and iron all fabrics so that they immediately shrink as much as possible.
The finished size of the pockets is 65*25 cm. From the main and lining fabric, cut out 2 blanks measuring 68*27.5 cm. This will be the basis of the pockets for the wrong side and the lining for sewing on the pockets
- From the main fabric, cut out 3 pieces of pockets measuring 22.5 * 27.5 cm. Glue the upper sections of the blanks with adhesive dolikov, cut in the form of strips 1 cm wide. They will protect the upper edge of the pockets from being pulled out during use.
- Also, from the main fabric, cut out 3 parts for the facings of the upper sections of the pockets - rectangles with dimensions of 3.5 * 27.5 cm
- Then you can start sewing. First, iron the lower longitudinal section of each facing 5 mm towards the wrong side.
- Then place the facing on the pocket, face to face, align along the top edges, pin
- Sew the facing with a 7mm wide seam. Remove the pins
- Press the facing seam onto the facing. Fold the facing onto the wrong side of the pocket and iron it, fixing a transition edge 1-2 mm wide from the main part towards the facing, pin along the lower (ironed) edge to the pocket
- Place finishing stitches close to the top and bottom edges of the facing, remove pins and iron
- Prepare all the pockets in the same way.
- Then continue working with the lining of the pockets. First, place the first pocket on it, aligning it along the bottom and side edges and pinning it with pins. Then mark the place where the first pocket begins, add 5 mm upward and draw a line - this will be where the bottom cut of the second pocket will be applied. Attach it to it, pin it and sew it with a seam 7 mm wide
- Iron the second pocket up, stitch the seam of its stitching along the edge
- Check that the pockets are sewn on correctly. They must go one right after the other
- Process the last pocket in the same way.
- You should be left with a small uncovered area at the top of the lining. Measure its height, add 7mm to the seam and sew it in the same way as the pocket. So the entire front side of the pockets will turn out beautiful
- There can be several ways to attach pockets to a cabinet door. The simplest one is hanging loops of ribbons, through which the pockets are hung on small hooks. To make them, cut a grosgrain ribbon of a suitable color, 1 cm wide, into pieces 7 cm long. You will need 5 pieces in total. Scorch the cut of the loops with fire to prevent them from spilling out. Evenly distribute the prepared loops along the upper cut of the front side of the pockets
- Place the main (back) part on the front side of the pockets, align and pin along the edges
- Sew the pocket pieces around the perimeter using a 7mm wide seam, leaving a small unstitched area at the bottom for turning inside out. Remove the pins
- Turn it inside out, straighten the pockets right side out, iron them, stitch along the perimeter close to the edge, and at the same time sew up the opening for turning them inside out.
- Finish the buttons or overcast the loops and sew buttons to close the pockets.
New clothes for kindergarten are ready.
MK sew an organizer for needlework with your own hands step by step
2. With exactly the same dimensions, I cut out one rectangle from quilted padding polyester. It will serve as a substrate and give a rigid shape to the base of the organizer.
3. Putting padding polyester between the pillowcase teak. Layers: teak - padding polyester - teak.
4. I fasten all three fabrics together with pins. Now you need to quilt them. I draw a pattern for quilting with a marker (pencil).
5. I sew on a machine along the lines. I make sure to make fastenings at the beginning and end of the lines so that the line does not unravel later.
6. I take the bias tape and smooth one edge with an iron.
8. I go around the corners, slightly rounding the bias tape.
9. I overlap the edges of the bias tape.
10. Trim excess fabric
11. I fold the bias tape over to the right side. I sew the free edge of the binding to the base of the organizer using hand running stitches.
12. I sew on the bias tape. Notice how I laid the fabric in relation to the machine foot. The stitching should go 1 mm. from the edge of the bias tape.
13. I cut out two pockets - a rectangle with sides 32 * 13 cm. I trim the upper edges with bias tape. I overlock the remaining open sections with an overlocker (zigzag).
14. I bend the edges of the pockets 1 cm inward. I stitch on a typewriter.
15. I measure 5.5 cm from the bottom of the organizer base and draw a line across with a marker
16. I attach the bottom pocket to the drawn line, as shown in the photo. I make a fold on both sides.
17. I sew the bottom pocket on the machine, retreating from the edge by the width of the foot.
18. I measure 19 cm from the top of the base. I draw a line with a marker. I sew the top pocket on the machine along this line.
19. I turn the pocket pieces right side up. I attach the pocket details to the base of the organizer on the sides over the existing stitching.
20. I ended up with three pockets at the top and two at the bottom. You can do the same. Or you can come up with your own version.
21. I cut 3 pieces of grosgrain ribbon. I burn the ends with matches to prevent them from unraveling.
22. I pin pieces of tape onto the base and secure with pins.
23. I sew the ribbons on the front side using a machine.
24. I insert a wooden pipe into the resulting holes. This is all I have on hand for now; the pipe from Bethlehem came in handy) I tie a cord to the pipe. Ready!
Sewing a handicraft organizer from Aliexpress with your own hands turned out to be not difficult. For a beginner, this creative process will be interesting, because here you can give free rein to your imagination. And the thing is very useful; in the same way you can sew a shoe organizer for your closet; Can be used for masks, gels, shampoos and other things in the bathroom or on the dressing table.
And the thing is very useful; in the same way you can sew a shoe organizer for your closet; Can be used for masks, gels, shampoos and other things in the bathroom or on the dressing table.
Branch processing
After the pockets are made, you need to decorate them. The easiest way to do this is to stick appliques with fairy-tale characters. It will look beautiful if beautiful embroidery is done on the pockets in advance. The appliqués are attached before the pocket is sewn on.
You might be interested in: Creating a pattern and sewing a beanbag chair with your own hands according to the instructions
Step-by-step instructions for processing pockets are as follows. The lower side edges are folded into a deep fold. This is necessary to give the pockets volume. To make flaps to close the pockets, they are cut in a trapezoid shape and sewn to the base at the wider part. For fastening, it is convenient to use a Velcro-type connection.
Decorated with appliqués
Fabric organizer options
There are different types of storage organizers. They differ in the area of their use, the form of fasteners, and for what purpose they are used.
Depending on whether the module will move in space or not, they are divided:
The following types are determined by the type of fastener:
If we consider models created to contain a certain group of objects, we distinguish:
List of original ideas for an organizer:
Features and purpose
Lockers in kindergartens are most often narrow, with a small number of shelves that do not fit all the necessary things. It is still difficult for a child to find the right item without outside help. The best option is pockets for a children's locker in the kindergarten. The organizer is attached to the door, has several sections (large and small), can be easily removed, washed or washed. This is especially convenient for small items that can easily get lost on shelves. While in the garden, a child may need the following things: panties, socks, tights, T-shirts, replacement shoes.
In addition to a change of clothes, the baby needs to have a sports uniform and Czech shoes. There are also personal hygiene items - a towel, handkerchiefs, combs, hairpins, elastic bands. To make it easy for your child to get what they need, you should use hanging pockets for the kindergarten locker. A mother who purchases a ready-made organizer or creates one herself should carefully consider the number of departments and their designations. It’s easier to get what you need if you divide the space into zones:
- for essential items;
- for small accessories;
- for small toys;
- for small personal items.
Pockets for a kindergarten locker, in addition to their main function, contribute to the development of motor activity of the baby’s fingers and memory.
Wall pockets
Pockets on the wall are an excellent solution for organizing space in an apartment or house. Organizers of this type take up little space and can perfectly complement or complete a designer’s interior design. Products in matching or subdued tones will help emphasize the style of your home, while contrasting and bright ones will add a touch of joy.
A useful panel can not only be hung on the wall, but also mounted on the door of a room, closet or inside it. There are a huge number of options and varieties, as well as models of useful organizers. Everyone will definitely find a product to suit their taste.
This useful device was held in high esteem in Soviet times, since the furniture of that time was far from modern functionality.
In home economics magazines one could often see step-by-step instructions for making fabric stands with pockets and elastic bands for attaching small items. There you could also find a pattern and recommendations for choosing material.
This description was what today we call a step-by-step master class. Experienced housewives took the idea as a basis and created it. The girls also sewed pockets during their home economics lessons.
Today, pockets for the wall can be easily purchased in online stores, but it is more pleasant to make them yourself.
Types of pockets on the wall
Wall pockets can be divided into several categories:
- According to the intended purpose: for the kitchen, bathroom, children's room, garage, for example.
- Frame and frameless. The product can be soft or have a rigid base made of cardboard or plywood.
- By functionality, for example, universal or special, such as holders for newspapers, documents, slippers, combs, telephone or TV remote control.
- In appearance: single or in the form of a stand.
- According to the method of fastening: on loops, a rod, Velcro, or simply screwed tightly to the wall with self-tapping screws.
Also, wall pockets can serve a decorative function or, as they said in an old cartoon from the Soviet era, cover a hole in the wall. Young mothers store small things in pockets on the wall, and their grown daughters happily hide their “treasures” and dolls.
A variety of materials are suitable for making useful things. Organizers for small items can be not only rag, but also made from:
- oilcloths;
- silicone;
- felt;
- plastic;
- newspaper tubes.
To make a useful device, scrap materials can be used, such as scraps of boards, plastic flasks or bottles. In garages and utility rooms, craftsmen even use cans to make improvised “pockets”! Knitters can crochet or knit pockets, and seamstresses can easily turn even old jeans into pockets!
A little patience and imagination - and a homemade organizer will decorate the hallway or help tidy up the pantry. This convenient invention will also be useful for schoolchildren. Lately, people are increasingly asking to bring wall pockets to kindergartens. There they are placed in lockers and a change of underwear, shoes and the child’s personal belongings are stored there.
Let's do handicrafts together
Why do we need pockets for kindergarten? Mothers who have already raised more than one child know that such an accessory is very convenient to use. As practice shows, closets in preschool institutions are not very spacious. All clothes do not fit.
But we put spare panties, panties, socks, pajamas, and shoes there.
To put everything neatly and neatly on shelves, we came up with original fabric pockets. Of course, you can buy ready-made pockets and simply attach them to the cabinet door, but it’s much more pleasant to make such an item yourself. You and your child can decorate the pockets with various figures, embroidery, appliqués and other designer little things.
Where is the best location?
As mentioned above, pockets can be placed both on the side and at the foot of the crib. They are usually located on the outside of the cradle. Although, if the child is small enough and does not know how to sit independently, the sachet can serve as a protective side. In this case, I hang it inside the cradle. But even when the baby not only sits independently, but also moves around the crib, you don’t have to rush to rehang the sachet. It’s enough to place the little ones’ rattles and favorite toys in their pockets, and then mom’s lifesaver turns into a fidget playground.
Decor options
Each cabinet and its hanging pockets are individual. To make the organizer bright, you can use fabric with checkered, striped, polka dots, flowers or stars. If you decide to stick to a plain base for the product, then the finished pockets can be decorated:
- buttons, rhinestones (it is better not to use small parts for safety reasons);
- ribbons and bows, lace;
- applique, stripes, embroidery;
- images of cartoon characters and animals;
- the base can be the same color, the pockets are decorated with a pattern.
The right combination and reasonable selection of decor is important. You should not use many small decorative elements on fabrics with a ready-made pattern. If the base is monochromatic, it can be diversified with a combination of contrasting colors.
Wall mounted comb organizer
An organizer for combs located on the wall next to the mirror is a very practical solution.
Materials that may suit the organizer
The organizer is located on the canvas. Thick fabrics, knitted fabric, plywood, and plastic boards are suitable for it
The pockets are placed in a convenient order and secured with glue, thread or nails. They come from absolutely any material. If the base is hard, then it is better to use small boxes attached with glue or nails for pockets.
How to make a wall organizer
Denim is a great material for a wall organizer .
Source
DIY organizer made from old jeans!
Denim fabric is quite durable. Therefore, making a wall organizer out of it is a great idea. This is a wall panel with pockets in which you can put anything.
And to make it look stylish, when sewing it, beautiful stitches, pockets and other parts of the jeans are preserved. An organizer made from old jeans can be a great gift for your beloved man.
This organizer can be used not only in the house, but also in the car or garage to store various useful little things.
Before sewing the organizer, you need to decide what things you will use it to store and whether the pockets are deep enough. You can use belt loops (belt loops) to attach photographs and other small items. For greater convenience, use pockets from different jeans on one organizer and not only back pockets, but also side ones.
You can even sew an organizer from pockets alone. The base for the organizer is made by sewing together the pant legs. Before sewing the jeans legs, you need to rip the seams, cut off thick seams, measure the height and width of the future organizer, sew the denim fabrics, and trim the edges.
Or denim pockets can be sewn onto another fabric that suits the style, for example, from an old shirt. And denim belts with loops as edging will not only decorate, but also add rigidity to the structure.
As a base, you can take whole jeans, make slits in the front and sew them to the back to create pockets.
Depending on the design, a denim organizer is also suitable for a child’s…
And for a teenager’s room, especially if it is decorated in appropriate colors.
An organizer made from old jeans can be hung not only on the wall. An excellent solution is a cover for the back of a chair.
Craftswomen will appreciate this idea: everything you need is at hand, very convenient.
You can also make a mini-organizer from old jeans, hang it on the back or armrest of a chair or sofa, and store remote controls for the TV and other devices in it.
- Organizer made from old jeans for a creative person
- And for the summer resident
- Decorate your organizer with appliques and no one will guess that it is made from old jeans
To sew an organizer from old jeans you don’t need any special skills or patterns. Each organizer is made to store certain things and the place in which it will be used. Show your imagination and create your own convenient and functional organizer. We hope our selection has inspired you. Have fun with your crafting!
Hallway organizer
To avoid clutter in the hallway from scattered small items (mittens, scarves, scarves), sew an organizer with pockets convenient for this purpose. Such an organizer, by the way, can be hung on a closet door or on the hallway door. From any thick fabric (you can use, for example, out-of-use curtains), cut out two identical pieces measuring 40 x 80 cm (they can be cut to any size as desired). Sew these pieces first with the wrong side up, and then, turning them right side out, stitch along the edges. Now cut four more strips from the same or another fabric that matches the color. From the strips, make four lines of pockets, each with three pockets (you can vary the number as desired). Tuck the upper edges of the stripes and trim them with beautiful braid or appliqué. Then add depth to each pocket using two folds that are not secured at the top (otherwise the filled pocket will protrude greatly). The entire strip with folds is attached on three sides, as well as between the pockets. The bottom edge of the bottom line of the pockets is sealed with braid or finishing fabric, which will close the edge and strengthen the folds.
Phone organizer
How often do you find your pen or notebook missing when you're on the phone? This can be avoided by sewing a small organizer and placing or hanging it near the phone. The organizer is easy to sew - we sew a long and narrow pocket for a pencil or pen on a base of thick fabric. Another compartment, a little wider, is for an alphabet notebook. Or you can stitch a strip, and then use stitches to “make” pockets.
Bathroom organizer
There are always a lot of different necessary little things in the bathroom - brushes, creams, deodorants. In order for them to be in proper order and in a certain place, we suggest sewing a case. Depending on where it will hang, it can be made larger or smaller. It is better to make all the details of the pockets in different sizes, from fabrics with different patterns. You can also use oilcloth for the product. All parts are cut out along the grain thread with 1 cm allowances along the cuts. Each pocket is edged with bias tape. You can see how to properly edge parts in the master class Edging seams. The finished width of the edging is 0.75 cm. The bottom pocket is made large, which should be carefully stitched to the base. A rail is inserted into the upper drawstring, which is attached to the wall. Don't forget the hanging loops.
Using the same principle, they make a case for storing necessary things in the kitchen (various brushes, powders, napkins) so that they are always at hand.
Organizer for small items
Pockets for storing small and small items (glasses, combs, knitting needles, scissors, etc.) can be of various sizes and shapes.
An organizer for glasses can be made from bright felt. Glasses are put away in a pocket specially designed for storing glasses. The organizer can be folded and fastened with a button, but you can also hang it on a wall or door handle near your workplace using a loop. This way, you are less likely to break or crush your glasses.
It is convenient if combs and necessary toiletries are always at hand, near the mirror that hangs on the wall. A small sachet will be useful for this.
Using the same principle, unique pockets for scissors, measuring tape, crayons, and a thimble are made. Several spare buttons, pins, and small spools of thread will also be placed here.
The case can be folded, in this form it will take up no more space than a wallet and will not weigh down the bag, but at the right time everything you need will be at hand.
Thanks to such pockets, you can greatly increase the capacity of your wardrobe, and there is also room for many important little things.
Closet organizer
To sew the closet organizer, I used two types of fabric - flannel and chintz. I cut out 2 rectangles 40 x 80 cm from flannel and polyethylene. I stitched the edges together, leaving 10cm for turning. I turned it right side out and sewed a finishing stitch around the edge. The base for the pockets is ready. I sewed pockets of different sizes onto the base. I made three large pockets. The lower, middle and upper pockets are rectangles approximately 25 cm high and about 50 cm long (40 cm is the width of the base and + 10 cm for folds and gathers). I gathered the top of the lower and upper pockets with elastic, and placed folds along the bottom of the pockets. The pockets turned out to be voluminous - they fit a lot of things. I sewed pockets on the top pocket - for handkerchiefs, creams, etc. The pockets are arbitrary in width and length. In order to prevent the pockets from sagging too much due to an overabundance of things, I sewed and stitched loops to the base, and sewed buttons to the pockets. Buttons and loops can be replaced with Velcro tape (Velcro). I sewed such an organizer after reading the book “To Help Housewives.” I used some quotes from the book in this article.
Handicraft organizer
Organizers for handicrafts vary in purpose. A needlewoman who is interested in sewing will be interested in this organizer, which is easy to make with your own hands.
For those who like to knit, you need a case for knitting needles, which is made on the same principle as a case for glasses.
The base is made of cardboard covered with fabric, the pocket and lintel are made of any bright patterned fabric. Height - 45 cm.
The frame of the craft box is covered with fabric. Pockets for scissors, knitting needles, glasses, etc. are sewn on before the frame is covered.
Organizer for the artist
An artist's folder can be made simply. Two rectangles of the required length and width, depending on the size of the sketches, are cut out of cardboard and covered with matting or harsh canvas.
They are sewn together, wearing straps and fasteners are sewn on. You can make a beautiful applique from colored fabrics - for example, a jug for brushes and a cup for pencils.
Manufacturing materials
For making pockets in cabinets, a fabric that retains its shape well is suitable. Its color should be attractive to the child, with a cheerful pattern or plain if you plan to apply an applique. The following types of materials are used in the manufacture of the organizer:
- water-repellent fabric (tarpaulin, raincoat);
- thick textiles or cotton;
- thin plastic sheet.
More practical is water-repellent material or plastic. The first one washes well and gets dirty a little. To remove light stains, you can simply clean the organizer with a damp soapy sponge and let it dry. It is difficult to make a plastic product at home, but such pockets can be purchased in specialized stores. They are more convenient to clean, since they can be washed directly on the door. Kindergartens often purchase just such options. If parents have needlework skills, then you can sew the pockets yourself.
Desk organizer stand
To create a tabletop stand, you don’t need to look for expensive blanks in specialized stores. It is quite possible to make do with improvised means.
What can it be made from?
The design of the stand directly depends on your imagination. Most often it is made in the form of a glass or several containers of different sizes. The following available materials can be used.
Attention! The depth of the stand for combs should be at least 10 cm so that they do not fall out. The model itself should have a wide bottom or be quite heavy, since large combs can overwhelm a light container.
Making a stand for combs
A stand made of three boxes connected to each other will be practical and compact.
Materials
For manufacturing you will need the following.
Operating procedure
Initially, we select boxes or make them ourselves from thick cardboard. The most convenient base sizes:
We paste the first two boxes with one color, and the smallest one with another. If you are using wallpaper, you can paste over two blanks, placing the pattern horizontally and vertically on one blank .
Attention! To ensure that the paper does not peel off and is less likely to bulge, fold the edges of the decor inside the container and secure them there with glue.
Important! The box for large combs should be located in the center so that the organizer does not fall over.
There can be any number of small sections, and you can store not only combs, but also hairpins in them.
Step-by-step instruction
It is not difficult. Step-by-step recommendations will guide you in the right direction.
Step 1. Dimensions
Having decided on the model, you can indicate the dimensions of the future panel. The standard dimensions of a baby crib are 120 cm x 60 cm. The length of the front organizer can be 120 cm or less. The side ones usually remain 60 cm.
Then we determine the height of the element. To completely cover the wall of the crib, choose a height of 60 cm. If there are not very many small details, you can make it shorter - 40 cm.
Step 2. Select fabric
Knowing the size of the organizer, you can choose the right amount of fabric. Structure is also important. The optimal solution would be to choose natural fabric (cotton). It is easy to maintain and resistant to frequent washing. The color is matched to the bedding that is already present in the crib. You can also choose a contrasting color to match the interior design of the nursery. A set of an organizer and protective sides, which you can also sew yourself, will look especially beautiful.
Step 3. Filler
There should be a filler inside the panel that will maintain the shape of the product. When choosing a large front organizer, it is better to get a frame (a stick or twig along the entire width of the panel at the top; a handy option is glazing beads for window glass, which can be found in any market).
As a filler, you can choose thin foam rubber or padding polyester. It must be located around the entire perimeter of the panel.
Step 4: Pocket placement
Baby items (spare pacifiers, scissors, aspirator, favorite rattle or teether) should be placed in the top row. Larger items (especially if there is no changing table) - napkins, powders, diaper cream, disposable diapers and other necessities can be placed in the lower pockets.
Pockets can be either separate or separated by solid ones.
Before sewing, it is better to schematically designate all its elements on paper. To get started you need to prepare:
- fabric (for the exterior and the inner wall), optionally - braid for lining;
- filler;
- scissors;
- pins;
- threads;
- a needle.
Organizer basket
Another option for storing various things is this double-sided organizer. It's very easy to make; you only need a minimum of materials and a few minutes of time.
To make such a fabric organizer with your own hands, you will need two types of fabric, adhesive-based interlining fabric. It is needed as a seal for our organizer so that it takes the shape of a basket. Sewing machine.
These fabric baskets are convenient for storing medications, various toiletries, tubes of lotions and other things.
Ideas for storing small items
Firstly, ordinary small hooks are suitable for storing various things, for example, hats, bags, scarves and beads. If you hang your items in neat rows, this will not only save you time when searching for the right accessory, but will also be an excellent decorative element.
Secondly, it’s very easy to make an organizer for small items with your own hands. To create such an organizer, old cardboard or shoe boxes are suitable. They can be painted or covered with beautiful multi-colored fabric.
A plastic container or box can be wrapped with a rope. It will look very stylish and modern, not only helping you store things, but also decorating the space. In addition, to make such organizers with your own hands, you do not need to be a very skilled needlewoman. Anyone can cope with this task.
If you have a lot of glasses, you can make the following organizer. You will need a cardboard or wooden base, a small piece of beautiful fabric and metal staples (can be replaced with hooks).
The same organizer for glasses can be made much simpler. Buy a photo frame of a suitable size, several small hooks with a vacuum suction cup. Remove the glass from the frame. Place hooks in one or two rows. Instead of hooks, you can also string ropes made of beautiful fabric. Put glasses on them. You can also place various jewelry: necklaces, beads, bracelets. Such an organizer will look very stylish, and small things that usually get lost or confused with each other, like beads, for example, will always be in front of your eyes.
From plywood
Organizers for storing things are made of plywood.
To create a useful craft for the bathroom and fold towels in it, you will need the following tools:
- self-tapping screws (screws);
- plywood sheet;
- metal cans of pickled pineapples;
- brushes;
- glue gun and PVA glue;
- acrylic paint;
- colored wallpaper or decorative napkins.
Step-by-step method of formation:
- Wash the jars thoroughly, then mix the paint with PVA and paint them. It is recommended to use a light color scheme or tones that go well with the tiles in the bathroom.
- Dry the tin container and decorate it in the “decoupage” style; apply any image. It is allowed to complete the illustration using paint of a different shade.
- Using a glue gun, apply glue to the edges of the iron container and stick a satin ribbon of a suitable color there.
- Give the tins time to dry.
- Paint the plywood in a suitable tone and cover the entire length of the perimeter with the same edging.
- Place the cans parallel to one another on a plywood sheet and secure them to the base with short screws.
- Make a hanging mechanism on the back surface, and insert special hooks into the bathroom wall.
Do-it-yourself storage organizers made from plywood
Variants of plywood organizers:
- A holder for magazines and letters is made of 10-15 sheets, fastened at the bottom with pencils and screws inserted into drilled holes.
- For a mirror with shelves, you will need a large rectangular veneer plate, on which a long dressing table is attached to one side, and several small wooden shelves are nailed to the other edge.
- Drill many round holes on a large sheet of plywood and insert suitable sized wood dowels into all or some of them. Various kitchen utensils are hung on the inserted bushings.
- Make stable triangular stands from plywood, hang chains, necklaces or beads on top of them.