Every family probably has a lot of old and unnecessary newspapers, magazines, and advertising brochures. They can be used to light a stove or fireplace, and they can be recycled. You can also make furniture and interior decor items from this paper. Yes, don’t be surprised, newspapers can serve as a durable and reliable material for weaving.
You have all come across products woven from wicker. They look beautiful and airy, but are quite expensive. Therefore, we offer you several simple options that will allow you to master the technique of wicker weaving using cheap material.
So, let’s learn how to weave furniture with our own hands in order to decorate the house yourself and without special expenses.
Furniture made from newspaper tubes: what is needed to create it
First of all, we need to find out what we will need for work, regardless of what piece of furniture or decor we will create. The list of materials includes:
- Newspapers (magazines, advertising brochures);
- Sheets of cardboard;
- Scissors;
- Pencil;
- Paper cutting knife;
- Paper glue;
- Scotch;
- Stain and varnish for coating the finished product.
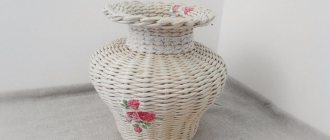
For a simple vase model, you can get by with a plastic bottle as a mold. For more complex structures, various objects may be needed as a frame or temporary holder during work.
In this case, you can always make do with improvised means. This could be dishes, legs and much more. If you want to make a wicker chair, the simplest option would be to decoupage a plastic chair, which will serve as the frame.
The first thing to do is to form tubes from newspapers, which will serve as a vine for weaving. The tubes must be the same length, and most importantly, diameter. Therefore, screw them onto a pencil to get the optimal shape, pre-coating the paper with glue. This will prevent the tube from falling apart after you remove the pencil from it.
From the outside it may seem that paper is not the most reliable material for the manufacture of massive objects for a specific purpose. But in fact, DIY paper furniture is quite practical, durable, and if you follow all the rules when making it, it will serve you for many years.
updating an old chair No. 4 - knitted cuffs:
You will need: A chair - wooden, in country style - of the simplest shape. Materials and tools: acrylic paint of your favorite color, brush, sandpaper, and then options
(1) if you like to knit - bright woolen yarn, knitting needles;
(2) if you want to quickly or are not keen on knitting - an old children's sweater, scissors, leftover wool or acrylic threads in a ball, a gypsy needle with a large eye.
Go over the chair frame with sandpaper to prepare the surface, then paint.
If you choose knitting, use circular knitting needles to knit 4 cuffs on the legs and one on the back. If you don’t knit, cut out an old sweater and sew the same cuffs from it: from the main part - onto the back, from the sleeves - onto the chair legs.
Try the cuffs on the chair, make sure they do not fall off, and if desired, make small gathers on the legs.
__________________________
How to make newspaper tubes correctly
In order for your newspaper products to be strong, you need to approach their production with the utmost care.
For more complex structures designed to hold heavy objects, such as chairs, bookcases, shelves, you will need a tube of greater density.
Fold the newspaper sheet lengthwise twice, cut it to make 4 equal strips. To make a tube, take a knitting needle of the appropriate thickness and apply it to the corner of the strip at an angle of 20-30 degrees. Hold the edge and twist the tube. Having reached halfway, remove the knitting needle and tighten it by gluing the edges with glue.
If during the weaving process you need to extend the tube, do not use glue for this. It is better to leave a gap of 2-3 cm, it is enough to hold the new link. For example, when rolling large sheets of newspaper, the tube expands upward, this is optimal for extensions.
Since paper is much softer than wicker, try, when tucking the tubes at the end of the weaving, to secure them with PVA glue on the product. Leave it overnight to allow the work to dry and continue finishing in the morning.
If you want nothing to distract you from your work, prepare more newspaper sticks in advance. Don't be afraid that there will be extra ones left: weaving paper furniture with your own hands is so exciting that you will want to create several more things.
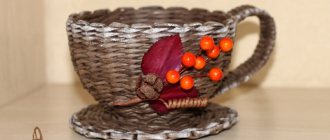
First, let's practice on something simple. For example, a small round tray.
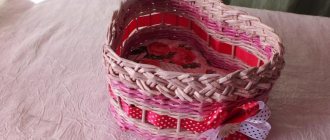
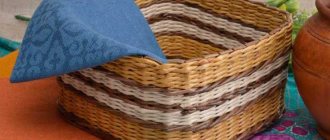
Weaving a tray from newspaper tubes
For such a tray you will need prepared newspaper tubes and cardboard, as well as some form to support the structure during the weaving process. Stock up on a decoupage napkin with a pattern you like and acrylic paint.
- Cut out three circles of the same size from cardboard.
- Paint one of the circles with white acrylic paint. After drying, decoupage it and set it aside for a while.
- Draw the second circle into sectors of equal size. Use a protractor for accurate calculations. For example, if you take an angle of 8 degrees for breaking, you will get 45 rays. Glue tubes on them, they will serve as the basis of the product.
- Now, on top of the base tubes, glue the second circle of cardboard. This way you will have the bottom of the product ready.
- Take two tubes and braid them around the first row, exactly adhering to the edge of the cardboard circle so that the ends are closed. Moving on to the second row, lift the base tubes vertically. In this case, it will not be needed for braiding, since the working tubes from which weaving began hold their shape well on their own.
- Continue weaving the tray either using a simple technique of interlacing tubes, or with a more complex pattern if such work is not new to you and you have already mastered several patterns.
- After the tray is completely woven, coat it with two layers of varnish, and after it dries, attach a cardboard circle with decoupage to the bottom.
So, you’ve practiced, gotten better, and you’ve got a nice and functional interior element. Now let's move on to more complex options.
DIY room furniture: weaving a beautiful chair
This is exactly the same version of decoupage of a simple plastic chair that we talked about above. For this you will need:
- Plastic chair;
- Sheets of cardboard;
- Tubes made of newspapers or paper;
- Glue.
Let's get to work. For convenience, you can place the workpiece on the table, but if you prefer to work on the floor, lay a soft blanket under your feet, since weaving a chair can take a lot of time.
- Place a sheet of cardboard under the chair and cut it to the required size, forming the bottom of the future chair. Glue newspaper tubes parallel to each other to each side of the resulting shape, at an angle of about 30 degrees on the folds.
- Having placed the chair level, lift the tubes, they will serve as stands. Now take four tubes, secure them to the base and braid the first row as shown in the photographs. The extra two tubes need to be hidden inside, and the remaining two weave two more rows.
- After the fourth row is completed, it is advisable to use two tubes at the same time for weaving. Having weaved several rows in this way, you can return to weaving using the “rope” technique. Thus, the bottom and stand of the chair are ready.
- Let's move on to working on the seat. It is woven in one tube. For every fifth row, a working tube is left on the right side, and a new one is added with a reserve on the left. This is how the side pillars are formed.
- The sides and bases are woven together using the “rope” technique from left to right. After this, the remaining tails from the seat are hidden inside, under the weaving. Proceed to the back: it needs to be woven from new tubes. Once several individual rows have been woven, begin braiding the backrest around the chair. To narrow the armrest, take two posts together; One of them can then be cut off.
- Start weaving the back from the left, gluing the ends of the tubes to it and cutting off the excess. From the inside, you will need to reduce the width strictly in shape. Add two bent tubes on the armrest and weave in a circle, bending the working tube on the right side under the first right post. Cut off the ends and glue them. To cover the arches of the arms and back, weave the top until the top and bottom posts meet. We bend the edges. We cut off the excess.
Now our chair is completely ready, all that remains is to cover it with stain and varnish.
In the same way, you can braid anything for a room with your own hands, which has long lost its presentation, but would be a pity to throw away.
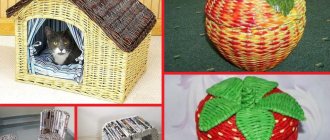
DIY paper furniture: master class on weaving a cat house
You love cats? If yes, then you are probably the owner of this affectionate furry animal, and you care about your pet. Why not make a two-level house that will make you feel comfortable and cozy. Moreover, you will need little for this: cardboard and newspaper tubes.
This kind of paper furniture is easy to make with your own hands and will not take much time.
First, pay attention to the size and fatness of your cat. The larger the animal, the denser the newspaper tubes should be and the wider the bottom. Let's look at the standard size: oval bottom 40 by 35 cm, the first level of the house is 23 cm high.
- The tubes are glued to the bottom at the same distance by the sun. Lift them so that they form a wall and begin to braid. In each row, when weaving, bring the base tubes a little closer to each other so that the walls taper towards the top.
- Once 23 cm has been woven, make a few more rows to form a straight post of about 5 cm. This is where the crossbar between floors will be placed. It must be woven in advance in the form of a circle, and the base tubes must protrude sufficiently beyond the working fabric to connect with the base tubes of the first floor.
- Now braid the resulting compacted base in a circle, forming a semicircular basket from the inside.
Since cats are active creatures, the house will need additional reinforcement. A solution of PVA in water in a 1:1 ratio will help with this.
It will make it heavier and make it strong enough. After the house is dry, cover it with stain and varnish.
A little about jute fiber
Everyone knows rope and rope, but few will say what jute is. First, it’s worth talking a little and finding out what kind of fiber this is. Jute is the material from which those same ropes and ropes are directly made. This is a bast plant that belongs to the Linden family. The height can reach up to 3-3.5 meters. There are up to 40 types of jute in the world.
Jute cultivation
From jute fiber they make:
- ropes;
- ropes;
- packaging and furniture fabric;
- base for linoleum;
- leg-split;
- bag containers.
Beautiful floor carpets are also made from jute fiber.
Finished jute fiber
Video about weaving from newspaper tubes
Now you know how to provide yourself with furniture and decorate your home with your own hands at virtually no cost.
Weaving from newspaper tubes is a very exciting activity that allows you to show creativity. If you want to learn something new and interesting about this type of needlework, ask questions in the comments. We will be happy to discuss with our readers anything that interests them! I started with vertical fixation of the tubes around the mold. I made holes in the cardboard in increments of 2 cm, stuck paper tubes along the diameter of the plastic stationery basket, which I used as a mold. The cardboard holds the entire structure well. I braided the basket alternating between a rope pattern and a chintz snake weave.
When I reached the middle of the structure, I wove a round bottom. It will be both the bottom in the internal space of the table leg and a stiffening rib.
On the tubes, which were racks, they were dressed with new ones - the extension of the rack was added to them from a rack with a round bottom. And then they flew together. She removed the cardboard base, took out the plastic form and moved it to the top, to the bottom partition and continued to weave around it, creating a bend in the leg of the future table.
I added it to the top, took out the bucket, bent the racks, and stuck an additional tube next to each one.
We wove 5 rows inside the circle and 3 rows around the outer circle along additional stand-up tubes. I bent the racks and tucked them into the hole to the adjacent rack. Thus, both the outer and inner circles were closed. Only on the inside I had to bend two posts together. The lower part of the table leg was covered in a similar way. The height turned out to be 63 cm. Now you need to weave 2 lids to the resulting “boxes”. The bottom cover will create stability of the structure, and the top cover will hold the glass surface of the table. The bottom lid was laminated like a container
with the pattern rotated for beauty. I added it to a diameter 4 cm larger than the diameter of the table leg, turned the fly radically inward, reached the size of the inner ring in the table leg, raised the stands to make a side that would fit inside. After 6 rows, I bent the racks inward with a rope and tucked them into the bottom rows. The protruding ends of the cut la.
The design was shock-absorbing and prevented the table from falling to one side.
The top cover was woven with a pattern, so that under the glass there would be a variety that was pleasing to the eye... The tubes were taken in white (from the edge of a newspaper) and blue (from magazines). 42 pieces of rods about 50 cm long are selected, from which 14 sets of 3 rods are formed: 7 triplets for transverse posts and 7 triplets for longitudinal posts.
I take the first 3 rods (horizontally) and at a distance of 20 cm from their left ends, perpendicular to them on top, I place the next three, leaving the upper end 20 cm long - we get a cross of 2 threes.
Then I take a blue tube, pass it into the lower left corner of the cross, bend it along the transverse three at the back of the cross and press it with the tube, which, going around the front of the cross diagonally from the lower left to the upper right, falls down from behind and is brought out to the front side. I place the next longitudinal three parallel to the first one and the blue tube diagonally, in the direction from left to right, and attach it to the transverse three. In this way I secure 7 longitudinal triples. When the 7th triple is secured with one dressing diagonally, during the reverse stroke (from right to left) I fasten each longitudinal triple to the transverse one crosswise, forming crosses from a blue tube on the front side. After this, a second one is placed from below parallel to the first transverse three and secured with a tube to the longitudinal threes, first in a straight line, from left to right, and then in the opposite direction. In this case, you need to ensure that the distances between the threes are the same, and that the dressings are well drawn in, symmetrical and beautiful.
I finish weaving the center of the panel when there are 7 transverse triples. As a result, in the center of the panel I get a square with a side of 10 cm.
Back side. On paper I drew a circle with a uniform distribution of rays.
Along this circle I will fly rays of blue tubes.
After 3 rows, I replace the multi-colored tubes with white ones and replace the rope pattern with a chintz snake pattern (in front of two tubes, behind one tube, offset in a circle by 1 tube). To each stand I add another tube next to it (both for rigidity and for elongation). When I leave for work, the Cat flies extra... After the cotton fly, I switch back to the rope and add quite a bit of color variety. I'm trying on glass. I got the rectangular glass from an old kitchen door. About 63 cm wide. I didn’t initially plan to have something so big, but apparently it was fate... There were two smaller ones, but while I was learning to cut it with a very old, blunt glass cutter, I broke everything... At home When cutting, cut exactly in a circle and don’t count! Only in a straight line! I changed the glass cutter. I trimmed the rectangular flax to a square. Cut off four corners of a square to get eight. I cut these eight corners straight and got almost a circle! All that remains is to hide these crooked and sharp edges in a frame. After trying it on, I removed the leak. I wrapped the racks one after the other. I tied them with a string. On top of this rope, another braid of three tubes was placed around the already completed row. I got the depth into which the glass would fall.
I missed taking a photo of the process of making the edges in a circle. I inserted the racks, bent like the letter “P,” into the front side, maintaining the rhythm of the pattern. I wove two sides along them, so that one side would fit into the inner ring of the table leg, and the second side so that it would capture the outer ring of the table leg. This is how the sides look on the finished lid.
I turned the lid over with the front side up, straightened the racks outward, and placed them on the sheet. Primed with a 1:1 mixture of PVA and water. Let it dry. Covered with varnish. Let it dry. I turned it upside down and also primed and painted it. The antennae that spread out to the sides were not painted!
She cleaned the glass thoroughly, placed it on its painted bed, covered it with a hairdryer and returned the antenna-stands to the center, pulling the entire structure to the glass with clothespins.
And she went, she went around in a circle with a string, 8 rows...
The ends were tucked inside. Primed with a 1:1 mixture of PVA and water. Let it dry. Covered with varnish. The Cat and I waited and let it dry: Then we simply pulled the sheet out from under the edge and found there “k ladik” - a clean table glass with a beautiful woven pattern underneath it...
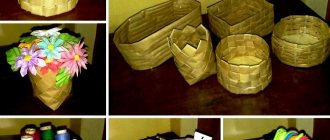
Surely, in every home there are many old and unnecessary magazines, newspapers and advertising brochures that can be used to light the stove or which can be disposed of. Or you can turn this raw material into wonderful furniture from newspaper tubes with your own hands. Yes, don’t be surprised, old newspapers can serve as a reliable and durable material for weaving useful household items. Probably everyone has come across products that are woven from wicker. They look very beautiful and airy, but they are not cheap. Therefore, we bring to your attention several simple options that will help you master the technique of wicker weaving using cheaper and more accessible material.
What is needed to create furniture from newspaper tubes?
The first step is to understand what you will need for the job, no matter what kind of decor or furniture you are going to make. The list of materials includes the following:
- Newspapers (brochures, magazines).
- Scissors.
- Sheets of cardboard.
- Knife for cutting paper.
- Scissors.
- Scotch.
- Paper glue.
- Varnish and stain for coating the finished product.
After the tools and materials are prepared, you should decide what kind of object you will make from newspaper tubes.
Important! For a simple vase model, you can use an ordinary plastic bottle as a mold. But for some more complex structures, various items may be required for the frame or temporary holder during work.
The first thing to do is to form paper tubes, which will serve as a vine for weaving. These paper tubes must be the same length and diameter, so it’s worth winding them onto a pencil to get the optimal shape, first coating the paper with glue. This will prevent the tube from falling apart after the pencil is removed.
Important! From the outside it may seem that paper is not the most reliable material for making massive objects for a specific purpose. However, in fact, furniture made from newspaper tubes with your own hands is quite strong, durable, and if you follow all the rules when making it, it will serve you for a long time.
Pros and cons of wicker structures
Rocking chairs made of wicker have a number of advantages. The advantages of such products include:
- availability of material to perform the work;
- ability to withstand significant weight;
- small weight;
- Possibility of location in any convenient place;
- environmental cleanliness;
- unique design thanks to openwork weaving;
- ease of maintenance and operation.
A chair made from wicker also has some disadvantages. For example, when exposed to precipitation and direct sunlight for a long time, the rocking chairs darken, crack, and lose their shape.
How to make tubes from newspapers correctly?
In order for your magazine and newspaper products to be durable, they must be made with the utmost care.
Important! For more complex structures that are designed to hold heavy objects, for example, shelves, armchairs, shelves, sofas, you will need higher density tubes.
Operating procedure:
- Take a sheet of newspaper and fold it lengthwise twice.
- Cut it so that you get four identical strips.
- To make the tube, take a knitting needle of the appropriate thickness and place it against the corner of the strip at a 30-degree angle.
- Holding the edge, twist the tube.
- Having reached the middle, remove the knitting needle and tighten the tube, gluing the edges with glue.
If during the weaving process you need to extend the tube, you should not use glue for this. It is better to leave a gap of 2-3 cm - it will be enough to hold the new link. For example, when rolling large sheets of newspaper, the tube expands upward, which is suitable for extensions.
Since paper is much softer than wicker, try, when tucking in the tubes at the end of weaving, to secure them with PVA to the product. Leave the work overnight to dry, and continue finishing in the morning.
Important! If you want nothing to distract you from weaving, prepare more paper vines in advance. Don’t be afraid that there will be extra left: weaving furniture from newspaper tubes with your own hands is so exciting that you will probably want to make a few more things later.
To begin with, you should practice on something simpler. For example, a small round tray will be an excellent opportunity to understand the intricacies of paper wicker weaving.
Tray made of paper tubes
To make a tray, you need to prepare cardboard and newspaper tubes, as well as some form to support the structure during the weaving process.
Important! Also stock up on a decoupage napkin with the desired pattern and acrylic paint.
Operating procedure:
- Cut out three identical circles from cardboard.
- Paint one of these circles with white acrylic paint. After it has completely dried, decoupage it using a prepared napkin and set it aside for a while.
- Draw the second circle into sectors of equal size. For more accurate calculations, use a protractor. For example, if you take an angle of 8 degrees for breaking, you will get 45 rays. Glue tubes on top of them, which will serve as the basis of the product.
- Then glue another cardboard circle on top of the base tubes. This will give you the bottom of the tray.
- Take two tubes and weave the first row out of them, strictly adhering to the edge of the cardboard base so that the ends close well. Moving on to the second row, lift the base tubes vertically. In this case, a frame for braiding will not be needed, since the working tubes from which weaving began hold their shape well on their own.
- Continue weaving the tray either using a simple technique, or with a more complex pattern if this kind of work is not new to you and you have already mastered some patterns.
- Once your tray is completely woven, coat it with two or three coats of varnish and, after it is completely dry, attach a cardboard circle with decoupage to the bottom.
Thus, after trying to weave from newspaper tubes, you will be able to make a functional and attractive interior element. If you liked this process, you can proceed to more complex options, for example, making a chair from newspaper tubes with your own hands.
Transition from the bottom to the walls. Raising the racks
Once the bottom is done, sound logic dictates that somehow you need to move from it to the walls to continue working. We'll look at several ways to raise racks to create beautiful pieces.
Smooth or imperceptible rise
The easiest way for a beginner is to simply lift the posts up about 30 degrees with your hands and continue to braid them with rope. After the first circle, the racks need to be raised another 30 degrees and continue to weave with a rope.
By the third, or maximum fourth, row you need to completely align them and continue braiding. This will create a smooth rise.
This method is used when it is necessary to achieve a smooth transition of the bottom into the walls of the product.
In the finished product, such a smooth rise of the racks will look like this: the transition is not sharp, the bottom gradually turns into walls:
Simple vertical lifting. Establishing a stand for the next
To master this technology, take an additional tube, preferably in a contrasting color, so as not to confuse it further, and place it on any rack; we will henceforth call it the first one. This manipulation will allow you to “reserve” a place for the last raised rack.
So, bend the first post, bend it through the additional tube and bring it up through the next one.
Bring the second rack up through the third in the same way.
Repeat these steps around the entire perimeter of the bottom. When you reach the extra tube, take it out and insert the last post in that place.
All the racks are already up. Before weaving the walls, pull each of them up a little.
A clear and sharp transition from the bottom to the walls will be visible in the finished product:
Using a string of three tubes
If you are new to newspaper crafting, this method may seem overwhelming to you. Therefore, we suggest you start your training by watching a clear video master class from Lada Ligai.
The transition made using this technique (a rope with three tubes) will be neat and smooth:
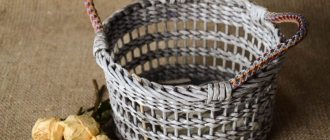
We weave a beautiful chair
This is exactly the version of decoupage of a simple plastic chair that we talked about just above. To do this you will need the following:
- Plastic chair.
- Tubes made of paper or newspapers.
- Sheets of cardboard.
- Glue.
Let's get to work. For convenience, you can place the workpiece on the table. If you prefer to work on the floor, then you should lay a soft blanket under your feet, since weaving a chair can take a lot of time:
- Place a cardboard sheet under the high chair and cut it to the required size, forming the bottom of the future frame. Glue paper tubes parallel to each other to each side of the resulting shape, at an angle of approximately 30 degrees on the folds.
- Place the chair level and raise the tubes - they will serve as stands. Now take four tubes, fix them on the base and braid the first row. Hide the extra two tubes inside, and weave two more rows with the remaining two.
- After the fourth row is completed, it is recommended to use two tubes at a time for weaving. Having weaved several rows in this way, you can return to weaving using the “rope” technique. So the stand and the bottom of the chair are ready.
- Let's start working on the seat. Weave it with one tube. For every fifth row, leave a working tube on the right side, and on the left, add a new one with a reserve. So form the side pillars.
- Braid the sides of the seat and base together using the “rope” technique from left to right. After this, hide the remaining tails from the seat inside, under the weaving. Proceed to the back: it is woven from new tubes. After several individual rows have been woven, braid the backrest around the chair. To narrow the armrest, take two posts at a time - then one of them can be cut off.
- Weave the back, starting from the left, gluing the ends of the tubes to it and cutting off the excess. From the inside it will be necessary to reduce the width strictly in shape. On the armrest, add two bent tubes and weave in a circle, bending the work post on the right side under the right post. Cut off the ends and glue them. To hide the arches of the back and armrests, weave the upper part until the lower and upper posts meet. Fold the edges and cut off the excess.
- The chair is almost ready, all that remains is to cover it with stain and varnish in several layers.
Important! In the same way, you can braid almost any piece of furniture from newspaper tubes with your own hands, which has lost its attractive appearance and would be a pity to throw away.
updating the old chair No. 5 - bright paint and upholstery:
You will need: A chair - wooden, classical in shape with an elegant backrest and beautiful carved legs. Materials and tools: jacquard or chenille for seat upholstery, bright acrylic paint to match the new upholstery, flat brush, sandpaper, furniture stapler, scissors, tape measure.
Prepare the old chair for renovation: remove the seat, remove the old upholstery (it will become a template for the new one), as well as old varnish or paint (using a solvent), remove rough edges with sandpaper, strengthen the frame.
Paint all wooden parts with 2 layers of paint and wait until completely dry. Attach the new upholstery to the seat, pulling it lightly and securing it with a furniture stapler. Connect the frame and seat.
Our notes:
- if the chair has a back covered with fabric, replace it using a principle similar to working with a seat;
- This project is interesting precisely because of the bright colors of the paint and upholstery, which gave the old classic chair a truly new look.