The note
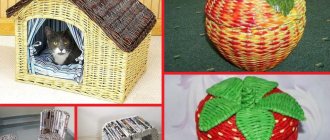
When I started weaving, I had no idea how in demand this type of creativity was. Almost everything was planned for the house, for gifts (again, for the house, but not your own). And then I saw handbags, and then display cases displaying charming wickerwork.
One needlewoman from Israel weaves various containers and props for photography for a beauty salon. This surprised me the most. And how many luxurious things they make for photo studios.
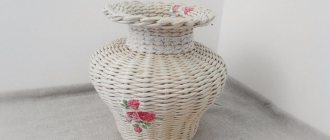
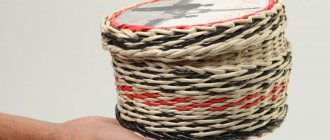
Today I want to share one of them - a flower cage.
For example, a gift for March 8 from such a cage with flowers (instead of the usual bouquet) plus a gift certificate for a photo shoot - I would be happy to receive such a set.
Spring is coming, imagine several of these cages hanging on the tree where you are taking photos - beauty!
Master class from a needlewoman from Minsk, whose work I am inspired by following her pages on Instagram and VKontakte.
“For a large cage like this one (height 60 cm), I built up the posts after lifting them from the bottom - I cut off the old ones, inserted new ones next to each other on the pva, and then covered the stumps next row. But usually I prefer to build up the racks at the bottom, it’s more reliable.
I begin to weave hanging rows
When weaving “hanging” rows, I glue the working tubes to the racks every 3-4 racks so that the rows remain at the same level and do not move down.
I decide in advance how many posts will form the entrance to the cage, and I don’t weave these posts, but turn around and weave in the opposite direction.
I cut the tubes and glue them. When making the entrance, these places will be covered with an arch made of flagellum.
At this stage, I increased the racks - these were not long enough to form a dome. For larger cages like this one, I insert wire inside the posts.
- I form a dome and tie it with jute twine
- I left 6 ends of the entire tail, cut off the rest and coated them generously with PVA.
- I divided the 6 ends into 2 parts (3 on each side), and connected the bundles to each other in the form of a ring
Now I wrap the ring with tubes according to the principle of weaving a twisted handle. You can make it simpler and just wrap the ring with one tube. It will look different.
- I wrap the ends and twine with a tube, coating them with glue in some places.
- I twist a flagellum from two tubes to form the entrance to the cell
- I cut off the free posts at the bottom, make a hole in the weave with a thick knitting needle, insert the beginning of the flagellum there and glue it along the post
- I form an arch from the flagellum, marking at the top the level at which I will cut off the free posts
I cut off the posts, and push the ends inside the flagellum and fix them with glue. After the glue has dried, I do the same on the other side. If you simply glue the flagellum to the top of the posts, the arch will stick out slightly forward.
For a large cage, like this one (height 60 cm), I built up the posts after lifting them from the bottom - I cut off the old ones, inserted new ones next to each other on the pva, and then covered the stumps in the next row. But usually I prefer to build up the racks at the bottom, it’s more reliable.”
- PAPER WICKER
- You can use a balloon to create a dome.
- And this is a master class from Elena Puzanova, some people prefer video lessons.
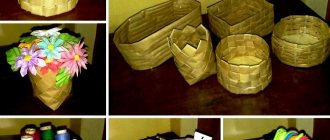
- And a couple more pictures of props from PAPER WICKER, for inspiration.
Source: https://oblacco.com/kletka-dlya-fotosessij-pletenie-iz-bumagi-mk/
Progress:
1. Cut 4 strips (I didn’t use thick cardboard)
1 cm wide, the length of regular cardboard.
2. Mark the middle of each strip and fold it with a flower.
3. Draw or download a bird template.
4. Cut out the bird and two wings from double-sided cardboard.
5. Using double-sided tape, glue the wings and attach a thick thread to the bird’s .
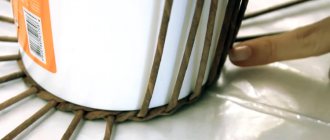
7. We move the paper strips apart so that there is approximately the same distance between them, sew the bars of the cage and the holder ring . We lower the strips down and glue them to the lid (I have a toothpowder lid, diameter 9 cm)
.
8. Cut a wide strip of paper, 3-4 cm, and glue it around the lid. The length of the strip will depend on the cover chosen.
9. Decorate the finished cage with flowers and a butterfly.
Let the bird in the cage , made by yourself, bring you joy and good mood!
Children's master class “Curly Bird” What can be made from paper? And you can make anything: vegetables, fruits, birds, animals and much more, as long as you have enough imagination. I suggest.
Summary of a comprehensive lesson for young children. Observing a hamster in a cage. We make grains for the hamster. Summary of a comprehensive lesson for young children. Observing a hamster in a cage. We make grains for the hamster. Objectives: to develop
Summary of educational activities Speech development 2nd junior group “Children in a cage” Speech development Program content Introduce children to the bright poetic images of animals from the poems of S. Marshak.
Master Class. Keychain “Bird for Mom” Description: the master class is designed for children of senior preschool and primary school age, teachers and parents. The craft is done.
Metal bird house (MK)
Metal crafts look especially attractive and rich. Before making a decorative cage with your own hands, you need to prepare all the materials that will be used in our work.
Components for work:
- design and sketch of a decorative motif;
- The material will be two types of wire: aluminum - about 22 mm thick, auxiliary - 0.9 mm, for example, nichrome;
- plywood sheet – 0.5 cm;
- You will also need a drill, thin-nose pliers and a jigsaw for the job.
1. First of all, you need to draw a cell to get the circumference of the base. We divide the resulting length by 4 - as a result we get the length of the decorative insert structure. Next, we draw out the parameters of the motif and decide on the pattern.
Related article: Notebook for all occasions: master class (+35 photos)
bend two circles from aluminum wire , respectively, the top and bottom of the cage. The pattern elements are connected with additional wire.
3. The pattern motif is bent in a circle, so we get the first part of the decoration. Using a similar pattern, we make the second circle.
4. At this stage, using drawings, we create the upper rib parts of the dome.
5. The plywood base must match the radius of the wire circles. Places for the wire are marked on it with a pencil , then holes are drilled.
6. Next, all the parts are connected . Keep in mind that when attaching the spokes you need to leave a span for the door.
7. You can decorate our cage with any decor. Decorative cages with flowers look especially impressive, they look quite romantic, creating an atmosphere of warmth and home comfort.
Decorative cage in the interior is a fashionable and current trend in design. The variety of shapes and decor allows everyone to choose the most suitable option for themselves, which will favorably emphasize the style of the room and decorate any home.
How to make a cage from paper tubes (video)
Cells made of different materials (35 photos)
DIY decorative cage
Another advantage of a self-made craft over a purchased one is that you can embody your own design ideas, not repeat existing interiors, and create completely new images. What can you use a decorative cage for? Buy
or making it means getting a wonderful candlestick or lampshade for a lamp, a flowerpot for flower arrangements, decoration for gifts or interior compositions.
In addition, such weightless and openwork cells will immediately create the necessary romantic, gentle atmosphere. They are very easy to use for the task of decorating a country house for a birthday or other holidays; such decor is often used at outdoor wedding ceremonies and receptions in an open space. You can complement metal structures with fresh flowers, birds made of fabric, or you can hang them on tree branches, putting surprise gifts inside for guests.
Options for making a decorative cage
there are many, everything is determined not only by the task you set for the product, but also by the material with which it will be easiest for you to work. For example, paper crafts are quite simple and light in weight, which allows them to be used, for example, for the task of decorating a ceiling. You can put sweets and flowers in them for a present; besides, even a child can handle paper cages. But, of course, wooden, and even more so, metal models look much more presentable. Plus, their size can vary from miniature to huge, almost covering the entire wall, depending on how you see the future interior composition in your imagination.
Antique effect
In addition to a metal cage, you can use wooden bird cages - paint them with white paint, creating scuffed effects. Shabby chic, vintage, Provence and others like them will gladly accept such a “gift”. A wooden cage can be decorated using the decoupage technique, creating a crackle effect - cracks created in a special way - using craquelure varnish - will create a convincing imitation of wood that has cracked over the years.
You can create an imitation of an antique cage using the tinning method. There are different types of processing that allow you to achieve a spectacular look, as if the cell has retained a touch of antiquity:
- Prime the metal parts of the cage with red lead;
cover with drying oil or oil-based varnish;
Apply beeswax and polish.
You can create a patina effect, this will enhance the decorative effect of a stylish piece of English interior design and emphasize the vintage styling of the house. Supplement the cage with lighting - just a small LED “twig”, and a romantic atmosphere is created.
A cage with a flowerpot will harmoniously complement the interior of the room.
Black check will be a great addition to the decor anywhere
This option of cages with candles will add variety to any room.
When summer turns to autumn
If you don’t want to care for a living bird, put a dummy in the cage. You can create a whole composition - a nest with bird eggs-models, a fruit-floral arrangement from twigs, flowers and models of berries and fruits. A bright autumn red-orange palette will decorate the room and bring into it the warmth of an autumn garden.
In spring it can be replaced with delicate green-blue or yellow tones. In winter, create a New Year's entourage - coniferous branches, cones, snowflakes and bright or snow-white Christmas tree balls will bring the fairy-tale night of wish fulfillment closer and fill the house with New Year's mood.
It will be difficult not to pay attention to such a creation
Such a decorative element will evoke only positive emotions in you.
A small decorative cage is what will transform your room
Home for a friend
If you decide to place a feathered friend inside the cage, you can also create an appropriate surroundings for him - elegant thin rods, decorations in the form of leaves and twigs look impressive on the outside, and inside you can hang an openwork feeder or a mirror in an elegant frame. You can decorate the cage inside and out using thin satin ribbons in delicate shades.
Cells with mirrors will look unusual and original
Place the cage anywhere and it will immediately update the environment
Description
To keep a parrot in captivity, you will need certain devices that satisfy its basic needs. One of them is a bird cage, which ensures the safety of a pet in a person’s home.
On the market you can find a large number of cages of various shapes, sizes, and materials. Their prices also vary widely. There are inexpensive small models for keeping budgies or huge all-metal structures, more like indoor aviaries for large species of birds.
You can design a cage for your pet yourself, which allows you to take into account the individual characteristics of this individual. The main criteria for evaluating a product are design, size, material.
Description of homemade cages for parrots
There are the following types of housing:
- With all metal connection.
The cage is assembled from a mesh or lattice, fastened by spot welding or special devices.
- Combined option.
A plastic or wooden frame holds a metal lattice or mesh.
- All wooden or plastic cages.
They are less common, as they are not very durable and are quickly destroyed by the strong beak of the bird. The mesh and tray are made of the same materials.
Drawings and step-by-step assembly instructions
Make a drawing of the future bird house. At the same time, take into account the size of the parrot, behavior, favorite activities and your own preferences.
You can look for convenient and comfortable cages on the Internet, and use them to create your own version.
Remember! Metal elements must be processed so that the bird does not get hurt on them, and wooden elements are sanded.
DIY bird cage.
- According to the modular principle, the underbody, side walls and roof are first assembled separately. Then they are attached to each other.
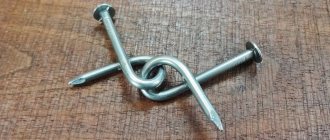
- First, the pallet is cut out from four bars, then the bottom itself, preferably from a sheet of chipboard. It is the basis of the cell. The parts are fastened together with nails or self-tapping screws strictly outward.
- Already sized metal corners are attached to the bottom, to which the adjacent side walls made of mesh are then screwed.
- When the frame is ready, work is done to secure the roof. It is recommended to make it from solid material, to which you can attach accessories for your pet - swings, bells, mirror, etc.
- The back wall is mainly made of galvanized iron.
- It is also recommended to “put” the house on wheels to make it easier to move.
- Don't forget the hole for the hinged door.
- The component elements are assembled into one common structure.