The aroma of coffee tones, lifts your spirits, and inspires creativity and work. And figurines decorated with coffee beans create a wonderful atmosphere of comfort in the interior, adding piquancy and completeness to your dining room or kitchen.
A coffee mill is not only a beautiful and fragrant figurine. The mill can serve as a box for small items or an original gift packaging for coffee. In this article we will tell you how to make a decorative box with your own hands.
- Materials
- Tools
- The process of making a decorative box Making a roof
- Making the “walls” of a coffee mill
- Making coffee mill blades
- Making coffee bags
- Making the base
For the little ones
Breeze, spinner, mill. Each of us had such a toy in childhood; we gladly made it with our own hands from ordinary drawing paper or soft cardboard. Let's remember our childhood and involve our children in making crafts.
One option is the origami technique. It will take no more than 15 minutes to create a pinwheel. You will need a cocktail stick, a sewing pin and a square of construction paper. Let's fold the wind pinwheel in a few steps:
You can complicate the task and make a children's windmill with eight blades. First, let's prepare a pattern for the craft parts with our own hands - there will be two of them.
We prepare the parts, insert one of them into the grooves of the other.
We make holes in the corners and bend them towards the middle. All that remains is to fix the turntable on the handle. You can use any sticks as a handle - cocktail sticks, wooden skewers. And so that our breeze moves freely, we use beads. We wind a wire around the tip of the stick, put an oblong bead on it, and only then - a mini-mill.
An even more simplified version of this craft is a “breeze” with six blades, which you can make with your own hands from just one part. As the main material we use colored paper with a dense texture or soft cardboard. Pattern details:
We transfer the workpiece to the base material, including marking the blades (semicircles). Carefully cut out and bend the semicircles. We attach the part to the handle.
Such a toy can be multi-layered, multi-colored and very fun. Use your imagination and involve your child in the design.
Waste material goes to work
Many, many different useful crafts can be made from so-called waste material. It’s also easy to get useful things for your garden plot and vegetable garden by applying your imagination and skillful hands to seemingly unnecessary things. Many different options for bird and mole repellers can be seen in various sources, some of them are quite complex, and some are primitive. It’s worth starting to create with the simplest designs. Plastic bottles, scraps of polyethylene pipes, a broken handle from a house mop, a used welding electrode, gift ribbons from already unwrapped gifts, toy bells or drink cans - anything can be used.
A real do-it-yourself cardboard mill
Real buildings and structures are made from paper or cardboard. But it is worth considering that creating such crafts takes a lot of time, you will have to be patient, and best of all, enlist the support of loved ones.
Materials and tools:
- cardboard and paper;
- scissors and stationery knife;
- Ruler and pencil;
- glue.
On a cardboard rectangle measuring 19*10 cm, draw 6 identical wedges and cut them out.
We fasten the wedges with masking tape or strips of plain paper, we get a cone.
We will add “planks” to the resulting cone. We cut them into different sizes so that they completely cover the “body” of the cone. We leave a distance of approximately 1.5 mm open between them.
We decorate the corners of the workpiece with strips of plain white paper 0.8 cm wide.
The next stage is the roof. We make it from a rectangle measuring 11*5 cm. It needs to be divided into three parts by lines.
We form triangles on the sides of the workpiece and bend them.
We cut another 11*5 cm rectangle, bend it in half and fix the roof blank in it with glue.
The roof of the craft also needs to be finished with “planks”. Their size is 5*1 cm. We cover the ends of the part with strips of white paper.
All that remains is to make the blades for our cardboard mill with your own hands. To do this, you will need a strip of material measuring 3 by 8.5 cm. We divide it into wedges, which we then cut into strips 5 mm wide.
We glue strips of wedges onto a piece of cardboard 5 mm wide and 6 cm long, leaving a distance of 3 mm between them.
We prepare 4 such blades and attach them to a cardboard cross.
All that remains is to put together all the details of our mill, add some decor to it, and the original craft for the garden and school is ready.
How to make a mill
How to make a paper mill correctly, because there are several interesting options. It is necessary to prepare materials and tools in advance so as not to be distracted from work. Simple execution schemes are selected for children. The child's work will take at least an hour. He will be able to paint the toy himself according to his wishes. Such activities develop imagination and creativity well.
Required materials and tools
To make an origami mill you will need:
- thick cardboard;
- colored paper;
- PVA glue;
- scissors;
- templates;
- wooden flat sticks;
- cardboard sleeve;
- watercolors or gouache;
- scissors;
- a simple pencil;
- a piece of thick wire.
For each master class, it is easy to find the necessary materials at home, especially if children live in it.
To make the structure dense, use corrugated cardboard, which is used for packaging equipment and large items.
Step-by-step assembly of a three-dimensional model with step-by-step photos
Various technologies are used to create three-dimensional models. They can be made in the form of water mills; for this, a wheel is attached to the side of the craft and glued to a blue sheet of paper. It will seem that the craft is standing on the water.
From scrap materials
For the mill you will need a toilet paper roll, a cardboard paper towel roll, an egg tray, glue, wooden sticks, masking tape and paper. Step-by-step manufacturing scheme:
- A rectangle is cut out of a piece of cardboard, rolled into a cone and glued together.
- Wrap the part in several layers of masking tape to create a roof.
- The bottom of the paper towel roll is wrapped underneath with toilet paper in 10-12 layers.
- For the steps, three crescents of different sizes are cut out of thick cardboard: from large to small.
- Cover each part with toilet paper so that there are no open areas left.
- The steps are glued to the bottom of a paper towel roll.
- The cardboard egg tray is torn into small pieces and pasted over the steps. They will imitate stonework.
- Wooden sticks can be taken from a bamboo kitchen napkin or collected after ice cream.
- They assemble a semi-oval in the form of doors from sticks and glue them above the steps.
- The area around the doors is also covered with pieces from a tray of eggs around the entire perimeter.
- If desired, the roof can be covered with a piece of gold-colored corrugated paper.
- The upper part of the sleeve is covered with wooden sticks. The stones around the door and on the steps are painted with yellow, orange, gray, and black felt-tip pen.
- They assemble all the parts together and attach the windmill to the roof. You can use a paper fan, cardboard rectangles on wire.
If you need to make a working turntable, then the master classes described here are suitable.
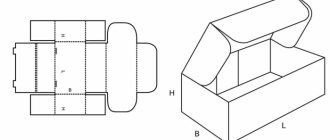
The photo below shows a visual diagram of how to make a windmill with your own hands from scrap materials.
Do-it-yourself real windmill made of twine
From improvised, waste materials you can get a real windmill, exactly the same as the one Don Quixote fought with.
You can make the craft yourself in just an hour, no special materials or tools are needed:
- 2 liter plastic bottle;
- leg-split;
- wooden skewers and toothpicks;
- glue Moment or Titan;
- cardboard and scissors;
- white and brown beans;
- sequins and wheat grains.
We roll a cone out of cardboard, fix it with glue and decorate it with twine. Important: the diameter of the lower edge of the cone should be slightly larger than the diameter of the plastic bottle. The fact is that we will “put” the cone on an element made from a bottle.
We assemble the blades from wooden skewers. We fix two identical parts with twine “cross to cross”.
The work on the upper part of the mill is completed by connecting the parts - we glue the blades to a cone decorated with twine.
We seal the bottle, like the cone, with twine. We fix the upper part of the mill to the lower part with glue. You can start decorating. We make the door from short fragments of skewers, placing white beans along the contour.
Decor does not require compliance with rules. You can do the finishing yourself and to your taste. As an example, there are windows made of toothpicks, a “dormer” window above a door made of sequins, a “edge” along the bottom of the product and on a dome made of brown beans.
MILL STANDS
I punched holes at equal distances along the edge of the plates with a hot knitting needle, inserted wooden skewers into them and fixed them with a heat gun. This turned out to be the base of the fence.
I painted the skewers with acrylic paint, alternating colors. Then, starting from the center, I wrapped the plates on the front side with twine, fixing the turns with glue. The reverse side of each was covered with the remains of wallpaper.
I cut the twine into pieces of the required length. I glued nine ropes together in threes and secured them with a heat gun between the skewers on one stand, and decorated the second with single “rails.”
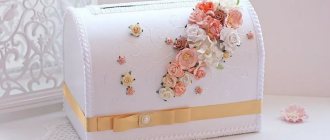
I wrapped the bottles with twine, starting from the bottom to the necks. I cut parts for the doors from a thin wooden strip and glued them to the bottles. I decorated each contour with a braid made of twine. Additionally, I decorated future mills with coffee beans (photo 1)
From cardboard I rolled two cones of the required size (depending on the diameter of the bottle and the length of the neck). I covered one with pieces of burlap, and the second with flower film.
She made windmill blades from skewers and colored threads. I twisted two circles out of twine and glued the blades to them with a heat gun. I fixed the finished windmills on cones. I just put the latter on the necks without gluing them.
I glued the mills to the stands with a heat gun, and made rakes from the remaining skewers for one of the crafts (photo 2)
This is how I made original gifts without much effort and expense.
Mixed materials
Handywomen often have materials left over from crafts that are a pity to throw away. You can assemble a mill from leftover wood, plastic, paper, and pebbles or seeds are suitable for decoration.
Let's check our "reserves". You will need paper, wooden toothpicks and skewers, imitation tiles (you can cut fireplace matches into slats), glue, small pebbles or seeds, cardboard.
Let's get to work. Let's start with the basics. We roll a cone out of cardboard and cover it tightly with pebbles or seeds. You can use coffee beans if you have them on hand.
Using wooden skewers we assemble a frame with a roof and install it on the base.
We “cover” the roof with tiles made from fireplace matches cut into fragments.
Now you need to prepare the blades. The basis will be skewers, and the planes on them will be assembled from a material that has replaced tiles or from simple matches.
The last step is assembly and varnishing. The varnish coating will protect the materials from aging and color changes.
Layout model Modeling construction Windmill Corrugated cardboard
In kindergarten we decided to make a “Museum of Bread”. The question of its design urgently arose. You need to show children the whole process of making bread. Stuck at the mill. I honestly admit that I don’t like to pore over patterns and work for a long time. Therefore, I decided for myself - cheap, but cheerful. And also, sorry for the small number of photos. As they say, a good thought comes later!
We build a “wooden” mill from corrugated cardboard. It is very similar to a log house and each log does not need to be fashioned. We make a pattern for the future house, remove the top layer of corrugated cardboard (we leave the corrugation itself and the bottom layer, it will “hold” the corrugation).
Glue the parts together. For gluing, I used the same removed “top layer” and Titan glue. The blades were made from cut off individual “tubes” of the same corrugated cardboard and the “top layer” of it.
I screwed the blades to the base. The screw cap (from the outside) was covered with the cut off top of a champagne cork (never throw away “unnecessary” things)