Both novice radio technicians and those who are fairly experienced in this matter encounter some difficulties when soldering radio-electronic elements. An inexpensive soldering iron bought in a store can cause overheating, due to which carbon deposits form on the tip, which leads to poor contact with the tin on the board, the board also overheats and the traces peel off. In this article we will write how to make a homemade soldering station with a hair dryer with your own hands, providing assembly diagrams, videos and photographs.
Making a contact soldering iron
This option can be considered the simplest and cheapest. This design regulates the voltage on the soldering iron by changing the heating temperature of the tip. The performance of the heater and the position of the regulator are determined experimentally.
The soldering process can be customized to suit your needs and specific production times. A dimmer for a chandelier can act as a voltage regulator. The only disadvantage of this idea is the small range of possible outlet temperatures. That is, for soldering it would be better to make the voltage range 200-220 V, and not 0-max. Most likely, you will need to modify the circuit, adding a “fine-tuning” resistor to the main resistor.
Assembly diagram at home
The rectifier bridge in this circuit will allow you to increase the voltage from 220 V at the input to 310 V at the output. This option is relevant for home craftsmen whose home has low electrical voltage, which does not allow the soldering iron to heat up to operating temperature. If you don't have a dimmer, you can do it yourself.
Optimal heating power
To assemble a lamp heater, it is better to use 150W models. Please note that after the introduction of a law prohibiting the production of conventional incandescent lamps with a power above 100W, they began to be sold under the name “heat emitters”.
With their sequential connection scheme, even two copies can be immediately felt radiated heat. At the same time, they do not blind the eyes.
The current in such a circuit at the same voltage will be 420 mA. This means that the two lamps consume about 100 watts in total, and most of them are used for heating.
you can compare the power of infrared heaters sold and the area for which they are designed. The coefficient for conventional models is 100 W per 1 m2.
Oil coolers have almost the same performance.
That is, in any case, watts turn into heat. Only specialized infrared models will have a more direct radiation to a specific point or area, and your DIY product will have a wider angle.
By the way, these 100 W/m2 are accepted by SNiP for insulated premises according to all standards. This is the optimal power for all heaters in central Russia. For northern latitudes, including cold, uninsulated garages, the values will already be higher. If, for example, the heat loss in a garage is 1000 W/h, and you heat it up by 300 W, the temperature will never increase.
But if the ideal heat loss is close to zero, then 100 W will be enough to create a bathroom inside.
In addition, this power depends on the height of the ceilings (calculated average - up to 3 m).
Air soldering iron
Sometimes when soldering you need to replace SMD elements, and the soldering iron with the tip is too large for this. For this purpose, an air device is used, whose operating principle is similar to that of a conventional hair dryer : an air flow is forced through a heated element to the soldering site, contactlessly and evenly heating the solder.
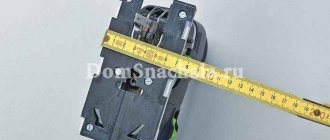
An air soldering iron can be made from a working old device - instead of a tip, insert a tube from the antenna that matches the old tip in size. Make the soldering iron so sealed. Forced air supply is provided by an aquarium compressor through dropper tubes.
To adjust the temperature of the air flow, you can use a voltage regulator . The best option if you don’t have an extra working soldering iron is to take a non-working tool and rewind it to a voltage of 8-12 V. This method is preferable from the point of view of electrical safety. The nichrome for the heater here can be a piece of wire, a 0.8 mm spiral from an electric stove, which is wound without overlaps of about 30 turns instead of the old one. The power of the transformer must be at least 150 W.
A more expensive method of regulating the temperature at the soldering iron tip is to maintain the temperature at the soldering iron tip. For this purpose, a thermocouple is additionally installed. Combining the described homemade products will allow you to make a universal soldering station. The device will have a voltage regulator that adjusts the input to the transformer, which changes the power of the heater.
When you need to desolder a large microcircuit, and for this you need to warm it up thoroughly and evenly, it is recommended to use a homemade thermal hair dryer with a temperature controller. You can also make an infrared soldering station, for which you need:
- nichrome spiral;
- ceramic lamp socket.
Nichrome is connected to a step-down transformer. The temperature on the surface of the parts is controlled by a thermostat.
The bee doesn’t have a pity, or What a good sting should be
If theater begins with a hanger, then a soldering iron begins with a tip. Both ease of use and the result obtained largely depend on the quality of the tip. Making a soldering iron
It's also wise to start with choosing a tip.
But what kind of a good sting
?
Here I would like to recommend a short article about the basic secrets of good soldering. It talks about the physics of the process, how wetting, capillary effect and surface tension solve most of the problem for us. This information is very useful for beginners and will not hurt those who are continuing.
But, returning to the topic of a good sting, we will have to remember physics again. Now from the field of thermodynamics. Don't be alarmed - there will be no formulas. We are talking about what shape the working surface of the tip
.
We had to touch on this topic because manufacturers of soldering irons have a unique understanding of the optimal shape of the working surface and supply their products with tips sharpened to a cone. As a rule, imported soldering irons suffer from this. I can’t say the same about domestic ones yet. I think this is a marketing ploy among foreigners, aimed at the mass amateur, for whom the sharp end of a conical tip
is associated with high soldering precision.
But let's figure it out. A cone, in principle, can be beneficial and effective, but only from the point of view of heat transfer along the entire length of the tip - this is when the entire tip is conical
(at least its outer part).
At the same time, the cone-shaped working surface is extremely inconvenient and ineffective. That is, if you have a cylindrical tip
and a conical working end, this is bad and pointless. Why is this so, and what does physics and its thermodynamics have to do with it?
As is known, heat transfer proceeds faster, the larger the surface area of contact of interacting bodies. In our case, this is a tip and a part. This means that, ideally, the surfaces should either be both flat, or each convexity should have its own “convexity,” and vice versa. Conical working surface of the tip
thus optimized for soldering “pits” and various kinds of “holes”, which is not so in demand in practice.
But working with a plane, for example, tinning a contact pad
on a board, will be much more difficult with a cone than with a flat edge.
Practice shows that it is the flat edge that is the most universal working surface, which means that the tip can be sharpened as you like, but so that there is at least one flat edge. In this case, it is not at all necessary to turn the sting into a “shovel”. Even the smallest flat surface at the end of the tip provides a noticeable gain in ease of use of the tool. For thin tips
(1-2 mm), we can recommend two classic forms of sharpening: wedge-shaped - with two flat edges, and oblique cut - with one flat edge. Of course, any variations are possible (there are an indescribable number of them) for reasons of convenience for a particular case, but do not lose the working edge by getting carried away with sharpening.
We figured out the shape of the working surface. And now it may not even be clear why I am picking on manufacturers of soldering irons with conically sharpened tips, if the tip can be resharpened. Yes, the fact of the matter is that not every tip requires sharpening. The tips I criticized are often short in length and not made of copper. It seems like this is some supposedly wear-resistant non-burnable alloy. Maybe with some kind of coating. There is no point in sharpening also because this alloy is poorly wetted by solder. That is, tin
such a sting is very difficult even with the use of the best fluxes. And after prolonged effort, when everything seems to have worked out, the tip is tinned, soon the solder on the surface of the tip again becomes uneven and begins to gradually gather into droplets. Maybe that’s why the sting doesn’t burn because it can’t be used. It’s like that joke: to prevent toys from breaking, don’t give them to children. Why then use such metal for a sting, if even an ordinary iron nail is more suitable for this role? But maybe I just don’t understand something about the newfangled stings. I would be grateful if someone could tell me what I'm doing wrong, if so.
I can’t recommend anything better than ordinary copper for a sting. Some copper alloys are also good. I'm in my soldering iron
I used a piece of thick winding wire for the tip.
At first the tip
was made with some extra length, then I shortened it slightly. This is due to the fact that for a tip with a constant cross-sectional area (not a cone), there is a maximum permissible length for a given diameter. Approximately (I do not pretend to be mathematically accurate!) the length of the outer part of the cylindrical tip (from the tip to the edge of the heater) can reach ten diameters. Exceeding this limit reduces the heat transfer efficiency of the tip, resulting in the ability to solder only small parts even with a powerful heater.
And now, when there is complete clarity about what a good sting
, you can describe the process
of making a soldering iron
.
In my description I do not give exact dimensions, since this makes no sense. Exactly copying a product in compliance with all dimensions is an extremely labor-intensive task. The technology I propose is based on the fact that the dimensions of subsequent parts depend on the finished parts and are adjusted to the exact dimensions of the finished parts, where necessary. In cases where dimensions are not of fundamental importance, they are selected “by eye”. And the first dimensions that I had to decide on were the diameter and length of the part of the tip that goes into the heater
.
I prepared a piece of thick winding wire for the future tip, aligning one end of it. I have not removed the enamel coating yet, so that there is some margin in diameter. There were fears (possibly unfounded) that I would not be able to insert the tip
due to the “too precise” size match. Thus, the diameter of the enameled copper wire became the internal diameter of the base of the future heater. I chose the length of the heater intuitively.
General characteristics and operating principle
The circuit of a soldering station with a hair dryer includes a block and a manipulator-hot air gun, where the air is heated. The devices are used to repair cell phones and household appliances. The methods for generating air flow are as follows:
- Turbine - air is supplied by a small vane electric motor in a hot air gun.
- Compressor - air is supplied by a compressor located in the main unit.
Mainly, compressor stations differ from turbine stations in that the latter can generate a larger air flow, but do not push the air through narrow openings enough. Compressor stations are more efficient when air must pass through narrow nozzles used for soldering in hard-to-reach places.
The principle of operation of the station: the air flow passes through a spiral or ceramic heater in the tube of a thermal hair dryer, heats up to the required temperature and exits through special nozzles onto the workpiece. The hot air gun is capable of providing air temperatures of 100-800°C. In modern stations, temperature, power and air flow direction are easily regulated.
In comparison with other stations (in particular, infrared), the disadvantages of hot air stations are as follows:
- The air flow may blow away small parts.
- Uneven surface heating.
- Additional attachments required.
The advantage is that turbo air stations are much cheaper than others.
Serial connection of light bulbs
Very simple. Simply connect two light bulbs of the same wattage in series and the voltage on each will be halved.
Of course, they will glow less brightly.
How will the energy consumption of such a beam of light sources change? Measurements can be taken with a multimeter.
Suppose, for example, at a constant voltage of 240 V for two 100 W light bulbs, the current is 290 mA.
Based on the formula for calculating power, we get:
P = I * U = 0.29 A * 240 V = 69.6 W
As you can see, consumption has decreased. But at the same time, heat generation per watt of power increased.
Assembly Recommendations
At home, it is easier and cheaper to make a station with a hairdryer on a fan, where a coil plays the role of a heater. A ceramic heater is expensive and can crack if there are sudden changes in temperature. The compressor is difficult to construct on your own, and it cannot be attached to a hair dryer, so you will have to run an air pipe from the main unit, which adds inconvenience.
The supercharger will be a small-sized fan (a cooler from a computer power supply will do) near the handle of a thermal hair dryer. A tube is connected to it, in which the air is heated and discharged onto the soldered element. A hole is cut at the end of the cooler through which air enters the tube with the heater. On one side, the cooler is tightly closed so that during operation the air only flows into the tube and does not come out. The blower is mounted at the back of the hair dryer.
The heater is much more difficult to assemble . Nichrome wire is wound in a spiral onto the base. The turns should not touch each other. The length of the spiral is calculated based on the fact that its resistance should be 70-90 Ohms. The base can be a base with low thermal conductivity and high resistance to high temperatures.
When designing a hair dryer, many different parts can be taken from old home hair dryers. Every device, even a simple and cheap one, contains mica plates from which a cross-shaped base is assembled for the spiral. The bases of old soldering irons or halogen lamps for spotlights are also used. The base of 5-7 cm should be unoccupied by the spiral. The ends are retracted from the spiral along the base. This part is then tightly wrapped with heat-resistant fabric.
Next, a tube is made from porcelain, ceramics and similar materials. The diameter is calculated so that there is a small gap between its inner walls and the spiral. Thermal insulating materials are glued to the top of the nozzle:
- fiberglass;
- asbestos;
- other.
Insulation will ensure greater efficiency of the hair dryer and will allow you to safely handle it with your hands.
The heating element and the nozzle tube are separately connected to the blower so that the air flows into the nozzle, and the heater is located inside the nozzle in the middle. The junction of the nozzle and the supercharger is insulated to prevent air leakage.
The shape of the resulting structure resembles a pistol. For convenience, holders and handles can be attached to the body. Special nozzles are purchased or machined from heat-resistant metal. There should be four wires running from the manufactured hair dryer to the main unit and coming out of the back of the hair dryer. It is recommended to collect them together and re-isolate them.
The block body contains two rheostats, one of which regulates the power of the air flow, and the other regulates the power of the heating element. It is better if the switch for the heater and blower is common. The final step is an outlet device for the socket.
How to use the soldering station
Contact equipment is not suitable for soldering modern microcircuits.
New chips have a lot of pins, so it’s simply not possible to deal with them using the usual method. However, many of them are not equipped with “legs” at all - this is the case with microcircuits supplied in BGA packages. They are installed on motherboards and memory modules. Even conventional planar chips are often equipped with a hundred or more pins. It is basically impossible to remove or fix such a part using a conventional soldering iron.
We'll tell you how to work with the station using the example of the Lukey-702 model with a hairdryer. In addition to the latter, it also includes a classic soldering iron.
The device makes it possible to select the most suitable temperature for each element, which allows you to operate as efficiently as possible.
The procedure for working with a hot air gun is as follows:
- the element being repaired is fixed in special clamps;
- the station is connected to power;
- install a suitable nozzle on the hair dryer;
- raise the temperature with the regulator to an average value;
- that the device is ready for operation will be indicated by a special indication on the display;
- serviceable parts are covered with a piece of thick foil for protection;
- a puller is placed under a chip that has become unusable - a steel wire bracket that penetrates into the space under its legs;
- contacts are treated with a special flux using a syringe;
- the microcircuit (to avoid thermal shock) is first warmed up using a hairdryer in a circular motion;
- then the “legs” are blown with hot air;
- as the solder softens, the chip begins to rise;
- when the part is completely removed, the tracks continue to be heated to level the tin layer;
- if necessary, clean the contacts with alcohol;
- before installing a new part, flux is applied to the board again;
- the chip is aligned and fixed pointwise (in each corner) with a soldering iron;
- the leads are again treated with hot air, making circular movements until the microcircuit is immersed in the solder under its own weight.
At the end of the operation, all outputs are checked for short circuits. If it is detected, the problematic “legs” are again lubricated with flux. Then, using a soldering iron and a piece of copper braid, remove the excess tin.
The final stage is washing the microcircuit with alcohol to remove flux residues and other contaminants. To do this, take an old toothbrush.
Safety precautions and rules of use
- It is important to follow fire safety precautions in the workplace.
- During operation, try to prevent sudden changes in the temperature of the heater. Do not touch the heating element or hair dryer attachments.
- Change the attachments after the hair dryer is turned off and cooled down.
- Do not allow liquid to come into contact with the hot air gun.
- Ensure the work area is well ventilated.
A soldering station-hair dryer is a fairly convenient device that you can assemble yourself. Despite its shortcomings, this is a quite suitable device for repairing household appliances.
Soldering stations
Method number 2. Contactless soldering station
As practice shows, it is not always possible to heat the tip to influence any elements of the board; for example, it is extremely difficult to get close to SMD parts. In such situations, a soldering gun is used to direct a stream of hot air onto the legs.
Despite the similarity, it is not possible to convert a conventional hair drying device into an infrared station, since the operating temperature must reach 500 - 800ºC. To assemble such a soldering station, you will need an air compressor, a heating element, a housing for controls, a nozzle, a step-down transformer, a rectifier, and an air speed control unit.
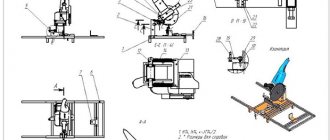
The schematic diagram of such a soldering station is shown in the figure below:
Rice. 2: electrical circuit of a hot air gun
The operating principle of the soldering station is based on the influence of infrared radiation from the heating element directly into the soldering area. The compressor supplies air from the heater through a tapering nozzle, creating a turbine effect; it is advisable to ensure pump performance in the range of 20 to 30 liters per minute.
When making an infrared station, there are two ways to do it - a manual model or a stationary one. The first option is suitable in situations where the IR soldering body is expected to be relatively small in size and will fit comfortably in the hand. The second method is suitable for large-sized devices in which the station is installed motionless and the workpiece moves under the nozzle.
Let's consider this example of manufacturing a non-contact soldering station:
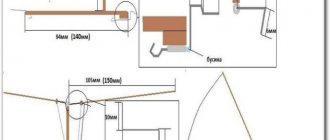
- Wind a heating coil made of nichrome wire, in this case it is used with a diameter of 0.8 mm.
You can take another option, for example, from an electric stove. Rice. 3: Wind up the heating element - For winding, use a rigid frame, lay the turns close together, but do not overlap, and be careful not to short-circuit the winding. The smaller the diameter of the wire you get, the more efficient the heating will be; a spiral with an outer diameter of 8 - 10 mm will be enough.
- In this example, several spirals are made, connected in parallel to increase the heating temperature.
- Install the resulting spiral on a cylindrical frame made of non-flammable material.
Figure 4: place the spirals on the dielectric element. First remove all excess from the frame, but if it is already ready, you can immediately wind it.
- Make a metal cup for the heating element, in this example of making a soldering station we will make it from the body of a AA battery.
- Make a nozzle from a piece of a telescopic antenna from a radio receiver, one edge of which should be splashed and put on the washer.
Rice. 5. Put on the washer - Screw the nozzle washer to the battery cup using appropriate bolts.
Rice. 6: Screw the nozzle to the glass - Place thermal insulating material inside the glass between the spiral and the walls to prevent overheating of the external parts.
- Assemble a diode bridge from four semiconductor elements; if you already have a ready-made assembly at hand, you can use that too.
- Make a power supply from a step-down transformer and a rectifier unit; your task is to obtain a low voltage at the output to reduce the likelihood of electric shock. In the example under consideration, it turns out to be about 10 - 15V, the transformer power is 150W. A similar model can be taken from ready-made equipment.
- We will make the case for the soldering station from an ordinary plastic bottle.
In this example, we need transparent plastic, since it is easier to connect the power supply, air blower and control board. Rice. 7. connect all elements in the housing - Connect the cooler and heating coil to the power supply terminals, connect the voltage regulator.
Rice. 8. install the cooler
The heat flow power can be adjusted either by the air supply speed or by the voltage level supplied to the heater.
Connect the power cord to the transformer terminals - the soldering station is ready for use.
Rice. 9: Soldering station is ready
Simple soldering station with dimmer
Let's consider a simpler version of an analog soldering station without a hair dryer, only with a soldering iron. The work can be performed by the user with minimal skills.
What you need:
- dimmer - a device for adjusting voltage, for example, to adjust the intensity of light from incandescent lamps. Since cheap LED lighting is common, the device may not be needed in household waste, it can be purchased and is cheap. The dimmer is sized, the installation principle is similar to the socket, only the dimmer dial is at the top;
- power cord with plug. Take any broken device, buy a flexible plug and a 2- or 3-wire cable (with a ground wire.
- ordinary welders with nichrome thread. It is better to take with high power, for example 60, 80W, the adjustment range will be wider;
- socket (internal), an old Soviet 5 A will do;
- body: fiberboard, jigsaw, screws, silicone glue. You can take an old case for a computer power supply, a soldering box;
In the following, the assembly steps are illustrated with explanations.
We cut it out of chipboard and assemble the body. We use silicone glue, self-tapping screws, bolts from below, and make this part removable. Holes: in front for the socket, or rather for its mounting screw and wires, we will fix a node on the surface, on top - a large one for the dimmer ballast.
Inside we connect the dimmer and the socket with wires. Next, we connect the wire with a plug for a 220 V network and remove it from the housing. In this case, the connection order and polarity do not matter.
The device is ready for use, we connect the soldering iron to the base connector, the device is connected to the network. The setup can be used this way, but it is best to calibrate the dimmer to clearly determine which position will cause overheating or the desired temperature.
We use an ammeter; it is impossible to connect in parallel: just probe the holes of the connected socket, otherwise it will burn out. The ammeter is connected only in series with the load, that is, our soldering iron must be included in the circuit. Therefore, we take another folding plug with the contacts removed and connect it to the station socket.
With the installation deactivated, screw one terminal with electrical tape to the teeth of the soldering iron fork, and the second to one of the ammeter probes. We connect the station to the network. We touch the second tooth of the soldering iron fork to another probe. We determine the current value, the degree of heating, and make (with a knife, file, marker, etc.) a graduation near the selector. Before taking measurements with an ammeter, it is necessary to set the current parameter corresponding to the 220 V (AC) network and its limit value for the existing network.
Main types
Soldering stations have significant differences in functionality and, of course, their cost. The classification of such devices is determined by several basic parameters.
Contact stations
Traditional soldering equipment, characterized by direct contact with the working surface. The device has a special electronic unit for controlling and adjusting the temperature regime. The soldering device is represented by a couple of subtypes, which are designed to work with lead and lead-free solders. Non-contact soldering machines come in three varieties, differing in their operating principle.
The device consists of an electronic unit for temperature control and monitoring
Hot air devices
Modern hot-air hair dryers that operate on the basis of a strong air flow generated by a compressor and then heated by a heating coil to the desired temperature. Hot air stations allow you to perform effective soldering in the most inaccessible areas with simultaneous heating of several surfaces.
In this installation, a compressor generates an air flow, which is then heated to the desired temperature
Infrared devices
Infrared models are characterized by the presence of a special heating quartz or ceramic IR emitter, which allows soldering of complex profile elements with uniform heating of the working area.
Infrared stations are represented by a quartz or ceramic emitter
The design of combined soldering stations very successfully combines several types of equipment at once, and the presence of an encoder knob makes it easy to set the optimal temperature regime.
Currently produced soldering stations or installations are represented by mounting and dismantling, as well as combined and repair models:
- mounting installations are designed for soldering parts;
- dismantling stations allow you to unsolder elements;
- combined devices are capable of performing installation and dismantling work;
- repair soldering stations carry out one-time or autonomous operations related to soldering.
Depending on the features of the mechanism that stabilizes the temperature regime, as well as the typical characteristics of control units, soldering stations are presented in analog and digital models.
Analog models have a heating element that is in the on position until it warms up sufficiently, after which the power to the unit is turned off. After the temperature has been lowered to the set values, the heating element is heated again. This type is distinguished by a very affordable price, but the disadvantages include the low accuracy of the soldering performed.
The disadvantage of analog stations is the not very precise soldering of elements
Digital soldering stations are characterized by monitoring and control of the heating process using a PID controller and a program embedded in a microcontroller. Such devices perfectly stabilize temperature conditions and are the most accurate compared to any analog models.
Digital devices are equipped with a special regulator and program that allows them to be controlled
Types of installations
Depending on the number of soldering irons connected to the power supply, the stations can be single- or dual-channel. The kit of the last of these samples may include both main and additional (dismantling) soldering irons, differing in their power and operating temperatures.
Sometimes one of them has a function for quickly changing the working tip (“tip”), which allows you to use it for soldering various types of radio components.
The appearance of some of the soldering machine models can be seen in the photo.
When classifying equipment of this type, a distinction is also made between digital soldering stations, in which the soldering operating modes are controlled using special electronic modules.
Of particular interest is the compressor soldering installation, equipped with a special air blower used when working with a hair dryer.
In such soldering stations, an air flow focused using a special device is first heated in a thermal channel and then directed through the outlet nozzle to the soldering zone.
The presence of a built-in temperature control system ensures the formation of a more uniform stream of hot air.
In addition to samples with compressor pumping of an air stream, turbine-type units are produced, which, due to their high cost, are very rare and are not in consumer demand.