The cartoon “Masha and the Bear” presents viewers with a fairy-tale forest in which funny wild animals, a caring bear and a restless girl Masha live. Every day the spoiled girl plays and comes up with new pranks, and big Mishka makes jam, cooks dinner, fishes and does household chores. Sometimes I want to envy Masha - such a good owner is the forest bear. His little house looks cozy and inviting. I just want to wander through its rooms, drink a cup of tea in the comfortable kitchenette. With great desire, creative imagination and suitable accessories, everyone has the opportunity to create such comfort.
The rustic motifs that are present in the bear’s house are perfect for decorating a country house or cottage. And some ideas taken from a forest hut will fit into the decor of a kitchen or children's bedroom.
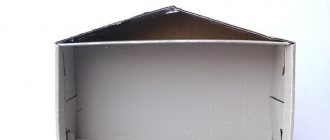
Masha and the Bear - build a house
Collector's Magazine – MiM Masha and the Bear
Finally, the long-awaited magazine series (partwork) with characters and buildings from the cartoon Masha and the Bear
. The magazine Origami LLC is published jointly with Masha and the Bear LLC.
The series is relatively small - 24 issues .
Recommended price: first issue - 99 rubles. From the second issue - 249 rubles.
Favorite characters + Real Bear House!
And also a convenient bag for toys and a smart educational magazine.
Each room includes a gift - a toy.
.
WHERE CAN I BUY.
"Masha and the Bear" is an interactive magazine for active children. On the pages of the magazine, little readers will be able to learn new stories about the interesting adventures of their favorite characters, funny comics, and learn funny poems and songs. The series was completed in 2014.
All Masha and the Bear products.
Now the heroes of your favorite cartoon are all together in the real Bear House! By purchasing each issue of the magazine, you receive a figurine of one of the Masha and the Bear characters or a part of the House.
Some rooms will also have an additional gift - a detail of the interior of the Bear House
. For example, his favorite refrigerator or chest of drawers.
The magazine is educational and developmental. The magazine will have sections:
- Considerations
- Profession
- Action games
- My diary
- Talkers
- Comics
- Workshop
- On a visit: we travel together with Masha and Misha.
- The company's secret: the unknown stories of the most ordinary things.
- Bedtime story.
What can be used for work
To organize such developmental activities with children, you can use any available materials, from paper and fabric to pine cones and disposable tableware.
Preschool children should select simple and safe materials from which they can do the work themselves. It’s best for kids to make crafts in the form of appliques, which can be made from different materials:
- nut shells;
- felt;
- cones;
- cereals;
- cotton wool;
- plasticine;
- cardboard;
- dry leaves, etc.
To make a bear craft from paper and other available materials, your child will need to select the following tools and materials:
- scissors;
- glue;
- pencils;
- paints;
- markers;
- matches;
- plasticine.
To make it interesting for a child to make a bear, you need to start with the types of materials that the child can handle on his own, with a little help from his parents.
Houses Masha and the Bear from Simba
- And here
You can purchase ready-made houses based on the cartoon from Simba, with action figures included. The presence of a variety of gaming accessories adds special realism to the plot of the game. High-quality toys made of safe, non-toxic, high quality plastic.
These are the models:
And also a designer. The two-story Masha House has a crib, table, chair and its own locker with 4 drawers. Near the house there is a well and a small fence. Masha’s campaign will consist of her favorite toys: a bunny, a doll and a bear:
Application: different types
This type of creative work can be varied, since the material can be used not only colored paper, but also other materials that are glued to the outlined outline of the future bear:
- cereals;
- small pebbles;
- wool scraps;
- pieces of fabric;
- dry leaves, etc.
The easiest way to start is with the classic paper appliqué technique.
Features of working with paper
Before starting work, you should invite your child to come up with a plot for future work. A good theme for a little artist could be the tale of the three bears.
The kid can transfer one or another plot of a fairy tale onto a piece of paper, making the surroundings of a bear's house from the inside or outside.
After the plot is chosen, parents need to draw a sketch of the future application with a simple pencil, according to which it will be easier for the child to stick on the elements of the drawing for the three bears craft.
The easiest way is to make an applique from colored paper, choosing suitable colors for each character in the picture.
Parents should also draw on colored paper all the elements of the future picture, which then the baby, with the help of the mother, will have to cut out and paste in the right place on a cardboard base.
Even if the mother takes on half the work, drawing a sketch, elements of the applique, which she then cuts out herself, the child will greatly benefit from such an activity, choosing the right place to glue the desired element in its place.
You can complicate the work process by inviting your child, after gluing, to color the work with a pencil or paints, drawing the eyes, nose and mouth of all the bears, dishes with food on the table, flowers and ruffles on the beds, as well as other decorative elements.
You can also use volumetric decor in the form of beads, buttons and other types of volumetric decor that can be found in any home.
Attachments that come with the magazine
Masha and the Bear - build house No. 1. As a gift - a Masha figurine and a bag for toys.
Masha and the Bear - assemble house No. 2. As a gift - Fence details.
Masha figurine from issue 1.
No. 1 Masha (figurine) + bag with a picture from the cartoon. Circulation - 250,000 copies. The figurine of Masha is not small, about 7 cm tall. No. 2 front left side of the house. However, the store says that the second number comes with fence parts as a gift. No. 3 Bear + cabinet (Teddy bear and chest of drawers) No. 4 part of the roof 1 No. 5 frog + part of the roof 2 No. 6 floor, part 1 No. 7 wolf + refrigerator No. 8 - Front part of the house 2 No. 9 - Table and goat No. 10 - Rival No. 11 - Part of the house No. 12 - Flowers and stove No. 13 - Part of the floor 2 No. 14 - Dog, TV and carpet No. 15 - Armchair and fireplace No. 16 - Part of the house No. 17 - Bed and ladder No. 18 - Bear No. 19 - Attic Part 1 No. 20 – Back of house 1 No. 21 – Attic Part 2 No. 22 – Hare and wardrobe No. 23 – Back of house 2 No. 24 – Back of the floor
The collection ends in mid-April 2014: the last, 24th issue is published.
Applications from other materials
You can make an applique from anything. Today, natural and natural bulk materials that can be glued to a flat surface and then painted in different colors are very popular. The following are suitable bases for this craft:
- various cereals;
- pasta;
- finely chopped pieces of thread;
- cotton wool
The operating principle is simple. First you need to draw the outline of the bear, which is then filled with the material used, which is attached with glue to the base.
When the craft dries, you can paint it with paints. When working, make sure that the material does not extend beyond the outlined contour.
Step-by-step instruction
You can make a bear as close as possible to the appearance of a forest dweller, provided that you have step-by-step instructions on how to make a bear.
With these instructions, you will follow all the parameters of the craft’s figure and create an extraordinary, exclusive pet, perhaps for the whole family.
Note!
DIY bird feeder: the best ideas for making simple and beautiful do-it-yourself bird feeders + master class with photo review
By making a bear pillow, you will not only decorate the interior of the children's room, but also provide your child with a useful thing. For such a craft, it is necessary to take natural fabrics, since the child will touch the pillow with his face. The fabric should not only be safe, but also soft and pleasant to the touch.
The extraordinary popularity of the toy
From the end of the nineteenth century to the present day, the most popular soft children's toy is the bear. Fashion, a fickle lady, makes adjustments to the popularity ratings of world design every year. However, the demand for bears never goes away.
The modern toy industry keeps pace with the development of children's animated films. Everyone you see on store shelves: minions, Maya the bee and much more. But this is a passing fashion.
Bears are already a recognized classic. Although now they are made from different, even the newest materials, and not plush as before, they still evoke the constant love of children all over the world.
Sew a bear
Question: “How to sew a bear?” - asked by all novice craft lovers who have not yet visited creativity and crafts sites on the Internet.
The sites provide a catalog of photos of different bears. They differ in sizes, shapes, and materials. But all of them are interesting and funny in their own way.
Having chosen the bear you like, you can take it as a basis. Additions or changes to the execution technique can be made during the process of creating the craft. But, it is better not to deviate from the instructions and recommendations if you are new to creativity. At first, it is better to strictly follow the advice of the masters.
Various options
Below in our photo gallery we offer you to look at photographs of children's crafts on the theme “Winter”. You can find images of various animals made from pine cones and plasticine, soft applications from paper, felt and cotton wool, a wide variety of shapes of snowflakes, tabletop compositions and dioramas. Products placed in various vessels look most advantageous. Let's look at how to make such a magical craft.
Bear pattern
Before you start sewing a bear, you need to print out the pattern of the craft.
The pattern of a classic bear is simpler than the pattern of the usual appearance of a forest animal.
Patterns for each piece of the craft contain information on the back: what kind of piece, how many centimeters to leave for allowances, how many of these pieces need to be cut out.
Following this information and step-by-step instructions for this craft, you can sew a funny bear, dress it in clothes or provide it with some object, for example, put a pine cone in its paw. This will decorate the image of the bear, show the connection with the forest, and make it understandable to the child.
Scene
For easy storage of dolls, the stage can be made flat in the form of a book spread or voluminous from hard felt. This creates a finished decoration and an envelope for storing the toys.
Stages of creating a flat scene in the form of a book spread:
- Take 4 pieces of felt measuring 20 cm by 30 cm (or larger), 2 of which are green (this will be the inside of the scene) and 2 more pieces of any other color for the cover.
- Make flat one-sided patterns of trees, a house, the sun, clouds (they will serve as permanent decorations for the intended fairy tale (for example, in a “kolobok” it makes sense to sew a house, a path, several trees, grass and the sun).
Here is an example of the scenery for the fairy tale “At the Order of the Pike”:
- Sew the decorations onto the green pieces of felt.
- Sew 2 sheets together along the inner edge (like the binding of a book).
- Sew the cover to the finished inside of the stage and trim the edges (decorate with braid).
This is roughly what it should look like:
The advantage of a flat stage spread is its versatility for several fairy tales at the same time with similar scenery (only the characters change).
And if the decorations are not sewn on, but placed on Velcro tape, then there are even more options. An example of such fairy tales: “Kolobok”, “The Three Little Pigs”, “At the Command of the Pike”, “Turnip”, “The Thirtieth Kingdom”, “Geese-Swans”. An example of such a theater from one scene and the characters of 3 fairy tales is given below.
Stages of creating a three-dimensional scene from hard felt:
- Gather materials: 3 large sheets of hard felt, 30*30 cm (or 30*20 cm) in size and 3 mm thick (it is possible to use thinner felt, but for strength and stability it will need to be sewn to cardboard).
- Draw a pattern on paper of the desired shape of the scene (front part and two side parts), transfer it to the fabric, trace it with a marker and cut it out with a stationery knife or scissors.
- Decorate the main facade of the stage with lace curtains or fabric.
- Connect the three parts of the stage together with seams.
This is what the approximate result should be.
DIY bear
Having made a soft toy for your child at least once, you will no longer ask the question: “How to make a bear with your own hands?” This question will disappear by itself.
All soft toys have the same principle of approach and the same sewing technology.
The whole difference is in the crafts, these are different patterns. But, if you follow the description of creating a bear with your own hands, then there will be nothing complicated in this creativity.
Bears made for their children by the caring hands of mothers carry their love and warmth. These toys are favorites for life.
Get involved in the creative process, create soft toys for your children, infect them with your love of handicrafts. This creative process will have a beneficial effect on the development of artistic taste in children.
Winter forest
Making panels is the most common type of creativity. In most cases, a natural theme is proposed, and the child comes up with his own story.
It makes more sense to start by making a simple creative work on the theme of a winter landscape.