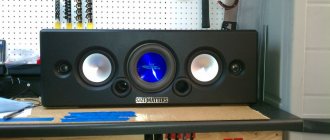
In my new home, I wanted to install a stereo system without breaking the bank. When moving, I was lucky, I found an old car radio that I hadn’t used for a long time, and a couple of speakers. I also knew that I had an old power supply lying around, and from all this I decided to build homemade home audio systems from car speakers.
Show 10 more imagesComponents for assembling a do-it-yourself acoustic system from car speakers:
- Car radio
- Speaker wires
- Car speakers
- Boxes for speakers (my speakers still had their original boxes)
- power unit
- Housing for the entire system (not only the system speakers, but also the power supply must fit in it - take into account all dimensions in the preliminary drawings)
- Stripping and crimping pliers
- Something sharp to cut the box
Models for computers
Speakers for computers are often made with one speaker.
To assemble the model, veneer sheets of small thickness are selected. A hole for the speaker is cut out on the front panel. The bass reflex must be located at the rear of the housing. If we consider low-power models, the amplifier can be used without a resistor. To adjust the speaker volume, special crossovers are used. These elements are allowed to be installed on a bass reflex. If we consider devices with a power of more than 100 W, then amplifiers can only be used with resistors. Some people select pulse diffusers for the model. At the end of the work, the terminal block is always installed.
Listening to music
The treble is good, the quality is average, the bass is surprisingly strong, perhaps this feeling is caused by the room in which they are played, but the desktop speakers did not show such kick. Overall a positive experience. The sound is pretty clear. The speakers work great in blues, techno, rap. Excellent female vocals, you can listen to them for a long time without interruption. The speakers are 87 dB and could probably handle up to 100 watts of sound.
Speaker design
Before you start making speakers, you need to prepare a speaker design. First you need to choose the right form. It’s better to go with a simpler classic rectangular or cubic design if you plan to make a subwoofer.
Important! If the speaker is low-frequency, you need to calculate its volume as accurately as possible, as well as the shape and position of the bass reflex. Otherwise, the bass will be of poor quality, which means there will be no effect from a homemade subwoofer.. After choosing the shape, you need to decide on the dimensions
If there are several speakers inside the structure, the device should be tall. You can make the speaker narrow, the internal volume will be enough to provide high-quality sound. The volume should be calculated fairly approximately, based on the diameter and power of the subwoofer, if it is present in the column. Accuracy in this case does not make sense, since almost no one can hear deviations of the sound amplitude from an ideal straight line
After choosing the shape, you need to decide on the dimensions. If there are several speakers inside the structure, the device should be tall. You can make the speaker narrow, the internal volume will be enough to provide high-quality sound. The volume should be calculated fairly approximately, based on the diameter and power of the subwoofer, if it is present in the column. Accuracy in this case does not make sense, since almost no one can hear deviations of the sound amplitude from an ideal straight line.
The next step is the selection of material. For the case it is better to buy MDF, but another material is also possible if it is rigid enough so that the walls do not deform from the vibration of the speakers, and is also lightweight and has a suitable price. For example, you can use multi-layer plywood, which is easy to process. After assembly, it can be decorated with veneer. The disadvantage of this material is its weak hardness, so stiffening ribs will need to be installed inside. You can also use GVL or DSP. They have high sound insulation properties, which will save on material for interior decoration, but at the same time they are difficult to process and quite heavy.
DIY housing for bluetooth speakers
We all like to listen to good music on quality devices. Nowadays, technology allows you to connect devices to listen to music in a completely contactless way, thanks to bluetooth. But such technologies are often accompanied by high costs, and this is not suitable for many. This article will help you make a Bluetooth speaker for listening to music with your own hands.
What to make a casing for bluetooth speakers from
The housing for a homemade speaker can be made of different materials, for example, plastic, thick cardboard, metal, wood. It is recommended to make the body from wood, since the material is available in any hardware store, is quite strong, and can be easily processed by hand.
Just purchase wooden plywood with an approximate thickness of two to three millimeters. Also, to create the body you will need a pencil, nails or hot glue. You will also need a regular or electric jigsaw and sandpaper. To create the system itself you will need:
- A speaker, preferably small in size.
- Bluetooth board.
- Smartphone battery.
- Amplifier.
- Switch.
- Activation button.
- USB charging connector.
- Wires.
How to make a case for a portable speaker with your own hands
In order to make this product, it is important to first fulfill the safety conditions. Put on safety glasses, protective gloves, and prepare your work area and materials for making a homemade product.
- The first step is to mark the main sides of your column on the plywood with a pencil. It is recommended to make the walls of the product small in size to save space and square in size for ease of execution. Also mark the grooves on the sides, thanks to which the walls will be attached.
- The next step is to cut out these walls with a jigsaw, and then go along their edges with sanding tape.
- After completing these steps, you need to determine the front, back and side walls. On the front wall, mark the hole for the speaker, and on the back wall, mark the holes for the connectors. Cut out the holes and sand them with sanding tape.
- Next, use a glue gun to connect all sides of the column except the top.
- After this, connect the wires to the Bluetooth board. Soldering locations are marked in the instructions for the board. In this way, solder the battery, connectors, amplifiers, start button and switches.
- Attach the speaker to the hole in the front wall, and the connectors, switches and start button to the back wall. Secure everything with hot glue so that nothing dangles.
- Secure the top cover and charge your homemade device using the connector and charger. If you wish, you can paint the column any color.
Recommendations
Place your speakers where they sound best.
Do not use speakers and PCs in damp, dirty areas, or near a source of acidic fumes. This will cause them to deteriorate prematurely.
Do not turn the sound volume higher than recommended. To avoid overloading the amplifier (and its frequent shutdowns due to overheating), use matching elements in the circuit. The speaker should not “wheeze” or produce distortion (“emphasize” high frequencies and reduce the level of low frequencies).
If the speaker is powered from a USB port, overloading the module that produces 5 V due to a voltage drop can lead to its failure. Don't overload your laptop. The same applies to smartphone and tablet chargers.
See below for a master class on making speakers.
Speaker crossover diagram
Crossovers are made based on measurements, here is a diagram.
We put everything together - we insert sound insulation, crossovers, cables, etc. We put on gaskets for the speakers, handles and cable entry. We install the speakers (here on hex screws with nuts).
BR (bass reflector) tunnels are made of PVC pipe, they have rounded exits so that they do not hum, ventilate them, then paint them black with a spray can, then press a black grille into the groove (preferably powder coated), glue strips of black felt on the grille supports so that they did not buzz and the assembly was completed.
As a result, the speakers sound very good. We had a combat test at a wedding, and everyone praised them very much for their sound and capabilities, no one even believed that these speakers were not store-bought!
Size
They all differ in size, which is very important in terms of acoustic design. You should not choose speakers that are smaller than 16 cm
Otherwise, it will not be possible to achieve acceptable sound quality in the low and mid-frequency ranges. In relation to high-frequency frequencies, this recommendation should not be followed.
Attention! In order for the sound at low frequencies to acquire bass depth, speakers of considerable size are required. If you are not going to use a subwoofer, then it is advisable to keep the front speakers to a size of 16–17 cm
The presence of a subwoofer can reduce the permissible parameters to 13 cm without loss of sound quality
If you are not going to use a subwoofer, then it is advisable to ensure that the front acoustics correspond to a size of 16–17 cm. The presence of a subwoofer can reduce the permissible parameters to 13 cm without loss of sound quality.
Single speaker models
Single speaker speakers are very common. To assemble the model, you will first have to deal with the body. Plywood is often used for this purpose. At the end of the work it will have to be sheathed. However, the first step is to make the side posts. For this purpose you will have to use a jigsaw. The speaker for the column can be selected with low power.
The inside of the plywood is necessarily stitched with vibration-proof tape. After fixing the speaker, the seal is fixed. Glue is used for this purpose. Next, all that remains is to attach the diffuser. Some people make a separate shelf for it and fix it with stacking screws. To connect the speaker to the plug, a terminal block is installed. How to turn on speakers? For this purpose, a cable is used from the terminal block, which should lead to a power source.
50 W devices
Speakers (homemade) rated at 50 W are suitable for ordinary acoustic players. In this case, the body can be made from ordinary plywood. Many experts also recommend using natural wood veneer
However, it is important to note that he is afraid of high humidity
After choosing the material, you should work on the speakers. They must be installed next to the bass reflex. In this case, you cannot do without an amplifier. Many experts recommend selecting only low-frequency crossovers. If we consider modifications with a regulator, then they use a pulse diffuser. The terminal block in this case is installed last. You can always use leatherette to decorate the speakers. A simpler option is to varnish the surface.
Homemade column made of polypropylene pipe
One of the options is a column in a polypropylene pipe casing. To work you will need:
- Hot melt adhesive.
- Module with speaker.
- Polypropylene pipe, the size of which will fit the speaker.
- Aluminum tape or electrical tape.
- High density film as a diffuser.
- Battery.
The manufacturing process is as follows:
- In the center of the pipe you need to make a hole that will look like the number 8. All sides need to be cleaned and any remaining PVC removed.
After assembling the speaker, you can do any finishing, paint or wrap it with electrical tape. If everything is done correctly, you can begin the test of listening and using the device.
How to make car audio
Creating a good and high-quality system requires not only high costs, but also special skills, knowledge and abilities. It should be understood that the acoustics in each car interior have certain features. The propagation of sound is hampered by the presence of many absorbing surfaces. You can solve the problem with the help of professionals who will adjust the sound in the car. You can do it yourself, but it is much more difficult.
High-quality acoustics in the car
Perfect Sound
To ensure good sound in your car, you must first install all the equipment correctly and follow all instructions. This applies even to a regular car antenna.
If you want to expand the capabilities of your existing audio system, it is important not to overdo it. After all, there is absolutely no need for a concert hall in a car, especially if the driver prefers traditional popular music
To do this, it is enough that the car audio can emphasize the depth of a certain sound stage.
Types of car audio systems
An acoustic system in a car can be created in two ways:
- Individual components are selected, and then installation and configuration are carried out. This option is not only expensive, but also complicated. In addition, it will take a lot of experience to ensure that the car acoustics turn out to be of truly high quality.
- Creating a system from proven components that are always available to you. The result directly depends on the amount of funds available, and in the process of performing the work you will be able to gain experience, and in the future adjust the car audio, and bring it to the perfect level. As a result, even a simple car antenna will allow you to enjoy the sound of music from any radio wave.
Do-it-yourself acoustic installation
Selecting the speaker cone material
The speaker diffuser converts the received electrical signal from the radio into sound. The diffuser is made of cardboard or paper. The material is treated on top with a special hydrophobic impregnation. The suspension of this element is made on a rubber or rubber base. Cheap speakers use fabric cones, which do not provide the required sound quality. Therefore, we recommend that you refuse to purchase such acoustics.
Speaker mounting location
Even before going to the store, you need to determine where to install the speaker system. Common speaker systems today are for the rear shelf, dashboard or door installation. The size and characteristics of the speakers depend on the type of acoustics. When installing in doors, in most cases, high-frequency speakers are chosen that provide stereo playback.
In most cases, acoustics for installation in doors have a round shape and a special protective metal mesh. The speakers for the rear shelf are equipped with protective plastic ribs. Quite often, such speakers are made oval, but at the same time the possibility of installing them in standard sockets remains.
Types of car speakers
All acoustic systems used today are divided into two types:
The quality of music reproduction in speakers of this type is much higher, but at the same time they have a significant cost. Two and three-component columns. Component acoustics are available in two- and three-component versions. The first type of device consists of several low-frequency speakers and a tweeter. Three-piece speakers have two additional tweeters that control the low and mid frequencies. Three-component speaker systems provide the highest sound quality.
Costs for homemade home speakers
This is roughly the cost estimate a few years ago for these DIY speakers for the home, made with your own hands in a couple of weeks in the evenings after work:
- Speakers — 15,000 rub.
- Transformers — 2×800 rub.
- Power cable - 200 rub.
- 2 radiators - 2×200 rub.
- Other electrical parts - 1000 rubles
- Chipboard (with sawing) - 1000 rub.
- Sintepon - 400 rub.
- Glue - 200 rub.
- Sealant - 100 rub.
- Putty - 100 rub.
- Film (wood-like) - 300 rub.
- Silver film - 500 rub.
The total of all expenses came to 20,000 rubles, this does not count the sound card, because in the end it turned out that it was quite possible to refuse it!
It is quite possible to assemble your own budget audio system for an ordinary apartment! A properly made speaker system with your own hands will sound no worse, or even better, than a “branded” one purchased for the same money. Almost all components for DIY speakers can be ordered online with delivery throughout the country. Many speaker manufacturers themselves publish ready-made cabinet diagrams for the corresponding speakers, that is, you have a ready-made “pattern” and you can cut the cabinet parts without bothering with independent calculations. But even if you don’t have a ready-made housing diagram, there is software and services for calculating the parameters and dimensions of housings for certain characteristics of the speakers. If you know the general principles of an audio system, you can assemble it yourself at home!
How to make a phone speaker from a speaker
If you have a small old speaker with a working speaker, you can turn it into a convenient portable device. For disassembly, you can use the cheapest models. The creation process looks like this:
- Disassemble the old PC speaker. Inside you will see a transformer, a board for amplifying music with a volume rocker and a mute button, as well as a speaker.
- Use a soldering iron to remove the transformer and power cable; such parts will not be useful.
- Connect the battery and load to the power board, install the charge indicator at the bottom of the case.
- For the connector you need to cut out a place, then file the board itself and glue it with tape or glue.
- Remove all diodes and solder the power supply to the diode bridge.
- For a charge indicator, drill a hole in the base of the column, fill everything with hot-melt adhesive and remove its remains after cooling.
After assembling the case and charging the speaker, you can enjoy music. In the video you can see how to make a telephone speaker from a regular speaker
You can write now and register later. If you have an account, log in to post under your account. Note: Your post will be reviewed by a moderator before it becomes visible.
Latest Visitors 0 users online
New version of the program. We managed to implement calibration. To calibrate, you need to turn on the meter with the calibration button pressed. Then connect the reference capacitors, the values of which are indicated on the display. The connection of each capacitor must be confirmed by pressing the calibration button. The values of the reference capacitors can be changed in the “set calibration caps” section. CapMeter_V2.zip
You need to take a photo of this board to understand the principle of operation and make a similar one. Otherwise, it is not clear which pulses should be given, of the same polarity or alternating. Maybe it will be easier to repair a burnt one? If it's not a secret, why do you need an aquarium in your car?
@Alexey Kuziv For now, I don’t plan to work on a program with a color display, because the program is quite voluminous and it will not be easy to remake it. Perhaps within a year I will find time for this work, but I will not promise.
Armenn, the jumper from the old owner was left just in the photo, naturally it has been gone for a long time. I don’t have a server lying around at home either. If I were, I wouldn’t write here. I disassembled the power supply, but little is clear from the traces due to the dense arrangement of parts, radiators and double-sided board.
Related content
Amplifier infinity 475a - the problem is the following: it does not turn on (the protection does not light up), when connected, the diodes (d12 d10) stabilizers (u2 u3) and ceramic resistors heat up. nearby elements are intact
Hello, I recently unearthed a couple of Infinity CXD-VF480SD cameras, but without wires. How to determine their pinout? There are two 4-pin connectors inside. I want to adapt them to a home video surveillance system to watch the entrance.
Construction and details.
In this speaker system, the signal to the high-frequency speaker is supplied through current-carrying rods, with which it is attached to the low-frequency speaker. The rods are made of PEV-2 copper wire with a diameter of 1.5 mm. The length of each piece is 65mm. At the junction with the current-carrying petals, the rod is cleaned of varnish and tinned.
To prevent the signal from shorting to the speaker housing, insulating bushings and washers are used.
Mounting unit for the rod to the HF head.
Mounting unit for the rod and bracket to the woofer head.
The picture shows the fasteners and parts used to assemble the speaker.
The filter coil is wound with copper insulated wire PEL-2 with a diameter of 1 mm. on the boss from self-adhesive tape (scotch tape) and has 95 turns, wound in four layers. When winding, the layers were secured with BF-4 glue.
The capacitor and coil are attached to a bracket, which in turn is attached to the speakers.
The bracket is made of a steel strip 8mm wide, 1mm cross-section according to this drawing. The dotted line indicates bending points.
This is what the assembled speaker assembly looks like. Centering of the low-frequency speaker in the groove of the rubber seal is carried out by two insulating and two steel bushings with a diameter of 8 mm.
Spring washers (grower) were used as locking elements when assembling the speakers. Instead, you can use any nitro paint or BF glue.
Crossover filter
Frameless reels:
- 0.33 MH, 0.480 Ohm, Dr 0.70
- 0.050 MH, 0.090 Ohm, Dr 1.00
Chokes with cores:
- 0.47 MH, 0.160 Ohm, Dr 1.00
- 2.0 MH, 0.400 Ohm, Dr 1.00
Useful: Protection device for 12V lead gel battery Resistors:
- 3.6 Ohm, 5 W, metallized,
- 10 Ohm, 5 W, ceramic
- 4.7 Ohm, 5 W, ceramic,
- 10 Ohm, 5 W, metallized.
Capacitors:
- 5.6uf IPC/400V
- 15uf IPC / 400V
- 2.7uf IPC/400V
- 10uF IPC / 400 V
- 0.68uf IPC/400V
- 2.7uf IPC/400V
Installing speakers in a car
It is necessary to say a few words about the technology for installing speakers in a car. It is recommended to install high- and mid-frequency speakers in the front shelf of the car. While the rear shelf houses speakers responsible for reproducing low frequencies.
If you are planning to upgrade your car audio system, we can recommend that you purchase a subwoofer for the trunk. Such a speaker generates high-quality bass and significantly improves sound quality, but it should be remembered that the subwoofer takes up a lot of space and requires the use of an amplifier.
The cost of high-quality acoustics
Conclusion
When choosing speakers, you need to pay attention to their technical characteristics and the manufacturer's company. By choosing the right speaker system for your car, you can improve the sound quality of music in your car.
Every car owner strives to ensure that the car sound in his car is perfect. And many are willing to spend a lot of money on this. And all because high-quality car audio is quite expensive.
Two-way speakers: design and assembly at home
I started creating acoustic systems for music lovers in 1993. From that moment until 2001, I was worried about a serious problem: practice has shown that models that reproduce music well cannot be repeated without individual additional tuning of each pair of speakers. On the other hand, patterns that repeated normally did not have an attractive sound.
It is known that small creative teams (exactly the kind I worked in) have a chance to survive only by offering products with convincing advantages. Therefore, for 8 years I made various speaker models that required custom tuning.
The cause of the problem is the speakers. Modern mass-produced speakers are made from synthetic materials or over-impregnated paper. This contributes to durability and stability of parameters. To improve the formal parameter - the uniformity of the amplitude-frequency response - the diffusers of modern loudspeakers are heavily damped. And this is achieved by increasing internal friction in the diffuser due to the properties of the materials and impregnations used.
Increased internal friction does not allow the speaker to reproduce the quietest sounds; it reacts with movement to signals starting from a certain threshold level. It turns out that the price to pay for the stability of parameters is reduced sound resolution, loss of “airiness,” and insufficient naturalness of the timbres of acoustic instruments and vocalists’ voices. Therefore, I tried to create my speakers based on old models of paper loudspeakers with low internal friction of the diffuser material. Such speakers have a wide range of parameters. In addition, there is no certainty that it will always be possible to purchase the required number of necessary loudspeakers, which have long been discontinued.
The desire to make a repeatable model of high-quality speakers grew stronger every year. It was possible to implement it for the first time in 1999. Three versions of rather expensive floor-standing speakers were produced using Dynaudio, VIFA and Polk Audio speakers.
I managed to assemble the most accessible model of bookshelf speakers on VIFA loudspeakers in 2001.
The VIFA M18SG-09 six-inch paper speaker operates in wideband mode - up to 6 kHz. There is no filter that limits the band of reproduced frequencies. From 6 kHz and above, reproduction is provided by a 3/4-inch polymer dome tweeter VIFA D19SD-05-08. The main content of the music is transmitted by the woofer/midrange speaker. Therefore, this model is close to single-band systems.
About the author
Alexander “Doctor” Klyachin is a radio communications and broadcasting engineer, a specialist at the international organization of installers CEDIA. He has patents in the field of electroacoustics, successful designs of tube amplifiers and speaker systems. Since 1982, he has been an expert at the Department of Electroacoustics and Radio Broadcasting at MEIS (now MTUSI). Developer of professional sound equipment, organizer of the first exhibition “Russian High End”. He was the first in Russia to create a transformerless tube amplifier. From 1995 to 1998 - expert at Salon AV magazine.
Currently, he is professionally engaged in the installation of audio and video systems. He willingly shares his experience.
The VIFA M18SG-09 is a typical modern paper speaker, inferior, like all other types, to the old paper speakers. However, the situation was not hopeless. The transmission of “air” and natural timbres is influenced not only by the internal friction of the diffuser material. The unevenness of the frequency response in the mid-frequency region and errors in the balance between low frequencies, midrange and high frequencies also have a detrimental effect on the airiness and naturalness.
“Antique” speakers, revered by experienced listeners, are created on the basis of excellent speakers, the capabilities of which are far from being fully exploited, since almost all the legendary old models have problems with frequency response uniformity.
Using my 9 years of intensive experience in tuning various speakers to obtain the desired frequency response, I was able to form the frequency response of the new model in the mid-frequency region with almost pinpoint accuracy and ensure the correct balance between bass, midrange and treble. Thus, all harmful factors, except for internal friction of the diffuser material, were minimized. As a result, the sound of the new model is closer in naturalness to the best “vintage” speakers.
From the point of view of formal fidelity of reproduction, the presented speakers are comparable to such good audiophile bookshelf speakers as Concerto (Sonus Faber) or Contour 1.3 (Dynaudio).
Rice. 1
The filter diagram of the new model is shown in Fig. 1. Let me explain the meaning of some symbols. The arrows on the lines indicating the internal wiring cables indicate directionality. The arrows near the inductors also correspond to the direction. Experience has shown that for most medium sized wire spools purchased, the start is on the outside and the end (“arrowhead”) is on the inside of the spool. By medium size we mean a coil with a diameter of 15 - 25 cm and a height of 15 - 30 cm (approximately). Obviously, when winding the wire from such a coil when making an “L” for your filter, the beginning of the directivity will coincide with the beginning of the winding (the point at the edge of the “L” on the filter diagram), and the “arrowhead” will coincide with the last turn of the newly made “L”.
If you are unsure about the directionality of the wire, do a test listening using sections of existing wire as speaker cable. The positive and negative wires with the supposed “arrowheads” should be directed towards the speaker. The main criterion for the preferred direction is a more “exciting”, soulful sound. Increasing detail when flipping the cable can be misleading, since it is often the weakening of emotions due to incorrect use of directionality that allows you to distract from the emotional content of the music and focus on the perception of details.
Of course, the filter elements can be connected to each other using their own leads. If there is a need to increase these pins, then you should be guided by the direction of the cables indicated in the diagram.
It is advisable to place the filter inductors in planes perpendicular to each other and no closer than 3 cm from one another. This minimizes their interaction, which can significantly distort the frequency response. It is better to mount the C2-L1 RF filter circuit exactly as shown in Fig. 1. In this case, the advantages of the specified orientation of the wires and coil L1 will be realized. Do not place resistors and capacitors closer than 1 cm from the inductors. If you use capacitors in metal cases, then move them away from the coils by at least 3 cm. The recommended location of the filter is shown in Fig. 2, which shows a sketch of the speaker housing. The crossover should not be installed close to loudspeakers, as this will cause harmful interaction with the coils. It seems convenient to place the filter on the bottom of the case, but then it will be impossible to place the speakers on metal stands.
Rice. 2
It is necessary to ensure exact compliance of the parameters of the crossover elements indicated in Fig. 1. values. Tolerance: ±2%. It is better if the deviations are smaller. On the other hand, there is no point in aiming for an accuracy higher than ±0.25%. Elements R1 and R2 should not have a parasitic inductance of more than 2 mN per resistor. The parasitic inductance of resistor R3 is no more than 10 mN. Practice shows that polypropylene and metal-paper capacitors provide acceptable sound. I do not recommend using polystyrene containers, as for some reason they distort the emotional content of the music, introducing “snide” tones into the voices of the soloists, and tightness into the sound of the orchestra.
Fluoroplastic capacitors mask the quietest sounds, a bit like a threshold noise suppressor. This impairs the transmission of subtle emotional shades, “airiness” and spatiality of sound.
The most affordable containers like K73 introduce some “fragmentation” or hoarseness and roughen the sound. However, unlike polystyrene and fluoroplastic capacitors, type K73, in principle, can be used, because The distortions they introduce, firstly, are not very great, and secondly, they do not cause significant harm either to the emotional content of the music, or to the “airiness” or spatiality.
Electrolytic capacitors are not recommended for use in audio circuits, but their only really noticeable drawback is losses when transmitting signals above 6 kHz (approximately). In any case, they do not introduce such strange and unpleasant distortions as polystyrene and fluoroplastic containers.
Rice. 3
In the presented speakers, it is possible to make element C3 from two polar “electrolytes” by connecting them in back-to-back series (Fig. 3.) The total capacitance of the resulting capacitor is half the value of two identical capacitors. The acceptable range of values for the C3 you manufactured is from 47.0 to 50.0 mF. In this case, the difference between C3 for the “left” and “right” speakers of a stereo pair should not exceed 2%.
Practical listening shows that an unacceptable deviation in the capacitor value affects the quality of music reproduction much more strongly than the type of this element. It is necessary to achieve low DC resistance of coil L2. The maximum permissible value is 0.4 Ohm. It is better if the resistance of L2 is no more than 0.3 Ohm. For RF filter coil L1, the maximum permissible DC resistance value is 0.8 Ohm. The correction circuit on elements L2, C3 and R3 corrects the frequency response of the LF/MF loudspeaker VIFA M17SG-09. It should be taken into account that almost all speaker models sound with noticeable coloration due to the uneven frequency response of sound pressure.
This is the reason for the unnatural timbres and distorted presentation of the sound stage. The most unpleasant consequence is the irreparable loss of the emotional and intellectual content of the music. The best musical groups and soloists are so precise in their interpretations that the unevenness of the frequency response, especially in the mid-frequency region, excludes the possibility of feeling the artistry and energy of the performers. One of the rare examples of a uniform loudspeaker frequency response without applying correction is some models from Dynaudio. But this does not make it easier to create speakers, since at the lower top (4 - 6 kHz) these speakers begin to experience a sharp decline in output. This “break” in the frequency response gives the sound a noticeable synthetic taste, which only a very experienced developer can combat.
Therefore, a rather promising option is the use of paper loudspeakers in combination with frequency response correction. Practical listening shows that frequency response distortions are much more harmful to music than signal distortions in the elements of the correction circuit.
In the region from 1250 Hz to 10 kHz, the LF/MF and HF loudspeakers of the types used interact very actively. The result is a significant unevenness of the frequency response of sound pressure in this range. Therefore, circuit C2-L1 is tuned to resonance with maximum absorption at a frequency of 3420 Hz. This circuit, in combination with other elements of the HF head filter, provides such frequency and phase characteristics of the HF loudspeaker radiation at which the total frequency response of the speaker sound pressure is most uniform.
For internal wiring, it is better to use copper litz wire, observing the directionality. This is a wire made of many thin wires, each of which has individual varnish insulation. The cross-sectional area is at least 0.4 mm², which approximately corresponds to a diameter D of 0.7 mm, excluding the thickness of the overall cable insulation. Optimal cross-section: 0.6 - 0.8 mm², diameter - D 0.9 - 1 mm.
If you are unable to purchase a wire of the required diameter, you can obtain a sufficient total cross-sectional area by connecting thin conductors in parallel (observing direction).
The recommended type of conductor is superior in quality of music and sound transmission to most other types of wires. The disadvantage of Litz wire is that it is difficult to maintain. It is necessary to use either aspirin together with rosin as a flux, or only rosin, if you can bring the temperature of the soldering iron tip to 320 - 340 ° C. It is necessary to service it using a sufficient amount of solder, persistently heating the cable, pressing it against a wooden surface covered with rosin. Be careful! Excessive movements can tear off part of the thin Litz wire cores.
Don't get carried away with minimizing the length of internal cables. In this case, the quality of signal transmission depends more on the type of conductor than on its length. It is convenient that the cables from the input connectors to the filter and from the filter to the speakers allow the connectors and speakers to be soldered and desoldered fairly freely before installing them in the speaker cabinet. A sketch of the speaker housing is shown in Fig. 2. Recommended materials - chipboard or fiberboard. Plywood of appropriate thickness (16 mm) is acceptable.
Unable to fine-tune the speakers, DIYers focused their efforts on improving the quality of the cabinets. Unfortunately, starting from a certain sufficient level of vibration protection and tightness, the increase in sound quality from the degree of perfection of the body slows down sharply. Such an important parameter as wall thickness depends on the dimensions of the speaker. For small shelf monitors, satisfactory vibration resistance of the walls is achieved when their thickness is more than 12 mm, if the material is chipboard or fiberboard.
Listening shows that a significant increase in wall thickness gives a slight improvement in sound. Each stage of improving speaker settings, that is, forming the desired frequency response of sound pressure, brings an unexpectedly significant increase in playback quality. Therefore, products from different companies, sometimes equipped with the same type of loudspeakers, similar-quality housings and components, often sound differently and, accordingly, differ in price.
By the way, VIFA loudspeakers are very widely used in speakers from many well-known companies, since VIFA is a stable supplier of decent and inexpensive speakers. There is no information about the influence of a typical setup of a particular speaker model in advertising, since the influence of the quality of speakers, cabinets and components is much more intuitively clear to an inexperienced buyer. It is easier to impress the imagination with an unusual cabinet shape or a new design and materials of loudspeakers than to show in practice what the sound quality really depends on in the first place.
However, the most experienced and attentive music lovers pay primary attention to listening to the speakers they choose, and secondly to the technological features of these products.
Of course, in the manufactured case there should not be a single leaky joint, not a single hole, except for the bass reflex port (PI). As can be seen in Fig. 2, these speakers are equipped with a slot FI with an output on the rear wall, tuned to a frequency of 40 Hz. The well-known theoretical assumption about the detrimental effect of minor gaps on low-frequency reproduction is based on the concept of the quality factor (Q) of an acoustic oscillating system consisting of a loudspeaker, housing and FI. Calculations show that even small cracks and holes significantly reduce Q. Numerous practical observations refute this hypothesis. Minor depressurization has almost no effect on LF transmission. The need for careful sealing is associated with noticeable whistling sounds due to the “blowing” of small cracks and holes when reproducing low frequencies.
As can be seen in Fig. 2, the side and, partially, front walls of the speaker housing are reinforced with two stiffeners. The contact areas between the ribs and the internal surfaces of the body must be completely glued so that these ribs and body parts are a single “monolith”. The same applies to the board that “cuts off” the slotted FI. This board has a hole for installing a plastic block with connectors.
Select the hole size depending on the type of block (“trough”) available to you. You can simply drill the required holes in the same area and glue in the required number of single connectors using epoxy resin (two or four if you are using bi-wiring).
There are two options for muffling the internal volume of the speaker.
First: cover the inner surface of the case with sound-absorbing material. A couple of layers of padding polyester or batting is enough. Second option: fill the volume with a sound absorber, observing the following rules.
- The material should not put pressure on the woofer cone and its wires from the coil.
- The FI hole, directed into the body, and the space for the movement of the air column from this hole (approximately 5 - 10 cm) must be reliably protected from the entry of damping material.
- You need to be sure that the material will not fall to the bottom of the speaker over time. At the very least, the area around the woofer/midrange driver must always be filled with a sound absorber, otherwise box overtones are inevitable.
- The sound absorber should not be packed “tight”, it should simply fill the volume given to it without compaction or compression.
To meet these conditions, you will need to glue sound-absorbing “pillows” or “rollers” to the body in several necessary places.
It is convenient to use fairly large pieces of padding polyester or batting. They can be easily rolled into shape-stable rolls or formed into “pillows” filled with small pieces of sound absorber. You can fill the “pillows” with pieces of foam rubber. At the same time, it is not necessary to wrap the foam rubber in padding polyester; gauze will also do. It should be remembered that over time, foam rubber dries out and may partially turn into powder, so it is better to use padding polyester or batting.
The dimensions, housing design and wall thickness provide more than sufficient vibration protection. Additional anti-vibration treatment of the internal surfaces of the housing will be a waste of effort and can lead to an unacceptable reduction in volume.
If the front panel has no defects, it is recommended to install the speakers without any O-rings, silicone or plasticine. The mechanical properties of the housings of the loudspeakers used ensure in this case tightness and absence of chatter.
Be careful when installing the HF head! Its plastic body will crack if you tighten the screws too tightly.
Listening shows that the vibration isolation elements used when attaching the speakers have little effect on the sound. For this reason, in modern speakers, speakers are most often simply screwed in with self-tapping screws.
Plywood, and especially chipboard and fiberboard, have excellent sound absorption at medium and high frequencies. In this regard, the internal planes of the housing should not be laminated or painted. In its finished form, this speaker model has rounded edges of the front panel, which is trimmed with synthetic or genuine leather. This reduces diffraction phenomena and, accordingly, improves the measured sound pressure characteristics of the speakers. However, you can use simple rectangular enclosures. The sound deterioration will be insignificant. In this case, the devices “see” what is of secondary importance to hearing. Unfortunately, more often than not, measuring equipment does not “perceive” a clear difference when changes in the audio system are clearly noticeable by ear.
The proposed speakers, like many others, should be installed at a height from the floor to the center of the HF head equal to 100 ± 10 cm. Most household speakers sound normally in a room with solid walls, upholstered furniture, carpet and fairly thick curtains on the windows. Non-permanent walls, plasterboard false walls and ceilings, large furniture (cabinets, etc.) absorb low frequencies. Under these conditions, any normal speakers require a subwoofer that is properly coordinated with them and the room. In a room without sound absorption, good sound is impossible. For household speakers, the normal area of the listening room is: 12 - 30 m² (approximately). Correct placement of speakers is at equal distances from the axis of symmetry of the room. The acoustic environment for the left and right speakers should be equal. For example, if there is a window on the right, covered with curtains, and on the left there is a bare wall, then, due to reflections from the wall, the sound stage will shift to the left.
If you install the speakers in the middle between the floor and the ceiling, for example at a height of 140 cm with a ceiling of 280 cm, then the low frequencies will stop being reproduced. The reason is a certain system of standing waves generated in the room. To obtain a good sound stage, it is necessary to remove the speakers from the rear wall at least 60 - 70 cm. You should not move them closer to the side walls than 20 cm. When the speakers are removed from the rear wall by 1 - 1.5 m, an excellent spatial picture is obtained , but may lack low frequencies. The closer the listener is to the wall opposite the speaker, the greater the response to the lowest frequencies, the excess of which often causes more harm to the music than the shortage.
If the distance between the speakers is less than 2 m, the sound will be “squeezed” and “flat”. If it is more than 3.5 m, sound stage tearing will occur. By placing the listener and speakers in the corners of an equilateral triangle, it becomes possible to localize sound sources in all directions. For example, when listening to a well-recorded movie soundtrack, sounds from the sides and rear are localized without connecting a surround sound processor and without rear amplifiers and speakers. However, in home theater, rear channels are useful, since the above speaker and listener placement is often not respected. In addition, not all phonograms contain sufficient phase and reverberation information necessary for spatial reproduction using only two channels.
The speakers are primarily responsible for the accuracy of the frequency response of the entire path. Therefore, fine tuning of speaker systems is a necessary condition for listening to music. Other elements of the tract have a stronger influence on the transmission of texture and natural sound. For example, an unsatisfactory CD player, amplifier and cables will not allow you to clearly distinguish a synthesized piano from a real one. Even in such a path, good speakers can reveal the artistry and energy of musicians, that is, the main thing that makes music a more perfect world than our everyday circle of life.
For the proposed model, one important point should be taken into account. These speakers are designed to work with a tube amplifier with an output impedance of about 2 ohms. Different models of lamp devices have output impedance from 0.3 to 6 Ohms. The most common values are from 1 to 3 ohms. For transistor amplifiers, this parameter, as a rule, tends to 0 Ohm. The specific value of the output resistance, interacting with the frequency-dependent characteristic - the impedance of any speaker model, forms a certain frequency response of sound pressure. Therefore, when connected to different types of amplifiers, we get different timbres from the same pair of speakers. To maintain the accuracy of reproduction of the proposed model when using a transistor amplifier, it is necessary to connect a resistor with a nominal value of 1.8 - 2.2 Ohms (the same for the left and right channels) with a power of more than 10 W and an inductance of less than 7 mN in series with each speaker. Our speaker has a rated power of 40 W.
Thanks to the optimal configuration of the bass reflex, the lower cutoff frequency at the level of -3 dB is 40 Hz. This is a very good indicator, since even floor-standing speakers rarely reproduce signals below 50 Hz at a level of -3 dB. When values of 20 - 40 Hz are given, they usually mean a deviation of -8 - -16 dB. The upper limit frequency (at a level of -3 dB) is at least 20 kHz. Nominal resistance is 8 ohms. Sensitivity - 87 dB/W/m.
Only experienced people who also have proper measuring equipment for precise manufacturing of filter elements have a chance to correctly replicate acoustic systems according to their description. If you do not have the necessary skills and technical support, and listening to the proposed speakers left a positive impression, it is better to purchase them ready-made.
Speakers can be finished with synthetic film, natural veneer, made of solid wood or finished with piano varnish. This model is produced by the ZKI company, whose specialists are proficient in high-quality woodworking methods and the necessary experience in mass production of acoustic systems without deviations from the standard. There are very few enterprises with such quality of work, so I recommend entrusting the production of acoustics created by amateurs and professionals to the ZKI company.
PracticeAV #2/2002
share
Tags: VIFA D19SD-05-08VIFA M18SG-09
Studio devices
Speaker drawings for studios assume the use of powerful speakers. The diffuser is most often used of the pulse type. Many experts recommend installing two amplifiers. For normal operation of the speaker system, a zener diode is required.
In order to assemble the speakers yourself, the housing is first made. Round holes are made on the front panel for the speakers. You will also need a separate output for the bass reflex. The design of the columns is quite different. Some people prefer to varnish the surface of the case. However, there are models covered in leather.
Step-by-step instruction
To make a column, you need to prepare a workplace. It must comply with basic safety requirements:
- Have the lighting and ventilation recommended by GOST and TU.
- There should be no flammable objects or liquids nearby.
- It is advisable to have a grounding wire at the site of assembly and testing of the product.
At the time of starting work, it is necessary to make all calculations and complete diagrams and drawings.
Housing assembly
- The column details are drawn on a sheet of chipboard. An allowance is given for the obtained calculated data for the thickness of the material.
- The parts are cut out with a hacksaw.
- The front panel marks the location for installing the speakers. The proposed holes are outlined with a compass or outlined using a template. They must be round and exactly fit the size of the emitters.
- The holes for the emitters are cut out with a hand jigsaw (or a similar electrical device). The outer edges are carefully sanded with sandpaper.
- The top, side and bottom panels are assembled. The joints are smeared with PVA glue, 2-3 self-tapping screws are screwed in at each joint. They must be screwed in at right angles.
- The housing must be sealed, so all seams must be coated with adhesive after screwing in the screws.
- If you plan to make the back wall removable, then you need to stick a seal around its perimeter.
- Emitters are mounted on the front panel on the inside and decorative grilles on top. The mounted panel is installed in its place in the same way as assembling the frame (glue + self-tapping screws).
Power switch and connector
They are connected by soldering to the battery case along with the protection board.
In order for everything to be done correctly, a number of conditions must be met when installing the power connector:
- The right contact can be bent or removed.
- The average is positive.
- The left one should go to ground.
- You should insert the included charger into the connector and check the voltage with a multimeter. This will ensure the correct polarity of the connector pins.
- Then it is soldered into the protection circuit.
Connecting to a Bluetooth module
Power is supplied to it through a switch. Since there is only one speaker, stereo sound on the module is reduced to one channel. In this case, resistors must be inserted into the circuit (one per channel). If you connect one wire, then a resistor is not needed. Sound control will be carried out from the transmitting device (smartphone, tablet, etc.).
When soldering the Bluetooth module, you need to use a thin soldering iron, since its connectors are small. It is advisable to take the wire from an Internet cable.
Battery connection
There are various options for using autonomous power sources, but one of the simpler and more reliable is the use of inexpensive rechargeable batteries.
The protection board is used to prevent force majeure circumstances:
- short circuit;
- recharge;
- excessive discharge, etc.
This board is a must when using lithium-ion batteries.
For ease of assembly and operation of the battery pack, batteries (3 pcs.) should be placed in a case.
Checking status
Before mounting the assembled circuit in the bass reflex housing, it is necessary to check its functionality.
- To do this, insert batteries into the case and press the switch.
- In this case, the Bluetooth module should emit a characteristic squeak, indicating that it is connected.
- After a sound signal, the module is paired with the smartphone.
- If everything is done correctly, you can turn on the music.
After a positive check of the device, the assembled circuit is mounted in the speaker housing.
Automotive modifications
Car speakers are available with two or three speakers. To assemble the model yourself, you will need sheets of plywood. In some cases, varnished veneer is used. To fix the speaker, you need to make a hole in the panel. The next step is to install the bass reflex. Some modifications are made with low-frequency cores. If we consider speakers (homemade) of low power, then the bass reflex can be installed without an amplifier.
In this case, a multi-channel crossover is used to control sound. Some specialists install terminal blocks behind the bass reflex. If we consider speakers with a power of more than 50 W, then the microcircuits are used for two amplifiers. The diffuser is installed as a standard pulse type
Before fastening the case together, it is important to take care of the vibration-proofing layer. For the terminal block you need to make a separate hole on the plate
Some people believe that the body must be cleaned. The wires for the speakers are of the two-wire type.
What you will need
To install a homemade speaker on 2 mid-frequency dynamic radiators, you will need a number of consumables and tools.
- Speakers. Selected according to the required parameters: extractable frequency range, output power.
- Decorative grilles for emitters. You can purchase them or make them yourself.
- Amplifier. Recommended class D with output power for 2 channels up to 50 W.
- Digital or LED voltmeter. It allows you to control the battery charge level during autonomous operation of the device.
- Volume control. Any standard one for devices of this type will do.
- You can supplement the design with an additional audio input.
- Socket and charging module. It is recommended to use 14 V.
- Switch and power connector. Any standard ones for devices of this type will do.
- Rechargeable batteries - 3 pcs. x 1.5 V. It is necessary to install samples of a proven brand with the same charge level.
- Bluetooth device. It is recommended to use wireless. If it is wired, then it also needs a power board.
- Chipboard. The workpiece area is taken with a margin of 10% of the calculated one.
- Furniture self-tapping ties. The quantity is taken at the rate of 2-3 pcs. on one side. For a rectangular case you will need a maximum of 24 pcs.
- Screws or fastenings for the back panel, if it is removable. Quantity based on 2-3 pcs. to the brink.
- PVA glue. It is used to lubricate bonded surfaces.
- wood hacksaw;
- drill with attachments and drills;
- jigsaw for wood;
- bench knife;
- screwdriver or screwdriver;
- glue brush;
- sandpaper;
- soldering iron
Acoustic systems - structural design and principle of operation
To assemble a speaker system (AS) yourself, you need to understand its structure. In general, the speaker design includes speakers enclosed in a housing and an amplifier.
Frame
The case is the first important element of the speakers, in which the remaining components are placed. It is responsible for reproducing sound at low frequencies and separates the speakers, preventing them from affecting each other, and also plays an aesthetic role.
To achieve high-class sound, you need to choose the body shape wisely. Standard speakers are made in the form of a rectangle (cube, parallelepiped), but such devices do not allow achieving ideal sound, because right angles create resonance and associated negative effects. Speakers are also manufactured in the form of structures with acute or obtuse angles (pyramids, trapezoids) and circles (spherical, ellipse), optimal for broadband acoustics.
On a note! To get the best sound from low-cost baseband speakers, designers often use round shapes. The front panel is flat, and the side walls, together with the back, form a curved surface that effectively reflects and directs waves towards the user.
Subwoofers reproduce low-frequency sound, so they are often used in a cubic shape. Subs are usually equipped with a bass reflex, which is a hollow tube that focuses sound waves and passes through one of the panels.
The case material also varies. For high-quality sound, fiberboard, chipboard, and loose plywood are used. Wood works well, but such acoustics turn out to be heavy and massive, so floor-standing speakers are usually made of wood. A good body is made from special polymers, but the sound quality deteriorates slightly. Cheap speakers are made of simple plastic. This material does not absorb sound well, which leads to the formation of unnecessary noise. And if you increase the volume to maximum, you will hear a hum and hum.
Speakers
Speakers are the main component of a sound system, as they are the ones that produce sound waves. They are designed with a permanent magnet that creates a continuous magnetic field regardless of environmental conditions. Most often it is ferrite. Expensive acoustics use neodymium magnets.
The magnetic field surrounds the second important component of the speakers - the copper coil, which is exposed to alternating current from an outlet, battery or USB connector. Under the influence of current and surrounded by a magnetic field, it performs perpendicular oscillations. This causes the diffuser to vibrate, which causes vibrations in the air masses, which are perceived by the human ear as sound waves. The diffuser membrane is made of polymers or natural materials, such as cellulose. Expensive acoustics use thin titanium plates. The sound quality depends on the properties of the material.
On a note! Depending on the frequencies reproduced, speakers are low-frequency (subwoofers, 20-120 Hz), mid-frequency (main audio range, up to 5 kHz) and high-frequency (tweeters, from 2 to 20 kHz). Subwoofers are the largest, tweeters are the smallest.
Amplifier
The speaker can be active or passive. In the first case, a separate amplifier is built into the speakers, converting the signal to match the power of the speakers. Without this part the sound will be very quiet. Whereas passive acoustics are connected to an external sound amplifier using a special cable with terminals. These audio amplifiers can not only convert signal power, but also collect and combine audio tracks from several speakers in multi-channel acoustics.
On a note! Not only an amplifier, but also a receiver can be used to convert an audio signal.
General operating principle
Schematically, the operating principle of the AC is as follows. The audio source sends an audio signal to the amplifier. The latter processes it and sends it to the speakers in the form of electrical impulses. The current enters the coil and, together with the magnetic field, acts on it. As a result, the coil moves up and down with different amplitudes. This causes the diffuser to move with the same synchronicity, creating sound waves of varying volumes.
Speaker technical data
- System: 2-1 with 2-way low-frequency reflector
- Rated power continuous – 600 W RMS
- Peak power – 1200 W
- Efficiency (1 W at 1 m) – 102 dB
- Maximum SPL – 129 dB
- Frequency response (-3 dB) 62 Hz – 20 kHz
- Nominal resistance – 4 Ohms
- BR setting - 55 Hz (measurement)
- Material – 12mm hardwood plywood
- Finish – structural varnish
- Speaker weight: 27 kg
- External dimensions (HxWxD) – 102 x 40 x 43 cm
- BR tunnels – two PVC pipes with a diameter of 110 mm and a length of 70 mm.
- The usable volume of the speaker is 97 liters.
- Woofers – 2 Celestion TF 1225 tweeters
- Tweeter – STX D800ti MRH-83
- Bandwidth – 18/12 dB passive crossover with switching stabilizer.
The body was designed using 3D technology, which allows you to predict all the complex physical relationships of elements with each other, in other words, you can almost feel the finished project while it does not yet exist, plan every little detail and there will be no mistakes that something will not fit . Even at the design stage, you can achieve the highest accuracy.