Alcohol has always been a universal gift for men. It is given as a gift for any occasion, but such a gift is faceless and banal. Do-it-yourself bottle decor for a man will help make it unique. After all, the stronger sex often pays more attention to the packaging than to the contents.
There are several ways to package a bottle beautifully. Some design methods require certain skills and dexterity, while others can be mastered even by a child. The main thing when decorating is to really evaluate your creative capabilities and not try to take on too complicated master classes.
Decorating a bottle of cognac for a gift
Delicate flowers and glamorous kittens are best left to decorate champagne and ladies' wines. For men, it is better to choose more serious images. If you need decoupage of a bottle for your birthday, you can choose from the following motifs:
- retro. Dilapidated castles, landscapes, the effect of aged stone or wood, etc.;
- transport. Ships, cars, planes, etc.;
- money. Modern banknotes look a little vulgar, but the image of ancient coins will allow you to give cognac in an original way;
- ornament. Interesting patterns look very stylish and expensive;
- hobby. Hunting, fishing and other men's hobbies will make the gift not only original, but also individual;
- professions. A bottle in the shape or with an emphasis on working tools also looks interesting and courageous. But such decor will be appropriate only if the recipient really loves his work.
When decorating a bottle with your own hands, you should first of all remember who it is intended for. In this case, choosing the right idea for decoration will be easy and simple.
May be interesting: DIY bottle decoration for the New Year: 20+ master classes with photos and videos
There are usually no problems with decor for other holidays - the appropriate theme is used.
To decorate cognac for February 23, decoupage is made with images of military equipment or the bottle is dressed in military uniform. For the younger generation, they choose screenshots from WOW and similar games.
Don't miss: TOP 17 useful gifts for men from AliExpress
For the New Year, bottles are decorated with winter landscapes, pine needles and Christmas motifs. Also popular for the winter holidays are Santa, snowman and Snow Maiden outfits.
Having decided on the idea of decoration, you can move on to implementing the idea.
Recipe 3: meat salad for men Drifts
This delicious, very satisfying and, most importantly, spectacular salad “Drifts” with beef can be quite simply prepared for the winter holiday on February 23. The fact is that the dish is simple to prepare and the ingredients for it are quite affordable.
You just need to understand that the longest process is the preparatory process, since it is necessary to boil all the ingredients. And only then grind them and form a dish.
In order to give the salad a special twist, halves of stuffed eggs are placed on top of the layers of potatoes, carrots and meat. And sprinkle the dish with chopped cheese on top - this creates the effect of Feval snowdrifts, which makes the dish especially beautiful and winter. Be sure to save his step-by-step recipe with photos so that you can prepare a delicious and easy-to-prepare salad more than once.
All the ingredients of the salad are perfectly combined with each other, so the taste of the dish is very balanced and self-sufficient. As for the meat layer, you can use sausage, ham or boiled meat (chicken or beef) for the salad.
- beef meat (tenderloin) – 200 gr.,
- potatoes – 2 pcs.,
- carrots – 1 pc.,
- garlic – 2 cloves,
- quail egg – 5 pcs.,
- hard cheese – 100 gr.,
- sauce (mayonnaise) – 200 gr.,
- salt and pepper - to taste.
We wash the vegetables to remove dirt and boil them until soft. Then cool, peel and grind with a grater.
Boil the prepared piece of meat with the addition of salt and spices. Cut the cooled meat into small pieces.
Boil the eggs for about 5 minutes, cool, peel and cut into halves. Take out the yolks, knead them and mix with chopped garlic and sauce.
Fill the egg white halves with this mixture.
Now we form the salad, place a layer of potatoes on the bottom of the dish and lightly coat it with sauce.
Next, add a carrot layer and grease it again.
Now add the meat and coat it as well.
Place the stuffed eggs over the meat layer.
Sprinkle the eggs and the entire salad generously with grated cheese.
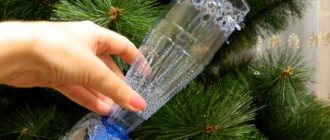
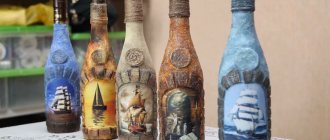
Bottle decoupage method
This decoration method is suitable for all types of alcohol. Decoupage of a bottle of cognac is no different from decorating wine, vodka or whiskey using this technique. The only point you should pay attention to when buying alcohol is the shape and relief of the bottle. Theoretically, a surface of any shape can be decorated in decoupage style, but it is easier for a beginner to work with a smooth and even container. Volumetric patterns and inscriptions can complicate the process of decorating cognac.
If a gift for a man is expensive alcohol, the emphasis is on the elite brand, the bottle is decoupaged, only partially (with the label preserved). For simpler drinks, decorations can be used to cover the entire container.
The classic decoupage technique involves using images from colored napkins, photographs, postcards or other printed materials. A more advanced version uses decoupage with glitter, salt, paints and other materials.
For decoupage you will need:
- a bottle of alcohol;
- acrylic primer;
- a napkin with the desired image or glitter, etc.;
- acrylic paints and varnishes (it is better to take them in the form of a spray, but this is not a prerequisite);
- PVA glue;
- a set of brushes and sponges;
- additional decor (optional).
Decoupage is a very exciting process, which for many becomes a personal hobby. In order for the result to be worthy on the first try, you need to strictly follow all stages of the work process:
- Remove the label from the glass surface (if required). To do this, you can temporarily place the bottle in a container of water, or wrap it with a generously moistened towel. After removing the label, any remaining adhesive must be removed with alcohol.
- Degrease the bottle with an alcohol-containing compound. After this, it is better not to touch the glass, so the primer and paints will lie more evenly;
- Cover the surface with acrylic primer (it is more convenient to do this with a sponge rather than a brush). If the decoupage will only partially cover the bottle, the free areas of glass should first be sealed with masking tape.
- After the soil has dried, the glass surface is evenly covered with glue.
- A decorative coating (drawing from a blank, glitter, paint, etc.) is applied to the glue layer. To work, you only need the top layer of a napkin. The desired image is cut out of it and carefully glued to the bottle.
- The finished work (after drying) is opened with varnish. It is better to apply several layers, so the design will be more difficult to damage.
If the decor of a bottle of cognac is not ideal, there is no need to worry. Flaws can be hidden behind additional decorations.
The uneven edge near the neck of the bottle can be hidden behind a thematic braid (St. George's ribbon for February 23, with frosty patterns for the New Year, etc.)
Holes that appear (by negligence) in the napkin are hidden behind small decorations that match the style (wood leaves, coins, buttons, etc.).
Knights and castles. Decoupage bottles/Decoupage. Knights and Castles. HobbyMarket
Recipe 2: Telnyashka cake for February 23
Dough:
- 2-3 eggs;
- half a glass of sugar;
- 1.5 tablespoons of honey;
- 1 teaspoon each of baking soda and vinegar;
- 50 g butter;
- 2.5 - almost 3 cups of flour, as much as the dough will take. You don’t need a lot, tough dough is difficult to roll out.
Cream:
To coat the cakes:
- 1.5 cups sour cream 20%;
- 2-3 tablespoons of sugar.
For stripes:
- equal parts sour cream and heavy cream, 2-3 tablespoons each;
- blue food coloring.
Knead the dough and bake the cakes. Mix eggs, sugar, soda with vinegar, honey and softened butter in a saucepan, stirring, and heat over low heat until it foams. Remove and gradually stir in the flour to make a moderately stiff, moderately soft dough. Divide into 6-7 cakes.
Now the fun begins: take a children’s T-shirt, a sheet of cardboard and trace and cut out a template along the contour of the T-shirt (or simply by hand).
Roll out one cake layer thinly (1-2 mm) on a table sprinkled with flour, keep the rest sprinkled with flour in a bowl under a towel, they are then warm, soft and easier to roll out.
Having rolled out the cord to the size of the template, bake for 4-5 minutes over medium heat on a baking sheet dusted with flour. Remove it to the table with a spatula and, while the cake is hot, cut out a “T-shirt” according to the template.
In this way we bake and cut out all the cakes.
We prepare the cream - sour cream, or simply mix sour cream with sugar and a little water so that it is not too thick. We coat all the cakes with cream, except the top one. And just grease the top one with thick sour cream so that the pattern doesn’t blur.
Now we need to make the stripes!
Mix sour cream with cream. Dilute part of the dye (about half a packet) with a little boiled water and add it to the cream, stir until the color is uniform.
Fill a pastry syringe with a “flat” nozzle and carefully draw stripes. To get good, you should first practice on something, for example on a plate.
The pie for our beloved Defenders is ready! Happy holiday, grandfathers, fathers, uncles, brothers, nephews and sons!!! Happy February 23!!!
Corrugated paper method
The choice of options suitable for the stronger sex is not that great.
Clothing for a bottle on February 23rd is already a classic. For men in shape, this option is also suitable for other holidays. A “civilian” uniform can be replaced by a tailcoat or an official suit.
But not everyone likes business style clothing; stylized outfits can serve as a substitute, for example, a cloak, a mask and a bottle hat - they will make “Zorro” from gift alcohol, and by playing with colors and style you can get a cowboy, Dracula, bullfighter or superhero.
It’s easy to decorate alcohol with corrugated paper. All you need for this is PVA glue, scissors, tape measure and paper of the desired shades. Naturally, you still need imagination and a certain level of skill.
Whether you need to remove the label depends on the outfit you choose. When only a cloak and hat or other decorations that only partially cover the glass are used as decoration, the factory stickers can be left. If the container is completely covered with corrugated paper during the decorating process, it is better to remove the labels first. This way the paper will lie smoother.
Simple ways to wrap a gift bottle
Clothing or a military uniform on a bottle is not the only way to decorate with corrugated paper. The original packaging method is widely used. A whimsically wrapped container looks interesting and unique.
In this case, additional decor is practically not used, so as not to turn the laconic men's packaging into a disorderly pile of jewelry.
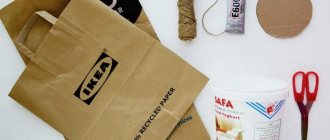
Another simple way to decorate a bottle with paper is to use a gift bag. This design looks strict and stylish. This type of decoration is perfect for an anniversary and February 23rd. If difficulties sometimes arise with the production of “clothes” (the paper does not fit as well as we would like or the cut lines are not straight enough), then such problems do not arise with packaging in the form of a bag.
Funny gifts for husband from wife on Defender's Day
A beloved husband is always happy to receive congratulations from his dear wife. What can you do to please your better half? Here's what! You can always cook something delicious - as they say, the way to a man's heart is through his stomach.
You can bake gingerbread cookies and paint them with icing to match the holiday style. By the way, I suggest you look at a simple recipe for delicious gingerbread dough here.
Or serve a delicious breakfast in bed.
It would be nice to design such a delicious men’s bouquet of sausages, cheese and buns on Defender of the Fatherland Day.
To do this, you need to buy sausages, sausages, cheese, tomatoes and long wooden sticks. Carefully place the products on the sticks using tape and combine everything into a bouquet. Wrap it in eco-friendly paper and give it to your beloved husband for the holiday.
And here is a short video on how to make a beer cake. Drinking a little beer with friends on this day is not forbidden, so feel free to make an amazing cake!
In an original way, we give socks and champagne to our favorite tanker.
With your gift, be sure to hug your beloved husband. Tell him warm, affectionate words, and don’t be too lazy to once again confess your love and affection.
Method with satin ribbons
Decorating in the kanzashi style is one of the most popular ways to decorate a bottle for any occasion. There are two decoration options:
- removable. In this case, the shirt for the bottle is made in the form of a separate cover (a la clothes for a doll). Such outfits can be found on free sale. Ready-made clothing is produced in an average size and a slightly impersonal version (if it is a military uniform, then it is not clear which country the uniform belongs to, a sailor bottle without insignia, etc.). Ready-made clothes are unlikely to fit perfectly on the bottle, but such decoration will require less financial and time investment than making clothes yourself. Cover clothes do not have to be purchased ready-made. In this case, clothes from ribbons are sewn according to patterns, and the internal seams-joints are hidden under the lining-cover. Below, as an example, are ready-made patterns for a shirt and tailcoat for a bottle. Depending on the brand of alcohol and the volume of the container, the dimensions on the patterns may vary. Initially, using these measurements, it is better to make a “draft” of clothing from unnecessary scraps in order to see what parameters should be changed so that the outfit “fits” perfectly on a specific bottle;
- non-removable. This method of decoration involves the absence of a lining. A pattern is also not used in most cases. Each row of tapes is measured for a specific bottle and fixed in the right place using superglue or a heat gun. It is impossible to remove and reuse such an outfit. This design option is used only when decorating handmade items, but is considered simpler and is used more often.
Also, depending on the event, there are two types of decoration: universal (suitable for any holiday) and thematic (wedding, New Year or military decor).
Wedding decorations
Kanzashi is most often used to decorate bottles for weddings. In this case, alcohol is “dressed up” in the costumes of the bride and groom, or simply decorated with flowers, beads and lace.
Tailcoat on a bottle
If the delicate glamorous decor of the “bride” is completely unsuitable for decorating a bottle of vodka or similar strong men’s drinks, then you can borrow the idea with the “groom’s” tailcoat. Moreover, it is implemented quite simply.
For decoration you will need a satin ribbon of two colors (black and white), a heat gun, scissors and acrylic primer (they cover the glass with it to make the surface rougher, so the glue and ribbons will adhere better).
If acrylic primer is not at hand, then the bottle must first be covered with napkins or thin paper; PVA is quite suitable for this.
Some alcohol producers produce bottles with completely unmasculine silhouettes. An outfit on such a container may look awkward. In this case, you can cheat by initially making a wide-shouldered “case” from cardboard. The main thing is to attach such a frame well to the glass surface.
After this, the workpiece is decorated according to the standard scheme.
Depending on the width of the tape, making a “shirt” may require from two to five rows. Each subsequent layer should cover half the width of the previous one.
The decoration starts from the top row and the “collar” is fixed with a heat gun at an angle (as shown in the photo below).
Then, in the same way, several rows of black tape are applied so as to completely cover the curved part of the bottle.
The flat part is decorated with horizontal rows, starting from the bottom. The joint should be on the back side of the container.
When the glass is completely hidden under a layer of tapes, you need to hide all horizontal joints. To do this, one row of tape is attached vertically, covering the sloppy edges. The ends of the vertical strip are folded under the horizontal rows and carefully glued.
Next, it remains to secure the final decor: a bow tie, a bouquet or a contrasting handkerchief in the “pocket” of the jacket.
But it is worth considering the shape of the container. In some cases, vertical rows are easier to form than oblique or horizontal ones. In this case, the top edge of the ribbons is hidden under the tie and collar.
Decorations for February 23
Similar to a wedding suit, you can make a military uniform. It is enough to complement the suit with a cap, shoulder straps and play with the colors of the ribbons and additional decor.
This way you can make a uniform for a policeman or the Ministry of Emergency Situations, and by replacing the cap with a beret you can get an Airborne Forces uniform or a sailor’s outfit.
Main differences from a regular suit:
- the uniform requires a shirt and tie. The shirt is made in the form of a shirtfront. The tape of the required width is folded in half and glued in the bottle. For the collar, it is better to take bias tape; it comes with the edges turned up, so it is easier to process than regular tape (although it can also be glued and tucked, giving the shape of the collar, but in this case there may be problems with processing the edges). The tie is carefully tied from a thin ribbon in the color of the uniform and glued in the right place;
- the presence of “buttons” emphasizes the severity of the uniform. Not only real buttons, but also half-beads can act as them. If you couldn’t find the right color for the accessories, you can paint them with golden nail polish (only without glitter);
- the junction of all the tapes (both in the narrowed part of the bottle and in the flat one) is made in the front part of the bottle. At the end of the decoration, the edges of the horizontal ribbons are covered with a vertical strip, to which “buttons” are subsequently attached;
- A headdress will help to emphasize the type of troops (security forces). The cap is made of cardboard covered with ribbons of the desired shade. If the size allows, you can use a lid from another container as a basis (it should be suitable in height and, after decoration, fit onto the sealed neck of the gift bottle). The beret is a little easier to make; in this case, there is no need to make a rigid frame.
Don’t forget about the small details; they are the ones who make the uniform for the bottle as authentic as possible. A miniature belt buckle or “cockade” in the shape of a star or coat of arms can be found in handmade stores. If you cannot find the design you need, you can print out the elements of the required size on a color printer and glue them to the uniform. It is better to print on self-adhesive paper (glossy sticky paper used in chewing gum inserts), but this option is quite expensive and is only suitable for those who professionally decorate cognac bottles.
Anniversary decor
A professional uniform is also suitable for birthday decorations. But in this case, you should not limit yourself to the form of the Airborne Forces or the Ministry of Emergency Situations. A bottle dressed as a doctor, builder or academician looks no worse.
The main thing is to choose the right accent details. In this case, you need to use not only miniature details of the profession (tools, hats, insignia, etc.), but also the individual characteristics of the recipient (glasses, mustache, smoking pipe, etc.).
Such decor will not only highlight the personal achievements of the hero of the day, but will also emphasize the personalization of the gift.
If professional success is not observed, you can decorate the bottle taking into account your hobbies: music, painting, hunting, fishing. Even a character from your favorite TV series or book can be embodied in such a gift.
Beverages
1. Ginger drink (ginger, lemon, honey)
At any holiday, when we eat a lot and have fun, we always want to drink. Therefore, prepare a citrusy, slightly bitter and at the same time sweet drink due to honey. When chilled, it will perfectly quench your thirst.
Ingredients:
- Honey (sugar) – 2 tbsp. l.
- Water – 2 l.
- Fresh ginger – 5-10 g.
- Lemon – 0.5 pcs.
Amber drink looks great in clear crystal glasses.
2. Freshly squeezed orange juice
Orange juice is a classic of the genre. If you want everything at the holiday table to be at the highest level, take care of a natural drink.
Ingredients:
- Oranges – 2 kg.
- Water – 700 ml.
On men's holiday, we obviously drink orange juice not for the purpose of cleansing the body, so we will definitely dilute it with clean chilled water by half or even more. The harshness of the juice will go away, but the wonderful taste and aroma will remain.
3. Smoothie Even stronger
For men who are strong in spirit and body, we will prepare a vitamin smoothie “Even Stronger”. The result is a thick, rich, nutritious drink that looks very beautiful in thick-bottomed glasses.
Ingredients:
- Bananas – 2-3 pcs.
- Kiwi – 3-4 pcs.
- Water (apple juice) – 300 ml.
- Honey (sugar) – 1 tbsp. l.
Make the smoothie so thick that the drink can easily pass through the straw. Believe me, even the most brutal men love to drink fancy drinks with straws.
4. Cocktail 007 – martini with vodka and olives
The 007 cocktail is named so because it was the favorite drink of the famous intelligence officer James Bond. Warn men that the drink is very serious and should not be abused.
Ingredients for 1 glass:
- Dry vermouth (gin) – 25 ml.
- Vodka – 75 ml.
- Olives – 1 pc.
- Ice - optional.
James Bond fans have calculated that the spy drank alcohol 109 times throughout the film epic. I don’t recommend being like Bond, but if you drink it on holiday and within reasonable limits, then the 007 drink is a super cocktail!
5. Cocktail Screwdriver
The Screwdriver cocktail is a great drink! Just don’t start the holiday with it, otherwise it simply won’t take place, given the strength of the drink.
Ingredients for 2 glasses:
- Vodka – 50 ml
- Orange juice – 150 ml
- Ice - optional.
According to the IBA recipe, the screwdriver is prepared in a ratio of 1 to 3. On the wonderful holiday of February 23, I propose to mix everything “by eye” and drink while standing to the defenders of the fatherland!
Alcohol and candy
The classic set of alcohol and sweets is usually given to women, but there are also men with a sweet tooth. To turn sweets into a men's set with alcohol, you need to properly arrange the gift.
Motorcycle made from a bottle of whiskey and candy
If desired, whiskey can be replaced with any other alcohol, the main thing is to maintain the general idea.
For manufacturing you will need the following set of products and materials:
- a bottle of alcohol;
- candies of different shapes and sizes (the exact quantity depends on the shape and capacity of the container);
- black and gold corrugated paper;
- wire 1-2 mm thick (larger diameters are difficult to bend);
- glue gun;
- scissors;
- ruler;
- pencil;
- round blanks for wheels. They can be made from lids of suitable diameters or cut out ribbons and glue rings from cardboard or plastic bottles;
- base (a rectangular piece of chipboard, MDF or plywood with a thickness of at least 3-16 mm);
- triangular wedge stand (made of timber, foam plastic or thick cardboard);
- additional decor (braid, foil, etc.).
The master class on making a gift bottle is quite simple. Initially, the stand is decorated. To do this, it is wrapped in corrugated paper (like a box with a gift). If desired, the base can be additionally decorated with braid, sweets or painted.
Depending on the candy available, wheels can be made in different ways:
- make disks of the required diameter from foam plastic. Wrap them in corrugated paper, and hide the edges of the paper under glued round candies packed in metal foil;
- Decorate the round blanks and cover them with trapezoidal candies, as shown in the photo below. It is advisable to wrap such a blank on top with adhesive tape, so the candies will hold more firmly. If the final version is not very neat, the Wheels can be wrapped in corrugated paper and the joints hidden under additional candies;
- Cone-shaped candies are glued together with a “flower”. The edges are covered with double-sided tape, and it is hidden under a tape of black corrugated paper. The candy wrappers can additionally be wrapped in silver foil, so they will resemble light alloy wheels (distantly, but they will). If desired, the center can be supplemented with a round candy (coin).
Then the wheels are firmly glued to the base so that a bottle can be placed between them, acting as a frame. If it lies unstable, a wedge stand is installed under it, and all components are fixed with a glue gun.
The steering wheel is made of wire. To do this, it is bent in the desired way, having previously wrapped the base with a tape of corrugated paper or foil.
A “seat” and a “gas tank” made of candies are laid out on top of the bottle. All elements are fastened with a heat gun.
Small details are added: headlights, handles, exhaust pipe, mirrors, etc. They can be made from matching candies or rolled from foil and wire.
The process of making a motorcycle cannot be called too complicated; the main thing is to ensure that the structure is strong and stable.
This gift bottle is suitable for any event: February 23, anniversary, professional holiday, etc.
A cannon of sweets and cognac for February 23
The idea of the gift remains the same, but the execution is simpler.
To make it you will need almost the same set of items:
- decorated stand;
- a bottle of your favorite alcohol;
- round candies (they will act as cannonballs, so another shape is not very suitable);
- heat gun;
- blanks for wheels. In this case, two boxes of monpensier will work well (monpensier with cognac is, of course, an amateur combination, but the shape and size of the boxes are ideal);
- corrugated paper, twisted cord and any other decor.
The step-by-step manufacturing instructions are similar:
- candy kernels are glued onto the decorated base in a heap;
- wheel blanks are covered with corrugated paper, the joints of which are hidden under the decor of braid or twisted cord;
- The “wheels” are glued to the bottle with a heat gun (it is better to choose a flat or rectangular container). In this case, you need to ensure that the wheels are at the same level;
- the resulting “gun” is attached to the base;
- Additional decor can be added upon request.
Considering the specific theme of the decoration, this design is more suitable for February 23rd or as a gift to the military or law enforcement officers.
Cognac and sweets cake
This composition of cognac and sweets has already become a classic. This present is suitable not only for individual congratulations, but also as a gift for a male team (this decor would be appropriate for February 23, and for any corporate holiday).
If the cake is small, then all you need to make it is a container of alcohol, candy and a glue gun. For a massive multi-tiered craft, it is advisable to additionally stock up on a box of chocolates, which will act as a base, or a special base for the cake (they are sold in confectionery stores). Additional fixation around the perimeter may also be necessary. Not all men like satin ribbons; such decor can be replaced with decorative braid or hemp.
In the simplest version, a bottle of alcohol is placed in the center of the composition, and a circle is covered with sweets in several rows. In this case, choose narrow and long varieties of sweets, which are placed vertically.
To get a more original and beautiful cake decoration with a bottle of alcohol, you will need several types of candies of different shapes. In this case, it is desirable that the shades of the candy wrappers match the color of the bottle label.
A box of chocolates or a base is placed at the base of the “cake”. A composition of sweets and cognac is harmoniously placed on top of the base. After that, the resulting gift set is decorated with braid or twisted cord (the main thing is not to put too much on flowers, beads and ribbons - after all, this is a gift for a man).
Grenade made from sweets and cognac for February 23
A very simple DIY gift with cognac. To make it you will need a minimum set of materials:
- a bottle of alcohol resembling a “lemon” in its shape;
- protective or brown ribbon for decorating bouquets (sold in office supply or flower shops);
- wire;
- heat gun;
- candies (preferably in green packaging).
It is very easy to wrap such a gift beautifully. The glass surface is completely covered with candies. The neck is wrapped in tape, and a “lever” is made from it. The “check” is rolled up from wire and wrapped with the same tape.
In order to decorate a bottle with decoupage or kanzashi for February 23, it will take several hours or even days - such decoration can be completed in 20 minutes. At the same time, the gift will look original and interesting.
Helicopter
You will need a bottle of alcohol, banknotes, and tape.
- Fuselage - a cylinder is made from green colored paper and placed on the bottle so that the bottom is open by about 1.5 - 2 cm.
- The remaining part at the neck is covered with tape.
- Tail - a strip is cut out of green paper, wrapped around the neck, and the ends are glued together.
- Blades - are made from banknotes rolled into tubes and attached to the bottle with a satin ribbon.
Things created with your own hands will not only please your loved ones on holiday, but the process itself is guaranteed to provide pleasure and the opportunity to show your own imagination, as well as experience that will allow you to develop creativity in the future.
Money bottle
Many people leave a bottle decorated with coins at home in the form of a piggy bank for change or a talisman that brings wealth. It is unclear whether such a talisman attracts money, but such decor looks very stylish and interesting.
The method of making this design is a bit like decoupage. Therefore, the list of necessary materials is somewhat similar.
To design a money bottle you will need:
- coins of different sizes and denominations;
- heat gun;
- PVA;
- brushes and sponges for applying glue and paints;
- acrylic glossy or shiplap varnish;
- an unnecessary stocking or part of nylon tights;
- small zipper;
- scissors;
- black and gold acrylic paints;
- bottle for decoration.
The manufacturing instructions include the following steps:
- Remove the label from the bottle. Remove any remaining adhesive with alcohol.
- Cut off the elastic and the “foot” from the stocking. The resulting nylon “pipe” must be placed on the container with alcohol, evenly distributing the folds (the fabric should completely cover the glass).
- Cover the nylon generously with PVA and leave until completely dry (at least 6 hours). The completely dry surface should become hard and crusty.
- A slot is made in an arbitrary place on the nylon. Its size should be slightly less than the length of the zipper.
- A zipper is glued into the resulting hole. Its fabric part must be carefully hidden under the nylon.
- The workpiece is carefully painted with black paint (several layers may be needed).
- The slot is filled with coins. They stick to the glass in a chaotic manner.
- The fabric is covered as tightly as possible with polyethylene. Only the slot with coins remains visible. They are coated with golden spray paint.
- The polyethylene is removed and gold tinting is applied to the protruding parts of the nylon with a sponge.
- After the paint has dried, the bottle is opened with several layers of varnish. If ship varnish was chosen for the work, then it is better to carry out the procedure outdoors or in a well-ventilated room.
The finished craft has a very unusual appearance and texture. At the same time, this decor is very durable. The bottle can even be washed under the tap without losing its appearance.
The video below shows how to decorate alcohol in a steam-punk style in a similar way, but using foamiran.
Brutal bottle decor in Steampunk style
My boyfriend is an airborne soldier, what can I give him?
When there are two of you, the number of memorable dates also doubles. General holidays appear and personal ones remain. Finding a good gift for a celebration that you have nothing to do with is not an easy task. We recommend giving your loved one the following cool and functional gifts on Airborne Forces Day:
- Acoustic guitar. Many guys who served in the airborne forces dream of this musical instrument. Songs with a guitar once helped them while away the long days of service and drowned out the longing for their home. You can't go wrong by giving a paratrooper a guitar!
- Paintball game. What else is more reminiscent of the army days than an imitation game of war with air guns? Playing paintball brings a lot of fun and charges with adrenaline. An hour of play will cost you no less than 900 rubles.
- Award statuette. For example, with the engraving “To the Chief Defender of our family.” Made to order and will take its rightful place on the shelf in your man’s home. Cost from 1000 rubles.
- Game console . Men love to spend time playing video games. Military games will help former soldiers remember their days of service and the army atmosphere. We guarantee a cheerful mood and a pleasant atmosphere!
- Jewelry. It could be a silver signet ring or a chain with a pendant: a classy and status gift that will serve your beloved guy for many years!
- Name badge. A personal tag on which his name, blood type and the emblem of the troops are engraved. Your hero will undoubtedly like this medallion. Its price is at least 600 rubles. and depends on the size and material of manufacture.
Box of alcohol
Beautiful design in itself can be a gift. An interesting presentation has always been valued. You can buy the original box in specialized stores, or make it yourself (the first option is still preferable).
In stores you can find gift boxes of various shapes and sizes made of cardboard, tin or thin wood. The shape of the packaging can be either classic (square, rectangle, etc.) or thematic (a heart for February 14, a suitcase for a long-awaited vacation, etc.).
In addition to the gift set (alcohol, sweets, glasses, etc.), the set must include filler. It serves as a base for the contents of the box and protects fragile items from damage. The filler can be:
- special thinly sliced corrugated paper;
- decorative hay;
- foam balls;
- a single piece of fabric or paper (they are usually carelessly crumpled).
Any of the fillers can be bought in handmade stores.
In addition to the base, you can add additional decor to the gift box: colored feathers, nuts, Christmas tree decorations (for the New Year), etc.
Also, this type of design can be organically combined with other decorations. For example, a bottle in a sailor's suit made of satin ribbons, in a box with additional decor in the form of shells. This set is suitable for February 23 and the summer holidays.
At the same time, you can decorate not only the bottle, but also the box itself, turning the packaging into part of a gift set.
Gift of small bottles of alcohol
Miniature containers with alcohol do not lose their popularity. They are used to make bouquets, collect gift boxes and baskets with cognac and other strong drinks.
There are several reasons for this demand:
- relatively low price. High-quality alcohol has always been expensive. By beautifully decorating small bottles, you can show a sign of attention at a lower financial cost;
- mini containers allow you to assemble a gift box with several types of alcohol. Moreover, such a set will not smack of “alcoholism”, as is the case with the same number of full-size bottles;
- this volume of alcohol is suitable for comic sets (gag gifts);
- small bottles are good to use in decorative bouquets. They do not burden the composition and go well with the rest of the set.
Any of the miniature containers can also be decorated with ribbons, decoupage or candies. At the same time, other container proportions will allow you to bring non-standard design ideas to life.
Beer and vodka cake
This gift is suitable for a large company. Making such a cake is very easy, the main thing is to take into account the final weight of the composition.
The base in this case should be strong enough (a cake base will not work). It is best to use a metal or glass tray. Alcohol is installed on it in tiers.
In a “cake” that needs to be transported, all the cans and bottles should be secured together with a glue gun. If transportation of the gift is not required, it is enough to tie the tiers with gift ribbon.
There is a little trick for those who don’t want to give the birthday boy too much alcohol. You can place an empty plastic bottle with the neck cut off inside the cake. It will fill the central part, reducing the number of gift bottles.