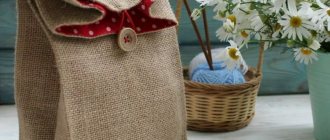
What's the one thing no girl can do without? No bows! After all, they make her look very different: sweet, funny, serious, young and adult. Bows are worn when doing hair in kindergarten and school, on holidays or just for every day. They decorate not only hair, but also handbags, phone cases and even clothes! This is also a great gift for any young fashionista.
And if it is made with your own hands, it will definitely turn out charming and like absolutely no one else has! Handmade is always in price. Do you want to learn how to create real little masterpieces with your own hands? Then our material is for you.
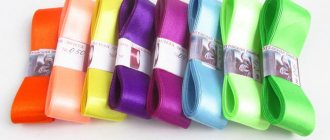
Of course, the very favorite and extremely popular ones are the satin ones. This is quite understandable: they have the brightest colors, and besides, they are affordable for any needlewoman. But you can also use grosgrain ribbon, satin, brocade, fabric, silk, or velvet. The bows made from them are no less interesting and original. Plus, this is a great way to show your imagination! Tulle, organza and a wide variety of fabrics - believe it or not, these are also materials for your creativity. Use your imagination and create with us.
History of origin
This art form originated in Japan several centuries ago and belongs to geishas who wore jewelry along with the traditional, festive outfit - a kimono.
In the original it sounds like kanzashi, in Europe it was transformed into Kanzashi. These are original, bright, spectacular crafts from which they make hairpins, bags, and dresses.
It is based on the technique of assembling ribbons according to given patterns of individual elements and arranging the parts into a whole composition, attaching them to hairpins, pins, and a felt base.
Bows made of satin ribbons, assembled with your own hands, look beautiful, impressive, highlight the hair color, support individual strands, and fix the hairstyle.
Handicrafts are suitable for both adults and children. Working with fabrics and ribbons of different textures develops tactility, a sense of taste, and the ability to combine materials of different densities and colors.
Do-it-yourself bows are a good opportunity to replenish your own wardrobe, make a pleasant surprise for your friends, and acquire additional income, since hairpins and decorations made from ribbons are very popular and are in great demand.
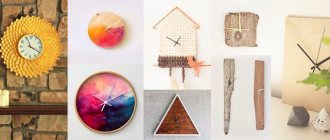
Elegant bow
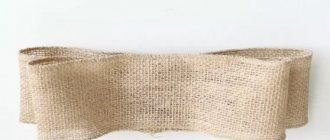
Sometimes, instead of the pomp and glossy sheen of satin ribbons, modest elegance is required. Bows made from grosgrain ribbons look serious, with a claim to solidity. Small accessories made from grosgrain ribbons are used to decorate business suits, hats, bags, and, of course, hair. Rep tapes are denser in structure, can take and hold their shape, and have a matte, corrugated surface.
Step-by-step master class:
- Prepare two small pieces of grosgrain ribbon of any color. The length of the cuts depends on the size of the future bow.
- Form each ribbon into a ring and place them on top of each other.
- On the rings, lying crosswise one on top of the other, place the third piece in a horizontal position.
- Apply a drop of glue to the middle and stitch all three strips.
- Prepare two more pieces of tape. One is small in size for wrapping the workpiece in the center, the second is slightly longer than the rings, process the edges in the shape of a tick.
- Wrap a small piece around the bow in the middle and secure with glue.
- Sew a long piece with finished edges to the back.
A piece of ribbon with scalloped edges transforms a simple bow into an original accessory, giving it volume and completeness. The edges, decorated with teeth or an oblique line, make the craft ready.
Material for production
In the photos of bows and flowers presented on the site, you can see what crafts can be made from. The basis is:
- Thin, soft fabrics. Organza, tulle, silk, which are distinguished by a clear structure and amazing tints;
- Satin ribbons. The material is used in different widths: 2.5 cm, 5 cm, 7.5 cm, 10 cm, and other sizes if necessary. The color scheme is limited only by the author's intention. Serves as the main material for making crafts;
- Lace, narrow, wide, gathered several times. Transparent lace makes beautiful DIY satin ribbon bows even more attractive, colorful and graceful;
- Decorative braid used to decorate bows.
How to make from satin or nylon ribbon
Most often, satin or nylon ribbons are used to make bows. There are many ways to make a beautiful accessory. The most popular methods are classic and two-layer from a thin strip of fabric.
Classical
This is the simplest method; its advantage is that it does not require any tools. Requires only manual dexterity.
| Step-by-step instruction | Recommended belt width |
| Any |
The finished product can be used to decorate a hair clip. Another use is to decorate your hair. By attaching a chain, you can wear a bow around your neck instead of a pendant.
On the fork
This way you can easily make a cute little bow. To work, you will need a metal or plastic fork. Even cutlery from toy dishes will do.
| Step-by-step instruction | Recommended belt width |
| 1–2 cm |
This accessory can be used to decorate a handbag, wallet or keychain. It is also suitable for decorating children's toys. The bows are very beautiful: they turn out perfectly even and symmetrical.
Two-layer thin ribbon
This is a rather labor-intensive method. To work you will need a fork and scissors. To prevent the ends of the tape from fraying, they will need to be scorched with a lighter.
| Step-by-step instruction | Recommended belt width |
| 1–1.7 cm |
The finished product can be used to decorate clothes; it is also suitable for decorating hairpins. A large two-color ribbon bow will also look good as a bookmark.
Twisted
The finished handmade accessory resembles a three-dimensional rose. The “flower” is made from fabric of two colors. As auxiliary tools you need a fork, thread and needle.
| Step-by-step instruction | Recommended belt width |
| 2–2.5 cm |
This bow is perfect for decorating a headband or hairpin. By attaching a “stem” of wire to it, you can get an artificial flower - an excellent option for decorating a wedding or holiday costume.
Dior
You can roll up such a bow without using any auxiliary tools. To fix the resulting structure you need textile glue. After work, the excess is carefully removed with a napkin.
| Step-by-step instruction | Recommended belt width |
| 1–3 cm |
The finished product can be used as a gift or as costume decor. If you attach a metal ring, this elegant accessory can easily turn into an original keychain.
Wide material bezel
To work you need a needle and thread and scissors. The finished product is attached to a plastic or metal hoop with a glue gun.
| Step-by-step instruction | Recommended belt width |
| 2–3 cm |
Instead of a headband, you can sew a homemade one onto a hair clip or elastic band. It is most convenient to use an alligator clip. It is better if it is a neutral color without decoration.
In the style of Minnie Mouse
The child will be delighted with such a gift. To work you need sharp scissors, a needle and thread. Sewing an accessory on a machine will be faster than by hand.
| Step-by-step instruction | Recommended belt width |
| 4–5.5 cm |
Typically, such an accessory made of ribbons is used to decorate a headband with the ears of the famous Disney mouse (they can be cut out of black felt). The child can also put a bow on the soft Minnie Mouse toy itself.
On the neck
You can make a lush bow that will become a real decoration for a child’s costume. No additional tools are required for work. You may need a lighter to singe the ends of the tape.
| Step-by-step instruction | Recommended belt width |
| 4–6 cm |
The accessory can be safely used instead of a bow tie. It is good for both boys and girls. You can also decorate a doll or plush toy with it.
On the belt
This satin ribbon bow can decorate a wedding or any other festive dress. No auxiliary tools are required for work.
| Step-by-step instruction | Recommended belt width |
| Any. Instead of a ribbon, you can use a wide belt |
The bow on the dress serves a decorative function and also emphasizes the grace of a thin waist. An accessory made of fabric in a contrasting color to the clothing looks beautiful. Popular color options are black, blue, bright red, rich dark green.
On the back of a chair
Such a bow will become an original interior decoration. It will look good on the back of a wooden chair with upholstery. To work, you will need a needle and thread, as well as a ruler and scissors for cutting out strips. You can first put a cover on the furniture.
| Step-by-step instruction | Recommended belt width |
| 7–10 cm (depending on the width of the chair back) |
Before you tie a lush bow of nylon ribbons, you need to straighten it.
You can decorate chairs in the kitchen, living room, or children's room in this way. The color should be in harmony with other elements of furniture. This type of decoration goes well with the Provence (rustic) style.
Overview of satin raw materials
Ready-made satin ribbons are one of the most affordable materials and are available in a wide range; products made from it stand out for their beautiful appearance, style and variety of shapes.
High-quality, inexpensive samples can be purchased at sewing stores. Different types of ribbons, braid, lace, and knitted elements are useful in needlework.
Finished materials with processed edges are easy to use, quickly assembled into the necessary parts, and require minimal costs for fixing with glue or threads.
Using a sticky thermal fabric that glues two edges together is not practical since the products often have a curled shape. It is better to give preference to ordinary cotton threads.
Satin is a rather soft, smooth material with an even texture and a reflective effect. Pleasant to the touch, the material requires certain skills when forming elements for bows from satin ribbons with your own hands. To work with it, pins are used to fix the position and folds.
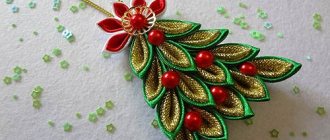
A simple bow for the Christmas tree in 5 minutes
To make this bow you will need pieces of ribbon:
- 4 x 24 cm - 2 pcs.
- 4 x 22 cm - 1 pc.
- 1.5 x 6 cm - 1 pc. - for the middle
- 0.3 x 19 cm - 1 pc. - for hanger
- Needle with thread.
Operating procedure:
- Fold the 24 cm pieces in half and mark the middle, then bring the edges to the middle, going 5 mm beyond it, straighten on one side and the other, and then sew.
- Make 6 punctures to distribute the tape so that it lies evenly and the folds are beautiful.
- Also bend a piece of tape 22 cm in half, mark the middle, sew this piece, making 8 punctures, gather everything onto the thread, scroll, tighten and bring the needle to the front side.
- Now you can release the needle and pull the bow so that the folds are straightened out properly, bring the needle inside out again and secure it.
- Fold a 6 cm piece of ribbon like an accordion and secure it on both sides with a hot knife, then glue it to the bow.
- Apply a little glue, glue the middle and straighten it, cut the edges of the tape at an angle, and treat with fire. Fold the narrow tape in half and glue it to the wrong side.
The bow is ready, you can decorate the Christmas tree.
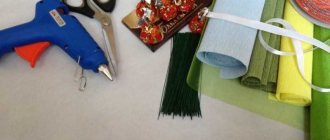
Assembling a tool box
The site presents step-by-step photos of making bows from ribbons with your own hands, which can be mastered in a couple of lessons. Tools you will need:
Note!
- DIY hair bands - ideas for decorating homemade rubber bands + step-by-step instructions for making them yourself
- DIY shadow theater: step by step how to do it at home! 175 real photos
- DIY photo frames | How to make a simple and beautiful photo frame as a gift or for yourself from scrap materials
- Scissors;
- Needles, threads of different sizes and colors. You will need several spools of thread of different colors, since the kanzashi technique is based on modeling jewelry using a needle and stitching the elements;
- Tweezers. An assistant who helps when working with small parts;
- Lighter. Fire prevents threads from falling out from cuts of ribbons and fabrics by sealing the edges. You can use matches, a burning candle, or work over the open flame of a burner;
- Glue gun, Moment glue. Used for gluing parts of a composition;
- Base for crafts: hairpins, elastic bands, hoops, clips, combs;
- Decorative jewelry: beads, beads, fastenings for the core, children's themed decor.
Materials and tools
To make bows, you will need a sewing needle, sharp scissors, and a measuring tape to measure strips of fabric of the required length. You can sew by hand or by machine. Tapes made of various materials are suitable for the job. The most popular:
- Satin looks impressive and is easy to sew.
- Nylon is strong and tough.
- Tulle and organza are airy translucent fabrics. A significant drawback is that the ends often crumble, so they need to be melted with a lighter.
- Rep is a pliable material with a long service life.
No less popular is the lace bow made from ribbon. This material holds its shape well, the finished accessory looks elegant and expensive. At the same time, the lace wears out quickly and is difficult to care for. Cotton products are durable and do not fray at the edges. Of course, they get dirty quickly, but washing this material is not difficult. The simplest technique for sewing an accessory from multi-colored ribbons is the Japanese kanzashi method, which allows you to get beautiful multi-layered flowers of the most bizarre shapes.
The best option for beginning craftswomen is a grosgrain bow made from a wide ribbon, because this fabric is the easiest to work with.
Required Tools
Satin Capron Tulle Rep Lace Cotton
Basic elements
For those who want to master the technique of creating jewelry and bows from ribbons, there are various instructions and diagrams on how to make kanzashi. They describe in detail, step by step, the process of creating petals, flowers, and bows. The finished decoration consists of individual elements assembled by hand.
The basic ones include: voluminous, round petal, sharp petal, double petals, voluminous leaves, flat parts, complex ones using several materials at the same time.
Ribbon decor for gift decoration
Once you've learned how to make a simple and cute bow, you can move on and use the technique to decorate something, such as gift wrapping. For this case, you will need a more magnificent bow, but it is based on the same two loops threaded into one another.
The step-by-step master class is as follows:
- Fix the tape with two fingers and make a ring out of it.
- Throw on several turns, holding the new rings in the middle.
- Prepare a small piece of thin tape in advance.
- Tie a bow in the center with a thin ribbon and straighten the petals.
A lush, rich bow is ready to decorate any holiday packaging. It always looks beautiful, no gift can be presented without it. A gift designed with love leaves the best emotions and is remembered for a long time.
How to make a complex element
- Fold the square piece of tape diagonally.
- Form a small square from the resulting triangle, bending the ends.
- Fold in half, forming a complex petal with a bridge in the middle. Glue the edges.
- In this way, by overlaying square on square of different colors, you can get multi-colored complex petals.
Kanzashi bows for school and kindergarten
- These bows are small in size, very stylish, made from 2 types of satin ribbon, on average 45 cm in length and 5 cm in width.
- Prepare a 10 cm piece of tape, an elastic band, a rhinestone tire, a small piece of 3 lines will be needed for the middle and one line will be used to finish the ears.
- Treat the edges of the ribbon with fire, fold the corners, connect, thus making 4 folds, cut and treat with fire.
- Trim the edges and secure with a needle and thread and do the same on the other side. Now the workpiece can be opened.
- When the ear is ready, you need to make the same ear from another ribbon, then connect them using hot glue, glue an elastic band to the wrong side, and glue strips of rhinestone bus to the edges of the ears.
- Fold a 10 cm piece of tape into 4 times like a tube and secure with glue.
- Apply a little glue inside the elastic band, glue the edge of the tape to the elastic band, then apply glue to the front part and turn the tube.
Next you need to glue the rhinestone splint to the tube and the bow is ready.
How to form leaves
- You can make a leaf using the flat element technique, giving the edges a wavy shape with fire.
- Make a blank of green ribbons 2.5 cm wide and 10 cm long.
- Fold the piece in half and cut it diagonally with a soldering iron (you can use a burner.
- Unfold and iron. It turned out like a cup with a sharp top.
Small decorative bows
Small dainty bows are great for elastic bands, barrettes and other decorations. They can be woven into braids or decorated with holiday cards - they are quite light and compact. To do this, you will need two pieces of thin satin ribbon, 15 cm long.
Make a fold at a distance of 6 cm from the edge and fold the ribbon along this line at an angle so that it looks down. Bring the edge back up, and fold the remaining end at the back and make the same triangular bend. The second part is made according to the same principle, only in a mirror way: measure 6 cm from the other edge. Pull the pieces together with thread, sew them together and attach them to an elastic band or hairpin.
Photo: mld-mobile.ru
Master class on making hair clips from ribbons
Step 1. Cut the blanks for the petals. One flower will require 30 pcs. large rectangles, 7 cm long, 20 pcs. small ones, 5 cm each. Process the edges.
Step 2. Make voluminous petals from blanks. Divide the rectangle into 3 parts: fold one third perpendicularly, fold in half and glue. Do this with all the blanks.
Step 3. Assemble the elements into a flower. On a felt circle with a diameter of 4 cm, glue large petals one next to the other, pressing them to the base. The second tier is formed from smaller petals. The third and fourth tiers are glued with the base to the middle, forming a lush flower.
Step 4. Glue the leaves to the wrong side of the felt, distributing them evenly in a circle.
Note!
DIY bird feeder - interesting ideas on how to make it quickly and easily from scrap materials- Do-it-yourself cold porcelain: the best options for porcelain products, step-by-step instructions and recipes for making it yourself (photo + video)
- DIY curtains - types of curtains, choice of materials for sewing and design + step-by-step instructions and simple patterns for beginners
Step 5. Decoration.
Step 6. Using a glue gun, glue the finished dahlia to the hairpin. The hair decoration is ready.
Kanzashi flowers open up the wonderful world of handicrafts.
Flower Festival
For this accessory you will need a wide satin ribbon, about 4 cm. The petals are made from it, which form the base of the flower.
- Cut 6 pieces of equal length from the tape.
- The sections are alternately strung on a thread and pulled together to form petals.
- Cut 6 pieces from a narrow ribbon (1.5-2 cm wide) of the same color. In the same way, they are strung on a thread one after another and slightly pulled together.
- A layer of narrow ribbon petals is placed on the bottom layer and stitched together.
- A shiny decorative element (beads, beads, decorative stone) is placed at the top center. Between the layers of petals you can place a contour element made of rhinestones, made in the shape of a flower.
As a dense base, a small circle of felt is glued to the wrong side, and a fastener-clip or pin is placed on it. A two-layer bow gives room for imagination. Alternating colors and types of ribbons, playing with decor and decoration look original.
Decorative decoration for school
We suggest making bows for school with your own hands. They look elegant and democratic on your hair, have a simple elastic fastening, match any hair color, are quick to put on and securely fix your hairstyle.
The description shows the classic color scheme. You can use your own ribbon colors.
To create an elegant hairpin you will need:
- White satin ribbon 5 cm wide. The total length is 140 cm, it is cut into rectangles of 10 cm;
- Blue satin ribbon 2.5 cm wide and 70 cm long. Choose rich, dark blue shades, they make the composition more contrasting and stand out well on the hair;
- Sewing kit: needles, pins, scissors, threads, measuring tape;
- Decor: rhinestones, buttons for decorating the middle;
- Candle for finishing edges.
Ways to beautifully tie a grosgrain ribbon
The main features of grosgrain ribbons are increased strength and flexibility, the ability to take on any shape as a result of mechanical action. They can be found in craft stores. A multi-layer or double bow made from this material looks impressive, lasts a long time, without losing its visual appeal over time.
Multilayer
This craft can be used to decorate a photo album or hair clip. The more colors are used, the more elegant and magnificent the accessory will look. Step-by-step manufacturing instructions:
- Form multi-colored petals (22 pieces) from the segments.
- Attach them to a round felt base.
- Glue the second of 16 parts on top of the first tier.
- Make the third row of 10 elements.
If there are still a few pieces of tape left, you can attach them to the felt base. The craft is glued to a headband, elastic band, hairpin or photo album using a special glue gun. You can make several identical bows in different colors at once.
With elastic band
This accessory can be used to decorate children's hair, for example, to secure pigtails with it. It is better to choose brightly colored ribbons for making - red, orange, yellow. When working, you should follow the step-by-step instructions:
- Take two grosgrain strips of the same length and fold them together crosswise to create the base for the bow.
- Glue a decorative mesh on top.
- Form a flower from oval white blanks and fix it on the base.
- Place decorative stamens in the center.
Additionally, you can collect leaves from green pieces and decorate ribbon bows with them. After this, the resulting structure is securely fixed with an elastic band. An elegant accessory that goes well with a summer dress or sundress.
In the form of a bow tie
This product will be an excellent gift for a boy 5–7 years old. It is better to choose a solid color: dark blue, gray, brown. An accessory made from a small checkered ribbon looks stylish. To work you need:
- Place two grosgrain strips together.
- Solder or tape one edge to form a loop.
- Form a butterfly bow with pointed ends.
- Secure with clothespins and trim carefully.
The resulting structure is superimposed on a wide tape, which acts as a base. After this, both strips are sewn on. A screed is made in the middle.
American
Beautiful ribbon bows are made in the American style. They can be of different colors. The finished product is glued to a hair tie or a decorative headband. Step by step guide:
- Form two figure eights from pieces of material.
- Attach them to each other to make a flower.
- Sew, pull together in the center.
Next, sequentially apply several more layers: the more, the more magnificent the product will be. The finished accessory simultaneously resembles both a star and a flower. You can glue bright pebbles into the middle of the bows.
Master class with detailed description
Step-by-step instructions on how to make bows from ribbons, in an accessible form with pictures and detailed descriptions, make it possible to assemble such a wonderful hair decoration with your own hands.
Step 1. Preparing the material. Mark the tapes and cut them into pieces. From white make 4 rectangles of 10 cm, 11.5 cm, 13 cm. From blue - 3 rectangles of 22 cm.
Step 2: Forming the base. Lay out a corner from the white pieces. The stripes are longest at the bottom, smaller and smaller at the top. Everyone has the same angle. There will be six cuts in total.
Step 3. Make a bow. Bend the corners of the cuts on each side. Fold each side of the three pieces in half and bend them towards the middle. Get a figured square. Secure each step with pins. Sew along the bottom corner, moving 2 cm from the edge. Apply the seam in an arc from one edge to the other. Cut off excess ribbons and process the edges over fire. Unfold the ribbons.
Step 4. Fold the blue pieces in half, sew, and place them together in a herringbone pattern as shown in the photo. Secure the middle with threads.
Step 5. Place blue and white bows together, sew, and decorate the middle. We use a decorative button as the central detail. Sew on an elastic band. The school bow is ready.
Classic school bow made of nylon ribbon
Classics will always be in fashion. It is appropriate in any case. The same applies to wide bows, especially school ones. What hairstyle do you associate with the holiday of first-graders on September 1, last bell or graduation? Right! With big white bows on her head!
We suggest you do just that. It is very elegant and voluminous. Perfect for decorating ponytails and braids. Read about how to do it step by step in our material below.
Before you begin, prepare a piece of nylon tape that is not too short. The optimal length is about one meter. And the width should be at least ten centimeters.
Step 1. First, you need to take our ribbon and bend it very carefully in half. And then be sure to pin the free edges together with pins. Step 2. The edges on the sides need to be scorched with a match or lighter. Do this quickly so as not to burn the entire product. Then pin these edges together too. Step 3: To this edge where you sewed the two ends together, sew any hair tie of your choice. Step 4. Now sew along the fold line with strong threads. Step 5: Remove the pins and carefully roll and pull the ribbon. Step 6 . Form a fluffy bow by hand and sew it carefully again with a needle and thread.
Interestingly, the classic way of tying a bow is also called French . And therefore, dear readers, you should not look for a French bow, this is ours, familiar and beloved - classic!
Photo of DIY satin ribbon bows
We pick up the child from the maternity hospital - we arrange decorations for discharge
The birth of a child is not only a long-awaited, but also a solemn moment. A happy mother, a joyful husband, who has not yet fully realized that he has become a father. Relatives are euphoric because the long-awaited child has been born. Diapers, rompers, pacifiers, bottles have been purchased, the room is waiting for its new owner. Have you forgotten about the elegant bow for discharge from the maternity hospital? In addition to decorating, you can also prepare an envelope, as it is described in the article: “Do-it-yourself envelope for a newborn.”
How to make a bow from a ribbon for a boy to be discharged from the maternity hospital?
To make your own decoration for a boy’s discharge from the maternity hospital, you need to buy the following materials and the following ribbons:
- from satin, which will become the basis. It could be: blue, cyan, green, purple, it all depends on the preferences of the young parents. A width of 2.5 cm is perfect;
- white satin for decoration. It should be the same width as the main one;
- a candle, lighter or wood burner is necessary for scorching the edges;
- scissors;
- ruler;
- tweezers;
- transparent glue;
- decorations in the form of rhinestones, beads, stones.
Now let's get to work:
1. Initially, you need to assemble the main decor, since it will serve as the main decoration. The bow looks like flower petals placed on a base. To make it you need to cut eight centimeter strips of blue and white. Using tweezers, fold the petal and burn the edge.
2. On a round base, glue the resulting petals in several layers with transparent glue. Decorate the center with a bead or rhinestone. Use a piece of ribbon to make a loop at the back of the bow (as in the photo) so that the bow can move along the base.
3. The main ribbon can be about 1.5–1.8 m long. To make the ribbon for discharge from the maternity hospital look original, you need to decorate its ends. To do this, you need to make small bows, retreating a few centimeters from the edge. Using the principle described above, make petals and attach them, as shown in the photo below.
It turns out to be such an interesting, original accessory for discharge from the maternity hospital.
While you're having pleasant troubles, don't forget about buying things for a little family member that he can pick up, read: “What you need to buy for the birth of a child.”
Video master class: how to make a ribbon bow for a boy to be discharged from the maternity hospital
Photo options for ribbon bows for a boy being discharged from the maternity hospital
How to make a ribbon bow for a girl leaving the maternity hospital?
A lady should always look good, even if she was born just a few days ago. We offer to make an exclusive decoration for a girl to be discharged from the maternity hospital. For it you will need materials and the following tapes:
- main satin, 2.5 cm wide, pink. It can be any color, as the young parents decide;
- white from satin, it should be about half the size of the main one;
- pink nylon (narrow);
- silver metallized;
- ruler;
- scissors;
- sewing threads;
- needle;
- transparent glue;
- tweezers;
- a candle, lighter, or wood burner is needed to scorch the edge;
- beads for decoration.
Making a bow for the little lady:
1. Initially, you need to cut 6 pieces of each type of tape, including metallized. Scorch the edges with them. Collect petals from the widest one using a needle and thread for flower sewing, and make petals from all other ribbons.
2. Glue all the resulting petals to the large flower. Prepare 27 small petals from the main ribbon, as they are made as described in the master class on a bow for a boy on discharge. On the base, it can be cardboard, felt, thick fabric, glue small petals, and decorate the top with a bead.
3. Assemble the two parts of the flower, attach a ribbon to the back and the bow is ready for the girl’s graduation.
Discharge is always a pleasant moment, but before you go to give birth to a child, you should know what the expectant mother will need in the maternity hospital, and you can find out this from the article: “What to take with you to the maternity hospital.”
Video master class on how to make jewelry for a girl to be discharged from the maternity hospital
Photo options for ribbon bows for girls being discharged from the maternity hospital
How to tie a bow?
Not everyone can make a beautiful bow the first time. Here are a couple of secrets in mastering the secret technique:
Watch a craftsman at work in a flower shop or a place where gifts are decorated. This way you can master a new technique or learn the tricks of the professionals.
Study videos on YouTube - watching videos is the easiest and most effective way to learn new techniques for needlewomen. The advantage of this method is that you can stop an infinite number of times and try to repeat after the master until you get the perfect result.
Note!
- DIY gifts for February 23rd - a large selection of ideas for creating unusual gifts for Defender of the Fatherland Day
- What to give a 2-year-old boy - a list of the best options for an interesting and useful gift (120 photo ideas)
Papier-mâché - TOP 120 photo reviews of original products. Detailed instructions for beginners on creating beautiful crafts
Instructions: make a double bow
Having mastered the technique of making a simple bow, you can move on to more complex variations. How to make bows from satin ribbons with your own hands step by step? Let's move on to a more complicated version!
A double bow will look most advantageous. To increase the decorativeness and complexity of the bow, use two colors. It can be two shades of the same color, then the bow will be delicate and aesthetic, or two opposite colors - the bow will be bright and stylish. Choose shades and colors depending on the further use of the bow.
For a simple solution, take ribbons of similar width and tie one beautiful bow. In a complex version, the tapes can be of different widths. There are two solutions here:
- Glue the ribbons in the center and assemble a bow;
- We fold the wide ribbon according to the principle of rings and make it flat. We tie a structure made from a wide ribbon with a narrow ribbon.
Note!
- Kinusaiga technique - TOP-140 photos of the best ways to create crafts using the Kinusaiga technique with your own hands + instructions for beginners
Do-it-yourself passe-partout - a master class with step-by-step do-it-yourself schemes. Making tips + photos of the best examples
- Decoupage with napkins: TOP-150 photos of ways to decorate with napkins. Simple instructions for beginners at home
If you like to experiment, try combinations of ribbons that are complex or unusual at first glance. There can be a lot of variations and solutions, for example:
- Polka Dot Ribbon;
- Hearts;
- For children's stories, ribbons with prints of various animals are suitable;
- Cell;
- Geometric elements;
- Zigzags;
- Strip;
- Floral motifs.
You can also choose ribbons to match any theme and choose a print for various holidays. For example, a ribbon with snowflakes, Christmas trees or Easter eggs. Pictures of a bow on the Internet can lead to beautiful solutions that can bring a festive mood and a special atmosphere!
Another great idea is to use lace ribbon for the top bow. This will give everything tenderness and additional charm.