The health of children depends on many different factors. For the younger generation, it is important not only to have proper nutrition, exercise and develop thinking. An important factor is correct posture when sitting at the table. Correct posture shapes the child’s skeleton and provides balanced development to the entire body.
Decorating elements are chosen at the discretion of the master.
For very small children, it is better to upholster with leatherette or oilcloth to be able to clean the surfaces.
When working independently, you must also focus on this figure.
The growing chair copes with several tasks simultaneously.
- Is orthopedic furniture.
- Allows you to use it from 6 months.
- Saves the family budget.
The little humpbacked horse chair has only one significant defect - the high cost when purchasing a finished product.
To decorate the finished product you will need putty, primer, varnish or stain, and paint of the required color.
A properly made chair allows you to adjust the stand, seat and back in various combinations.
Preparation for work begins with creating a drawing of the chair.
Experienced craftsmen who have some experience in assembling furniture with their own hands will not find it difficult to complete this model themselves. For those for whom the growing chair will be the first independent product, we advise you to carefully read the instructions. It is also necessary to first assess not only your capabilities, but also the availability of tools that you cannot do without during the work process.
For the younger generation, it is important not only to have proper nutrition, exercise and develop thinking.
Regardless of the source of the drawing, the pattern should only be made in full size.
Materials and tools
Not all materials are suitable for making a folding chair that grows with the child. The product can be made from either plywood or treated wood. It is also possible to make a chair from solid wood, but it will be very bulky and heavy, which is inconvenient for the child. Therefore, plywood is still considered the best material.
For the racks you will need plywood of at least 22 millimeters, on the basis that each rack will use two blanks, which will subsequently be glued together. The seats, footrest and backrest can be made of 22 or 16 mm plywood.
The parts of the child's chair are fastened using hex bolts and furniture countersunk nuts.
The little humpbacked horse chair has only one significant defect - the high cost when purchasing a finished product.
A preliminary pattern of all elements is made on paper or thick cardboard.
It is important to consider that some elements of a chair for a child should be right and left, that is, “mirror” each other.
What is the Little Humpbacked Horse chair?
The product, named after the fairy tale character the Little Humpbacked Horse, was developed by a Russian company.
Growing high chair “Kuzya” in the interior of a children’s room.
“The Little Humpbacked Horse” is a wooden chair of original design. Its design is very well thought out and aesthetically pleasing: it consists of a seat, backrest and footrest located between two slats (legs).
The holes in the stands allow you to adjust the level of the seat and footrest to suit the child’s height, which is why this product is called growing. The spine will always be in the right condition, without the risk of spoiling your posture.
The “Humpbacked Horse” chair will be useful for both a baby and a schoolchild; it can be used for classes, feeding, as a computer chair, etc. In addition, the strength of the product is designed for a weight of up to one hundred kilograms, that is, even an adult can use it .
Some growing chairs can last anywhere from 5 to 18 years of use, making them a worthwhile purchase, and the piece of furniture is incredibly versatile.
The Little Humpbacked Horse brand produces orthopedic chairs for children in different colors, using high-quality, environmentally friendly, child-safe materials. The company's products are reliable and durable. Wooden products are coated with non-toxic varnish and paint, and good fittings are used.
To assemble the “Humpbacked Horse” you need to spend only about half an hour, having studied the detailed instructions that accompany each product. There are also recommendations for adjustments here. Transformation - moving the seat and footrest to the required height, is done in just a few minutes using a screwdriver and hands.
Growing chairs optimally support the spine and thereby promote optimal development of the skeletal system in children.
This chair is intended for children aged three years and older, but it will also be useful for tall and younger children. In addition, the manufacturing company produces special accessories that allow the product to be used from 6 months of age.
Tools, hardware and materials
- Hex bolts;
- 2 pcs. dimensions 6x70 mm,
- 2 pcs. size 6x50 mm.
- Countersunk nuts;
- 2 pcs. 10x20 mm,
- 2 pcs. 10x12 mm.
To decorate the finished product you will need putty, primer, varnish or stain, and paint of the required color. Decorating elements are chosen at the discretion of the master. You can make the seat soft by upholstering it with foam rubber and decorating it with upholstery material on top. For very small children, it is better to upholster with leatherette or oilcloth to be able to clean the surfaces.
To make a growing chair for children you will need the following tools.
- Paper or cardboard for drawings.
- Pencil.
- Centimeter or tape measure.
- Wood glue.
- Electric jigsaw with files.
- Copy cutter.
- Fraser.
- Sandpaper.
- Paint brushes.
It is also necessary to first assess not only your capabilities, but also the availability of tools that you cannot do without during the work process.
Having prepared the pattern, materials and tools, you can safely begin to work.
Remember - work does not tolerate haste and fuss.
A properly made chair allows you to adjust the stand, seat and back in various combinations. Furniture manufacturers include at least 10-15 positions in a growing chair. When working independently, you must also focus on this figure.
Not all materials are suitable for making a folding chair that grows with the child.
An experienced craftsman knows that it is necessary to measure several times, weigh everything and only then cut.
The dimensions of the seat for a child are chosen independently and depend on his age and the calculated reserve.
UPD:
As promised, I am posting drawings of the chair parts with dimensions. I also post:
- links to chair drawings in DWG (I exported from Sketchup and collected everything on one sheet);
- drawings of a chair with dimensions in Sketchup (switch views “Front” and “Right”);
- model in Sketchup in version 2013, if someone does not open the original file;
Sketchup model of a kneeling chair (v.2013) Drawing of a chair in Sketchup Drawing of a chair in DWG
Preparing a product project
Preparation for work begins with creating a drawing of the chair. You can make a product for a child with your own hands only by correctly calculating not only the dimensions, but also the angles of inclination of the parts.
You can easily download a ready-made project on the Internet, or using GOST 19301.2-94, which describes what parameters tables and chairs for children should have, you can make a pattern yourself.
Regardless of the source of the drawing, the pattern should only be made in full size. A preliminary pattern of all elements is made on paper or thick cardboard. It is important to consider that some elements of a chair for a child should be right and left, that is, “mirror” each other.
It is also possible to make a chair from solid wood, but it will be very bulky and heavy, which is inconvenient for the child.
The shape of the parts can also be arbitrary - square, semicircular or oval.
A growing chair for small children can be additionally equipped with armrests and a safety front bar so that the child cannot fall from it.
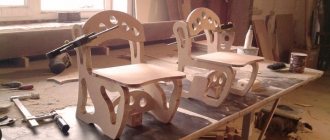
A stool-chair for a children's room in the form of puzzles.
These chairs are perfect for children and can go to a playroom or children's room, and would be an excellent solution for a kindergarten. The seats of the chairs are made in the form of puzzles, and therefore, if necessary, these chairs can be combined into a single bench , which in certain cases can be very convenient. You can learn how to make such chairs with your own hands from the step-by-step photos below.
Photo source: instructables.com/id/HomeMade-Modern-DIY-Puzzle-Stool Author: homemademodern
Step-by-step assembly instructions
Having prepared the pattern, materials and tools, you can safely begin to work. Remember - work does not tolerate haste and fuss. An experienced craftsman knows that it is necessary to measure several times, weigh everything and only then cut.
Stages of work.
- We apply the pattern made according to the drawing to the plywood and cut out the first part of the side legs. It is necessary to make the workpiece with a small margin of a few millimeters. This reserve will prevent mistakes when cutting.
- Using a copy cutter, we bring the workpiece to the ideal size.
- We cut out three more legs with a margin.
- Stack all four legs.
- Using the first perfect piece, we grind the remaining three legs. This approach will save time on grinding.
- Glue two pieces together and let them dry.
- Using a router we make grooves on the inside of the legs. The groove dimensions should be 10 mm deep and 24 mm wide. This groove plays a key role in further adjustment of the positions of all elements.
- Exactly in the middle of the groove it is necessary to make through holes in which the seat and footrest will be secured. Holes must be made at equal distances from each other. It is important to place a block under the leg when drilling to avoid chipping and deformation on the outside.
- We are preparing the runners. The slider allows you to fix the seat or footrest in the desired position. You will need 4 of them - two on each side. The sliders must correspond to the size of the foot and not look beyond it - height 20 mm and width 24 mm.
- All corners and edges of the runner are rounded, and a groove is made in the center. The gutter is intended for further gluing into it the slats, which will be inserted into the groove of the leg.
- The rail should be made based on the width of the groove into which it will be inserted on one side and the groove on the other side.
- The slider and the rail are glued together and dried.
- A hole is made in the slider for a bolt that will secure the selected position.
- Next, the back and footrest are cut out. The dimensions of the seat for a child are chosen independently and depend on his age and the calculated reserve. The shape of the parts can also be arbitrary - square, semicircular or oval.
- The next step is to make the back for the chair. The back can have a wide solid surface or be made of several slats of various sizes.
- Don't forget about the crossbar that secures the legs in their lower part.
- Finished parts are not assembled using the final method, but rather the baiting method. This will help evaluate the final result and identify flaws that need to be eliminated.
- If the chair for the child corresponds to the initial plan and drawing, it is necessary to disassemble it and begin final processing using sandpaper. We clean the surfaces, preparing them for painting.
- The paint color is chosen independently. Some craftsmen prefer to prime and then varnish, thereby emphasizing the existing wood pattern. Plywood, however, is best painted because it does not have a uniform appearance.
- The dried parts are assembled into a structure and are ready for use.
The seats, footrest and backrest can be made of 22 or 16 mm plywood.
These parts can be mounted using bolts and subsequently removed from the chair.
For studying at the school table, armrests are not needed, since the hands are always on the table.
A growing chair for small children can be additionally equipped with armrests and a safety front bar so that the child cannot fall from it. These parts can be mounted using bolts and subsequently removed from the chair. For studying at the school table, armrests are not needed, since the hands are always on the table.
The parts of the child's chair are fastened using hex bolts and furniture countersunk nuts.
Plywood, however, is best painted because it does not have a uniform appearance.
Blueprints. Dimensions. Scheme
You can make such a chair and table for feeding children with your own hands from 24 mm plywood, as the author advises. Look at the drawings, dimensions and step-by-step master class for making such a chair below. We advise you to order cutting of parts according to the specified drawings at the nearest furniture factory, which will save a lot of time. Don’t forget to sand everything thoroughly and cover the countertop with an environmentally friendly material.
Master Class
Photo source: instructables.com/id/Toddlers-High-Chair/. Author: Larsollerichter
All about children
08/14/2019 admin Comments No comments
The health of the child is the most important concern of every parent. It consists of many factors: proper nutrition, good sleep, mental and physical development. A child’s spine is subject to changes over the years, so it is important to ensure its proper formation and development. The “Humpbacked Horse” chair can help with this.
Its advantages are that it allows the child to sit only straight, and it is almost impossible to keep his back crooked on it. The undoubted advantage of the chair is that it can be adjusted depending on the age and height of the child. That's why it is called a "growing" chair. In addition, you can do it yourself without much expense.
Primary requirements
Interesting fishing spots are often located in very inaccessible regions and remote from civilization. This imposes certain additional requirements on all equipment. And city fishing, in the absence of a personal vehicle, forces you to be more careful in choosing gear and additional equipment.
Read Homemade lures for pike
Typically, homemade fishing chairs, chairs and platforms require:
- Sufficient strength. Tourist and fishing furniture must have a sufficient margin of safety in order to withstand the weight of the owner and additional body kit. And it should also be taken into account that the load increases significantly at the time of casting.
- Sustainability. Fishing places are rarely convenient for the arrangement of chairs or armchairs. And when fishing and recasting, the unstable structure can simply fall back or to one side. Sand, clay soil, viscous silt, stones and other options require stability, as well as, ideally, adjustable length of the legs, which will allow you to set your place exactly, regardless of the terrain.
- As compact as possible in transport position. The space in the trunk of a car is not unlimited, and if you do not have your own vehicle and you have to use public transport to get to the fishing point, then this parameter becomes even more important.
- As little mass as possible. This parameter does not fit well with the requirements for the greatest possible strength, since the only way out is to use lighter materials, which sometimes comes at the expense of strength characteristics.
- Availability of materials. If you need to buy only a few parts in a hardware or other store to make a chair or armchair, that’s one thing, but it’s a completely different matter if you need to buy all the materials and tools for the job. In the latter case, a more rational solution would be to buy a ready-made chair in a fishing store.
- Ease of manufacture. If the design requires any special, advanced skills in working with wood or metals, then this is not the most suitable option. Ideally, such furniture should be made in a few hours.
Important! The sizes of chairs or armchairs must be selected taking into account the volume of possible clothing. Few people limit themselves to summer fishing only, and fishing in the fall or spring often requires more than one layer of warm clothing. Tourist and fishing furniture must take into account the possibility of accommodating such additional volume
Tourist and fishing furniture must take into account the possibility of accommodating such additional volume.
Accessories
Each manufacturer produces a large number of accessories for its furniture:
- Stokke - infant seat with lying position, seat cushion, plastic tray and seat belts;
- Kid-Fix - high chair cushion and seat belts, as well as a table;
- The Little Humpbacked Horse - a large number of accessories, including a pocket for toys, a table with limiters;
- Kotokota - the only additions are limiters and a table.
Some are sold complete with growing chairs, others are purchased separately. The cost varies depending on the brand and material of manufacture. All accessories are also certified and meet safety requirements.
High-quality orthopedic furniture cannot be cheap, since natural wood itself is expensive:
- Stokke - 12,000 rubles for the chair itself, the cost of accessories is from 2500 to 6000;
- Kid-Fix - high chair price from 5,500 rubles. A pillow for it costs 750 rubles. Table with safety straps - 490;
- “The Little Humpbacked Horse” - 6000 price of a chair. A pocket costs 1,000. A table with a limiter costs 1,500 rubles. A kneeling chair can be purchased for 5,990 rubles, and a growing table-desk for 6,090 rubles;
- Kotokota - 6200 and accessories - table with limiter 1800 rubles.
Despite the high cost, many parents purchase growing chairs out of concern for their child’s posture.
Types of Adjustable Chairs for Children
Children's furniture in this category can be classified according to the following characteristics:
- Age of the young owner. Models for preschoolers and schoolchildren are produced separately.
- Material used in production. The most common are plastic, wood and metal.
- Product design. There are different types on the market: from the simplest, with a minimum of functions, to advanced ones, with a limiter, a wide seat and other bells and whistles.
By age: growing chairs for schoolchildren and preschoolers
Children's chairs of this kind are sometimes called, with particular tenderness, out-of-place chairs. If they are intended for preschoolers, then their design is necessarily equipped with a limiter, the purpose of which is to ensure maximum safety.
Option for schoolchildren
The older generation is more comfortable sitting on larger structures. Having started going to school, a person spends a lot of time at the table, so such growth is necessarily orthopedic. It relieves stress from the spine.
Related article:
A loft bed with a work area for a teenager will not only decorate a child’s room, but will also help to properly organize the space. What such a bed is, popular models and average prices are in our review.
According to the material of manufacture
The most advantageous option is a wooden chair. It is affordable, aesthetically pleasing, and will fit into any environment. Solid wood is a raw material that is reliable in its physical properties and environmentally friendly by definition. A stylish and safe wooden product is the most popular among consumers.
Plastic is used on more budget models. They are fragile and less durable. The most expensive specimens have additional features: a soft seat, a more liberated designer’s imagination. Only natural materials are used in production, no plastic or other substitutes.
By design
As mentioned above, within the average price category it is almost impossible to find a chair that is radically different from another member of the family. Doctors recommend purchasing only orthopedic ones. Manufacturers follow the demand that is generated by this call.
Thanks to this, all chairs that grow with the child are safe, stable, maximally ergonomic and equipped with the details necessary for the greatest comfort of their target audience. At the end, all this gives the result in the form of typicality. The design of expensive Premium class chairs may differ more or less. But individuality can often manifest itself in the little things that shape the style of the chair, and not its fundamental feature.
How to choose
When choosing a growing chair, take your baby with you to the store. This way you can try on the chair and make sure your little one is sitting comfortably. Be sure to ask the seller to show a safety and quality certificate, check the environmental friendliness of the materials from which the furniture is made.
Ideally, the baby should like the chair and fit the interior of the children's room. If there is no suitable color, it is better to take the classic black or white.
A good quality orthopedic chair should not have a slippery base and have a transformation mechanism so that as the child ages, right up to graduation, the furniture can be adjusted to suit the growing body. Parents should also check the strength of the mechanisms and their quality so as not to be disappointed in the future.
Therapeutic effect of orthopedic structures
An orthopedic knee chair is recommended both for healthy people who want to maintain their supporting apparatus into old age, and for patients with medical prescriptions:
- In case of osteochondrosis, osteoporosis, intervertebral hernias and prolapsed discs, by relieving tension with the correct position of the back and spine, there is a significant reduction in pain symptoms and a retreat of the disease.
- Correct posture helps restore the natural curves of the spinal column in mild to moderate scoliosis, completely preventing its development in the future.
- Since the load is transferred from the buttocks to the legs, the use of a kneeling chair reduces to zero the development of hemorrhoids - a disease of people leading a sedentary lifestyle. If present, the symptoms weaken over time, and complete recovery may even occur.
Despite all the positive characteristics and health benefits, in some cases the use of this piece of furniture is not possible:
- Due to standard sizes, it is impossible to choose a chair for small children.
- If a person has bad knees, using such a chair will lead to pain and aggravation of the condition of the joints.
- Individual characteristics of the body that do not allow loading the leg muscles.
Many owners of this wonderful invention recommend alternating its use with conventional orthopedic chairs so that the frequency of loads in the sitting position changes.
We need children's furniture.. Blog of user Irina35 on 7ya.ru
Help me choose a table and chair for a child, a 13-year-old girl, she loves to draw and do crafts, she sits at the table a lot, I want a good and comfortable chair and table. What do you recommend, what do you have?
For our daughter, we took a desk from. Its dimensions are 1200x900x750, just right for a 12-13 year old girl. If you are interested, you can make it to order with your favorite color. Let your daughter have her favorite desk, at which she will happily do her homework and draw.
Good company Moll, manufacturer Germany, high quality, I read a lot about this company before purchasing. We bought a moll table, Champion model, a table with a split top, it is convenient for drawing, reading and drawings. The table is made of good material, convenient and safe mechanisms. The table grows with the child, so it is suitable for any age and height, everything can be adjusted individually in height. We also want to buy a chair from the same company, we like the Maximo model, a chair with the same functions, the height and depth of the seat, as well as the height of the backrest, are adjustable.
Need a good chair for the child. The child will turn 11 years old. I want to give a gift, he asks for a gaming chair, but I read that they are not the right size and will bend my back, and we already have scoliosis. So a good chair for a student is needed to support the back and correct posture.
And whoever heard about Kotokota, it doesn’t look very comfortable, but that’s how they praise it. It generally seems very uncomfortable. Who knows what?
Good Moll chairs, we bought this chair a year ago for our child. Model Maximo, a very good purchase, the chair is still like new, the covers can be removed and washed, even the fabric is good and has retained its good appearance, even after washing. The chair can be adjusted to suit the height of the child, the height and depth of the seat, as well as the height of the chair and the height of the backrest, everything can be customized. The stool grows with the child; our son has stretched a lot over the past year. The quality is very good, all mechanisms are safe, there is a good stable platform on which the chair stands. There are no armrests, there is a comfortable handle at the back of the chair.
Breakdown into parts
You can buy solid beech wood in a store where it is sold in the form of ready-made panels. Their dimensions in the standard version are 800 x 400 x 20 mm. To make a children's chair, two pieces will be enough. To cut the panels into parts you will need a jigsaw.
So, the details:
- blanks for sidewalls measuring 450 x 400 mm – 2 pieces;
- seat and back of a chair measuring 340 x 340 mm - 2 pieces.
After sawing, the parts must be processed. The shape of the back and seat should be rectangular. As for the sidewalls, they can be made curly. Remember that sharp corners are undesirable for children's furniture.
Circles for the handles can be drawn by circling a small saucer. To make a rounding on the sides, you can use a large pan lid. To cut out handles, take a narrow file that is inserted into a jigsaw. Then you can easily cut out the rounded parts. The best option would be a four-millimeter wood saw.
To cut a round part in a sheet, you must first drill a hole inside the intended contour. Then the file will easily enter the circle and move in the given direction. If you want, you can add something individual to the design of the chair, but it will not affect its strength and stability as a whole.
Universal tables
– jpg 37.7 Mb (stol2.zip)
See also:
Wardrobes and kitchens Wardrobes Eighteen types of wardrobes. Book, kitchen, wall, TV, wall mounted. Download from depositfiles – pdf 88.9Mb (shkaf2.zip) Dressers, chests and chests Eight types. Linen chest of drawers, shaker, chest. Download from depositfiles... Sofas, beds Children's bed Bed for a schoolchild made of pine in country style for a standard mattress 990 x 1905 mm. A bookshelf is attached to the headboard, and there are four large drawers below. download – jpg 9…
Interior decoration Clocks Eight types of clocks. Tabletop, fireplace, console, art deco style. Download from depositfiles – pdf 18 Mb (klok.zip) Doors Several door designs. Sliding, arch. Download from depositfiles – pdf…
Features of the models
The “grow up” chair is a unique furniture option that bears little resemblance to standard chair models. The main feature of such designs is their functionality.
Growing furniture can change the seat height. Based on the age and individual characteristics of the child’s body, you can easily adjust the position of the backrest at any time.
To create growing children's chairs, high-quality and safe materials are used. The most popular are structures made of wood.
According to the manufacturers themselves, this furniture grows with the child. To change the position of the chair, you need to use a set of fasteners that are available at the base of the model.
The device often includes a footrest, so that the child can feel maximum comfort and convenience while sitting on the chair.
Design
You can make any chairs and tables with your own hands, as long as your imagination and ability to use tools is enough.
Most of the things that the manufacturer offers us can be done with your own hands if you wish, and if you have experience accumulated over many years, you can invent something better than the factory one. This homemade product was made by the author because it had a place to be, because it was intended for a child, and its creation was the first experience, which is also interesting in such endeavors.
In this article we will talk about the “grow out” chair, the creation of which I will now talk about.
In order to make a homemade chair, you will need:
* Sheet of fiberboard * Ruler, pencil * Jigsaw * Screws * Screwdriver or screwdriver * Sheet of plywood 15 mm thick * Paint of any color * Hand router with 16mm cutter
As can be seen from the above, this chair does not require many parts, and almost everyone should have such a tool.
Step one.
For an accurate product, it is better to make a template, and then make parts based on it. We apply the template drawing to a sheet of fiberboard using a pencil and a ruler; the appearance should look approximately the same as in the photo.
All dimensions of the parts, as well as the dimensions of the chair, are indicated in the drawing, which is convenient when creating components. Step two.
We cut out the template from fiberboard using a jigsaw.
When working with power tools, be careful and remember to wear safety glasses and gloves. Step three.
Using the template, we cut out two side parts with the same jigsaw from a sheet of plywood. The parts should be identical to each other. On each of them, we make several grooves on the inside using a hand router with a 16 mm cutter, in order to adjust the height of the seat. After this, according to the previously presented drawing, we cut out the remaining components of the chair, these are the back, two rectangles as a seat and a footrest, as well as two transverse beams for structural strength. Step four.
Each of the parts must be painted in the color you like, but if the child chooses the color of his chair, it will be even better. After the paint has dried, you can move on to the finish line, namely assembling all the parts into one whole. Armed with a screwdriver and a small number of screws, we assemble the chair from ready-made parts; to prevent the seat and legs from rotating, you need to tighten them with two screws. At this point, the homemade “grow out” chair is ready, now you can try it out, and as the child grows, you can unscrew the screws and move the seat to the desired, and most importantly, comfortable level.
Thank you all for your attention and more useful ideas for homemade crafts. Growing chair, a very practical piece of furniture in families with a small child
Such a seat is not only practical, but also very useful from an orthopedic point of view; its tilt does not allow the sitter to take an incorrect position, which will cause the spine to develop correctly
A growing chair is a very practical piece of furniture for families with a small child. Such a seat is not only practical, but also very useful from an orthopedic point of view; its tilt does not allow the sitter to take an incorrect position, which will cause the spine to develop correctly.
In addition, making such a chair yourself will not be difficult; you will need a minimum of materials, tools, and skills. Let's look at the diagram and list of things needed for such work.
Mounting method
Moving crossbars, seats and footrests have different fastening methods. All these elements are quite durable and can withstand the weight stated by the manufacturer.
When choosing between different mounting methods, pay attention:
- the ability to adjust the depth of the seat and footrest;
- height change step;
- convenient design and absence of side clutter;
- number of jumpers.
Does the mounting method allow you to adjust the depth of the seat and footrest? This is a very important parameter that determines whether the chair can be adjusted for a child to suit his height. A curved orthopedic back is of no use if the baby cannot reach it. On the contrary, a straight back can work well if you lean on it comfortably.
The knots should not be bulky, as this makes it difficult to adjust the height and depth. Also, there is no need for clutter at the bottom of the chair, as in the photo below. Because of them, not every baby will be able to climb onto the seat on his own.
How frequent are the height changes in the method of attaching the seat and footrest? The more frequent (smaller) the step, the more accurately you can adjust the chair according to your height. For children in the first three years of life and for preschoolers, 5 cm is a big difference. As a rule, adjusting with grooves gives a smaller step - and the smaller it is, the better.
Growing stool with infrequent steps
With frequent (small) steps
If the method of attaching the seat and footrest differs from what was originally intended (for example, from Tripp Trapp), then how does this affect the design and its convenience for the child? The Tripp Trapp features two L-shaped sidewalls. They look unusual compared to classic four-legged chairs and may even seem unreliable. But it is more convenient to climb onto such a chair than into one whose sides are covered with various handles and piles. And it’s more comfortable to sit at the table on it. Therefore, from a design point of view, it is better than a regular one.
Any high growing chair has a drawback: the child cannot move it himself after he has climbed onto it, and it is impossible to climb into one that is completely pushed up to the table. But the more we pile up on the side, the more difficult it will be to move the chair close to the table and climb it near the table to sit down. This means there should be no clutter on the side.
On this model we see piles on the side; they will prevent the child from climbing onto the chair pulled up to the table. The design is generally inconvenient.
Are there enough jumpers connecting the sides? Not all growing chairs have the same number of crosspieces. More bars mean a more stable structure and more screws need to be loosened to move the seat and footrest.
The number of jumpers can also influence how much you want to get stuck in the chair. But here the attractiveness is subjective: some will be interested in a large number of slats and plates with small distances between them, while others will like the large space between the sparse crossbars. In any case, it makes sense to let your child get acquainted with the new chair and find out the safety boundaries under your supervision.
Kids love to climb just for fun, and there is absolutely no point in depriving them of an additional opportunity to move. However, you will notice unsafe use cases and strongly advise against them.
