December 16, 2020
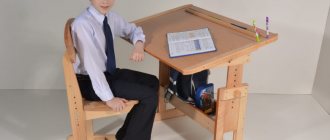
Doctors warn about the early formation of posture and the need to provide your baby with a good transforming chair from a very young age. This design, unlike other models, performs an orthopedic function and allows you to keep the child’s back in the desired position.
Many responsible parents think about the need for a “smart” chair with adjustments. When studying the market, some begin to doubt whether it is worth spending money. But high-quality certified products cannot be too cheap. Fathers with carpentry skills set a goal to make a chair themselves and are looking for information on how to assemble a growing chair at home.
In the process of work, as our personal experience of communicating with parents shows, common annoying mistakes are made, which is why the growing plywood chair does not turn out to be of high quality. Moreover, such a handicraft product often leads to incorrect posture and scoliosis. In order not to harm the health of children, you should carefully study all available information and try to make a growing chair (the drawing is created in advance) at home.
Step-by-step assembly instructions
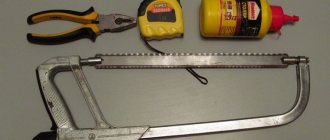
Having prepared the pattern, materials and tools, you can safely begin to work.
Remember - work does not tolerate haste and fuss. An experienced craftsman knows that it is necessary to measure several times, weigh everything and only then cut. Stages of work.
We apply the pattern made according to the drawing to the plywood and cut out the first part of the side legs. It is necessary to make the workpiece with a small margin of a few millimeters. This reserve will prevent mistakes when cutting. Using a copy cutter, we bring the workpiece to the ideal size. We cut out three more legs with a margin. Stack all four legs. Using the first perfect piece, we grind the remaining three legs. This approach will save time on grinding. Glue two pieces together and let them dry. Using a router we make grooves on the inside of the legs. The groove dimensions should be 10 mm deep and 24 mm wide. This groove plays a key role in further adjustment of the positions of all elements. Exactly in the middle of the groove it is necessary to make through holes in which the seat and footrest will be secured. Holes must be made at equal distances from each other.
It is important to place a block under the leg when drilling to avoid chipping and deformation on the outside. We are preparing the runners. The slider allows you to fix the seat or footrest in the desired position
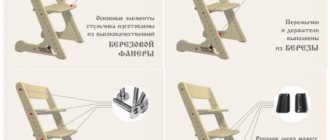
You will need 4 of them - two on each side. The sliders must correspond to the size of the foot and not look beyond it - height 20 mm and width 24 mm. All corners and edges of the runner are rounded, and a groove is made in the center. The gutter is intended for further gluing into it the slats, which will be inserted into the groove of the leg. The rail should be made based on the width of the groove into which it will be inserted on one side and the groove on the other side. The slider and the rail are glued together and dried. A hole is made in the slider for a bolt that will secure the selected position. Next, the back and footrest are cut out. The dimensions of the seat for a child are chosen independently and depend on his age and the calculated reserve. The shape of the parts can also be arbitrary - square, semicircular or oval. The next step is to make the back for the chair. The back can have a wide solid surface or be made of several slats of various sizes. Don't forget about the crossbar that secures the legs in their lower part. Finished parts are not assembled using the final method, but rather the baiting method. This will help evaluate the final result and identify flaws that need to be eliminated. If the chair for the child corresponds to the initial plan and drawing, it is necessary to disassemble it and begin final processing using sandpaper. We clean the surfaces, preparing them for painting. The paint color is chosen independently. Some craftsmen prefer to prime and then varnish, thereby emphasizing the existing wood pattern. Plywood, however, is best painted because it does not have a uniform appearance. The dried parts are assembled into a structure and are ready for use.
The seats, footrest and backrest can be made of 22 or 16 mm plywood.
These parts can be mounted using bolts and subsequently removed from the chair.
For studying at the school table, armrests are not needed, since the hands are always on the table.
A growing chair for small children can be additionally equipped with armrests and a safety front bar so that the child cannot fall from it. These parts can be mounted using bolts and subsequently removed from the chair. For studying at the school table, armrests are not needed, since the hands are always on the table.
The parts of the child's chair are fastened using hex bolts and furniture countersunk nuts.
Plywood, however, is best painted because it does not have a uniform appearance.
Preparing a product project
Preparation for work begins with creating a drawing of the chair. You can make a product for a child with your own hands only by correctly calculating not only the dimensions, but also the angles of inclination of the parts.
You can easily download a ready-made project on the Internet, or using GOST 19301.2-94, which describes what parameters tables and chairs for children should have, you can make a pattern yourself.
Regardless of the source of the drawing, the pattern should only be made in full size. A preliminary pattern of all elements is made on paper or thick cardboard. It is important to consider that some elements of a chair for a child should be right and left, that is, “mirror” each other.
It is also possible to make a chair from solid wood, but it will be very bulky and heavy, which is inconvenient for the child.
The shape of the parts can also be arbitrary - square, semicircular or oval.
A growing chair for small children can be additionally equipped with armrests and a safety front bar so that the child cannot fall from it.
Benefits of growing chairs
A chair that grows with the child has an impressive list of advantages:
- Versatility - products are suitable for children 6-18 years old. Some models are also designed for a younger age group (from 2.5 years), and by installing special restraints, the chair can be used for very young children (from 6 months). There is no upper age limit, so the growing chair is suitable even for adults.
- Multifunctionality - the chair can be used both behind and behind, as well as for creative activities.
- Provides correct posture and reduces stress on the spine due to the ability to adjust the position of the seat and backrest.
- The child does not get tired while sitting at the table, since the correct position of the body is ensured. As a result, the child’s interest in reading, drawing, homework, etc. increases significantly.
On such a chair, the child feels independent, since he can easily and without assistance get on and off it.
- The lifespan of a growing chair is practically unlimited, so when the baby grows up, this item can easily move from onto or even behind the bar counter
- The chair is very stable due to the large support area, and the design itself is designed for a load of up to 100 kg, so it is very difficult to break it.
- Safety during operation. Most models of growing chairs have a special Teflon coating on the legs, which helps the base slide gently across the floor without the child tipping over or falling.
Among other things, a growing chair for a child can be made even more comfortable by equipping it with restrictive straps, pockets for toys or small items, and a table top for feeding. These accessories are offered by the same manufacturers, so it’s easy to choose the right ones.
Both ordinary citizens who have already tried this item and orthopedic doctors strongly recommend buying a growing chair for a child, the reviews speak for themselves
But it is important to choose the right model of such a chair so that it best meets expectations and fully meets the baby’s needs.
First of all, you should pay attention to the material from which the chair is made:
, as a rule, have two seats at once - an upper and a lower one, which is used as a footrest. Both levels are easy to move in height over a fairly large range, which makes it possible to use the chair by children from 1.5 to 16 years and older.
Plastic looks impressive, weighs less, but will not last as long. The most durable options are those with a wooden frame and plastic seats.
The next thing you need to pay attention to is the age of the child. Some models, in particular those made of wood, can be used even by adults, while less durable plastic ones are more suitable for children of a younger age group
The same applies to design: bright chairs with plastic inserts are better suited for children, and for universal options “for growth” it is better to choose a model made of neutral-colored wood.
Ease of use and transformation of the chair plays an important role. In particular, some models allow you to change the position of the seat using a system of grooves on the frame, while others use a more durable bolt-on mounting.
The stronger the fastener, the longer the product itself will last, and its operation will be safer.
Wooden baby high chair
You will have to spend more time and money on a wooden high chair for feeding your baby. In order to make such a piece of furniture with your own hands, you will need:
- bars with a cross section of 400*200 mm
- board (thickness 20 mm)
- fibreboard measuring 2000*2100 mm.
- drawing of a high chair
For the chair you will need: 4 legs, 2 upper crossbars and 2 lower ones, 3 crossbars, a table top. For the table: legs, slats, crossbars 4 pieces each, table top
We cut out the parts for the chair from the bars and sand them with sandpaper. We cut out the elements for the chair arms from the board. We connect using dowels and glue. Holes with a depth of 30 mm will be needed for the dowels.
For the side, you will need crossbars, 2 curves, 2 legs. Lubricate the dowels and holes with glue. First, assemble the bottom crossbar and legs (the angle should be 90 degrees). Then we assemble the top crossbar and two curves. We tighten everything with a clamp. Leave for one day. The second side is folded in the same way. Make sure they are the same.
Now another important stage - assembling the seat and backrest. Be careful here, as children are very restless during feeding, so all parts must be firmly fixed. You need 6 parts from a plate measuring 300*250 mm. Round the corners so that the radius is 50 mm. Next you need to start sanding the ends. Lubricate the parts with glue and press. You can connect the back and seat with screws. We glue the crossbars to the sidewalls. Then you need to connect the legs with all the planks, attach the sides with crossbars and fix the tabletop at one end. We get a ready-made baby high chair.
Video gallery
__________________________________________________
Many modern parents are trying to make a baby high chair with their own hands. Made at home, it will meet all high requirements and completely eliminate allergens and components harmful to the child. In addition, if you take into account the high cost of furniture for a child, this will be a good way to save money.
A person who knows how to work with wood can easily make a good, and most importantly safe, transformable chair with his own hands. Before assembling a high chair, you should carefully select the materials for it.
Experts advise using softwood such as spruce or pine. They should be chosen because they are easy to process, last a long time and are relatively inexpensive. Still, professional carpenters are accustomed to assembling children's furniture from linden. It costs a little more, but will last much longer.
Since a children's highchair is being made, it is imperative to rid it of splinters and irregularities. You can use sandpaper for this, but the work will go faster using a sanding machine. Comfort and safety are important for a child, so these points are the main ones in this work.
Prepare all the necessary tools in advance: nails, bolts, nuts, hinges, and finally take care of painting the finished product. The mobile high chair should be painted with acrylic paint. It is less toxic, just like acrylic-based varnishes. The child will not only breathe harmful fumes every day, but also taste them, so parents should take care of his safety.
DIY children's table: measurements and drawings, step-by-step assembly
How to make a children's table with your own hands
There are many types of children's tables. You can make a desk at which the child can study. Or you can make a folding table for lunch. Creating a table consists of several stages:
- Choosing the design we need. It depends on the usage.
- Selection of necessary materials.
- Creating a project plan.
- Assembly of the structure.
- Scenery.
Tools and materials
To create a children's table you need only natural materials. Most often, wood is suitable for this. You can make a table from:
- Regular wood.
- Chipboard.
- MDF.
- Plywood. The best option, but the most expensive.
If your parents have experience in construction, you can make a table from plastic or metal. But it will take longer (the materials are more difficult to process).
Such furniture can even be made from cardboard. But the design will not be durable, and is not suitable if the child is playing around at the table.
To create a table with your own hands, you also need the following tools:
- Jigsaw.
- Screws.
- Construction adhesive or liquid nails.
- Pencil for marking.
- Roulette.
We also need tools for decoration:
- Primer or varnish.
- Dye.
- Tassels.
- Glue.
- A set of pictures.
Choosing a table design
Before creating a design, you need to understand which model is needed. It depends on the usage. There are 4 design options:
- Small desk. Suitable if the child spends a lot of time drawing, or practicing reading and writing.
- Folding tables. They are appropriate if there is little space in the room and the table needs to be removed as it interferes with active games. Children usually have lunch at such tables. The table can be removed as soon as the child has eaten, and it will no longer be needed.
- Folding table. The same. Suitable if there is little space in the house, or as a place for lunch.
- Growing table. This design has a tabletop that can be lifted. Ideal if the child is growing quickly. The design is suitable for children of any age and will last until school.
How to take measurements and drawings
The height of such furniture depends on the age of the child. For example:
- For a child aged 1-2 years, a table with a height of 40 cm is suitable.
- For children 3-4 years old – 45 cm.
- For children 5-6 years old – 50 cm.
It is also necessary to pay attention to the child’s growth. If he is growing faster than other children, he may need a 50cm structure by age 3
The height depends on the child's height. For example, if you are 80 cm tall, a table of about 35 cm is suitable, and if you are 130 cm tall, you need a table almost twice as large.
Do-it-yourself children's table: step-by-step instructions
You can start creating the design:
- The furniture board needs to be turned over, retreated from the edge by 5 cm, and an even strip drawn around the perimeter.
- Take a long wooden block. Let's cut it. We should have 4 elements (2 x 70 cm, and 2 x 30 cm).
- Using self-tapping screws, we secure the bars to the furniture board. We do this according to the strip made in the first step.
- To avoid cracks, the joints must be covered with PVA glue.
- We have a frame. You need to secure the metal corners in it.
- We mount the table legs to the metal corners.
- We process the product with sandpaper.
- Cover the table with primer (to protect it from moisture).
- The table is ready. Now we need to make the decorations. Here you should take into account the wishes of the child. The table can be painted with any type of paint, and beautiful patterns can be applied with it.
Decoration
Particular care should be taken to remove decorations. This is a table for children, which means it should look appropriate
It is better to do this work together with the child, he will give interesting ideas. The table needs to be painted, and then you can use decoupage or apply stencil patterns.
To decorate your table beautifully, you need to do the following:
- Clean the table surface with sandpaper and coat with primer.
- Paint the countertop with paint. The color should be uniform (white would be ideal). Acrylic paints are better for children.
- We wait until the base is completely dry.
- We take a set of pictures and paste them using PVA glue. You can choose characters from your child’s favorite cartoon as pictures. It is necessary to ensure that no bubbles appear under the pictures, otherwise they will not stick well.
- After the glue has dried, you need to coat the table with varnish.
- We are waiting for everything to dry.
- As a result, we will get a beautiful table depicting cartoon characters or animals. It looks very nice.
Making a table for a child with your own hands is very simple. Most attention should be paid to table decoration
It is also important not to make a mistake with the dimensions, because incorrectly made drawings will lead to the fact that it will be inconvenient for use.
Decoration
Today, much more attention is paid to the interior of a room and the appearance of its contents than twenty years ago. This is not surprising, because original design solutions have come into fashion. A simple chair made of ordinary plywood is definitely not the ultimate dream. It can (should!) be improved with a little decor.
You can use varnish to decorate the chair. A product coated with varnish will already look much more attractive. If you want to add color, you will need a good wood paint. You can choose any color: red, blue, white, brown. It is better to select colors based on the color scheme of the room’s interior. After painting, the product is also varnished.
Applying ornaments is another interesting way to decorate furniture. To do this, you need to use a thin brush and paints of different colors. You can look at drawing ideas from photos on the Internet, or come up with your own. It is better to use waterproof paints.
Fabric can also become a decoration for the product. A soft seat will highlight the interior of the room and make the process of using the chair more comfortable. It will be ideal if you use fabric identical to the fabric of the furniture located in the room to decorate the chair.
It is better for beginners to take on simple designs only.
The most important aspect is the size of the product.
Let's get down to business!
To understand the work ahead, you can look on the Internet for photos of children’s tables made by yourself. It will also help you get inspired and create a custom design! And you will probably want to recreate the same beauty.
Before we begin, we will need drawings of a DIY children's table. It determines the dimensions of the parts - the main thing will be the height of the product.
According to the drawings, the legs of the product are cut out. It is ideal to make them from a block of wood so that they remain level and do not taper. Then the table will be stable.
Then we sand the finished legs. Sandpaper will come in handy. We attach them to the base using end mills.
Let's make the base of a children's table from plywood, made by ourselves. You need to put marks along which the furniture elements will be connected.
We will use the tongue-and-groove connection method. Drill holes in the marks. The dimensions of the holes must match the size of the groove.
We fix the legs in the tripod and drill holes in them for the grooves. You need to make 2 grooves for the legs.
Mark on the frame the places where we will place the spikes
Measure very carefully. It is necessary that the grooves and tenons are opposite each other.
Otherwise, the structure will be unstable. Using a construction knife we will make grooves on the base. Let's place them in the middle.
We measure our entire base. We need to make sure we're doing everything in the right shape. If necessary, we adjust the sizes of the elements.
We make a test build. During this step we need to carefully trace all the connections. We made sure everything was done correctly.
Now let's disassemble the table into details. And we will assemble it completely. We will strengthen the connections with self-tapping screws. This way the product will be assembled more reliably.
Now let's sand it with sandpaper. This is followed by impregnation with protective mixtures and painting with varnish or paint.
To make a rocking chair you will need:
- Canvas with a thickness of 15 millimeters or more for load-bearing structures, such as side supports, racks, etc.
- A sheet of bent plywood 10 mm thick, from which you can easily make any curved part, for example, a backrest strip or other decorative element.
- Graph paper.
- Marker.
- Jigsaw for cutting parts from plywood.
- Sander.
- Wood glue.
- Antiseptic for FC treatment.
- Self-tapping screws.
Tips and nuances
Children's things are very often exposed to various mechanical and other influences, so it would be better to protect the surface and apply several layers of varnish. In extreme cases and when there is an urgent need to protect the surface of the table, you can use epoxy resin, which, when hardened, forms a thick film similar to a glass surface. But this should only be done if the table will be used for drawing or will be frequently subjected to wet cleaning with chemicals.
The heads of nails and screws need to be “hidden”. This can be done in several ways: “plant” them deeply in wood, attach special “caps” made of plastic, or use the same epoxy resin or varnish applied in several layers. These “hats” are made from both plastic and rubber. It was said above that it is better not to upholster the high chair, but if the child has already reached a conscious age, you can make the high chair leather upholstery. The leather covering on the bottom will need to be secured especially well. Its presence will greatly facilitate the care of the chair.
It is not necessary, but it is advisable to purchase two types (coarse and fine) sandpaper for sanding. After processing each of them, you can achieve a flat and smooth surface. The process of making a high chair and a children's table can be exciting not only for an adult, but also for a baby. The main thing in this process is patience and work, which, as you know, will grind everything down.
The process of assembling a high chair
To assemble furniture parts, it is best to use confirmats. Their standard size is 5 x 70 mm. This fastener does not require preliminary preparation and is suitable for fastening parts of any design.
Holes in the plane must be checked with a diameter of 8 mm. As for the ends of the parts, the dimensions of the holes are limited to a diameter of 5 mm and a depth of 50 mm. Often, plugs are placed on confirmations for a more aesthetic appearance of the product. However, some believe that it is better not to do this for children's furniture. Otherwise, a child who manages to remove the cap may swallow it.
To summarize, it should be noted that a self-made children's chair has the following properties:
- environmental friendliness;
- beauty;
- comfort;
- strength;
- sustainability.
And all thanks to your desire to make safe and comfortable furniture for your child that promotes his physical development. The chair can be decorated with children's stickers or drawings.
Purchased furniture for a child’s room, especially made from natural materials, can be quite expensive. In a store or online, you don’t always find exactly the option you like. You can create a children's high chair and table from wood yourself. The work will not be difficult if you prepare all the necessary parts and tools, use your ingenuity and imagination. The reward for the work is a unique product, as comfortable as possible for the baby and practical in home life.
You can create a children's high chair and table from wood yourself.
A DIY chair will cost much less, and one made according to your own sketch will meet the intended parameters and the required degree of comfort for the baby.
The reward for the work is a unique product, as comfortable as possible for the baby and practical in home life.
All natural wood parts can be purchased in specialized departments of construction stores. They will select boards and bars of the required sizes for you.
A DIY chair will cost much less.
A child's high chair, created with one's own hands, is high-quality furniture for a child. In the process of work, you take into account the dimensions of the seat and backrest, which are as comfortable as possible for a growing baby, and check the strength of the structure directly at home.
All natural wood parts can be purchased in specialized departments of construction stores.
A wooden chair you create with your own hands can be decorated to your liking, rather than being satisfied with a ready-made solution for purchased furniture.
They will select boards and bars of the required sizes for you.
Plywood chair
Plywood rocking chair
The long-awaited evening or day off is approaching, when you want to take a break from the hustle and bustle of everyday work, sitting comfortably in your favorite chair. After all, you must agree that one of the important components of a comfortable pastime is comfortable furniture. A rocking chair made of plywood will allow you to quickly relieve tension from your entire body after a busy day at work, relax with a book in your hands, or, rocking almost silently, indulge in pleasant memories of the events of the past day.
And what could be better than independent production of comfortable furniture that would fully meet your individual needs? Some people think that making a chair or armchair from bent plywood is a rather complicated process. Many people don’t even know where or how to start.
In fact, you don’t need to be a professional furniture maker or designer in order to build something special and beautiful. Today in RuNet you can find quite a lot of ideas with photos and videos that will help you choose exactly what you like most and will best fit into the interior of your room. Having figured out with our help what needs to be done and in what order, you will easily cope with this task.
Peculiarities
It is with the help of such a device that the baby develops posture from an early age. Also, the stool will help get rid of the manifestations of various pathologies that can cause complications in the future. Of course, you can also use ordinary chairs if it is not possible to buy a “grow-in” chair, but the child will grow quickly, and therefore ordinary furniture will not always be comfortable for him. This will affect his well-being and character, as well as the mood of the little user.
The transformable chair can be used for both a newborn baby and a teenager. With its help, the child will be able to take the correct position when sitting. In such furniture the baby will be able to sit as comfortably as possible.
The features of these models include their special functions:
- the position of the backrest in the transforming chair is adjustable;
- seat height adjustable;
- the height of the footrest changes, if such is provided for in the design.
Depending on the model of the chair, the backrest and cushions may change in different positions. Usually there are about 10 of them. This makes it possible to position the baby correctly at different ages, depending on the needs. When the child grows up, parents will only need to rearrange the slats to the desired height, having previously adjusted them. Reliable fastenings ensure the safety of a child sitting on such a chair at different heights.
Required materials
To assemble a beautiful chair, the height of the seat of which can be changed depending on the growth of the child, you need to acquire the following materials:
- half sheet of plywood, thickness 22mm. This piece will be needed to make the seat;
- 2 pcs sheets of plywood, 22mm thick;
- plywood sheet 16mm thick. To make backrests as well as footrests;
- paint of any color;
- nuts, bolts, screws;
- roulette;
- pencil;
- brushes;
- milling cutter;
- sandpaper;
- jigsaw;
- wood glue.
Making a high chair: stages of work
Stage one: wood preparation
The beam is sawn
according to specified sizes. Its individual pieces are processed (sanded) with sandpaper, thanks to which all irregularities and scratches are removed from the surface of the wood, so that in the future the child will not drive splinters into the wood.
It is better to connect the bars using wooden dowels
(connecting elements), you can make them yourself by cutting out blocks measuring 10x20x50
, or buy
ready-made
tenons at a furniture hardware store.
Advice!
If you don’t have the time or desire to tinker with dowels, you can simply connect the parts using self-tapping screws.
holes in the bars and boards themselves at the fastening points.
, suitable for the size of the dowels (approximately 30-40 mm
), being careful not to hole the tree all the way through.
Second stage: assembling the sidewalls
The future chair will have two sides
, for each you will need 2 roundings
,
2
upper and lower
strips
and
two legs
.
Each side panel is assembled separately
, first the legs and the lower crossbar are connected, the curves are attached separately to the upper crossbar, after which these two elements
are glued
together.
Before connecting two bars, the joint and dowels are well lubricated
glue, you can even use regular PVA
.
The second sidewall is assembled in the same way, then these parts need to be left for a day
, and then sanded again.
Attention!
During the assembly process, you need to ensure that the angles between the bars are straight and the sidewalls are completely identical.
Third stage: seat connection
Chipboard
cut into6
rectangles
300x250 mm
, each with two adjacent corners rounded along the long side.
To protect
the baby, all edges need to be thoroughly
sanded
, and then glue the plates together in
three
and put them under a press for a day. The result is a solid, durable back and seat.
Finished parts
They are fastened together with a corner or a strip of metal bent lengthwise, and screwed with screws.
Stage four: chair assembly
Sidewalls
They are connected by transverse strips using dowels and secured with glue. In the same way, strips are attached to the structure to support the back and plywood tabletop.
Advice!
It is more convenient to first fold the structure, mark places for the dowels, drill holes and attach the bars without glue - this way you can replace the defects in time and correct them.
Fifth stage: creating a table
Technology
Assembling a table is similar to the process of assembling a chair. First, the upper and lower planks are attached to the legs, then the resulting sidewalls are connected to each other by transverse bars 340 mm
.
Sidewalls are desirable
sand with fine sandpaper to make their surface even, smooth, and safe for use.
The next step is attaching the tabletop
. We screw it on from the end of the structure - and that’s it, a reliable children’s table-chair
ready.
Stage six: making a soft seat
In principle, this is not necessary, but for the child’s comfort it is better to make the seats, and, if desired, the backrest soft
foam rubber onto a sheet of chipboard.
1-2 cm thick
and cover it with non-staining fabric or oilcloth in bright
children's
colors.
On the back of the seat the fabric is easy
fastened using a construction stapler.
Advice!
To save money, foam rubber can be replaced with several layers of padding polyester. Manufacturing
a baby high chair for feeding
at home
, and only on the basis that the work will be carried out only in free time in the evenings.
So, if you wish, you can quickly
, efficiently and inexpensively build a cute chair for your baby.
From this video
You will learn how to make your own baby high chair:
Still don't know how to design a highchair yourself? Our article will help you understand all the intricacies of folding this irreplaceable piece of furniture. You will see that assembling children's high chairs from wood with your own hands is not difficult.
Deciding on design and construction
For a wooden product, you can come up with any option. A highchair is usually made with straight supports and the following forms of the back structure:
- solid square or rectangular;
- wide truncated cone;
- straight through (with jumper bar).
To accurately apply the image you will need a stencil.
For the chosen design solution, the parts are processed in accordance with it.
Creating a product with your own hands requires careful preparation. You must first make a sketch of the project. Visually draw a diagram of the connections of all parts separately with calculations of sections and lengths. Following the sketches, you will recreate the model in reality with exact parameters. A chair that has all the right dimensions will fit the baby and will not create any inconvenience.
For a wooden product, you can come up with any option.
Certain models are created with the expectation that the child will sit at a common table with other family members. In this case, high legs are chosen for the product, which are not attached exactly vertically in relation to the seat and floor, but more widely. The lower part of such a chair will look like a truncated cone, connected for stability by wooden blocks around the perimeter. The top part will be approximately 30-35 cm below the table level.
A children's high chair is usually made with straight supports and the following forms of the back structure
If you have certain skills, you can assemble a folding product. Such items can be easily removed if necessary into storage areas.
For the chosen design solution, the parts are processed in accordance with it.
Older chairs
At the age of about one year, the child will already need a chair on which he can sit down, move it, and rearrange it. Chairs for small children in the age category following babies are play chairs (on the left in the figure below) and work/study chairs, in the center. Working chairs for children differ from play chairs primarily in their armrests; They are necessary for the child to develop correct posture. Then, the seat height of the work chair can be immediately taken based on the oldest preschool age, i.e. up to 400 mm. In this case, you need a step; preferably repositionable. The approximate dimensions of a high chair for babies of the “second stage” are given on the right, but, as mentioned above, they need to be specified according to the child.
Drawings of high chairs for small children
Drawings of chairs for older children are given below. rice. On the left is a game of the simplest design. The legs are the optimal length for a child aged 12-36 months who often plays on the floor. Fasteners – wood screws 40x4.2.
High chair for a child “like an adult’s”
The chair on the right is more complicated; its parts need to be marked on a grid and grooves cut to connect them. But it is universal, playable and working. The small protrusions of the sidewalls above the seat are enough to prevent a normally active child from sitting down with half of his butt hanging in the air. The seat height of 400 mm is the maximum for very young children. It can be made minimal first, approx. 220 mm, and then change the sidewalls as they grow; It will take a little labor and plywood, but mom will have something to say to dad on occasion. So, if dad is prudent, it is better to immediately cut the sidewalls for growth.
This chair is basically easy to assemble, like a puzzle. In the mobile version, say, for trips to the country, you can leave it like that. But with constant use, the chair will soon become loose, no matter how tight the joints were initially. Therefore, it is better for a child of this kind to glue his home chair with PVA. Dismantling, if necessary, put into storage - see above, about glue.
Finally, there is a category of children who, having barely realized themselves in this world, want everything to be like an adult. This is generally a useful quality, but dad will have to work harder on a chair and other furniture for the child. The design and dimensions of a highchair “like an adult’s” are shown in Fig. on right. A wooden chair of this design will require quite complex technological techniques, but even in this case plywood will come to the rescue, see next. chapter.
How to choose?
A growing chair for a child implies use in different cases. This furniture is considered a good addition to the dining table. Children often use these chairs to do homework or do creative work.
In order for a high chair to be truly useful for a child, you need to choose the right model
It is important to start from several significant criteria, starting with the choice of material
photos
The raw materials for the production of this furniture are varied.
In addition to wood, which is recognized as the best choice, plastic products are also relevant. However, if brands consider such structures to be strong enough, practice shows the opposite.
Plastic is a modern material, it looks beautiful in the interior, but the maximum where it can be used is in additional elements of the high chair. More often this is support for the design, which is found in models for the smallest (from 6 months).
In addition to the material, it is important to take into account the age of the child and the features of the device. Manufacturers offer customers models designed for children of all ages, including school age
The stores offer a wide range of growing chairs for first graders.
Compared to varieties for small children, these options have more extensive functional features.
Designs based on two seats are in demand. One of these elements can be used instead of a footrest. The main advantage of these wooden models is their high functionality, since the seats can easily be adjusted to the child’s height.
There are different elements used to secure the seat. Most often, sawn grooves or bolts are used for these purposes.
It is important to make your choice in a trusted store with a good reputation from real customers. This will allow you to purchase a quality product that will last for many years.
An important factor is convenience: if the child is uncomfortable, the product will cause negative emotions
It is important to choose a model in such a way that this chair is the favorite piece of furniture in the nursery.
What to look for when choosing a growing highchair for a child
The durability of adjustable children's furniture is an important criterion that parents focus on. In order for such an item to please the child for a long time, when purchasing it is worth considering:
- User age;
- Material of manufacture;
- Adjustment method;
- Design features;
- Weight;
- Model stability;
- Strength of fastenings;
- Coating safety;
- Manufacturer;
- Smooth surface;
- Price.
The material for children's furniture is predominantly safe, environmentally friendly raw materials. They use natural wood, metal or high-quality plastic.
Warm, durable, comfortable, non-slip wooden growing chairs occupy the “palm” here. These structures can easily support the weight of an adult child. Wood products fit perfectly into any interior.
Plastic is lightweight, affordable, and easy to transport, but is inferior to wood in strength and durability. Plastic material is subject to mechanical damage and is also incompatible with classic and luxury interiors.
Iron structures will last for several generations, but they are not as convenient as wooden ones. The design of such furniture is often a real work of art. The disadvantage of metal products is their high cost and the risk of damage to the floor covering.
The varnish coating makes the product safe for use by children. It is better to give preference to water-based varnishes and paints.
Growing chairs are equipped with different mechanisms for changing the seat height. They can be used as grooves in the side posts, fastenings on furniture bolts. Most adjustable children's furniture has the first mounting option, but this solution does not provide durability. The grooves deteriorate over time, making the product unsuitable for further use. Furniture bolts are a more durable option, but they significantly increase the cost of growing chairs.
It is best to purchase a growing chair with a child. This will allow you to choose the best option that the baby will like and will suit the parents in all respects.
Design Features
The chair consists of a double-sided frame, footrest, seat and double backrest. The product is also equipped with a wooden jumper, which is installed in areas where the maximum load is observed. This detail helps strengthen the frame.
Stages of making chair seats with your own hands, methods of fastening
Bolts and screws are used as fastenings. There are grooves in the side posts of the structure, with their help it is possible to adjust the height and position of the backrest. It is enough just to place the elements where necessary and tighten them with screws. To adjust, you need to loosen the tie a little. The weight of the structure is 7 kg, due to this the product is stable.
The kit includes additional accessories to improve ease of use. For example, for children under 2 years old a table measuring 20 x 40 cm and a seat belt are provided. The chair can be equipped with hanging pockets for storing toys and things, as well as soft pads on the back and seat.
Review of Ikea ladder stool varieties, product functionality
7 footrest positions and 4 seat positions
Hinged pocket for storing toys
Soft pads on the back and seat
High chair design