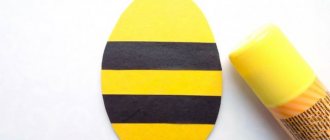
The composition “Cornucopia” in its various manifestations - with flowers, New Year's, men's or simply with coins, can be divided into two types: the base, that is, the horn, ready-made (woven, you can buy it in a florist shop) or handmade. We will have a second one. It's not simpler, but it's clearer. After all, many variants can then be made using the same scheme. We will need:
- Expanded polystyrene (ceiling tiles)
- Soft cardboard (wallpaper, thick paper), masking tape, plain wide and narrow tape, wire
- Glue “master” (“titanium”), heat gun, construction foam (in a tube)
- Floral paper in several colors - for the base and flowers, artificial greenery
- Round candies for roses, chocolate coins, “esferro”
- Money from the “joke bank”, decorative cord, beads
Let's start by making the horn itself. Its inner part is a paper cone. It is better to take an ordinary leaf, because the horn is supposed to have a tail bend. We make a cone and secure the edge with masking tape.
Then we insert a “tail tail” type wire and secure it with tape. We stuff crumpled newspaper inside to the middle of the cone. We insert a thick cardboard ring along the socket to strengthen it. But you can do without it if the paper thickness allows it. Blow some construction foam inside. It will be the basis of our composition, therefore we need at least 10 centimeters of foam deep into the cone. The outer side of the cone must be reinforced with wire equal in length to the cone. Apply and secure with masking tape. 3-4 such guides are required. They will allow us to bend the paper blank the way we want it.
We cut off the excess foam with a knife. We get an even cut. We don’t throw away the “cake” of foam, we will need it later.
We begin to bend the cone itself, giving it the shape of a horn. To increase the volume, you can wrap the cone with paper, non-woven material (it goes on the back wall of upholstered furniture) or film - if desired.
Then we insert a couple of pieces of wire into the foam and glue - in the finished work the horn will be at an angle, and gifts will fall out of it. At the final stage of making the horn, the entire structure must be secured again with masking tape.
To decorate the horn we will use polysilk. This floral material is very strong, you can pull it without fear of tearing it.
We measure the required piece, cut it out, and carefully wrap it around the horn. Secure with thin tape. The finished horn looks like this
For decoration we use twisted cord. Let's start with the tail. We fix the end of the cord with a drop of hot glue, then, along the way, in some other places.
We finish the work in that part of the horn that will be adjacent to the base.
Our cornucopia will rest on a round base. We cut it out of polystyrene plates.
We glue several pieces using “master” glue. Height is optional. But there is no need to make it very thin - it will be disproportionate to the large structure of the horn.
We measure out two circles from brown floral corrugated paper, 2 centimeters larger than the diameter of the polystyrene cylinder. We cut in a circle, apply “master” glue and glue it on the sides one by one.
We trim the side with a strip of the same paper. Cut it out to a length equal to the circumference of the base. Gently stretch the edges with your hands to get a wave or corrugation.
Glue it to the side. That's it, the base is ready.
We decorate it with a ribbon of the same polysilic: we wrap it around the base and attach it to a drop of hot-melt adhesive in several places. Add beads. But all this is optional.
Now we strengthen the horn on the base. We stick the pieces of wire pre-glued into the horn onto the glue into the base. We rest the horn on a stand and leave it to dry.
Now we return the “cake” of foam to its place. We need it in order to receive the correct cascade of gifts falling from the cornucopia. If they come out with an even cut, additional manipulations will be required to form a cascade. The photo shows how the halves of the foam “cake” return to their place.
For gifts from the cornucopia we use “esferro”, “crucho” candies and chocolate medals.
We reinforce the wish for wealth with paper bills from the “joke bank.” We fold the pieces of paper and secure them with tape. We will “scatter” such twists along the flower cascade.
We have already learned how to make roses. How are they
When you don’t know what to give, you almost always use the standard ones: money, a set of sweets and/or alcohol. Why not pack even these banal gifts so that they look chic and individual? You can make many interesting installations from chocolates: a guitar, a cake, a horseshoe, a ship and many others. Some of them have a narrow focus, like a guitar, while others, on the contrary, will suit anyone, at the same time it will be clear that the gift was made with soul for a specific person. The cornucopia will show your care and love, and will also become a beautiful and useful souvenir-amulet that is easy to make with your own hands. Choose MK to your taste with step-by-step instructions and photos.
DIY cornucopia made from candies
- Cut out a circle from polystyrene foam or other suitable material. Insert any suitable twigs or wire into it. At the same time, the more often and closer together you stick them, the more rounded the horn will be.
- The ends of the rods on both sides must be secured with masking tape. Well, or ordinary, but painting is better.
- You can use the same masking tape to cover the entire frame. Or take some other paper - napkins or toilet paper work well.
- Once the glue is dry, paint. Brown and copper acrylic paints are ideal. But you can choose gold or silver colors. Wrap a metallic or gold-colored nylon cord around it and secure it in some places; this can be done with glue or double-sided tape.
- This particular option also requires a stand. In our case, it is not homemade. Fill the horn with beautiful candies, coins and bills.
Master class on a cornucopia made from newspaper tubes
Despite the similarity in operating principles, some things are still done differently. Read more about these changes:
- We twist 7 pieces of tubes using a knitting needle and PVA. It is better to use white A4 paper, although newspapers are also suitable. We connect six of them at one end with glue, from the seventh we make a circle so that the glue sets, we press each of the 6 tubes to the 7th with a clothespin.
- Bend the ends inward. Glue it together.
- As in the previous MK, cover the frame with paper. Cut the corner of a newspaper sheet into a semicircle.
- Take souvenir or printed money and glue as many of them as you need, based on the newspaper clipping.
- Twist the glued bills and insert the resulting bag inside the horn blank:
- Bend the excess protruding corners outward, generously lubricating everything with glue.
- Wrap the horn with corrugated gold paper. Here you can make a stand with your own hands from polystyrene foam or penoplex. Your task is to cut out pieces of the desired shape and connect them to each other with toothpicks, and then wrap them in gold paper.
- Wrap the horn with cord or ribbon. At the junction of the horn and the stand, glue some decor so that the cuts are not very noticeable.
- Wrap a stand made of a sheet of cardboard or a plastic board (it can be used from a modeling board - it’s cheap and just the right size and shape) with openwork fabric or mesh of a suitable color, and secure from the inside with tape (painting tape). Fill the cornucopia with various things that represent profit and wealth.
DIY cornucopia made from salt dough or polymer clay
Of course, such a product will not be as beautiful and voluminous as the previous options. But you can use it to make a wall panel or a painting!
- If you make a horn from dough, then its proportions are as follows: flour, salt and water in a ratio of 1:1:0.5. Add PVA to this mixture - about a third of the total volume. Salt needs to be fine and without iodine. After kneading, refrigerate for a couple of hours. The dough should not stick to your hands.
- The horn will be “braided”, so we create the “braided” look step by step:
- We roll the workpiece into a horn shape and flatten it onto the work surface.
- We fill the horn with “gifts of nature” - fruits and berries are most appropriate. Roll the balls and then carefully shape them into the desired shape with your fingers. Make all cracks and recesses with a toothpick or plasticine stack. You can make a filling from flowers. Lay out the filler in layers. That is, there will be several rows.
- For beauty, make leaves that will be placed on top of the fruits/flowers.
- Dry the workpiece in the oven - with the door open, at the lowest temperatures - no more than 60 degrees. Without an oven you will have to wait a week for drying. Not less!
- Paint the dry workpiece with a mixture of black and brown paints, leave for five minutes and wipe with a dry cloth. Wash only from the convex parts - let anything that gets into the recesses remain.
- Color according to the fruits/berries/flowers you made. The horn will look more organic if it turns brown.
- After complete drying (which takes a couple of days), coat with acrylic varnish. If you attach a strong rope, you can hang it on a nail, for example, in the kitchen.
Such different, but incredibly attractive souvenirs will become a chic decoration for your home or office (the cornucopia, after all, must bring money) and an excellent gift for anyone - from dad to boss! Watch the video from MK, they always help you understand the details.
How often today, in congratulations, people wish each other that a “horn of plenty” would shower them with good luck, happiness, health, well-being and material wealth. They even present a symbolic horn filled with coins, fruits, and hearts. And some put models of houses, cars and other attributes of prosperity into the bell of the horn.
Sometimes a person himself has no idea what is hidden under his words. After all, in order to understand what the symbol depicting a cornucopia means, you should look into mythology.
The Legend of the Goat
An interesting answer to the question of what the “cornucopia” symbol means is given to modern people by legends. In Ancient Greece, it was believed that this attribute of wealth and fertility was created by the god Zeus. There was a myth that the goat Amalthea, thanks to whose milk a baby named Zeus found himself in a cave on the island of Crete, managed to survive and turn into a god, lost one horn. The goat's name means "giver of wealth."
Zeus, in gratitude, so the myth says, made this horn a symbol of wealth in memory of his nurse. Abundance is an endless stream of bliss and prosperity. The cornucopia promises to receive not only material benefits, but also spiritual ones.
In antiquity, there were coins that depicted this symbol of well-being and prosperity of the state. Thus, the picture of the distribution of wealth by Fortune was immortalized - this is how the ancient Greek myth was put into the plot of coinage.
Many people also know the picture in which Fortuna (Tiha), holding a cornucopia in her hands, distributes divine benefits to people. The myth of the appearance of this symbol on earth is often the subject of many works of art.
Legend of the Bull
According to this version, during a battle with a bull-shaped river god named Ahelous, Hercules twisted one of the monster’s horns. Further, the myth tells that the winner showed generosity and returned the spoils to Aheloy. He also did not remain in debt and gave the world a cornucopia. More than one painting, painted by great and anonymous ancient artists, had the plot of this beautiful legend. The Horn of Plenty in the Middle Ages was renamed the Holy Grail.
Associations associated with the symbol of prosperity and happiness
Sometimes this symbol of wealth, luck and longevity and its origins are associated with Hades. Hades is the kingdom of the dead. But at the same time, it is considered the place of the original origin of life. The cornucopia, a symbol whose origin is associated with the emergence of untold wealth from nothing, is one of the confirmations of this statement.
In some cases, the meaning of the expression “May Fortune throw down a cornucopia over you!” associated with the phallus. This means that the wish carries not only material wealth, but also love, the happiness of fatherhood and motherhood.
In the theory of the cornucopia there is a variant of its association with femininity. According to this version, supposedly, being hollow, it symbolizes receptivity and the ability to reproduce, to increase what falls into it.
Decorating the work
Next, take the finished dough out of the oven and leave it to cool for 10-15 minutes. Then carefully remove it from the mold, carefully unbending the structure. Keep in mind that the dough is still susceptible to breakage. Therefore, it is better to leave it until it cools completely, putting it back into the mold. And then comes the fun part of the procedure.
Wash pre-prepared fruits, nuts or candy. The cornucopia, the meaning of which boils down to the idea of fertility and wealth, must be beautifully and originally decorated. Place it on a large plate, pre-decorated with bright colors. Add various fruits inside: grapes, apples, tangerines. Use nuts for decoration: walnuts, almonds. Create a fun arrangement by adding pretty leaves or sprigs of greenery. Sprinkle the nuts on the empty parts of the plate. Your product should look rich and original. Thus, absolutely all components of the horn will be very tasty.
A symbol of wealth and prosperity - with your own hands
If desired, you can make a symbol of good luck, an amulet and a gift yourself. Since the horn of plenty symbol has the meaning of an attribute that gives endless gifts, its main element is the filling of the horn. Therefore, you can use it as a “wrapper” for the main gift: money, gold jewelry, sweets and other useful and pleasant gifts.
The theory behind the action of the symbol depicting a cornucopia is that divine providence gives the owner of this attribute exactly what he needs: for some, health, for others, success, for others, love, and for others, material wealth.
The theory also says that even those who simply look at the image of this symbol will be granted help from above and protection from troubles.
Another idea in the video:
The cornucopia is a source of abundance and wealth in ancient Greek mythology. You can make a cornucopia with your own hands in any way - decorative (in the form of a painting or souvenir), edible (baked goods) - it will decorate any table, sweet (made from candies). Whatever it is, it will still be beautiful and original.
Floral option
You can make a cornucopia of flowers, which will make an excellent interior decoration or an exquisite gift. The photo will give you ideas.
From salt dough
Dough modeling, also called testoplasty, bioceramics is a type of creativity that has been known for a long time. This exciting activity does not require large sums of money or special skills. The modeling process will be equally interesting for both children and adults. The incredibly soft, pliable and absolutely safe material makes beautiful products.
How to knead the dough
There are many recipes for salt dough. In any of them, the main ingredients are salt, water and flour.
- 1 cup finely ground salt;
- 1 cup flour;
- 5 tbsp. l. vegetable oil;
- water.
Thoroughly stir the dry ingredients in a deep container, pour in the oil and a little water. To make the dough a certain color, carefully stir in juice (for example, carrot or beetroot) or add paint of the desired color.
- 1.5 tbsp. flour;
- 1 tbsp. salt;
- 125 ml water.
You also need to add 1 tablespoon of PVA glue or wallpaper glue (2 tablespoons), diluted in water (100-150 g).
All ingredients need to be mixed and kneaded into a dough. Knead it well until smooth. The dough should be soft and pliable. If you need to get the dough of a specific color, you need to roll it into a ball shape, make a hole in it, drop paint of the chosen color into it, and knead it very well. You can make the dough in several colors. Then the finished mass is divided into several koloboks. And they add their own color to each one.
We weave a “basket”
Now comes the most difficult moment. We begin to construct our cornucopia. Take one strip and start wrapping it around the sharpest edge of the foil horn. Next, take another strip, wrap it around the horn, and place the ends on top of each other in the form of the letter “V”. Add the next strip. Do the same procedure with her. Only now you have to thread the ends under the previous strips in a checkerboard pattern. Lift the dough carefully so as not to ruin the entire product. Continue adding new strips, forming a “basket”. Don't worry if the tip breaks somewhere. It can always be covered with a new strip.
Of course, in the end it will be very difficult, because you will need to pass several strips under each other at once. So here you will have to be patient. It's okay if there are small gaps between the stripes. Keep in mind that the dough will still rise and all the “voids” will be filled. Decorate the entire side of the foil in this way. At the very end, trim off the remaining ends of the strips. Twist three long ropes of dough and braid them. Wrap it around the wide side of the horn, pressing the dough a little with your fingers. Use a little water to press the braid onto the base of the piece.
Tools and accessories
You will need:
- a small rolling pin or bottle of water (you can’t live without it!);
- modeling board;
- plasticine stack;
- ballpoint pen refill (for creating holes and patterns);
- brush;
- container with water;
- shaped molds for plasticine
- buttons, beads, rings, lace, etc. for making impressions;
- paints.
It is very important to dry the craft properly. The two most popular drying methods are:
- Drying in a slightly open oven. The oven is preheated to 55-80 degrees. Dry the product for about an hour.
- Dry outdoors (out of direct sunlight). It lasts longer (3-4 days depending on the size of the product).
It is important to pay attention: you cannot dry the figurine on the radiator, it may crack.
You can paint the product with gouache, watercolor, or acrylic paints. For decoration, beads, rhinestones, buttons, etc. are used. You can coat the craft with varnish. This way the beautiful appearance will last longer.
The master class will tell you how to make a cornucopia out of salt dough.
To ensure that the product retains its convex shape, foil rolled into the shape of a horn is placed under the wicker base.
We make fruit. You can also put foil balls inside large fruits.
The resulting horn is then dried and painted.
Baking the form
Now we can begin the most important part of our procedure - baking. To do this, beat the egg in a bowl with a fork. Then brush the surface of the product with a brush so that the cornucopia becomes ruddy and shiny. Place it in the oven preheated to 200 degrees. You need to bake for about 20 minutes until the horn is covered with a beautiful golden brown crust. Of course, depending on the capabilities of your oven, the cooking time may be longer or shorter, so check your masterpiece every five minutes to make sure it doesn't burn.
The most delicious horn
Such a cornucopia can be filled with any goodies (cookies, candies) and placed on the holiday table. You can also give it to dear people as a wish for happiness and abundance.
Ingredients: 2.5 cups flour, 1 cup kefir, 3 tbsp. vegetable oil, 1 tsp. yeast, 5 tbsp. sugar, 2 tbsp. cocoa powder, 1/3 tsp. salt, 1 egg yolk.
Mix yeast, 2 tsp. sugar and warm kefir, leave for 15-20 minutes.
Pour flour, sugar, salt into a large container, pour in vegetable oil, add the risen dough and knead the dough. Grease with oil, place in a container and cover. It will take 1 hour to rise.
A frame is made from foil that will give the dough its shape. The frame is also filled with foil from the inside.
Divide the risen dough into 2 parts. Add cocoa to one of them and knead. Then roll out the dough on the table, cut into 3-4 cm strips. Cut the second part as well.
Grease the foil frame with vegetable oil and place on a baking sheet. Strips of dough are placed on it to form a cone. The strips below the horn are connected to each other. Brush the horn with yolk and place in a hot oven (180 degrees). Bake for 40-50 minutes until golden brown. When ready, cool, remove the foil and fill with filling to your taste.
You can try.
Ingredients
You can make this dessert very quickly using regular dough, which is sold in any store in the confectionery department. You can use the bread base or for baking pies. If you have a bread machine, knead quick yeast dough. If you prefer to cook only at home and on your own, you will have to work a little.
For the sweet dough you will need 250 grams of flour, 100 ml of low-fat milk, 100 g of butter, a pack of dry yeast, 2 tablespoons of sugar and two eggs. To make the product beautiful, add a little turmeric. Leave another egg for brushing the finished product. Prepare also vegetable oil to grease the pan. You will also need baking foil and various fruits or nuts for decoration. Use grapes, apples, tangerines and walnuts. You can make a horn with candies and pistachios. It all depends on your capabilities and creativity. So let's get to work.