In the household, it is simply necessary to have multifunctional things. They save storage space and money. In addition, they fully perform their functions. One of these products is a step stool. It is useful for many jobs and can serve as a chair. But you don’t have to go shopping to find it. We can make such an innovation with our own hands.
Chair – stepladder with three steps made of wood
Stages of assembling transformer parts with your own hands
Before attaching all the elements, it is advisable to carry out preliminary assembly to make sure that all parts of the product fit perfectly together. Next you need to do the final assembly using wood glue, dowels, screws, screws and dowels. Each type of transformer has its own installation features. Let's take a closer look at them.
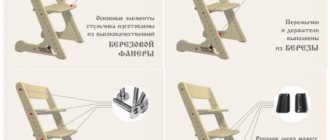
Elements of a classic steppe chair.
The transforming chair is assembled in the following order:
- The finished and carefully polished parts of the back and high sides of the chair are fixed with self-tapping screws.
- The seat and steps are attached to the grooves of the small side walls. The joints are additionally fixed with glue and self-tapping screws.
- The resulting parts of the chair are held together with a piano ring.
Assembly diagram of a transformable chair.
Steps to assemble a step stool with your own hands:
- For greater stability, the ends of the stool legs should be sawn with a slope of 10 degrees.
- Using dowels, you need to connect the middle legs and ends of the drawers. The steps are cut at an angle of 80 degrees.
- The high chair legs are attached to the top drawers with self-tapping screws.
- Secure the drawers to the top step with self-tapping screws.
- Reinforce the middle legs with a dowel and dowel and attach to the front and back sides.
- Using screws, attach the small legs to the crossbar, then to the front side beam and install the step.
Assembly diagram for a stair stool.
DIY transformer scales:
- The side ends of the chair are attached in pairs to the crossbars using self-tapping screws.
- The steps are attached to the stool using a piano ring.
Stages of assembling a stair stool with a screw module:
- Align the inside corners of the middle and bottom steps. Drill 38mm holes in opposite corners. Secure your leg.
- Using self-tapping screws and wood glue, assemble the remaining pieces of the product.
Step-by-step assembly of a stair stool with a screw module.
High step stool
Another design variation
- We cut out blanks for the chair and steps according to the patterns. The design consists of several elements: four legs; two crossbars at the bottom; two crossbars at the top. And also - drawers (connecting strips between the legs): two upper, lower. And also: two plywood overlays located on the sides; top step.
- For the steps you should prepare blanks: four middle legs;
two crossbars; two small legs; three front and one rear tsars; two steps. Dimensions in millimeters
- For a high stepladder in the form of a stool, we cut out and prepare the parts according to the drawing. We carefully sand each of the workpieces until smooth. And in order for the stool to gain stability, its legs will be positioned in a parallel manner and at a slope of 10 degrees.
- We will also make sure that the ends of the plywood overlay and crossbars do not move away. If you chose dowels to fasten the middle legs, drill grooves for them (dowels need to be placed in the holes).
- We cut the end of the drawer at 80 degrees. When cutting out the step from below, we make two cutouts so that it coincides with the legs of smaller dimensions. We connect the large legs with the upper crossbars with screws. We do the same procedure with the drawers and the top step.
- We install the stool with steps in the way they will look when assembled, and screw the structure guide. If no shortcomings are observed, we disassemble the stepladder-stool again, and then reconnect the parts, but using gluing. And when they are noticeable, there will be an opportunity to correct them. We use clamps to compress the workpieces and securely glue them.
In the same way, according to the drawing, you can assemble a ladder chair
Watch the video on the topic:
The benefits of making it yourself
Making a wooden staircase with your own hands gives the master a number of advantages, the main of which are:
- Assembling a chair yourself will cost much less than buying a ready-made one at a furniture store;
- the ability to select exactly the optimal design option for the stated purposes under specific conditions of use;
- saving space by simultaneously combining two functions in one sample;
- satisfaction from a product assembled independently, the operation of which also brings quite tangible benefits.
Note! From many everyday examples, it is known that hand-made furniture is always treated with much more care than purchased samples.
Because of this, they usually last much longer than store-bought items.
Tools and consumables
We will need the following tools:
- hacksaw for metal (optional - circular);
- jigsaw (preferably electric);
- screwdriver;
- grinding wheel and rim for cleaning wood;
- hammer;
- Bulgarian;
- self-tapping screws;
- brushes and paint (optionally, paint, stain) for final finishing.
Experts recommend using multilayer plywood (at least twelve millimeters thick) as the main material. If the base is thicker, then, undoubtedly, the product will become stronger, but its “weight category” will increase. And we are for a compact and not too bulky design. A small clarification: when you plan to work not only indoors, but also outdoors, you need to choose a moisture-resistant version of the plywood sheet.
You can sit down and relax
Pros and cons of homemade design
It is necessary to highlight the pros and cons of assembling the structure with your own hands.
The advantages are as follows:
- designing a staircase chair at home will be much cheaper than buying it in a store;
- you can save time, because you can’t always find a suitable chair in the store;
- everyone will be happy to make a design for themselves that will be useful;
- common advantages of all models: compactness, ergonomics, versatility, ease of use.
Disadvantages: you need to calculate all the indicators very well, otherwise the step may break.
Types of structures
Different types of products differ mainly in their design, according to which they can have the following designs:
- chair-ladder with steps smoothly rising outward (without backrest);
- modular block in the form of a stool;
- a chair with a ladder, but with a backrest for sitting;
- a high stool equipped with retractable steps.
Additional Information. All types of prefabricated products can also differ in the material from which they are made (they can be metal, plastic or wood).
The main requirement for the models is high structural strength, reliable fastening of individual components and good stability of the platform itself. All samples can be fixed or collapsible depending on how they are stored in non-functional form.
Stationary
A fixed or non-removable ladder is made so that the product does not shrink to a compact shape, but remains in its original state. The most popular types of stationary chairs that can be turned into a comfortable and fairly high staircase are:
- after simple manipulations, the transformable chair turns into a three-step staircase;
- a stool, which is a structure with a retractable part that moves along special guides;
- staircase in the form of a chair with a small back;
- a small stool with steps that spiral out from under the base (seat).
Non-folding products are inconvenient because they take up too much space in the room, but they are more functional than folding ladders.
Folding
The seats can, if desired, be quickly converted into a fairly compact form and then converted back into a stool or a comfortable ladder. When folded, the chair takes up minimal space and is used only when necessary.
The most famous examples of folding seats that can be converted into a step design are:
- a transforming stool that easily folds and turns into a compact whole;
- bar counter with steps, which when folded turns into a small structure.
Important! The hinge mechanism used in folding models must include a reliable latch with a safety lock, eliminating the possibility of its spontaneous return to its original state.
In a situation where it is planned to manufacture a prefabricated staircase with a folding back, a special hinge mechanism (piano ring) will be required to fix it. With its help, you can easily lower the top of the folding chair, creating additional support.
What is
A transformable chair is a wooden product that looks like a regular chair, but can turn into a stepladder. The product has many advantages:
- takes up little space;
- does not require additional support, it is easy to move;
- able to withstand heavy weight while maintaining stability;
- you can make it yourself at home using available materials;
- Easily transforms into a staircase.
The design of such a chair consists of the following parts:
- front, rear sidewalls;
- backrest slats;
- sitting;
- steps.
Similar transforming chairs have been used in everyday life for a long time. Initially, they were used in libraries, as they made it easy to reach even the highest shelves. Soon after this, the idea spread to the people, step stools began to be found everywhere. At the same time, the appearance of the products can be completely different: the chair can be made of inexpensive wood or decorated with decorative and carved elements. Everything depends only on the carpenter’s imagination.
Drawing of transformers and dimensions of parts
When making a transforming ladder with your own hands, you can use standard dimensions (indicated in millimeters) of blanks:
Drawing of a transformable chair.
1. To assemble the transformable chair we will need:
- two front sides, 20 * 270 * 400;
- two back sides, 20*325*850;
- three slats for the back of the chair, 20 * 50 * 400;
- rear seat, 20 * 165 * 400;
- front seat, 20 * 90 * 400;
- three passes, 20 * 120 * 360;
- six strips, 20 * 20 * 95.
2. Assembling the transformer ladder:
From the pipe
If there are fragments of a profile pipe left from welding any metal structure, you can put them to use - build a step-ladder chair with your own hands.
- Using a grinder, we cut the profile into parts so that the base can be welded. We will weld the frame at an angle of 45 - for comfort in climbing stairs.
- We make the frame of the bench at an angle of 90 degrees (see picture below).
- We cover the finished frame from the profile pipe with black paint (it is better to do this twice, drying each layer thoroughly).
- We construct steps with a seat from a plank pallet (from under blocks or bricks). We cut out the elements using a jigsaw in accordance with the dimensions of the welded structure.
- We fasten the parts from the board with self-tapping screws, covering the steps with the seat with furniture varnish (2 layers are desirable). Ready to use!
Stages of production from a profile pipe
Photo gallery
Manufacturing process
A do-it-yourself wooden ladder stool, assembled according to a pre-drawn sketch, can become an indispensable seat in the house and comfortable for home use. To manufacture it, you will need to stock up on all the necessary components (including special models). Most often, the material chosen is wood or plywood, which is easy not only for conventional processing, but also for finishing.
Tools and materials
To work you will need a set of tools:
- Universal jigsaw.
- Drill with a set of drills.
- Lumberjack and carpenter's plane.
- Clamps, chisel and hacksaw.
You should prepare consumables, which should include dowels, dowels for fastening, wood glue, as well as self-tapping screws. You can use boards, plywood or MDF blanks as the main working material. Before preparing drawings of a wooden folding ladder, you need to decide on the configuration of the future product.
The thickness of the material used is selected so that the finished product can withstand the weight of a person (at least 20 mm).
Purpose of the model
Any universal design that can easily be converted from a chair to a stepladder is always in demand not only in a city apartment, but also in a private home or country house. The need for it may arise in any living space where you need to reach mezzanines or ceiling lights.
It is practically irreplaceable in cases where there is a need to reach the cornice structure, as well as high shelves with books or deposits of household utensils.
