An aesthetic tray is not just a stylish decorative attribute, but also a practical everyday item. And if this accessory is made with your own hands, then it also turns into a priceless family heirloom.
You can transport food and drinks on it, install hygiene products on it in the bathroom, and also use it as part of a decorative composition.
And in order not to waste money, we bring to your attention several non-trivial ways to make an interesting tray with your own hands.
For important events
In order to make a stylish tray for holidays and important events, you will need a cutting board without a handle and a couple of handles from furniture drawers.
The tools you will need are: a drill, a drill, screws for fastening the handles, a regular pencil and a tape measure.
To begin, take the handles from the drawers and mark with a pencil where they are attached to the board. Drill holes for screws in the measured places.
After this, we strengthen the handles well into the prepared holes. You can attach rubber legs to the tray, which will transform it into an even more elegant and practical tool.
Manufacturing stages based on the model
To make a high-quality wooden tray with your own hands, you need to go through several stages, during which the parts will be prepared and assembled into a single product. A pre-developed drawing will allow you to avoid inaccuracies. Experienced craftsmen advise first deciding on the raw materials, and then choosing the optimal design based on its characteristics. But in some cases they do the exact opposite - they select suitable material for the finished sketch.
You should start by determining the parameters of the tray, in particular its size and weight. It should not be heavy and bulky, because in this case the product will not be easy to move, especially when loaded with plates and other utensils. The functional component is also thought through, which includes legs, sides, and handles. When creating a tray from plywood, take into account the mounting locations of the fittings, the width and length of the product, and the thickness of all elements. If more massive lumber is used, the drawings also indicate the attachment points for legs, handles, and intersections of elements.
Numerous drawings are offered on thematic resources; it will not be difficult to remake them “for yourself.”
Wood
Once the drawing is ready, its implementation can begin. The work follows a general algorithm that will help you figure out how to make a tray that combines simplicity with attractiveness:
- Cut a rectangular piece of wood according to the dimensions indicated in the drawing.
- Make a frame of slats or boards along the length of the base.
- Attach the handles to the frame using a glue gun.
- Decorate the bottom of the tray using wood cutting, paints or other tools.
- Connect the frame to the base with glue or screws.
One of the most popular is a small wooden tray with legs, more reminiscent of a breakfast table. However, its manufacture requires at least basic skill in handling tools. Prepare for work:
- a rectangular board or piece of plywood with dimensions 40 × 70 cm;
- 4 metal tubes one meter long;
- 8 corners by 15 mm;
- 4 spacers measuring 15 mm;
- stain with varnish for treating a wooden surface.
Further work is quite simple if you follow the instructions. First, the pipes are cut with the obligatory preservation of smooth edges. You need to get 4 pieces of pipes with a length of 6, 19 and 25 cm (12 elements in total), as well as two parts with a length of 58 cm. Further actions are as follows:
- Pipes of 25 cm are connected to corners of 6 cm using glue.
- These handles are applied to the attachment point, and the joints are marked according to the location.
- In the marked places, holes are made with a diameter that is suitable for the prepared fasteners.
- The wood is sanded with sandpaper, then covered with stain, and after it dries, with varnish.
- Gaskets are attached to the holes using glue.
- Mount the made handles.
- The legs are fixed to the resulting tabletop, for which two main 58 cm pipes are used, as well as four pipes 19 centimeters long.
- The corners of the legs are combined with 25 centimeter tubes.
- The structure is secured with glue, which must dry before using the product.
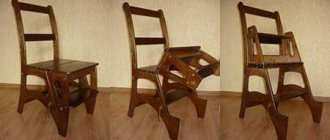
This way you will get a high-quality, durable, easy-to-use tray. To improve the product, you can provide folding legs, which can be made with a spring mechanism or bolts. The first method requires advanced skills in working with furniture, but the second is accessible to everyone. In the lower part of the frame, holes are made for the diameter of the bolt; the prepared wooden legs are also equipped with the same. Next, the supports are placed against the frame, bolts are threaded through them, and they are secured with nuts on the inside.
To reduce the risk of damage to the wood when screwing and to make folding easier, it is better to use a washer at the junction of the nut and the wood.
4 identical boards are placed together and fastened together
A shorter board is attached to the top side using liquid nails.
Repeat the same steps with the second side
The workpiece is coated with quick-drying tinting oil
Using light paint and a sanding machine, the surface of the tray is aged
Handles are attached on both sides, and the tray is ready.
From a photo frame
This option is quite simple even for beginners. All you need is a medium-sized photo frame, glue, and a base for a tray in the form of plywood or thick cardboard. Sequencing:
- The backing and glass are removed from the frame.
- Make holes on the top or side on the short side, where furniture handles (from bathrooms or kitchen cabinets) are attached using self-tapping screws.
- A plywood base is created to suit the size of the frame.
- The base is decorated decoratively with the help of paints, applications, and stencils.
- The movable decor is secured with glue.
- Glass is inserted on top, since plywood is not strong enough for heavy loads.
In this way, the wooden tray will be made without wasting materials, and the frame will be transformed for the better, becoming a useful kitchen fixture.
With a slate board
An unusual and functional tray would be a model with a slate board, which is made using simple technology. To work, you will need a finished product made of ceramics, metal or glass, as well as slate paint, a brush and restrictive tapes. The actions are:
- Apply tape to the edges of the tray that fit the base, which will prevent the paint from getting into unnecessary places.
- Apply slate paint in two layers to a clean and dry surface. The second can be coated only after the first has dried.
- A day after drying, heat the tray in the oven for half an hour at a temperature of 163 degrees.
- After the heating cycle, leave the tray in the oven until it cools.
High temperature will securely fix both layers of paint. In this case, the product will not lose its functionality. This slate coating can be additionally decorated with drawings or inscriptions.
The surface of the tray can be coated with chalkboard paint
From an old painting
Another fun idea is to make a tray out of a damaged picture frame, which will look absolutely wonderful. For this we will need some things: fabric; stain, varnish; brush, glass, stained glass handles, hot glue, picture frame.
Firstly , we lubricate the frame with stain, a paint that is pleasing to your eye. Then we use self-tapping screws to fasten the selected handles to the sides of the planned tray, and the protruding screw heads also need to be painted to match the homemade product.
The next step is to cover the frame with the selected piece of fabric and fix it with glue.
The last stage is to protect the fabric from wear.
Therefore, to preserve its charm, we cover the bottom with glass, which, in a similar way, is fixed in the corners using the same method.
Required Tools
In order for a handmade tray to be not only beautiful, but also of high quality, you should take a responsible approach to the choice of manufacturing materials. Metal is not always easy to use and is also difficult to process. Plastic, although resistant to wear, is difficult to change shape at home. The ideal choice is wood, an environmentally friendly and aesthetic raw material. Species suitable for making a tray include:
- oak;
- Linden;
- alder;
- birch;
- cherry;
- maple.
The cuts of these trees are durable and at the same time attractive in appearance; if you wish and have the necessary tools, they can be given any shape.
To make a tray, you should not use wood species that emit resin, for example, pine needles. When heated, they can ruin dishes, and their strong smell will significantly worsen the taste of food.
You can also make a tray from plywood. Such raw materials are very easy to process, but it should be understood that they are not very durable. Plywood sheets are best used only for decorative trays or those that will not be subject to heavy loads.
As for the sides, they can be made from boards, slats, old photo and painting frames, and unnecessary furniture. In order for the work to be completed efficiently and without problems, you should prepare a number of tools and consumables:
- sandpaper with different roughness;
- furniture stapler for securing additional parts;
- glue gun;
- screwdriver;
- jigsaw for cutting;
- a ruler and pencil with which to mark the tree;
- saw for cutting wood.
If you wish, you can purchase environmentally friendly paint, for example, water-based paint, to cover the product with it. It is also recommended to use varnish, which will protect the surface of the tray from damage, excessive heat and make it easier to clean.
Remembering school
If you want to really surprise your friends with your handicrafts, then a tray with an imitation school board is exactly what you need. Moreover, this can be done using spray paint that has the desired effect and a roll of paint strip.
A regular wooden tray is cleaned and completely wrapped with tape, except for the bottom. Then the required area is painted - half an hour to dry everything is ready.
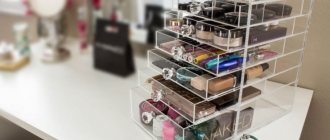
Decor options
The design of the finished tray depends only on the imagination of the master and the materials he has. Those who know how to draw can color the bottom and frame as they wish. If wood is used, the paints should be acrylic or oil, and an additional coating of varnish will help prevent them from being washed off or deformed.
An excellent option would also be rose petals placed on glue, with beads scattered between them. For durability, this composition is filled with varnish. There are many other options:
- mosaic picture;
- wool and fabric scraps;
- postcards;
- natural materials (leaves, flowers);
- small straw;
- mat.
Interesting handles can also enhance the impression of a handmade tray. They can be made from wine corks, leather belts, or twine wrapped around plastic frames.
Another part you can experiment with is the legs. They are made from metal or PVC pipes and wooden dowels. Finished products are painted, including in gradient colors.
Most often, mosaics are used for decoration. Of course, laying it out requires time and effort, but the end result is a unique and very beautiful tray. The components of a mosaic can be pebbles, multi-colored paper, eggshells, glass shards, shells and much more. It is enough to fix the selected elements with glue in a unique pattern, and cover the result with glass so as not to damage it.
A handmade tray is not only a product that increases the comfort of life, but also a real art object. It is best to make it from wood, which can easily be decorated with paints, mosaics, and artistic carvings. When creating, you can use unusual legs, frames and handles - it all depends on the taste and preference of the master. In any case, due to its uniqueness, such a product will become a real decoration of the kitchen.
Wine corks
Decorative paper Decoupage
Dried plants
Mosaic
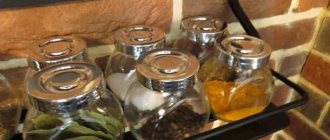
What may be required
Necessary materials:
- Lids from wooden boxes.
- Wood putty.
- Pencil.
- Glue E6000.
- White paint (or any other color).
- Polyurethane.
All materials are available in almost every home. Some of them can be purchased at any hardware store.
An animal drawn by a 9-year-old boy from Russia will appear in IKEA stores
Who is she - the woman who won the heart of Anatoly Kot
Experts: salt may help fight multiple sclerosis
Features of creating decoupage with your own hands
- Drawing on paper. These can be ordinary paper napkins with a design you like or special decoupage cards. Magazine clippings or printed pictures will also work.
- Acrylic paint – white for the base and colored (if necessary). If you plan to apply an elegant design with thin lines, stems, spikelets, then it is better to do the work on a white background. If the pattern is bright and rich, you can try cream, peach, blue and other pastel shades.
- Acrylic lacquer. Needed to secure the work and protect it. The tray, coated with acrylic varnish, can be used at home and washed without fear.
- Wide flat brushes with synthetic bristles.
- Special glue for decoupage or PVA.
And the tray itself. Regular plastic. Old home. And there are special blanks for decoupage trays - wooden “semi-finished products” of various shapes and sizes.
If the tray you are using is not new, it should be prepared first. Wash, degrease and dry well.
Master Class . Photo frame tray for the evening
The easiest way to make a tray with your own hands is to convert an ordinary photo frame into it.
Buy or remove a wooden photo frame of the appropriate size from the wall. It’s good if you find a frame with a strong bottom and reliable fastenings, then you won’t have to change the backing and you can update the decor of the tray according to your mood.
So let's get started. Remove the cardboard backing, remove any excess and put the glass back in place.
Now you need to decorate the cardboard from the photo frame as you like. You can glue or simply apply decor from various materials. This could be: bright fabric, a piece of wallpaper, postcards, yellowed pages, a herbarium, etc. In our master class, the backing is simply covered with fabric and glued with a glue gun. Instead, you can use PVA or any other glue. After the decor is ready, place the backing on the glass and secure it (scroll the photo to the right).
Now you need to screw on beautiful furniture handles of the appropriate size. You can screw them either on the side or on top of the frame. To do this you will need the actual handles, 4 screws, a drill with a small drill and, of course, a screwdriver. First you need to attach the handles to the frame, align them, then mark the holes with a pencil, drill them with a drill with a suitable drill bit and finally screw the handles onto the screws using a screwdriver as shown in the photo below.
Well, that's it, your serving tray is ready! Or... almost ready.
- For reliability and to add weight to our tray (so that it stands flat on a soft surface), it is better to additionally strengthen it from below. To do this, you need to take plywood, place a frame on it, trace it along the contour and cut it out with a jigsaw. The resulting workpiece must be sanded along the edges and then painted in a suitable color (pre-primed). Once the plywood is dry, all you have to do is attach the plywood to the frame with small screws, nails, self-tapping screws, or a furniture stapler. This tray will withstand even the heaviest breakfast in bed.
Based on this master class, you can make beautiful trays with a wide variety of decor. For example, you can make a serving tray like this with a slate bottom, on which you can write romantic notes with chalk.
- The substrate can be painted either with slate paint or covered with chalk wallpaper.
Here are other decor ideas for both the frame itself and the backing. As you can see, you can come up with a variety of designs - in a vintage style like Provence or shabby chic, in a classic style or in a modern one, using fabric, photographs, colored paper, wallpaper, pages from books (scroll the photo to the right).
This master class will also be useful for making interior trays for coffee or dressing tables, where candles and books, or jewelry, cosmetics and perfumes can find their place.
Types of rotating cake platforms
Specialized markets offer many tray stands from world-famous brands.
Someone wants to have compact products for a dessert bar (Candy bar) when serving sweets. Some people are impressed by rotating models with a tilt, while for others the ability to use only 2 tiers of the stand is not suitable.
Varieties of design
There are such models according to the form:
As well as shaped trays for an extravagant demonstration of confectionery creativity.
Materials used to make a rotating cake decorating stand
- Steel;
- Glass;
- Plastic;
- Ceramic;
- Wooden.
Plastic rotating cake stands are a rather fragile product. This is the most affordable option. Thanks to the last circumstance, it is also the most common. They are presented in a wide range of models, made with or without tilt. Plastic cake pans usually have a non-slip material, which promotes good grip on the table. It's quite convenient.
The glass rotating cake tray looks elegant. Made from high-quality tempered glass, often decorated with an original design. It looks neat, impressive - you can take a photo and serve it on a rotating plate. It has a non-porous surface, washes quickly and easily, and does not absorb odors.
Metal structures are heavy, but they are designed to last longer. They can withstand heavy cakes and do not deform over time.
The wooden cake maker is constructed from natural material and looks aesthetically pleasing. Sweet products can be served directly on it. The cost is higher compared to a plastic rotating stand for decorating cakes.
The optimal diameter of wooden structures is at least 34 cm. This cake pan is spacious, it is convenient to decorate products from three kilograms (or tiered ones) and make confectionery decor on them. The wide surface makes it possible to place the leveling spatula in a convenient way.
Rotating trays for decorating cakes
A rotating cake stand is an essential tool for pastry chefs, from beginners to true masters. If you want to be able to reach the cake from all sides at once, but without having to "cut circles" around it, definitely consider having a rotating cake tray. Only this will help make the cream decoration even. And the decorating process itself turns into a mesmerizingly beautiful event.
Such rotating stands for decorating a cake look great at a large feast, on the windows of cafeterias or pastry shops. If you want to present your handmade masterpiece in the most attractive way, you can use a rotating cake pan for this.
Source
First make the handles
1. From a 25 mm cherry board, cut four blanks of the specified length for the halves of the arms A (Fig. 1
and
photo A)
(read the “Tip of the Master” below to correctly orient the workpieces relative to the direction of the wood grain). If you keep the original parallelogram shape of the workpieces, the next step will be easier.
Mark the handle blank as shown so that the grain of the wood is oriented diagonally. We oriented the squares at a 30° angle, but the angle may be different depending on the width of the board and the direction of the grain in it.
The temples will be strong if the fibers meet at the top. Distribute the blanks for the halves of the arms A
in pairs and choose the most attractive combinations. Orient the fibers in each pair so that at the junction they form a triangle, the apex of which is directed upward, as on the left arch. Mark each pair by placing appropriate marks at the joint to ensure alignment when final gluing. The right bow is glued together from halves, the fibers of which meet at the bottom. Such a bow will be fragile, since the fibers are directed across the cross-section in several places, and it may break during assembly or when using the tray.
It is difficult to saw end grain, so grooves with a depth of 51 mm are best made in several passes. Press the workpiece firmly with the pusher against the longitudinal stop of the machine.
2. Install a 10 mm thick groove disk into the saw machine and make halves A
groove
(Fig. 1
and
photo B).
To reliably support the workpieces, attach a high wooden pad to the longitudinal (parallel) stop of the machine. Having cut out the grooves, saw the workpieces to a square shape with a side of 114 mm.
3. From wood of a contrasting color (we chose wavy maple), cut a blank 114x305 mm for keys B
, two blanks 51x483 mm for longitudinal walls
C
two
blanks 51x330 mm for end walls
D. Plane these blanks on a thicknesser, adjusting their thickness to the width of the grooves cut into the blanks of the arch halves (Fig. 1
and
2).
Set the wall blanks aside and cut out the dowels of the specified sizes.
Glue two handle-bracket blanks, connecting each pair of halves A
using a key inserted into the grooves.
With the workpiece laying flat, lift the saw blade so that it passes only through the inner wall of the tongue, without touching the other wall.
4. Once the glue has dried, carefully align the bottom edge of each A/B
and in four passes cut out a tongue and groove with a cross-section of 10×51 mm
(Fig. 1a).
Saw off part of the tongue wall from the inside to a width of 12 mm
(photo C).
5. Using a compass, mark A/B
outer and inner radii
(Fig. 1).
Also mark the centers of the screw holes on the outside of each piece. Make counterbores with a mounting hole in the outer wall of the tongues. Using a band saw or jigsaw, carefully cut out the handles along the contour, sand them to the final shape, and then mill 6mm curves on the ribs. Finish sand the handles with 220-grit sandpaper.
Tricks for transferring a drawing
- If a whole napkin is used for decoupage, it is better not to glue it dry onto a tray, but to transfer it using plastic film.
- To do this, the napkin is placed on the film with the pattern down, moistened with water and leveled.
- And this workpiece is carefully turned over onto a tray. This reduces the likelihood of tears, wrinkles and damage.
In addition, in this way it is convenient to join the fragments together.
Master Class . Photo frame tray for the evening
The easiest way to make a tray with your own hands is to convert an ordinary photo frame into it.
Buy or remove a wooden photo frame of the appropriate size from the wall. It’s good if you find a frame with a strong bottom and reliable fastenings, then you won’t have to change the backing and you can update the decor of the tray according to your mood.
So let's get started. Remove the cardboard backing, remove any excess and put the glass back in place.
Now you need to decorate the cardboard from the photo frame as you like. You can glue or simply apply decor from various materials. This could be: bright fabric, a piece of wallpaper, postcards, yellowed pages, a herbarium, etc. In our master class, the backing is simply covered with fabric and glued with a glue gun. Instead, you can use PVA or any other glue. After the decor is ready, place the backing on the glass and secure it (scroll the photo to the right).
Now you need to screw on beautiful furniture handles of the appropriate size. You can screw them either on the side or on top of the frame. To do this you will need the actual handles, 4 screws, a drill with a small drill and, of course, a screwdriver. First you need to attach the handles to the frame, align them, then mark the holes with a pencil, drill them with a drill with a suitable drill bit and finally screw the handles onto the screws using a screwdriver as shown in the photo below.
Well, that's it, your serving tray is ready! Or... almost ready.
- For reliability and to add weight to our tray (so that it stands flat on a soft surface), it is better to additionally strengthen it from below. To do this, you need to take plywood, place a frame on it, trace it along the contour and cut it out with a jigsaw. The resulting workpiece must be sanded along the edges and then painted in a suitable color (pre-primed). Once the plywood is dry, all you have to do is attach the plywood to the frame with small screws, nails, self-tapping screws, or a furniture stapler. This tray will withstand even the heaviest breakfast in bed.
Based on this master class, you can make beautiful trays with a wide variety of decor. For example, you can make a serving tray like this with a slate bottom, on which you can write romantic notes with chalk.
- The substrate can be painted either with slate paint or covered with chalk wallpaper.
Here are other decor ideas for both the frame itself and the backing. As you can see, you can come up with a variety of designs - in a vintage style like Provence or shabby chic, in a classic style or in a modern one, using fabric, photographs, colored paper, wallpaper, pages from books (scroll the photo to the right).
This master class will also be useful for making interior trays for coffee or dressing tables, where candles and books, or jewelry, cosmetics and perfumes can find their place.
Painting the product
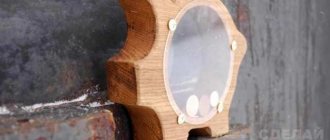
I applied three generous coats of white paint, touching up any areas that needed more. Once completely dry, I applied two coats of polyurethane, which seals and protects the paint.
I love how the legs lift the tray, literally and figuratively. It's a small and simple detail that makes it so unique and gives the tray a unique touch.
Instead of our “Ku-ka-re-ku!”: Australians wake up to the hubbub of parrots (video)
“Believe and know your worth”: Anna Khilkevich about real men
Vyacheslav Fetisov headed the central council of VOOP
If you don't have nice napkins
When the picture you need is found in a magazine, it can also be used for decoupage. To do this, the paper is pre-soaked well. You can reduce the thickness of the layer with sandpaper, but this must be done very carefully so that holes do not appear. Pictures printed on a color printer are also refined.
Family vacation: how to choose a resort for a trip with children?- How not to lose money when selling an apartment?
- Bathroom curtains: review of popular models and new designs
There is a practice of using photographs as pictures. To do this, the top layer is covered with several layers of varnish. When the acrylic coating dries, the photograph is soaked. Then, from the reverse side, the layers of paper are gradually rolled up with your fingers. The remaining layer will be no thicker than a napkin.
Wallpaper also comes into play. Excess paper is removed with sandpaper to achieve the desired thickness.Before gluing, any picture must be wetted so that folds do not form on it after applying the glue.
The desired background of the napkin is obtained by soaking it in a colored solution; tea and instant coffee are used as dyes.