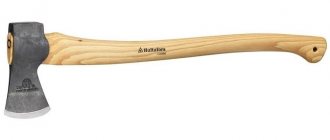
Currently, axes are often made from low-quality materials; moreover, such “counterfeits” are quite expensive, so people use tools that were made during the USSR. If you suddenly find an ax that was made a century or more than a few centuries ago, it is possible to restore the ax using available materials and tools. This will be discussed in more detail below.
Almost any ax can be restored.
The process of restoring an old ax
If you find an old or battered ax that has been preserved in fairly good condition, you can give the tool a new life, that is, repair it using the restoration method.
First, separate the old ax handle from the head. Completely clear any remaining wood and begin gathering the necessary materials.
Materials
Preparation for restoration.
For restoration you will need the following things:
- Bulgarian;
- sandpaper;
- grinder;
- metal grinding machine;
- lathe;
- pen, pencil and paper;
- wood file;
- hammer;
- metal polishing circle.
Repair for centuries
At first glance, this method seemed inappropriate to me. Isn't it easier to buy a new ax handle? But the grandfather explained that in this case, the same problems would soon appear again: the wood would dry out, the wedges would fall out, and the tool would fly off. When using hot-melt adhesive, such troubles will be eliminated in the future.
An ax handle installed in this way does not have to be stuffed, and the price of the issue is only a piece of metal, one electrode and a pack of glue gun rods. If you need to disassemble the ax, you just need to heat it up.
Found a violation? Report content
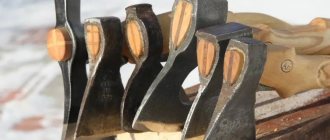
Making the head
To make a head, you need to know what you want your future ax to look like. To implement the idea, you need to draw a sketch.
Step-by-step production:
- Place the old head on a blank sheet of A4 paper.
- Trace the outline of the blade using a pencil.
Drawing. - Add additional elements to the sketch, such as reducing the span of the blade or adding additional notches.
- Cut out the sketch and glue it to the old head using regular glue.
- Use a grinder to cut off any excess metal.
- Treat the workpiece first with a grinder or metal polishing wheel to make the head shiny, then with sandpaper to make the color uniform. If you don’t have a grinder or a metal polishing wheel, you can use a metal grinder.
- Ready!
How to clean an ax from rust using electrolysis
Electrolysis is one of the cheapest and most effective ways to clean an ax from rust, but the main thing is to act carefully and not mix anything up. To clean an ax from rust using electrolysis, you will need:
- current source, preferably low voltage;
- a degreaser such as acetone;
- soda ash or caustic soda (baking soda will not work);
- a small plastic container (excess liquid will significantly slow down the cleaning process), sufficient to immerse the ax;
- unnecessary hardware (can be made of stainless steel), to which rust will transfer;
- two wires.
The process of cleaning an ax using electrolysis proceeds as follows:
- The ax is degreased.
- Then it is connected to one of the wires, and a piece of iron for collecting rust is connected to the second. Here it is important not to confuse the polarity and attach the object to be cleaned to the negative wire, i.e., the cathode, otherwise the process will go in the opposite direction, and the tool may be lost altogether.
- Fill the structure with an alkaline solution at the rate of 1 tablespoon of soda per liter of water.
- Plug in and leave for a while (from two to eight hours).
After such treatment, all rust and salt deposits from the ax will transfer to unnecessary iron. The ax itself may become covered with a black coating, which can be easily removed with a hot solution of citric acid.
By the way, increasing the volume of water slows down the reaction, and increasing the voltage, on the contrary, speeds it up. If the voltage is too high, the liquid will boil strongly and actively release hydrogen, which is an explosive and rather poisonous gas, especially if you use stainless steel as a receiver. That is why it is better to carry out rust treatment outdoors.
The main advantage of this method is that it does not damage the metal. You can remove rust from even the thinnest iron without damaging the engraving or dulling the edge of the product.
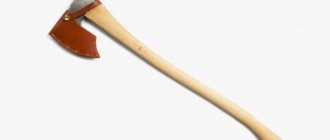
Placing an ax on an ax handle
We take the finished ax handle and put the prepared head on it. To make the ax handle fit in easily, you need to tap it with a hammer. The ax handle should extend beyond the eye.
- Using a saw, divide the protruding section of the ax into 4 parts to form a kind of cross.
Nozzle process. - Prepare the wedges. To do this, you will need to process a medium-density small piece of wood on a grinder.
- After this, we begin assembling the axe.
- Lubricate the outside of the cuts with wood glue.
- We plant the ax so that a small part of the ax handle sticks out.
- Insert 2 wedges into the cut.
- We hammer them into the ax handle with a hammer until they crumble.
- Now we cut off the excess wood using a grinder.
Restoring an ax with your own hands
Greetings! Today I will remake an old Soviet axe. Let's go!
The ax itself has a simple shape, and nothing good will come of it by cutting off the excess. Therefore, I decided to weld a piece of spring to the bottom, thereby increasing the metal. I trimmed off the excess and cleaned up the weld. It turned out well. Then I used a grinder to cut out a semicircular recess and cleaned it with a grinding wheel. I gave it a more precise shape with a round file. I also removed some metal from the top of the ax, thereby making a smoother line from the butt to the toe of the ax. When everything was ready, I treated the surface with a flap wheel with a grit of first 60 and then 100 grit.
Sketch
Piece of spring
Stripping
After all the manipulations, I marked the center of the butt and drilled a blind hole with a drill with Pobedit pads with a diameter of 10 mm. Using a lathe, I turned out a tip with a protrusion, the diameter of which corresponds to the diameter of the hole in the butt. It fits tightly there, which prevents displacement during welding. After welding the tip to the butt, I went around the circle several times to build up the metal and create a smooth transition from the butt to the tip. After cleaning the welding area with a grinder, I decided to decorate this area with a drill. Using a semicircular cutter, I cut chaotically located grooves. The result was a texture similar to torn stone. Looks great!
Treatment
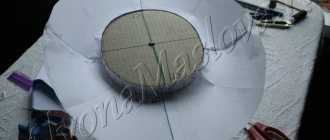
The next stage is applying the pattern for etching. Loot technology works well. Laser ironing technology. Its essence is to transfer toner from the printer to metal. The printer must be laser. It is important! The paper is only glossy. You can use a magazine, or, as I did in this case, a backing from self-adhesive paper. She shows excellent results.
Now about the drawings. In the search engine you can type “Viking axe, Celtic axes, etching pattern, ax etching” and there you can choose from a huge number of options. I chose three options for myself. During printing, it is advisable to disable toner saving. This will allow you to get a thicker layer of toner, which will have a positive effect on the quality of etching.
Next we proceed to transfer the drawing. The ax must be heated to a temperature of approximately 200 degrees. Then carefully apply the cut paper with the picture to the surface of the ax and smooth it with a cloth. Use a second cloth to hold the paper from moving. So I transferred all the drawings to the axe. And one moment. Those areas that are covered with toner will not be etched. If you need to etch the drawing itself, then the picture needs to be inverted in a photo editor, and the entire area around it should be painted over with paint or nail polish. I have the first option, so I transferred the image to an ax and cooled it in water. The drawing is not afraid of water. If the image was transferred with gaps, you can paint on the missing fragments with a waterproof marker. Further along the perimeter of the cheeks of the ax and the drawing itself I sealed it with masking tape. The rest of the surface was painted with primer. It dries quickly while preparing for etching. Etching. This method has been known for a long time and there is nothing fundamentally new here. You need a container of a suitable size, water and salt. You need to prepare a saturated salt solution. I have 3 liters. It took about 600-700 g of water. The ax itself acts as one electrode. You need to attach a plus to it. The second electrode is a metal plate with an area approximately equal to the etching area. More is possible, the main thing is that it is not a piece of wire. We attach a minus to it. For etching, I used a charger with a voltage of 14 V and a current of about 3.5 A. You can use 9V blocks. The main thing here is current. The larger it is, the faster the process goes. People also use phone chargers, but that takes a long time. You can try welding at a minimum current, but there is a big risk of damaging the protective coating and etching excess. It is also better to take a transformer power source.
Transferring a drawing
Modern pulsed ones can go into defense thinking that this is a short circuit. After the preparatory activities, place everything in a container and turn on the power. I don’t need a very deep drawing, accuracy is also not very necessary, since the ax style does not imply this, then 20 minutes. the etching time was sufficient. Periodically I took it out and wiped the plaque with a soft brush. After etching, the ax was washed with solvent and treated with a soft brush. The drawing turned out just right, with some etching of the protective coating in places.
I forgot to uncheck the toner saving box in the printer settings. But this is even better, it turned out like antique. But it’s shiny, and I wanted a dark color. There are many options. Vinegar, lemon juice, ferric chloride, cola, electrolyte. I chose cola because I have never tried blackening in it. I cut the canister, threw in the ax and filled it with cola. After 2 days I got this result. I like. All that remains is to make the ax handle.
And according to tradition, a video with the complete manufacturing process: Thank you for your attention. See you.
Restoration and artistic processing of an ax
To make the ax more colorful, small drawings, logos and any designations in the form of letters or numbers are added to it.
- To implement this idea, you need to print the desired color picture on a blank piece of paper.
- After this, the drawing with the colored side is applied to the ax and a hot iron is passed over it.
- Now remove the excess paper from the blade.
- It is important that the drawing is completely transparent!
- After this, the ax is wrapped in a protective film and the required solution is prepared.
- Water is mixed with salt. An ax in a protective film and a device that gives an electric charge are placed there.
- After this, the chemical reaction process begins.
- After 20-30 minutes, the product is pulled out of the water.
- After this, remove the protective film and clean off the remaining paper film.
- After this, the surface of the ax is treated with a metal polishing wheel.
How can you clean an ax from rust?
You can also remove rust from an ax using chemical agents, among which rust converter comes first. Its main active ingredient is phosphoric acid, which very effectively and quickly dissolves iron oxide, and various additives (depending on the brand) form a reliable protective layer on the surface of the product, preventing new corrosion.
Also, for minor contaminations, you can use kerosene, diesel fuel or gasoline. Soak the product in the chosen product for several hours or even days, depending on the depth of the corrosion, and then wipe off the remaining plaque.
An excellent way to combat corrosion is hydrochloric acid, which corrodes everything unnecessary on an iron tool with a bang. In order not to damage the ax itself, some advise adding “Urotoropin” to the acid solution (from 3 to 10 percent) at the rate of 1 tablet per half liter of solution.
Among the available methods of fighting rust, a special place is occupied by soda based on phosphoric acid (most of it is in Coca-Cola, but Pepsi or Sprite are also suitable). If a rusty object is brought to a boil in soda, the effect will be the same as that of a rust converter, since the active substance is the same.
Hydrogen peroxide will help facilitate the removal of oxides before mechanical treatment. If the ax is first moistened with it and then heated, the oxides will be rubbed off much easier.
What to make an ax handle from
An ax handle is an ax handle. It is usually made from wood. Although now metal and plastic axes have become widespread.
- You need to initially know why you need an ax. Perhaps for chopping wood, or maybe for carpentry. And only after you decide on the type of activity, you can choose wood.
- One of the main criteria for selecting wood is strength and good impact strength.
- Next, based on the type of activity, you need to choose the material for the ax handle: oak, birch, elm, ash, acacia or hornbeam. Birch is a versatile wood, while oak is highly durable.
- A very important point is the age of the tree. It is recommended to use only mature trees, at least 40 years old. Then your ax handle will be much stronger.
Processing is one of the final stages.
How to impregnate an ax handle: 2 ways to keep the handle in its original form
Of course, in our world you can buy absolutely everything. But sometimes the price tag for a thing of proper quality is too high, so the idea comes to mind to do everything yourself. And one of those things that everyone can make is an axe. This tool is simply irreplaceable in a country house or in a private home, but choosing a quality ax from the entire assortment of stores is quite difficult.
The ax handle requires processing.
How to weld an ax with an electrode
First of all, you should clean the corner of the eye from forging scale and rust - for which rhombic file is best suited, or worse - a hacksaw for metal, into which a couple of blades are clamped at once in different directions.
1. If the ax has a barb , a lead strip is attached to the front end of the blade from the eye side (!), on which the arc will be ignited/extinguished; if there is no barb, there should be two strips. After this, 2/3 of the ax blade along with the blade is wrapped in cotton cloth, secured with knitting and soaked in water.
2. To repair a tool using welding with coated electrodes, preference should be given to brands with a basic coating, the apparatus should be DC, the arc should be kept as short as possible by resting on the skirt of the coating: the seam from the “alternating” electrode may burst as soon as it becomes dull! The semi-automatic welds with bare wire in the ZG at the (reverse) polarity required for tool steel, while argon welds only at the direct polarity (to save tungsten). The welding current is set to the lower position indicated on the pack, after which the root seam is welded through, stripped, the ax is tilted with the edge of the seam to the lower position - and the first rounding bead is welded, after stripping - the second, and the blade is immersed in a container of water until the butt cools completely . After the ax has cooled, the planks are broken off and grabbed to the ends of the root seam, after which the crack is cut with an opening angle of 60-70 degrees, capturing the root seam and exiting to the planks. After this, the cooling winding is wound and soaked.
3. The cutting is also welded with rollers facing forward (possibly towards each other) - and the last of them should become annealing (its edges fuse the previous pair without capturing the edges of the part). The blade is immersed in water, and after the butt has cooled, the strips are cut off and its narrow part is smoothed with a round file.
4. If there is a beard, it should be a continuation of the eye and fit tightly to the neck of the axe, lengthening the supporting surface when chopping - and not form a “nail puller” with it.
Thus, using welding, you can either fuse the missing metal onto a defective beard (for starters, bend it by heating its root with an arc of direct polarity from a carbon rod) or make it by grabbing a quarter of the pipe to the eye and fusing a wedge onto the blade. polarity from the carbon rod) - do it this way, grabbing a quarter of the pipe to the eye and fusing a wedge onto the blade.
Comments • 0
Why make such axes at all? Complete bullshit.
I glued it with fiberglass putty. It also holds up well.
Thank you. Interesting method. You and I seem to be comrades. Freedom for Nikolai Nikolaevich Platoshkin! Good luck to you!
The vertical automatic washing machine started to wear out. I'm going to do something, I'll try to post what happens.
But I don’t have red plastic, but black tar type. crumbles into pieces. It's a pity the hatchet is convenient. I want epoxy. if the hardener is less than normal, it will be elastic.
@Pooh Delta wow). but I still haven’t filled it with anything, it’s lying around... I’m thinking of welding a 6-8 mm flat sheet and making overhead handles.
I poured it in (with epoxy resin), 2 days and the ax was in the bushes, the ax handle was in my hands.
@DEMBEL IN MAY I’ve been to Novosibirsk, my brother is there.
@RURAL COMPOSITION in the Urals There her son-in-law is chopping wood, she is in her house. He made a gift when he was leaving and the cleaver also brought it in, otherwise everything was wretched with her. Moved to Novosibirsk region. a day by train to Sverdlovsk, nearby.
@DEMBEL IN MAY stick together, this is more important than ever! The ax is still working. So why is he working there in women’s hands? Hanging on a nail). A rural farmstead, this is a true test of the strength of technology))). Good luck in Siberia, there is POWER there). I’m from Sverdlovsk, maybe nearby).
Hello, the other day such an ax flew out, I solved the problem this way: I sat the station wagon down for a moment, wrapping it with rope, then 4 self-tapping screws so that the heads overlap the ax, then with silicone on top! It has been freezing for 4 days, today there are 20 bits of oak, and the ax is blunt, not a bit of play, the ax has not moved a millimeter from the ax handle
@DEMBEL IN MAY 1/2 tube + wrapping with canvas rope
Moment glue also becomes like rubber when it dries, which means it will soften the blow. Also an option, only the cost is higher (how many tubes are needed?). Silicone is even softer than hot melt adhesive. Probably possible, why not. Only there are more problems, but the result is the same: the product is in working order.
Drill, clean and, like the old fashioned way, trace around the handle and sand the wood! Grandfather's axes still serve and plow. This is how we won the war. dried up in the water, it flies off, the wedge is clogged, you can also put the gum in China in the trash
They have a small hole
@sofa translator Well, Izhstal still makes axes. And if you dig around, you can choose a wonderful ax. Whether you put a handle on it or not, and whether it will fly off, depends entirely on the degree of your handshakeness.
One Two The war with the ax was won. In general, we are talking about a plastic ax handle.
Is China in the trash? What if we don’t even sew our own panties?
@kamikadzemore You're a fool twice over. 1) I wrote something stupid. 2) I wrote something completely off topic.
no, you need to wedge it somehow, tighten the metal plate with a self-tapping screw
IT STILL WORKS, IT HAS NOT EVEN WARMED UP AGAIN.
Yes Yes Yes! I did the same, so far so good! Epoxy is fragile and susceptible to impacts, but this is elastic!
Why not foam it up then?
AX AND AX ARE WHOLE, NEW, WASTED SOMEHOW
Almost a year later, what happened to the ax?
Now, or rather in the spring, I want to try the same thing with a sledgehammer, it’s the same problem. But mix plastic powder into the glue (I saw it in some video about homemade products), we’ll see.