Master class on making a “Tractor” craft from waste material
Nadezhda Lichman
Master class on making a “Tractor” craft from waste material
In addition to building material waste material is also used in kindergarten for construction . When teaching children how to design from paper and waste materials, the following basic techniques are used: explanation, demonstration, sample, viewing the results of the work.
I bring to your attention a craft made from matchboxes - a tractor .
We will need:
- five matchboxes;
- colored double-sided cardboard;
The tractor base consists of two covers and a box.
Lubricate the top of the box with glue and insert it into the lids and push them in.
The front part is made from two matchbox covers, glue them together.
We cut one lid.
Glue most of the cover (this is the tractor )
to the base
of the tractor .
Lubricate the inside of the box with glue and glue it in a vertical position.
We paint with gouache of any color.
tractor wheels and a steering wheel from cardboard .
We glue the blue circles onto the brown wheels.
We roll two paper strips into tubes, the length of one strip is 4 cm (pipe, and the other (to the steering wheel)
– 1.5 cm.
We glue the wheels, steering wheel, and pipe to the tractor .
Our tractor is ready .
You can use moment glue, coat it with varnish, you will have a bright, strong craft that can be used for playing with a tabletop builder.
The wheels can be made to rotate using axles - small sticks that are inserted into the holes of the boxes.
I will be glad if it is useful to someone. Thank you for your attention!
"Little Penguin." Master class on making crafts from waste material I would like to bring to your attention the making of a penguin toy. It can be done with children 5-7 years old. You will need red and black cardstock. "Fish in polyethylene." Master class on making crafts from waste material to decorate a site. This fish is not simple, this fish is golden. You will find understanding with her. Three wishes will be granted! Hello, dear colleagues and friends! Allow me. Master class on making crafts from waste material “Dandelion” Today I would like to present to your attention a master class on making a “dandelion” from waste material or simply ordinary household material. Master class on making crafts from waste material “Funny Bee” 1. We will need colored paper in yellow, black and blue, a toilet paper roll, scissors, glue. 2. Cut the paper. Master class on making a surprise “Ballet” craft with a 3D effect from waste material Crafts from waste material are still relevant. To make them, you just need free craft materials and your imagination. "Bell". Master class on making crafts from waste material Once again I present crafts from waste material. For work we will need: an empty plastic bottle, scissors, plasticine. Master class with children on making crafts from waste material - the Christmas tree toy “Owl”. To make the “Owl” we will need a toilet paper roll, scissors, glue, a sheet of white paper, a ruler or a creative one. Master class on making a hedgehog from waste material Make a Hedgehog with your own hands (for the lesson “Apples for the Hedgehog”) Lesson notes on fine arts (Modeling) first junior group. Master class on making crafts from waste material “Hyacinth for Mom” This master class on making a hyacinth flower in a pot will be useful not only for preschool teachers. Master class on making a windmill from waste material. To decorate a site in a kindergarten, my husband and I made a mill. The basis of the mill - the body - is made of MDF, but you can use a board.
Source
Let's move on to the front beam
1. Take a walnut blank measuring 13x152x305 mm. Saw off a 13 mm wide rail from one of its edges and set it aside to then make from it the gussets of the front axle I and the rotary block N. Cut the rest of the workpiece to a thickness of 10 mm and cut out the sidewalls of the beam F. Glue the core and the sidewalls (Fig. 1) , aligning the ends and edges.
2. When the glue has dried, sharpen the F/G beam blank and saw it to the dimensions indicated in the “List of Materials”. Make a copy of the beam template and attach it to the workpiece with spray adhesive. Cut the beam along the contour on a jigsaw or band saw with a narrow blade, saving the bottom trim for further work. Drill a 5mm hole at the front end of the beam, transfer the J and K position markings from the template onto the material, then remove the paper template.
Having secured the wooden plate to the cross-bar, make cuts in the clamp and traverse J, K according to the markings on the templates. Remove excess material between the edge cuts in several passes.
Having installed the scrap from the F/G beam at the bottom, create a parallel surface for installing clamps in order to glue the clamp and traverse J,K on top.
With the scrap underneath, drill a hole in the F/G beam through the holes in the clamp J.
3. Cut out the front axle H and drill a through hole with a diameter of 9 mm in the center (Fig. 1). Take the J gusset blank you saw earlier and mill a 10mm chamfer along one edge over a 50mm section (Fig. 1c). Saw off the gussets of the specified length from the chamfered area, and set the rest of the workpiece aside.
Do-it-yourself mini tractor: how to make it, the best homemade options
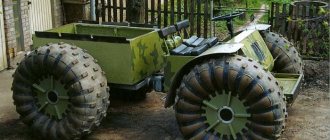
A mini tractor is just like a tractor, but with slightly less performance sacrificed for maneuverability and efficiency. In addition, some specimens are so light that they can be transported in a trailer. Small tractors perform all the same tasks as their higher class counterparts. You can also attach attachments to them for cultivating and fertilizing the soil, cleaning the area and transporting various loads. In addition, many tractors, even those made independently, have a rotation drive for auxiliary units and hydraulics.
They differ from walk-behind tractors, first of all, in that they are full-fledged agricultural machinery. Of course, a powerful walk-behind tractor also has considerable functionality, but when operating it you have to walk all the time. This is very tedious, especially when cultivating a large area of arable land. And when working with a self-propelled machine, even the smallest one, the operator gets tired much less - after all, a steering control is installed on the homemade machine. Understanding all the advantages of mini-tractors, domestic inventors sometimes create first-class specimens with their own skillful hands. On the Internet you can now find many descriptions, diagrams and even ready-made drawings of such homemade products.
Pros of installing hydraulics
Hydraulics are installed on a minitractor in order to ensure the operation of some of its mechanisms and facilitate the control of this unit. A unit with installed hydraulics has its advantages.
- The car becomes easy to control. The steering wheel can be turned with virtually no effort, with one hand.
- Hydraulics makes it possible to use various attachments.
- The use of hydraulics allows you to modernize the brake system. Thanks to the hydraulic cylinders installed on the unit, the unit brakes instantly.
You can make hydraulics on a mini tractor if you purchase a ready-made system in advance in a store or use parts from old agricultural machinery.
Mini tractor designs
For the most part, when making a tractor, amateur designers simply remake some serial product, adding some components and eliminating others. This is an easy way, but it is not always feasible, since a complete machine must be available. And the design of homemade tractors, created from scratch, is individual in each case - today the variety of solutions is simply off the charts. For example, the frame for a mini-tractor is made solid and breakable (called “fracture”), the rotation is made with steered wheels and onboard, the layout is classic or in the form of separate modules, allowing you to change the purpose of the device. Install the hydraulic system (hydraulic system) and power take-off shaft. The cabin is not the primary task when creating a homemade product, so it can be built on later.
A tractor from the manufacturer at the price of a homemade product - the entire model range is here. We buy a good hitch for a homemade agricultural machine using the link. Read in this article - the easiest way to assemble a mini-tractor from a walk-behind tractor.
The homemade motor tractor proposed below is one of the easiest to manufacture and allows you to get by with affordable materials and parts. Assembling a homemade tractor is done on your own. Instructions and drawing are below in the picture.
But, of course, anyone who is planning to do something themselves, with their own hands, is recommended to have technical skills, the ability to work with tools and read drawings. And, most importantly, have a lot of time and a great desire to do it.
It is made from rolled metal. Strength calculations are a thankless task (and in this case, unnecessary). Therefore, you just need to lay down multiple reserves in advance. Based on this, using a channel from No. 6 to 12 is the best solution for a homemade mini-tractor. It is not worth making any “cuts” and “bending around” the units, as this will greatly complicate and increase the cost of the project. An ordinary flat “ladder” is simple and accessible to many.
As practice shows, for a homemade tractor it is more useful to use a channel of a larger rolling size (up to 20) as a front and rear traverse (cross member), since subsequently it is to these traverses that various working parts and auxiliary equipment are attached. Moreover, it is better to place it with shelves inside. And the channels of the side members (longitudinal beams) can be placed both inward and outward. Fuel lines and lines are laid inside the side members, which are naturally protected.
In shape, the simplest design of a homemade frame is a rectangle with two or more traverses. But a frame in the form of a trapezoid will have much greater rigidity. The width in the front part should be smaller to accommodate the minimum dimensions of the steered wheels, as well as to allow monitoring of movement strictly along the arable row. The joints of the side members and cross members must be welded or reinforced by welding gussets. Please make sure that everything is in order with the body of the mini-tractor, because all other units are attached to it. To connect the trailer to the frame, you can weld a hitch.
Layout
The relative arrangement of the units of any tractor has developed historically. The classic layout of a self-propelled vehicle is as follows: the engine is located in front, longitudinally, above the front axle. A gearbox is connected to it through the clutch, followed by a transfer case and followed by a drive axle. The shafts of the units are connected to each other using cardans and (or) couplings.
Compliance with this scheme will be the best option when creating a mini-tractor, since it will allow you to use existing units without changing them. According to the experience of many creators of homemade tractors, it is better to assemble the units “in place”, without doing unnecessary drawings and calculations. The best option is to place all the main components and homemade mechanisms on the finished frame, installing them on temporary supports (conveniently, on wooden blocks) and finding the best relative position. After this, you can begin to manufacture brackets and fastenings for tractor components. But we must not forget that all components on self-assembled tractors must be mounted through supports that dampen vibrations (rubber cushions). It is best to borrow them from the same equipment from which the unit was taken. Another important factor that needs to be taken into account is weight distribution, i.e. distribution of the total weight of the mini-tractor along the front and rear axles. The most acceptable option is that 60% of the weight falls on the drive wheels, 40% on the steering wheels.
Varnishing crafts
If desired, you can transform our craft by covering it with Wood Varnish, preferably colorless. Read how best to varnish a craft. Try to choose a quality varnish. Varnishing is carried out using a special brush “For glue”. Take your time. Try not to leave visible marks or scratches on the craft.
Engine for homemade
From the point of view of thrust-to-weight ratio, weight, availability and low cost of repair, it would be most logical when manufacturing a tractor at home to take an engine from classic VAZ car models, from 2101 to 2107, or install it from a motorcycle. They can be found in good condition for the price of scrap metal. If you're lucky, one car can become a donor for most of the parts for a mini-tractor. Or you can equip it with a new Chinese diesel engine.
The motor with clutch and gearbox are fixed as a single unit, which simplifies the work on a homemade tractor and saves the creator from many difficulties. Be sure to install a fan impeller on the shaft of the water pump (“pump”), even if it was not there. After all, the speeds of agricultural machinery are much lower than those of automobiles, so the operating mode of the mini-tractor engine is the same as when standing in a traffic jam. And this is considered heavy for any engine. Consequently, the radiator of the cooling system of a homemade tractor requires forced airflow.
Preparation of drawings
Before purchasing and preparing components, it is necessary to draw up a project for the future tractor. You can take drawings of finished models as a basis. The spare parts you have may differ from those declared, and changing the finished design will not be difficult. There are ready-made solutions for any modifications.
If it is not possible to use a ready-made project, then you need to prepare rough sketches yourself. During the assembly process, the arrangement of elements may change, but you must understand how the individual components will be located.
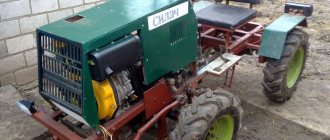
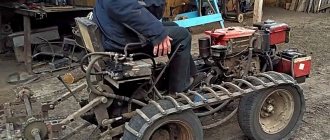
A mini tractor is an indispensable agricultural equipment for cultivating land, planting seeds and harvesting crops. This technique is especially in demand in the countryside, among owners of large personal plots. The cost of factory-made mini tractors is quite high. Even the latest Chinese-made technology is sometimes not affordable for everyone. Therefore, more and more home craftsmen are trying to make a mini tractor themselves, using available materials.
If you decide to assemble a mini tractor with your own hands, then first of all you need to select a power unit for it. The ZID engine is often used as the latter
. This is a four-stroke unit with a volume of 0.52 liters. and a power of 4.5 l/s, which is quite suitable for cultivating 2-3 hectares of land. The engine is easy to maintain, so it is often installed on various home-made equipment; moreover, it is easy to buy on the Internet.
Another option for homemade is. This is a two-cylinder unit with a power of about 12 l/s and a volume of 0.42 l. Although this type of motor has long been discontinued, there are a large number of offers on the Internet for the sale of this unit. It can be bought for approximately 5,000 – 8,000 rubles.
Often, when making homemade tractors, craftsmen use motors from cars. For example, you can find mini tractors with an Oka engine.
This engine has a power of 29.3 l/s and a volume of 0.649 l. In fact, this is a VAZ engine (VAZ 21083), only in a lightweight version, since it weighs 2 times less. A distinctive feature of the Oka engine is its low gasoline consumption and high efficiency.
A more expensive option is a Zhiguli engine.
. The engines of the VAZ car line have an engine power of 59 l/s (VAZ 2101) and higher. A tractor with a VAZ engine is a fairly powerful unit that can cope with almost any agricultural work.
It is easiest for owners of walk-behind tractors to make a mini tractor for the household, since this unit already has all the necessary control units. All that remains is to make a suitable frame, and the tractor is ready.
Transmission
As mentioned above, it is advisable to install the entire power plant on self-propelled vehicles. In this case, what will later become a mini-tractor will already have at least four forward gears and one reverse. All that remains is to coordinate the optimal tractor engine speed and the desired speed. For this, a transfer case from any all-wheel drive car will be quite sufficient. The most suitable option is an all-wheel drive UAZ. By the way, the previously discussed components can also be used from UAZ. But you need to understand that they are heavier, so the consumption of the resulting tractor will be higher, and all its power will be rarely used.
A good element for connecting shafts is an elastic coupling, which is installed on the output shaft of the VAZ gearbox. By making a flange for the transfer case, you can do without an intermediate cardan. But from the transfer case to the drive axle, a cardan is required, since the loads there are significantly higher, and the coupling will not withstand them. When building a tractor yourself, it is best to use the drive axle from a UAZ vehicle that has final drives. This will increase, firstly, traction, and secondly, ground clearance (which should preferably be increased to 450 mm). The required track size for a homemade mini-tractor can be obtained in two ways. The first way is to cut off the bridge stockings (narrowing the track). The second way is to make a spacer for mounting the wheels (by expanding). This has to be done because the nominal track of the UAZ is 1445 mm, which does not coincide with the accepted ranges for agricultural vehicles (1260-1285, 1350-1370, 1490-1515, 1790-1815).
Chassis and propulsion
This system in the homemade mini-tractor under consideration almost completely replicates that of commercially produced tractors, and differs from the automobile system in some important points. The main difference is the lack of rear suspension. That is, the drive axle is not attached to the frame on springs, but is rigidly fixed to it. This must be done if you plan to build not only the tractor itself, but also all the agricultural implements for it with which it is supposed to be used. Because attachments such as a plow, harrow, tiller, mower and other devices attached to the rear of a homemade mini-tractor very heavily load the rear axle and, if it has a rear suspension device, will quickly render it unusable. The front axle on a homemade tractor can also be installed without suspension - comfort will not be significantly reduced. It is convenient to use forks of cardan joints of trucks (ZIL, KAMAZ, KrAZ) as turning axles, spare parts for which can be found in motor vehicles and at metal receiving yards. Two forks are welded to the beam or directly to the frame, maintaining the alignment of the chassis, and two counter forks are welded to the steering knuckles of the donor car. The steering linkage along with the entire steering mechanism is also borrowed. The steering wheel is installed from a donor.
There is no point in using the braking system (disc brakes) in its “automotive form” on a tractor made by hand, since the speeds are not the same. Only the parking brake is enough. However, the mechanism is driven not from a lever, but from a pedal with a fixed pressed position. Then the homemade product can be slowed down in motion and fixed in the parking lot. It is best to use wheels from agricultural machines, since they have the required tread. But tires from SUVs or light trucks are also quite suitable if you cut them with the desired tread pattern (preferably herringbone for self-cleaning). Tire pressure is determined empirically to find the optimal combination of comfort and performance.
Fairy tales for boys - about cars and other equipment) | Topic author:
A TALE ABOUT A CAR THAT GOT LOST IN THE FOREST.
In one city there lived a machine. And her name was Bi-bi. She lived in a large garage under a large house. Every day she drove her uncle to work, and on weekends they went on vacation together. But BB really wanted to take a walk in the forest. And so, one evening, parked in the garage after work, my uncle said: “Tomorrow I don’t want to go anywhere, and you are completely free. You can go wherever you want." BB was very happy. The next morning, the machine woke up very early. The sun had just appeared over the horizon, and Bi-bi joyfully set off towards adventure. At first she drove through the streets of the city, past large houses, beautiful shop windows, past parks and squares. And then I drove out of town onto a wide highway. BB drove and sang her favorite song. We are driving, driving, driving To distant lands Cheerful neighbors Happy friends... The car drove further and further from the city. So she drove past a large field where a combine was working. Then past a village with small wooden houses and loudly barking dogs, and finally reached the forest…. The trees were tall, tall, and the grass next to them seemed so small, small... And the voices of birds were heard from the forest... BB saw the turn and turned towards the forest. How great it was in the forest! The sun had already risen high, but it was not hot at all in the forest, the leaves of the trees cast shadows and sheltered the car from the rays of the sun. Birds sang their songs around and Bee-Bi quietly sang along with them... The car drove just a little bit and saw a lot of small red mushrooms near the stump. “Chanterelles,” she remembered, and began collecting them. Then she saw russula, and a little further under a birch tree she found a boletus, and a little further on in the clearing honey mushrooms grew. And then BB found more boletuses, moss mushrooms and even a large porcini mushroom. When there were already a lot of mushrooms in the trunk, the car decided to rest. She ate blueberries straight from the bush and went back. BB drove and drove, but could not find her way home. She drove so deep into the forest that she got lost. The car beeped once, then again and again, but no one heard it. "What to do? “- thought BBC. "Already evening. It will be dark soon. Apparently we'll have to spend the night in the forest..."
SHAKE! (Giana) PART 2
The car found a small clearing nearby, saw a good place on it under the Christmas tree and began to make itself comfortable. But then it seemed to her that someone was crying. BB listened... yes, sure enough, somewhere nearby someone was crying. BB went to look and in a neighboring clearing she saw a girl sitting on a stump and crying. “Hello,” the machine greeted. - "What's happened? Why are you crying? “I was picking mushrooms and got lost...” the girl answered and began to cry again. “And I got lost too,” said Bee-Bi. "What is your name? “My name is Masha,” answered the girl, “And I’m Bi-bi.... Oh, it looks like it’s starting to rain... Let’s go to the neighboring clearing, there is a wonderful place under the Christmas tree. There we can hide from the rain and sleep, and in the morning we will definitely find our way home! “Masha got into the car, and together they hid under the Christmas tree. Drops of rain rustled on the leaves of the trees, but under the tree it was almost dry. Masha and Bibi were so tired during the day that they quickly fell asleep to the soothing sound of the rain. The next morning, they woke up to the sound of a motor somewhere nearby. “Hurry up, hurry up,” Bee-Bi hurried. – “It looks like a tractor is working somewhere nearby. He will show us the way to the highway.” The friends followed the sound... And sure enough, an old tractor was working very close by. “Hello,” the friends greeted. “Hello,” answered the surprised tractor. “You see, we got lost yesterday...” BBC began her story, “could you show us the way home?” "Of course, I will help you! First you will need to drive along this clearing. Then you will see a large oak tree, you will need to turn right near it, and then...then always drive straight and you will go straight onto the highway...” the old tractor told them. "Hooray! “- Masha shouted joyfully. "Thank you! Goodbye! “- answered BB and she and Masha drove towards the house. " Good luck! “- the old tractor shouted after them. The car and the girl quickly reached the highway. BB took Masha to her grandparents, and she also went home! Just like yesterday, the sun was shining, snow-white clouds were floating across the blue sky. The car drove along the road and smiled... She remembered the forest, the clearing, mushrooms, Masha, the night rain, the old tractor and felt very, very happy - after all, how great it is to have a day off!
Electrics on a homemade tractor
You can use any parts from anything, the main thing is that the voltage of the generator and consumers match. We must not forget that the battery is a container of acid. Therefore, it must be secured very firmly. The recommended solution is to place it under the seat of the mini-tractor in a special box or simply in a fence. Detailed description of the electrics in the pictures below.
Headlights and side lights, as well as brake signals, are desirable elements, but not required, since you can only use the result of your labors away from other vehicles.
Manufacturing a three-point hitch
The hitch is used to connect additional equipment to the tractor
, for example, a plow.
The hitch must be movable both in the horizontal plane and in the vertical
. In the first case, mobility helps to reduce the overhang of the nozzle when taxiing. Vertical movement of the suspension is required to lower the equipment into a working position or raise it into a transport position.
The hitch on a mini tractor is made from various parts removed from old agricultural machinery. It is quite difficult to describe how to make a three-point hitch at home. Therefore, it would be more correct to use the following video, which shows the dimensions of all parts of the device.
Driving on the roads
Not all home-made mini-equipment of designers goes on public roads. And this is correct, because our country lists a number of strict requirements that vehicles moving along them must meet. Even if everything turned out well and the product meets all the requirements, certification will be required to confirm this, which is very expensive.
Therefore, it is prohibited to drive on the roads on a homemade tractor. If it needs to be delivered to the work site, it is better to do this on a trailer. This, by the way, is one of the reasons why they are trying to make homemade work easier.
Source
Paper origami machines (diagrams)
Origami racing car
Such cars were popular in the USSR.
We also post a video: Origami tank Origami machine
Features of paper technology
Creating automobiles out of paper is a fascinating and educational hobby that develops engineering thinking, precision and accuracy of movements, and broadens one’s horizons. Models of paper tractors can be collectibles for paper modelers, an educational children's toy, or an original gift for Agricultural Worker's Day.
The process of assembling a model with your child can be unobtrusively turned into a lesson in physics or auto mechanics.
Examples of paper and cardboard layouts
The good thing about paper is that, essentially, from the same flat sheet you can create completely different three-dimensional layouts depending on the skills, age and desires of their creator. Experienced modelers create detailed samples of agricultural machinery that are absolutely identical to the real thing, and simple crafts for children can be the first step on the path of a design engineer.
T 40-A and MTZ-80 Belarus.
Crawler tractor DT-75.
Armored steam tractor Flowler B-5 1899
Mercedes-Benz MB TRAC.
Blue tractor from an educational cartoon.
Field worker using modular origami technique.
Step-by-step assembly of a three-dimensional model of the MTZ-80 Belarus tractor with step-by-step photos
MTZ-80 Belarus is a brand of universal row-crop wheeled tractors produced by the Minsk Tractor Plant from 1974 to the present. Creating MTZ from paper is a painstaking and time-consuming process, but the result - an exact copy of the legendary agricultural machinery on a scale of 1:43 is worth the effort.
Printable templates
Patterns are printed on paper with a density of 140-160 g/cm, cut out and assembled as the diagram suggests. Immediately after cutting out the elements, they are numbered on the wrong side so as not to be confused.
It is better to cut out parts as needed and immediately glue the elements together so as not to lose or crush the workpieces.
Assembly diagrams
Assemble the model according to the diagram, observing the numbering of parts and the order of actions. The folds are pre-pressed along the ruler. To get an accurate result, wait for each of them to dry before connecting the finished elements.
The resulting model will be a worthy piece in the collection of paper transport lovers or a gift for a child who is interested in various techniques. Middle school children can make a paper tractor together with their parents or older brothers.
Developments of simple tractor models for children's creativity
Children who are not yet able to assemble a tractor out of paper using complex patterns with a large number of parts can make a toy with their own hands from a ready-made development.
The process of creating a craft consists of several simple steps:
Blue paper tractor
In order for a cheerful educational cartoon character, a blue tractor, to “settle” in the house, the layout must be printed on a color printer on thick paper and assembled according to the step-by-step plan given above.
The toy will turn out more beautiful and more durable if you print the blank on glossy photo paper.
A simple tractor layout with a step-by-step assembly master class
It’s not difficult to make a model of a tractor with a trailer and rotating wheels if you carefully look at the photo and consistently carry out all stages of the work.
Reamers for printing
Let's start assembly
1. Note. Do not apply adhesive sealant to incisal joints until final assembly has begun after the finish has been applied. Prepare a piece of M5 threaded rod 67 mm long and use it to glue the front arms O, the rotary plate L and the rotary block N (photo G). Once the glue has dried, connect the pivot plates with a 22mm piece of threaded rod to the cap nuts (Figure 2).
2. To attach the upper arms Q to the clamp J, take an M5*76 threaded rod, washers and cap nuts (Fig. 1). Place a 67mm length of threaded rod on the I.-O blade assembly through the holes in the upper arms to position the blade under the F/G beam.
Attach the front arms O to the beam, then connect the vertical arms P with the front and upper arms using pieces of threaded rods, securing the assembly with nuts and washers (Fig. 2, photo H). Check how the assembled unit rises and falls.
H. Make 9 mm axle holes in four wheels with a diameter of 32 mm (photo I). Try on wheels with a diameter of 32 and 64 mm to the chassis A and the front axle H, inserting the axles and washers (Fig. 1). Remove the wheels and all fasteners. Cover the ends of the axles that will be glued into the holes with masking tape and apply a finishing coat to all parts. (We applied three coats of semi-matte polyurethane spray varnish with a 320-grit sanding pad in between.)