Toys can be made from anything - even gloves. It's simple, inexpensive and kids really like it. Kids will appreciate this idea and love a teddy bear or kitten made from a glove. This is also a great way to avoid throwing away one glove from a pair when the other one gets lost. She can be given a new, very cheerful life. Do-it-yourself glove toy - how is it done, and what ideas are easiest to bring to life? All manufacturing tricks below.
We sew soft toys
Interior soft toys are distinguished by their originality and character. They perfectly convey the mood and characteristics of their owners. Such a toy can be sewn as a gift, reflecting the individuality of the recipient. And you can do it for yourself - for a good mood every day.
Sewing soft toys is a great activity for children of any age. It has been noticed that children produce especially bright and interesting characters, created by a mind not befuddled by adult concerns.
Sew a soft toy KNOW-ALL BUNNY
You can use an ordinary glove. Step-by-step master class and patterns at the end of the article.
Chanterelle
To make a fox, you need to choose a bright glove - red or orange. In extreme cases, yellow and red will do. The body is made according to the cat principle.
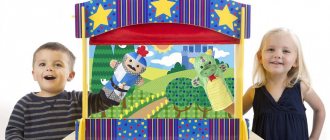
The cuff of the glove is cut off for the head. The upper part is sewn up according to the cat stitch principle. After this, the head is stuffed halfway, and the remaining hole is gathered with a thread to create a sharp nose. The head is sewn to the body. The red glove toy is ready! By the way, such toys can also be used for home puppet theater.
Cat
Since mittens are most often made gray or striped, it would be a shame not to use them to make a toy cat! To do this, cut off the middle finger and little finger of the glove at the base. The hole from the middle finger is sewn up, and the finger itself needs to be sewn to the place of the little finger.
Now, where the tail joins on the cat’s back, you need to make a vertical cut and sew the little finger there.
The body of the future cat is tightly stuffed with filler and pulled tightly together in the neck area.
The cat's head needs to be stuffed only to the middle, after which the glove sleeve is sewn up from the edges - this is how the ears are formed.
The finished Murzik can also be decorated with buttons, beads and ribbons.
What gloves and mittens are used to make crafts?
Crafts from gloves (you can make a design of any size and complexity with your own hands) are most conveniently made from:
- knitted products;
- leather or suede;
- rubber;
- knitted
Knitted gloves
Knitted gloves are ideal for creating soft animal toys, as well as dolls and Christmas tree decorations. The color of the source material must be selected depending on what object should appear as a result of the work (for example, if you need to make a bear from mittens, it is advisable to give preference to mittens in brown or black shades).
The key points in choosing material for crafts in this case are:
- the quality of the mittens (they should not have holes or abrasions, since such defects will negatively affect the process of creating the craft, as well as the final result of the creative process);
- lack of design and secondary decorations (patterns or decorations on the original material can interfere with joining the parts of the craft, and in some cases look out of place. Before starting the work process, you must remove all decorations, regardless of the method of their attachment).
Leather, suede
It is most convenient to use leather and suede gloves to make jewelry intended for attaching them to the head or clothing. When choosing a material of the type under consideration, it is important to pay attention to the uniformity of the color of the outer surface of the mittens, as well as its integrity.
Otherwise, the craft may turn out to be shapeless or deformed during further use after 2-3 weeks of regular wear.
Rubber
Any rubber gloves are suitable for crafts, regardless of their density and original purpose.
Using medical or household mittens, you can make both unusual Christmas tree decorations and animals, birds, as well as characters from famous anime and cartoons.
Workers
If you have work gloves at home, which in the vast majority of cases are a knitted product with several rows of rubber dots on the inner surface (to minimize slipping when using the mittens for their intended purpose), you can make a cat, a dog, or New Year’s decorations.
Instructions: How to make a bunny from a glove
We prepare the necessary materials to make a bunny from a glove
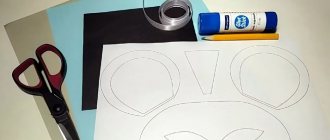
To work you will need:
- Glove
- Scissors
- Filler (sintepon, tinsel, cereals, etc.)
- Threads
- Beads
- Markers
DIY bunny
Making a bunny for a puppet theater
We cut off two fingers from the glove - the little finger and the ring finger. Later we will make one piece with a bunny’s paw, the second with a tail.
How to make a bunny
Sew one finger to the glove at the level of the thumb of the glove.
We tie the two middle fingers with a thread.
We have a blank for a finger bunny.
How to make a bunny
Making a head for a bunny with your own hands
The easiest way to make a head is to draw eyes, a nose and a mouth with a felt-tip pen.
Did you draw it? You've got a cute little bunny for finger play.
You can make beady eyes for the bunny, a beady nose, and stitch the mouth with red thread.
Filler for a bunny from a glove
The intended purpose of the toy depends on what you fill the bunny with.
To make a soft bunny, fill it with padding polyester.
If you want a fun, rustling toy, fill the bunny with rain, tinsel, and cellophane.
To train children's fine motor skills, fill the bunny with beads, peas or beans.
Making a snowman from a mitten
You can quickly make the cutest snowmen from a mitten: they will decorate a Christmas tree or simply become a universal New Year's decor.
You need to prepare for this craft: filler (regular padding polyester, cotton wool or cereal), skewers, elastic bands, foam balls.
How to make a snowman from a mitten:
- Fill the mitten with printed material and tie it with an elastic band. Place a foam ball on a skewer and stick it in.
- Now you need to decorate the hero. Tighten his body with another rubber band. Decorate the snowman's outfit with buttons. Draw a mouth and eyes on the face using felt-tip pens. You can sew a snowman's finger.
- You can put a hat on your baby’s head, which is also easy to sew from a mitten.
- You can put “brushwood”—finely broken twigs—under the hero’s arm.
You can make a whole family of these snowmen: they look very touching under the Christmas tree, by the fireplace, and on the window among the paper houses.
You will learn how to make a bunny from a child's mitten in the video.
Adorable toys can be quickly made from pompoms. How? Read our article: “We make simple and cute toys from pompoms with our own hands.”
It's in your hands
Do-it-yourself toys made from gloves is a completely new type of needlework, which stands alongside crafts made from socks, nylon tights and other things. Their beauty is that now you don’t need to throw away your old favorite thing - you can turn it into something useful for you and your child.
To make, for example, a funny little hare from a glove, you will need the following materials:
- A pair of bright children's gloves;
- Threads;
- Filler;
- Comfortable needle;
- Scissors;
- Doll eyes and other toy decoration items.
- Place the gloves in front of you, fingers down, pinkies facing out.
- Cut out the middle and ring fingers on both gloves, along with a piece of adjacent fabric to form a protruding wedge - you won't need these parts.
- Cut the remaining parts of the glove in half so that you are left with one piece with the thumb, index finger and part of the fabric up to the wrist, and the other with the little finger and part of the fabric up to the wrist.
- Cut off the excess fabric and sew the bases of the little fingers to each other - this is the head with the ears.
- Now sew together the parts with the thumb and forefinger - these are parts of the hare’s body with the neck, arms and legs.
- Stuff the body tightly with filler, also stuff the ears and sew the parts to each other.
For the product, it is better to choose fluffy gloves made of mohair or other fleecy material. Then the toy will be soft, and uneven seams will be hidden by pile.
Now your bunny is ready! Add doll eyes or button eyes to it, decorate its ears or neck with an elegant bow made of ribbon, attach antennae made of wire - give free rein to your imagination to make your glove toy look better than any store-bought one!
Progress
1. Pre-wash the glove. Turn three fingers inside out: thumb, index and little finger. Sew them up at the base, cut them off and turn the glove back onto your face.
2. Loosely stuff two fingers of the glove with padding polyester - these are the ears. Also fill the glove (palm) with padding polyester, forming a round head.
3. Tighten the glove with a thread at the base of the wrist - this will be the neck. If the glove is long, then its bottom can be cut off, leaving a small “tail” so that the body can be sewn on.
4. Cut out a pattern for a shirt and pants from fabric using patterns.
5. Sew the clothes and sew the cut off fingertips of the gloves to the sleeves of the shirt, having previously stuffed them with padding polyester.
6. Cut out the paws from the remaining part of the glove, stuff them with padding polyester and sew them to the panties.
7. Fill the resulting body in clothes with the same padding polyester and sew it to the bunny’s neck.
8. Sew the straps and sew buttons on them.
9. Cut out the beards, tail and eyebrows from the fur. Sew the tail to the back of the panties. Sew the muzzles to the muzzle.
Mustaches and eyebrows can be made from fishing line
10. Glue the eyes with superglue. Fur eyebrows can also be glued with glue. Embroider the nose and lip with pink thread.
Eyes can be made from buttons. This design for interior toys will be more interesting.
The nose and lip can be made from polymer clay or self-hardening mass.
For the nose and lips, you can also use non-bulk materials: foamiran, fleece, velvet paper, felt.
Pattern of a soft toy - a bunny from a glove:
Source
Kitty
A glove toy made according to these recommendations will be an excellent gift for family and friends for the New Year holidays. The kitten turns out to be very warm, soft and affectionate, so it will certainly cheer up the lucky person who will become the owner of such a unique creation. It is interesting and useful to make such toys together with children - they will be happy to participate in the process of creating such an affectionate and kind gift.
Tools and materials
- knitted glove with a pattern - 1 pc.
- stationery eraser - 1 pc.
- eye blank - 2 pcs.
- antennae preparation - 1 pc.
- double-sided tape - 1 pc.
Step-by-step making of a kitten from a glove
- We turn the glove inside out, while straightening the middle and index fingers of the knitted item. For ease of operation, it is better not to turn out the remaining fingers, but to leave them inside the gloves.
- Now we wrap the knitted elastic band of the product up. We make one bend, then a second and a third. The result will be a blank for a kitten with a future tail, ears and paws.
- We straighten and distribute the fingers remaining inside the glove, forming a tail and paws from them so that the cat turns out smooth and neat.
- Using a rubber band we secure the body and cat's paws.
- We attach the blank antennae and eyes to the right place using double-sided tape.
Video instruction
This video covers in detail how to make a handmade glove craft in the form of a small, affectionate kitten.
obuvdk.ru
Hello, regular blog readers!
I hasten to tell you about what a wonderful lesson my student Anya Atryakhina
for your classmates. Anya is a passionate and creative person. And how many interesting things her hands can do, how many excellent creative ideas her head contains! And how wonderfully she draws!
Yesterday Anyuta gave a real step-by-step master class, where she showed how you can make a cute bunny out of an ordinary old children's glove.
Handmade glove toys are a new type of handicraft. The beauty of them is that now you don’t need to throw away your old favorite thing. You can make something useful out of it.
Anya showed the guys a way in which they don’t need to cut anything off the glove. She patiently explained and showed her classmates each step. For the guys who asked for help, Anna helped, suggested, or explained again.
At the very beginning, the second graders “hid” their thumb. Then the two fingers that are in the middle must be filled with cotton wool. These are the future bunny ears, they should stand up.
Then cotton wool is added to the glove (this is the head and body of the bunny). Two fingers - future paws are pulled back and tied with a ribbon. This is how the hare develops a head and body. The edge of the glove is sewn up.
I was glad that I only helped most of the second graders tie a knot on a thread. Some guys held a needle for the first time in their lives, but they tried very hard! Well done! And there were those who masterfully sewed up the hem, and even helped their comrades!
At the end of the work, the children only had to attach the eyes. Some guys sewed button eyes, and some glued on “live eyes”.
Once upon a time there were gloves, knitted, gray with stripes. They lived for a long time, and for more than a year they were bored in a box with nothing to do. And they had a friend - a pink glove. Her sister got lost while out for a walk and since then the glove has been left without work.
And then Inspiration came and the old gloves got a new life - they turned into toy bunnies!
And here are the instructions for homemade glove toys:
1. We prepare the gloves as in the photo - already at this stage you can see how two bunnies are made from one glove, and the paws for them from the other.
2. Here is our “sketch” of the future bunny.
3. We sew up the sides and make the “filling”. You can fill the bunnies with padding polyester, or with dry aromatic herbs, but I made mine from finely chopped shreds left over from previous handicrafts.
4. The nose and eyes can be made from beads or buttons; in my hares they are simply embroidered with regular threads. The pink bunny has an embroidered flower - this is a native decoration of the glove.
5. If you sew the bottom above the cuff and add volume to the bunny’s butt, he will sit. If the cuff is rolled up, the bunny will be standing up - then the bottom should be carefully hemmed with a round patchwork or twisted into a tight roll from the leftovers and simply tucked in.
Handmade toys have a special warmth. And homemade toys from gloves, socks or other household items give them a second life, and for a child it looks like a real miracle when one thing turns into another!
If you create such hares in the spring, when the family accumulates a dozen worn or unpaired gloves, you can stage a real performance or game of Grandfather Mazai and the hares!
How to make a dog out of gloves
1. We will need a pair of gloves
2. Take one glove. Cut the tail and 2 front legs along the lines shown below.
3. Stuff the resulting parts with padding polyester.
4. Sew on the front legs.
5. Sew on the tail.
6. Take the second glove. Cut as shown in the photo below: two fingers in the middle and a thumb.
7. Fold the glove so that the hole from the cut off thumb is in the middle. Sew along the dotted line.
8. Cut just below the seam.
9. Stuff the future head through the hole that used to be the two middle fingers.
10. Sew the hole. Bend the ears down and sew them to the head with a couple of stitches or glue them.
11. Sew the head to the body.
12. Make eyes and nose from buttons. Sew in a circle around one of the eyes to create a spot. The navel can also be stitched with thread.
How to make a hare from gloves.
The hare is made in the same way. Follow the instructions in the photo.
Other Master classes from the section
We invite you to sew such a cute angel for your children's room. Let it guard your baby's sleep.
This glove bunny is a fun DIY craft for kids ages 7-8. If you make such a toy yourself, your three or four year old child will enjoy playing with it. For him, such a game will be a fun and interesting finger workout. After all, in order for the bunny from the glove to “come to life”, the baby will have to form a rather complex figure from his fingers, and then move them independently, controlling the doll. It’s best to make the craft from your child’s old glove; the hare should fit fairly tightly on your hand. The glove hare will help you learn poems about bunnies with your child by acting them out with this glove doll.
You can take a glove for a hare in any color, not just white, like ours.
Turn the glove inside out and cut off the thumb, middle and ring fingers. Sew up the slits in the glove: sew up the cut between the bunny's ears (where the middle and ring fingers were) so that the distance is smaller. We have them sewn perpendicular to the original location. We sew up the cut at the thumb. Turn the glove right side out.
Cut out the nose and eyes from felt. When gluing the bunny's eyes and nose, put a glove on your hand and mark the gluing areas. Felt can be replaced with cardboard, buttons or beads.
From the cut off finger of the glove, make a tail for the hare and sew it to the back of the craft.
Our glove hare craft is ready, you can put it on your hand. The hare's ears are the little finger and the index finger, bend the remaining fingers as shown in the figure.
Similar articles
How to wash Roman blinds: rules, features and secrets of the process How to wash Roman blinds
Stylish blocking of light Sun-protective drapes with lining
Exercises to gain feminine energy
What do Barboskin characters from the cartoon look like?
Crafts from old rubber gloves with your own hands. Master classes step by step
You can make simple crafts with your own hands from scrap materials with your child, regardless of his age. For example, with the help of knitted, rubber, leather or knitted gloves, even a novice craftsman can design not only primitive New Year's decorations, but also a doll, animals or representatives of ocean fauna (for example, octopuses).
To do this, it is enough to have a basic set of necessary tools and materials, as well as strictly follow certain instructions.
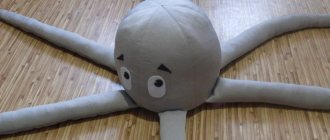
Octopus
An octopus made from a glove is even easier to create than other toys! Just fill it with stuffing, sew up the sleeve and decorate it with button eyes. An ugly sewn-up area can be disguised with a homemade wig, hat or hairpin - the toy will turn out to be flirty with such decoration. Or, another option for making an octopus from gloves - watch the video:
DIY glove toys
Many parents will agree that children constantly lose gloves or mittens. When my daughter lost four gloves over several seasons, from different pairs, I started thinking about what to do with the remaining gloves. And this is what I came up with: I decided to make cute soft toys from gloves with my own hands.
Materials and tools for making soft toys:
- gloves, maybe mittens
- filling: padding polyester, cotton wool or scraps of fabric.
- needles
- threads
- buttons for creating eyes
- ribbons
- pompoms
- yarn braids.
Manufacturing process:
- Take a glove, fold the thumb and two middle fingers inside, which are not needed for the ears, and sew up the resulting holes using a needle and thread.
— Fill the inside of the product with padding polyester, cotton wool or scraps of fabric. If you like, leave the “ears” empty so that they bend and hang freely.
— Sew up the main opening of the glove or mitten. The base of the toy is ready!
- Create a face for the toy. To do this, take buttons and sew them on, creating eyes. Then sew on the pompom, creating a nose. Cut a small piece of ribbon and sew it to the toy, creating a mouth.
- All! The soft toy cat is ready! Use the same principle to make other toys.
Similar:
- Next Christmas tree figures of Santa Clauses
- Previous Pictures from footprints
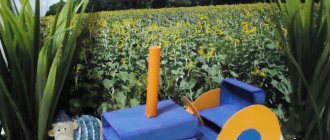
Gray hare from a glove with a rose. Master Class
Author of the craft: Trushina Lidiya Sergeevna, 7 years old. BDOU "Kindergarten No. 95", Omsk.
Material for making a hare:
- Glove
- White self-adhesive felt
- Colored felt
- Filler for toys
- Ear templates
- Eyes
- Black nose bead
- Skewer
- Satin ribbon for bow
- Glue Titan
- Pens black, green or felt-tip pens
- Gray threads
- Needle
- Scissors
- Pins
- Plate d=15 cm - template for roses
1. If the glove has double elastic, cut the seam threads with scissors and unroll it.
Make a small cut above the middle finger of the glove. Turn the middle finger of the glove inward and pull it through the cut. Twist the finger of the glove and sew it on to create a hare's tail. Make a seam between the 2nd and 4th fingers of the glove. Photo 1
2. Fill the glove with filler. Thread a thread along the bottom of the elastic band. Pull and tie the thread to create the neck and head of a hare. Photo 2
3. Attach the paper ear templates with pins to the felt. Cut out the ears and glue the white part onto the gray part. Photo 3, 4
4. Sew the ears onto the head. Photo 5
5. Cut out the cheeks from white self-adhesive felt, cut out the tongue from pink felt and glue them on. Photo 6
6. Glue the eyes and nose with glue. Make a drawing on the cheeks with a black pen. photo 7
7. Sew together the 1st and 5th fingers of the glove. Photo 8
8. Tie a bow around the hare’s neck. Photo 9
9. Make a rose for the hare. Trace a plate onto pink felt with a pen. Cut out a circle and cut it into a spiral. Cut out leaves from green felt and draw a design with a pen. Make a stem from a skewer and cover it with a felt strip. Roll a rose out of a spiral, gluing it with Titan glue. Glue all the parts of the rose together. Photo 10, 11
10. Place the rose in the hare’s paws.
We sewed this bunny with our own hands from an ordinary glove.
What other bunnies are on our website, see HERE.
Source