Recently, children and adults have enjoyed attending master classes on making puppets for the theater. The world of theatrical toys is many-sided and diverse: there are puppets, plasticine dolls (as in old Soviet cartoons), and glove heroes.
Home puppet theater was the favorite entertainment of Russian children before the revolution, when there were no computers and televisions. DIY finger puppets are very convenient because they are small in size. But the main thing is that, if desired, skillful hands can turn an ordinary glove into any fairy-tale hero. Children of senior preschool and primary school age willingly make glove puppets according to a pattern under the supervision of adults, and then come up with entire performances, acting them out in front of their peers and kids.
What is a bibabo doll for?
A bibabo doll is a toy that is the protagonist of a theatrical performance. In specialized literature, both combined and separate (bi ba bo) spellings of this name are found. Both options are valid. Sometimes the spelling “bi ba byy” is also found, but it is erroneous. Fans of glove dolls can find patterns in specialized needlework literature and on the Internet. Of course, you can buy ready-made mittens, but they are quite expensive and often look faceless, of the same type, and lack “zest.” Here are just a few options for using a fun glove toy:
Also, the bibabo toy will adequately decorate any exhibition of joint creativity between children and parents in a school, kindergarten, or educational center. Making such toys in technology lessons develops fine motor skills and imagination, and teaches children creative thinking. The bibabo toy is perfect for staging amateur children's performances based on Russian folk tales (“Kolobok”, “Turnip”, “Three Bears”) in theater studios for children.
They help children to relax, gain self-confidence, and overcome inferiority complexes and fears. Psychologists say that collective theater activities (for example, home puppet theater) are one of the most effective methods of art therapy for children and adults.
Materials for work
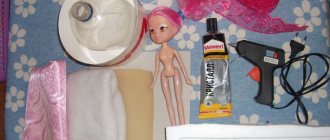
To knit mitten dolls, you will first need dense material for the base, as well as multi-colored shreds, pieces of fur, felt, and leather. The choice of available materials depends on the appearance of a particular toy . It’s easier to use a ready-made glove as a basis.
, but only if it is in good condition. Also, those who want to sew dolls for the theater with their own hands will need patterns. In addition, for work you need to prepare:
When working on cutting fabric, you will also need pattern paper, sharp scissors and a piece of chalk to transfer the pattern onto the fabric.
General description of the process
The principle of making any glove toys is the same, and the execution of the details depends on what kind of hero it will be. For example, a hedgehog definitely needs sharp needles. A hare can be recognized by its long ears, and a cunning fox by its sharp nose and fluffy red tail. First you need to draw a sketch or download a ready-made version from the Internet. Here is a general job description:
When several dolls are already ready
, you can sew a simple screen from thick, bright fabric and start a fun performance with the participation of bibabo dolls.
The simplest version of such a toy is an ordinary old glove with funny faces embroidered on the fingers. This option is convenient because five characters fit on one hand at once, and the toy does not take up much space. Instead of a glove, you can use an old mitten or an ordinary children's sock.
Decor options
The decor of the bi ba bo doll depends on what character it portrays. Each hero has his own style, his own unique appearance. The main thing is to make the character recognizable
. Animals can be sewn with characteristic ears and tails, mustaches attached, and claws and teeth attached. The decor of glove dolls with your own hands depends on the pattern, the material used, as well as on the capabilities of the needlewoman. Most often, bibabo dolls are used for performances based on Russian folk tales about animals. Here are the most interesting decor options for such toys:
DIY mitten dolls for home theater
There are many rainy days in Russia when children spend more time at home.
What can you offer them as entertainment? Construction set, story games, coloring books with pencils, board games, mosaic or lotto, watching cartoons, reading fairy tales...
Why don't you organize a home theater?
DIY mitten dolls for home theater
Of course, you can read in the evenings. And in order to choose a new interesting story or story, you don’t need to run to the bookstore. In the “fiction” section on the “Russian Magazines” website you will find everything you need, discover new names and new works of art.
You can read the magazine online or download it to your computer and then read it whenever you have time and desire.
So, in the evenings you can read, watch a movie, but I offer you another option for spending time, namely, creating your own home theater.
To do this, first of all, the whole family needs to make decor, toys, dolls and other attributes for fairy tales with their own hands. And then beat them in a friendly company. This is so interesting!
We have already learned how to make simple knitted dolls with our own hands for home theater. Don't remember? Then come HERE.
Today we will learn how to make dolls with our own hands from simple mittens.
DIY mitten dolls for home theater
So, what do we need for a puppet home theater?
1. Screen.
Instead of a screen, use chairs and a large blanket. But how the actors will be provided is up to you.
If you don’t want to make a puppet theater, but prefer just a home theater, then you can sew costumes and do makeup for children and adults.
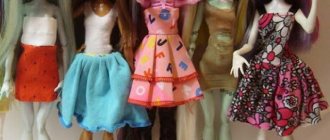
2. Dolls.
If we are talking about a puppet home theater, then I will now tell you how easy it is to make home theater characters from mittens and those dolls that you already have in your home.
Dolls for home theater from mittens
A good and very simple idea is a home puppet theater with mittens.
Sew several mittens from thick fabric or take ready-made ones. It is important here that they fit on the “puppeteer’s” hand. Even old mittens or gloves are suitable for creating home theater characters.
And now we will turn them into funny characters for our home puppet theater with our own hands.
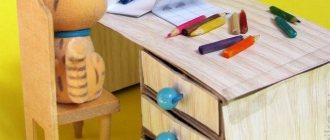
For example, a dog. It is made very simply from an old toy. I hope that the photo makes it clear what was done and how.
DIY mitten dolls for home theater
DIY home theater dolls
Hedgehog. See how easy it is to make it from a regular shower sponge.
DIY mitten dolls for home theater
DIY home theater dolls
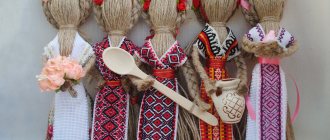
Grandmother is the main character of all fairy tales. Its elements are made using knitting and embroidery techniques.
DIY mitten dolls for home theater
This way you can come up with many different characters.
DIY home theater dolls
Then in the evenings, get together at home with a friendly group and play out the plots of fairy tales or made-up stories.
This way you will teach your child to be creative, he will be able to show his talents of singing, reciting poems and beautiful spoken language.
DIY dolls:
Knitted toys for home theater
White dog
Cat with a heart
Papier-mâché goat
Penguin from a plastic bottle
tkalez.com
Scenarios for games with dolls
Real masters of puppet theater can come up with a variety of amateur productions with the participation of glove heroes. Mitten toys in the hands of an experienced puppeteer can sing, dance, tell funny stories and even perform simple tricks. Funny characters can come to children's New Year's party and participate in the distribution of gifts along with Father Frost and Snow Maiden. In kindergarten, you can use glove puppets during sports and music themed events.
Recently, the tradition has been actively reviving in Russia
Christmas nativity scene using handmade dolls. In specialized literature, you can read about the rules for making dolls depicting traditional Christmas characters, and make glove heroes according to the recommended model.
For younger children, you can make a funny Parsley in a jester's cap, who can tell funny stories and move funny to the music. Older children will be happy to use bibabo dolls for role-playing games; for them you can make dolls depicting representatives of various professions: sailor, doctor, driver, cook, builder. The main thing is that the image is clear and recognizable.
The glove puppet is one of the favorite toys among children
, and for older guys. The bibabo doll gives the child his first impression of the theater, teaches the child to play different roles and helps him easily transform into his favorite character. Using such dolls at home, in kindergarten and in elementary school helps children develop creative thinking and awakens interest in theatrical performances. In order to make such a funny hero with your own hands, you can use any available materials - it all depends on your capabilities and creative ideas.
Attention, TODAY only!
Any theater always has its grateful audience, especially the puppet theater. It's worth spending an evening to make your own rag performers for the puppet theater. The biggest reward for a needlewoman is the happy laughter of her little one when he sees the doll come to life. For an older child, it will be a real discovery that the glove doll on his hand begins to bow and clap his hands. If you have ordinary work gloves on your farm, then within an hour a charming bunny may be born.
To work you will need:
- two knitted work gloves;
- two eyes (buttons);
- scissors;
- threads, needle;
- braid;
- knife for ripping.
Operating procedure
- The glove toy starts with the head. Take a glove and thread a red (sometimes yellow) thread on the cuff. Tuck your little finger, index finger and thumb inside and sew them up so they don’t come out again. The result was a hare's head with ears and a neck. It is necessary to sew at the base of the ears so that the leader’s fingers do not get there. After this, you can put a little filler inside the head.
- Take the second glove and hide your ring finger in it, also sewing up the hole. Gently clasp your middle and index fingers together and place the hare's head on them.
- Sew the head around the neck. To hide the seam and decorate our bunny, tie him a bow tie. All that remains is to sew or glue the eyes and embroider the muzzle. You can make a mischievous red forelock from synthetic fluffy threads.
In the same way, Parsley is made for the puppet theater. For metamorphosis, you just need to put a paper cap on your white ears. Don't forget that Petrushka wears a fluffy ruffled collar.
A Pinocchio glove doll can just as easily be born. Add a tassel to the cap and insert a long cardboard nose. Sew him a jacket with your own hands and the glove puppet is ready for the stage.
The importance of puppet theater in the development of a child
Most often, puppet shows are common in preschool institutions for children. Dolls play a huge role in a child's life. They become the first friends with whom the child begins to communicate. The movement of a favorite character brings joy to the baby and an ordinary day becomes a holiday for him.
But such performances are not just entertainment for children. With the help of puppet theater, educational and cognitive processes occur. At the age of 4-6 years, the child’s character is formed and interests in the environment appear. It is then that you need to instill in your child a sense of kindness, hard work, the ability to make friends and tell the truth.
Children enjoy taking part in performances
With the help of a puppet theater, you can find a common language with a child who does not talk to strangers. Such a child will trust the doll more. He will laugh at her jokes, offer his hand or allow himself to be touched.
Important! Regular communication with a doll character will help a preschool child become familiar with the environment and teach him to be courageous when interacting with peers and teachers.
Older children are taught to perform puppet shows themselves.
- Thanks to the theater, children become accustomed to art and develop their imagination.
- Over time, they begin to develop a talent for drawing, music or sculpting.
- While playing with dolls, the baby vividly imagines what the character is going through and thinks about what the right thing to do is.
- He shows all his emotions through gestures and facial expressions.
Puppet shows are an integral part of holidays in kindergarten.
Most often, it is the finger theater called bibabo that is used. The glove hand puppet is distinguished by emptiness inside and is so called because it is used as a glove, with the head placed on the index finger of the hand, and the middle and large ones replacing the character’s hands. The other fingers remain inactive and form a fist. You can learn how to make such a toy from this article.
Another hare
If the first bunny was made from a glove, then the second one can be made from a working mitten by sewing another finger to it. But it’s better to make patterns and sew the simplest toy for a puppet theater with your own hands.
- This glove doll is cut out of dense material that can hold its shape. Cut out two parts each for the body and yellow ears. Four pieces of white ears.
- Sew the yellow inserts to the two ear pieces.
- We connect the two halves of the ears. We won't turn it inside out. We put cardboard inside for durability.
- We draw eyes and a muzzle on one side of the body with felt-tip pens.
- We sew the two parts of the bunny together, not forgetting to insert the ears.
What kind of glove puppets can you sew yourself?
In order to organize a puppet theater, first of all you need to think about where to get actors. You can make your own heroes by carefully considering which dolls you need to make for the performances.
The most common remain:
- fox;
- hare;
- English frog Kermit;
- parsley;
- bear;
- wolf;
- three piglets;
- shark;
- herringbone;
- Father Frost.
In addition, you can make a bun, grandfather and grandmother, and chicken. With the help of these characters you can not only act out scenes from famous fairy tales, but also come up with your own scenarios.
Hare from a scarf
Many grandmothers know how to make a bunny out of a scarf in one minute, which, no worse than any other purchased glove toy, can cheer up a sad baby. It is enough to take a scarf, fold the two nearest corners and tie a loose knot. Then insert your index finger into the knot and speak in a hare's tongue.
This is the most primitive way to make a living toy with your own hands. There are patterns that are much more complex.
Toy for a professional
This is the kind of red fox glove doll you can get if you try hard. Such complex toys have a special cup or tube inside the head into which the puppeteer’s finger is inserted. It can be seen that the inside of the muzzle is filled with filler.
Having one “body” glove, you can easily change characters by simply changing their heads. In just a second, the fox will turn into a grandfather glove doll or the children’s favorite Parsley. The main thing is to have a set of different heads on hand.
Heads can be made in different ways. Look at the photo, what a characteristic grandfather glove doll it turned out to be! His head is crocheted around a tennis ball. You can also simply make the heads of any characters from salt dough or papier-mâché with your own hands, securing them on a cardboard tube for your finger.
Master class 2:
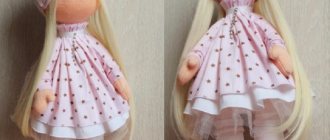
A doll that comes to life in your hands! She dances, jumps, rejoices, is offended, surprised and... makes friends with her puppeteer. And how the kids like it! The puppet theater fascinates children, and if you give such a “spiritualized” little friend to a child, he will be simply delighted. Moreover, it is easy to create a glove hero with your own hands. In this master class we will tell you how to make a glove doll using nylon tights and cotton wool.
Master class: DIY glove doll
To create your own cast for a puppet show, you don't have to go to the store for sources. I am sure that almost every home will have the materials listed below.
Necessary materials:
- stocking
- thread, needle
- piece of fabric 30x60 cm
- cardboard, paper
- scissors
- PVA glue
- gouache
- tassels
Doll base
- The core of our future product will be the “cartridge” on which the head is attached, with its help we will control the doll. To make it, we twist a strip of cardboard into a tube, having first coated one side with glue. The internal diameter of this part should be such that the future puppeteer can put it on the finger, but not to its base, but so that the finger can bend. This parameter should be taken into account if the doll will be controlled by a child. In this case, the cartridge should be tried on a child’s finger. Make the cartridge height approximately 8 cm.
- Next, we install a barrier on one side of the cartridge, onto which the glove fabric will later be attached. We cut strips of plain paper about 3 mm wide and glue them to the edge of the cartridge, coating it well with PVA. This way we increase the step we need to a height of about 3-4 mm.
- We place the finished cartridge on the battery to allow it to dry and gain strength. Making the head of a glove doll from nylon and cotton wool
- For the head, you will need two 20 cm sections of stocking. We sew each of them on one side with a strong seam, slightly rounding the corners. It would be possible, of course, to use the side of the stocking where there is a factory seam, but for our undertaking the width of the sock will not be enough, besides, the tights often have a strong draw in this place.
- Now we fill one of the resulting bags with cotton wool. For these purposes, it is good to use “rolled” cotton wool. It can create a uniform surface without visible differences.
- By tamping the stocking with cotton, we stretch it well so that the resulting “ball” is dense and elastic. This is how we got the head blank.
- Now we insert a cartridge into the future head of the doll and, stretching a thread along the edge with a needle, tightly tighten the nylon around the cartridge.
Drawing a face
Now the fun begins. We will create the face of our character. At today's master class, we decided to make a chicken - this, it seemed to us, is the easiest option for making a glove doll with your own hands.
Sew a glove dress, pattern and process
Using the same principle, you can create a wide variety of characters. Moreover, the option of sewing a glove doll with your own hands is the only one if the production requires some unusual character that is difficult to find in the store.
Any theater always has its grateful audience, especially the puppet theater. It's worth spending an evening to make your own rag performers for the puppet theater. The biggest reward for a needlewoman is the happy laughter of her little one when he sees the doll come to life. For an older child, it will be a real discovery that the glove doll on his hand begins to bow and clap his hands. If you have ordinary work gloves on your farm, then within an hour a charming bunny may be born.
Worker Bunny
To work you will need:
- two knitted work gloves;
- two eyes (buttons);
- scissors;
- threads, needle;
- braid;
- knife for ripping.
Operating procedure
- The glove toy starts with the head. Take a glove and thread a red (sometimes yellow) thread on the cuff. Tuck your little finger, index finger and thumb inside and sew them up so they don’t come out again. The result was a hare's head with ears and a neck. It is necessary to sew at the base of the ears so that the leader’s fingers do not get there. After this, you can put a little filler inside the head.
- Take the second glove and hide your ring finger in it, also sewing up the hole. Gently clasp your middle and index fingers together and place the hare's head on them.
- Sew the head around the neck. To hide the seam and decorate our bunny, tie him a bow tie. All that remains is to sew or glue the eyes and embroider the muzzle. You can make a mischievous red forelock from synthetic fluffy threads.
In the same way, Parsley is made for the puppet theater. For metamorphosis, you just need to put a paper cap on your white ears. Don't forget that Petrushka wears a fluffy ruffled collar.
A Pinocchio glove doll can just as easily be born. Add a tassel to the cap and insert a long cardboard nose. Sew him a jacket with your own hands and the glove puppet is ready for the stage.
DIY glove doll, parsley, Pinocchio, grandfather, fox, patterns
Any theater always has its grateful audience, especially the puppet theater. It's worth spending an evening to make your own rag performers for the puppet theater. The biggest reward for a needlewoman is the happy laughter of her little one when he sees the doll come to life. For an older child, it will be a real discovery that the glove doll on his hand begins to bow and clap his hands. If you have ordinary work gloves on your farm, then within an hour a charming bunny may be born.
Worker Bunny
To work you will need:
- two knitted work gloves;
- two eyes (buttons);
- scissors;
- threads, needle;
- braid;
- knife for ripping.
Operating procedure
- The glove toy starts with the head. Take a glove and thread a red (sometimes yellow) thread on the cuff. Tuck your little finger, index finger and thumb inside and sew them up so they don’t come out again. The result was a hare's head with ears and a neck. It is necessary to sew at the base of the ears so that the leader’s fingers do not get there. After this, you can put a little filler inside the head.
- Take the second glove and hide your ring finger in it, also sewing up the hole. Gently clasp your middle and index fingers together and place the hare's head on them.
- Sew the head around the neck. To hide the seam and decorate our bunny, tie him a bow tie. All that remains is to sew or glue the eyes and embroider the muzzle. You can make a mischievous red forelock from synthetic fluffy threads.
In the same way, Parsley is made for the puppet theater. For metamorphosis, you just need to put a paper cap on your white ears. Don't forget that Petrushka wears a fluffy ruffled collar.
A Pinocchio glove doll can just as easily be born. Add a tassel to the cap and insert a long cardboard nose. Sew him a jacket with your own hands and the glove puppet is ready for the stage.
Another hare
If the first bunny was made from a glove, then the second one can be made from a working mitten by sewing another finger to it. But it’s better to make patterns and sew the simplest toy for a puppet theater with your own hands.
- This glove doll is cut out of dense material that can hold its shape. Cut out two parts each for the body and yellow ears. Four pieces of white ears.
- Sew the yellow inserts to the two ear pieces.
- We connect the two halves of the ears. We won't turn it inside out. We put cardboard inside for durability.
- We draw eyes and a muzzle on one side of the body with felt-tip pens.
- We sew the two parts of the bunny together, not forgetting to insert the ears.
Hare from a scarf
Many grandmothers know how to make a bunny out of a scarf in one minute, which, no worse than any other purchased glove toy, can cheer up a sad baby. It is enough to take a scarf, fold the two nearest corners and tie a loose knot. Then insert your index finger into the knot and speak in a hare's tongue.
This is the most primitive way to make a living toy with your own hands. There are patterns that are much more complex.
Toy for a professional
This is the kind of red fox glove doll you can get if you try hard. Such complex toys have a special cup or tube inside the head into which the puppeteer’s finger is inserted. It can be seen that the inside of the muzzle is filled with filler.
Having one “body” glove, you can easily change characters by simply changing their heads. In just a second, the fox will turn into a grandfather glove doll or the children’s favorite Parsley. The main thing is to have a set of different heads on hand.
Heads can be made in different ways. Look at the photo, what a characteristic grandfather glove doll it turned out to be! His head is crocheted around a tennis ball. You can also simply make the heads of any characters from salt dough or papier-mâché with your own hands, securing them on a cardboard tube for your finger.
Master class 2:
www.toysew.ru
Another hare
If the first bunny was made from a glove, then the second one can be made from a working mitten by sewing another finger to it. But it’s better to make patterns and sew the simplest toy for a puppet theater with your own hands.
Hare from a scarf
Many grandmothers know how to make a bunny out of a scarf in one minute, which, no worse than any other purchased glove toy, can cheer up a sad baby. It is enough to take a scarf, fold the two nearest corners and tie a loose knot. Then insert your index finger into the knot and speak in a hare's tongue.
This is the most primitive way to make a living toy with your own hands. There are patterns that are much more complex.
Toy for a professional
This is the kind of red fox glove doll you can get if you try hard. Such complex toys have a special cup or tube inside the head into which the puppeteer’s finger is inserted. It can be seen that the inside of the muzzle is filled with filler.
Having one “body” glove, you can easily change characters by simply changing their heads. In just a second, the fox will turn into a grandfather glove doll or the children’s favorite Parsley. The main thing is to have a set of different heads on hand.
Heads can be made in different ways. Look at the photo, what a characteristic grandfather glove doll it turned out to be! His head is crocheted around a tennis ball. You can also simply make the heads of any characters from salt dough or papier-mâché with your own hands, securing them on a cardboard tube for your finger.
Master class 2:
You can sew an Elephant from fleece, any other fabric, and even faux fur in two colors. When making a glove toy, do not forget about the lining, which is best made from simple natural fabric. Baby elephant's eyes are made of plastic
Source https://prettytoys.ru/
Hippo Gosha
For this hippo you will need fabric in gray and pink colors, as well as light fabric for the lining. The toy is sewn in the same way as all previous works.
Snowman
It is best to sew from fleece, because... The fabric is soft and flexible. Please note that the body part has a line - everything below the line is cut from white fleece, and everything above is lined from any light fabric. Separate from the body, cut out mittens that can be decorated with snowflakes or stars. Make a carrot nose from a piece of orange fabric, stuff it and use black thread to make random parallel stitches to make a real carrot. Stuff the head, put it on the body with a lining and sew it to the body.
Clown
Use fleece for this glove doll. The hair can be made from chopped fleece or yarn. Instead of a cap, you can make a hat, cap or other clown headdress. Using this pattern you can make other human dolls. Make the lining for the glove according to the pattern of the front part of the glove. For lining you can use calico, chintz, etc.
Witches
A witch needs fleece: black for gloves and hats, boots, green for hair and legs, flesh-colored for head and hands. First sew the head, stuff it and put it on the glove. Adjust in height and carefully sew to the glove. Then “put” the hair on your head, and the top of the hat on your hair. Sew everything to the head with a hidden seam and after that put on the brim of the hat and sew it on. Sew the boots and feet to the glove.
The Dragon
For the dragon you will need fleece in green and orange colors. The lining can be sewn according to the pattern of the previous toy - a witch or a clown. To create plumpness in some places, use thin padding polyester.
Continuation of the “Wolf” mitten toys + mini MK
So the last toy is ready, which they asked to make for kindergarten before the start of New Year's matinees. Meet the wolf. There will be a lot of photos, so get ready. Next, I posted a slightly incomplete MK on sewing such toys, I didn’t take a photo of the beginning of the process.
Next, a small MK especially for Lenochka (Elena Zima), as she promised, she had time to take pictures. I’ll tell you the first stages like this. So we need: fleece (in this case gray), any lining fabric (inside the head), a little white fleece for ears, synthetic padding, eyes, nose and fur. We cut out our mitten from fleece, simply sew 2 identical pieces together and turn them inside out. There is no pattern for the mitten, I cut it by eye (there is nothing heavy there)
Next are the ears, one side is white fleece, the other is gray. We sewed them together, turned them inside out and lightly stuffed them with padding poly so that the ears would stand up.
Next is the head, it’s more difficult here. We cut out 2 pieces from fleece and 2 pieces from lining fabric. We put it in this order: lining fabric, then 2 pieces from fleece face to face and lining fabric on top; stitch and turn it inside out.
We stuff it on both sides between the fleece and the lining fabric, so we have an empty space between the lining fabric (where we will insert our fingers).
I hope it's clear, if you have any questions, please ask.
I roughly cut out the muzzle, sewed it, and finally trimmed it. From there you can already see which muzzle is better.
The result is a muzzle-nose.
Turn it inside out, sew in the spout and stuff it with padding polyester.
sew it to the head with a hidden seam.
In the neck we sew up the hole through which we stuffed the head.
Next we cut out the fur. The first two pieces are for the bottom of the mitten, the 2nd piece is for the tail and the 3rd is for the chest
We sewed the first two pieces together and sewed them to the bottom of the mittens.
Sew on the ears.
Next we sew the mitten to the head with a hidden seam.
Well, we sewed and sewed a tail to the mitten, sew on the chest, glue on the eyes and our wolf is ready.
This is my pattern for the head and ears. The only thing is that the ear at the bottom needs to be made even and not rounded.
stranamasterov.ru