Chair made of clothespins
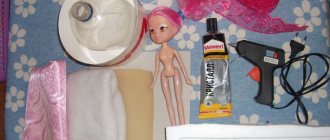
To make a cozy rocking chair for Barbie doll, you will need the following materials:
- 12 wooden clothespins.
- PVA glue (can be replaced with any other).
Now you can proceed to making a doll piece of furniture:
- Disassemble the clothespins, getting rid of metal parts.
- Arm yourself with the prepared glue and glue 8 halves together so that the parts look like a fan - this element will be the back of the rocking chair.
- The other 8 halves must be glued evenly to form a rectangle - this is the seat.
- Let's move on to the sides. Now you need to take two halves of clothespins and glue them together into a house. Then glue another half of the clothespin on the top of this “house” with the rounded side up, and at the base with the same side down.
- Make the second side in the same way.
- Glue all the parts of the chair together.
DIY rocking chair for a doll is ready!
Swing for Monster High dolls
2.A layer of napkins on top of the newspapers for leveling.
3. Don’t forget about the inside too. Designer's law: it should be aesthetically pleasing everywhere, even where it is not visible)))
4.Then we wrinkle the napkins as we want, soak them in a solution of pva + water and stick them on our swing. This decoration has already begun. The method is well-known, but very effective and allows you to hide all the flaws. How you will do it is up to you)))
6.After black, we took 2 shades of pink, lighter and more lilac. Using a semi-dry bristle brush, go over the protruding folds, first with one color, then with another. The final chord will be golden paint. It adds festiveness and luxury. Then we cover it with acrylic varnish.
Wicker chair
You will need the following materials for work:
- Cardboard.
- Needle.
- Wire.
- Twine (can be replaced with regular yarn).
- Sponge for washing dishes.
In order to make such a cozy wicker chair for a dollhouse, you need to follow the given algorithm:
- Cut the back of the chair from a piece of cardboard.
- Make a hole along the edge using a needle.
- Arm yourself with pieces of wire, insert them into the holes, first folding them in half.
- Using twine or yarn, weave the top.
- When everything is ready, secure the thread by bending the wire.
- Weave the bottom, also securing it with wire to the end.
Important! Make sure that the chair does not wobble.
- Weave a twine or wool braid of the same color and cover the curved wire with it to decorate it.
- Make them with the same wire for the chair legs.
- Arm yourself with a thin piece of dishwashing sponge, cover or cover it with a fabric of a suitable color and place it on a wicker chair.
Your DIY wicker chair for a doll is ready!
Important! In a similar way, you can make a table, bench and other pieces of furniture for dolls.
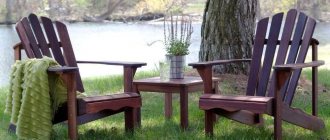
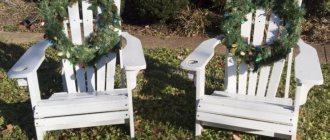
Where is the best place to install a rocking chair?
To make such furniture as convenient and comfortable as possible, it is best to install it in a recreation area under a canopy, namely: • on the porch of the house; • on the terrace; • near the barbecue under a canopy; • in the gazebo.
It would be great to put a rocking chair for outdoor relaxation in the garden on the lawn or next to the pool. Although in this case you need to be careful and make sure that such furniture is protected from precipitation. For example, such a product should be placed under a canopy at night, and during the day it can be taken out to any place.
Desk
Just 4 matchboxes, three beads, thick cardboard and colored paper are needed to make a stationery table or desk. Take 3 boxes and glue them together with their flat sides. Cover them around the perimeter with colored paper.
Cover the fourth box with the same paper, which will serve as a second support for the tabletop. The width of a matchbox is exactly equal to the height of a stack of three identical boxes. Decorate drawers by sewing beads as handles.
All that remains is to glue the cardboard tabletop on top and the desk for the doll schoolchild is ready.
How to determine size
Doll beds, wardrobes, chairs and sets are human furniture in miniature. Therefore, to determine its size, it is enough to take the dimensions of real furniture and reduce them several times. How long depends on the size of the doll itself.
Let's say the doll is 20 cm tall. The average height of a person is 170 cm. If you divide it by the height of the doll, you get 8.5 - that’s how many times you need to reduce real furniture.
Browse through the catalogs and choose a sofa that you like. Find out its dimensions and “adjust” them to your doll. As a result, you will get a beautiful, proportional sofa that looks like it came from the kingdom of the elves.
Chair made from plastic bottles
To work on the next version of the craft, prepare an empty two-liter container and scissors. The photo below shows which contours you need to cut the workpiece along. The armrests are elongated strips that will need to be folded in half and sewn. To make the fastening reliable, and at the same time beautiful, use a flower made of fabric and a button selected to match the color.
Pre-stitch the edges to prevent them from cutting your child’s hand. The seat is made round and filled with padding polyester or cotton wool. The soft part of the back is done in the same way. To prevent it from falling, it is sewn to a plastic base with stitches, again secured with a button.
What available tools and materials may be useful?
To create doll furniture and decorate the interior of a toy house, the following will be useful:
- matchboxes - they will become drawers of chests of drawers, desks, dressing tables, cabinets, chests of drawers for linen;
- cigarette packs – suitable for equipping Barbie’s dressing room and storing her boots;
- shoe boxes - these will make beds, tables, cabinets for large dolls;
- boxes of baby cereal, perfume, and other cosmetics;
- colored plastic bottles, yogurt cups;
- soft foam sponges, viscose napkins;
- pieces of plywood, fiberboard, wood cuts, boards;
- scraps of fabric, leather, gauze;
- plastic “eggs” from Kinder surprises;
- remnants of wire, chains, foil;
- sewing, knitting threads, laces;
- metal tin cans;
- paper, cardboard, wallpaper, PVA glue;
- tape, colored self-adhesive film;
- polystyrene foam, plasticine, polymer clay;
- gouache, acrylic, nail polish;
- beads, buttons, LED lights.
With minimal skills in wood carving, sewing by hand or on a machine, embroidery, it is easy to create incredible doll crafts.
Foam rubber option
A wonderful chair is very easy to make from foam rubber and fabric. Below is a master class on how to make it with step-by-step photos.
You will need five dish sponges, a piece of fabric, padding polyester, scissors, a needle and thread, lace and beads for decoration. Instead of sponges, you can take pieces of foam rubber or polystyrene foam and cut out parts of the desired size.
For parts from sponges you need to sew covers. We fold two sponges one on top of the other and sew the first cover on them. We sew the second one also for two sponges, but folded lengthwise. This will be the back of the chair, and it should be higher than the other parts. And one more cover needs to be sewn for one sponge. This will be the top seat of the chair.
About ready-made plywood construction sets
Ready-made plywood construction kits are cut out using a jigsaw according to design templates; buyers of such a kit assemble and glue them together themselves. In essence, this is a wooden blank for creativity, which not only needs to be assembled correctly in accordance with the instructions, but also painted and decorated in any convenient way. This product develops constructive thinking, becoming an entertaining puzzle for the whole family. Sometimes a set of collapsible furniture comes complete with the same plywood house or castle.
Kitchen set
Matchboxes are an excellent building material for doll furniture. These are ready-made drawers. You can make an entire kitchen set out of them.
- Take 9 boxes and fold them in three rows, gluing them together.
- Cover the perimeter with colored paper tape.
- Use a stapler to make staples at the ends of the “boxes”. These will be the handles.
- Make wall cabinets with your own hands from three boxes.
- Glue two parts of each box together.
- Paint or cover them with colored paper.
- Cut the top of the box down the middle. These will be the doors. Handles on them can be drawn with a felt-tip pen or glued onto a grain of rice.
Creative work
Making a swing for dolls with your own hands is not difficult, but hard work. It will be difficult for a child to cope on his own, but with the help of an adult he will have the opportunity to assemble a simple attraction for his favorite toy.
Before creating an accessory, you need to decide on their design and the materials from which they will be made. There are several simple ways to make a swing for dolls. We prepare or purchase the necessary material, stock up on creative ideas and get to work.
Ways to decorate a bed
Playing with dolls often turns into a real performance when your beloved Barbie is already a mother herself, and her little child needs a crib. Matchboxes with cardboard are an affordable and free material to make a doll bed. The whole process consists of three steps:
- glue 2 boxes;
- backs are cut out of cardboard;
- For beauty, doll furniture is covered with colored paper.
Instead of cardboard, the legs can be made from popsicle sticks.
It's not much more difficult to make a bed with drawers. To do this, matchboxes are glued in 2 layers. On the side that will be used as a box, beads are glued or secured with wire. After connecting with the backs, the furniture is decorated with paper. Additionally, it is advisable to sew bedding.
A small bed can be made from cardboard sheets:
- Initially, print out the proposed drawing or draw it yourself.
- The parts are cut out of paper, then transferred to cardboard or plywood.
- They assemble an interesting design of doll furniture.
Comment! If plywood is used in the work, the edges of the workpieces are carefully sanded so that the child does not get hurt during play.
Funny item
Creating a swing for dolls with your own hands is an opportunity to please your daughter with a new toy, as well as to build a new yard attribute for the beautiful Barbie.
The finished product can be purchased on the shelves of specialized stores, but it is better and more interesting to create gaming equipment yourself. The material from which interesting swing designs are made does not have to be purchased in a store. It can be ordinary trash that everyone has: ice cream sticks, toothpicks, cardboard boxes, knitting threads... Unnecessary trash can easily turn into a funny doll attribute.
Chair made from sponges for washing dishes
In order to make such a soft and cute piece of furniture for dolls, you need to prepare the following items:
- PVA glue (can be replaced with any other high-quality glue).
- Fabric in different colors (two will be enough).
- Cardboard.
- Buttons.
- Thread, needle.
- Ribbon, lace or braid for finishing.
- Foam rubber or ordinary kitchen sponges.
Now you can move on to making the chair. So, for further work you must follow these steps:
- Draw drawings of a doll chair - you can find them on the Internet or make them yourself.
Important!
The following parts must be present: a back, a base, two sides and a front.
- Cut these parts out of cardboard or hardboard.
- Start covering the parts with padding. First you need to glue the base and back.
- Cover the back of the chair with the prepared fabric. You need to make holes on the back side of the part using an awl, and then sew the prepared buttons to the upholstery - they should be the same.
- Cover the base of the chair with the same fabric.
- The front part and armrests also need to be covered with material, but of a different color.
- Give the sides the desired shape and glue them to the product.
- Now the parts need to be glued together and left to dry.
Important!
The product will dry completely in about 24 hours.
- If desired, you can make a small pillow for the chair as decoration.
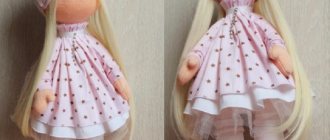
Wire bed
Making a jewelry box. DIY box: how to make it. detailed master classes
You will need: copper wire with a diameter of 1.2 and 0.4 mm (thick and thin), a ruler, wire cutters, pliers, super glue, tulle fabric or mesh, threads, a needle, scissors, a sheet of paper, a simple pencil, beads of 2 sizes , doll bedding set, doll, golden spray paint (optional).
Master Class
- Draw a sketch of the bed.
- Bed size: length 20 cm, width 10 cm, headboard height 10 cm, footboard height 8 cm.
- Bend a rectangle measuring 21x11cm from thick wire.
- Form two semicircular parts from thick wire - a headboard and a footboard with a height of 15 and 13 cm. These dimensions include the height of the headboard and footboard, the length of the legs is 4 cm and a 1 cm allowance.
- Secure the rectangle-lounger with several turns of thin wire.
- Attach the headboard and footboard pieces to the corners of the rectangle with thin wire, as shown in the image.
- Prepare 2 pieces of thick wire 28 cm long and make curls on different sides with pliers.
- Prepare 2 pieces of thick wire 18 cm long and also make curls with pliers.
- Screw on 4 pieces of thick curled wire with thin wire as a bed frame.
- Twist 2 shaped pieces from thick wire and attach with thin wire, decorating the headboard and foot of the bed.
- Sew tulle to the bed frame on all sides as a mesh.
- Glue 2 beads as crib legs.
- If desired, spray paint the bed with gold-colored paint and leave to dry.
- Make the bed with a set of bedding.
The bed for the doll made of copper wire is ready! I recommend watching this video!
How to make a bunk bed for dolls
Watch this video on YouTube
How to make a chair for a doll with your own hands?
We propose to make such an original, multifunctional doll chair. This chair will not only be a piece of doll furniture on which your doll can sit, but also an excellent place to store various doll items: bedding, clothes, jewelry, etc.
To make this chair you will need a cardboard box with a retractable inner part (matchbox principle). If you don’t have such a box, you can make it yourself from ordinary cardboard (see photo).
Cover the finished doll chair with a layer of foam rubber and cover it with beautiful scraps of fabric. You can also make fluffy armrests from foam rubber. Decorate the finished doll chair with decorative braid and colored strands. Make a drawer handle from ordinary buttons.
How to decide on sizes
The dolls, their houses and furnishings are smaller copies of us and our homes. And the most reliable way to make doll furniture with your own hands and not make a mistake is to measure real objects, reduce them several times, and then work with the obtained values.
Furniture for dolls - copies of our furniture
How much to reduce the actual dimensions depends on how small or large the doll is, because they range from 7 cm to 60 cm or even higher. Accordingly, they need furniture of different sizes. To determine the number by which the actual dimensions should be divided, divide the average human height in centimeters (170 cm) by the height of the doll. Let's get some number. This is how you will need to divide the dimensions of real furniture.
For example, the height of the doll is 15 cm. We calculate: 170 cm / 15 cm = 11.3. It is by this number that we divide all the parameters of “human” furniture. It is also worth saying that 14-15 cm is the most popular size among the doll population. Therefore, most of the finished furniture is made in a ratio of 1:12. We can also use the existing dimensions, at least so that we can navigate the scale of the required parts and the amount of materials.
Approximate dimensions of furniture for doll children
So, the most common doll sizes are:
- male doll 150 mm;
- female doll - 140 mm;
- child doll - 75-100 mm;
- toy baby - 65-75 mm.
If you need furniture for dolls of similar sizes, its parameters will be as follows:
- Bed: double – 160*130 mm;
- single - 160*75 mm;
If the toys you have are slightly larger/smaller, you don’t have to adjust the sizes. If the difference is large, you will have to increase or decrease (or you can calculate it yourself).
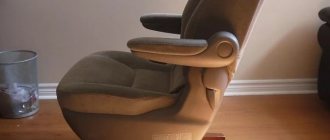
Chair made of foam sheets
The chair consists of 4 square sheets and one rectangular one. The sides are reinforced with a double layer, and the back is attached at an angle back. Cut out the necessary pieces with hot wire, then the edges remain even and smooth.
Subsequently, you can glue the round legs to the bottom, strengthening it with a piece of thick cardboard, and place soft pillows on the seat and back inside. You can not attach the side parts, but replace them with cylindrical pillows from old curlers.
Vintage furniture
We will make another chair in a vintage style from a plastic bottle, padding polyester and fabric.
To work, be sure to prepare sharp scissors, regular glue, cardboard, paper and a pen.
We measure the desired height of the chair and cut off the bottom of the bottle.
On paper we draw the back and a smooth transition from it to the seat.
Cut out the template. We cut the edge of the bottle along it.
Using the same template, cut out two parts from padding polyester.
We sew each detail with a ring.
Now you need to sew two rings along the top edge, turn them inside out and put them on the edge of the bottle. Glue the bottom.
Glue another rectangular piece to the top edge.
You need to sew a bottle cover from fabric. Its length should be the same as two heights of the chair.
Apply glue to the outer surface of the bottle and carefully put on the cover. Its lower part will be glued. We put the upper part of the case into the bottle.
We form beautiful folds on the back and glue them one by one.
We fill the bottom of the chair with padding polyester.
Cut out a circle from cardboard, the diameter is slightly smaller than the diameter of the bottle.
Cut a circle from padding polyester with a diameter slightly larger than that of a cardboard circle.
We bend the edges of the padding polyester and glue them to the mug.
Now the resulting soft seat needs to be covered with fabric.
We cut out a circle from the fabric with a diameter twice the diameter of the cardboard circle.
Place a frequent basting stitch along the edge of the circle.
We place the seat blank in a circle of fabric. Tighten the basting stitch threads.
The seat is ready.
We place the seat in the chair.
We decorate the chair with frills and beads. We sew small pillows.
Let's knit another pillow.
This makes a great vintage doll chair.
What will you need?
Scheme of a soft ottoman
To make a bean bag chair for a child, you will need to purchase the following materials:
- two types of fabric for covers;
- zippers;
- filler.
As a rule, homemade children's furniture is made bright and colorful, because this is the option that the baby will like. It is also important that the chairs are in harmony with the interior of the room. As for the material itself, it is important that it can withstand active children's fun. You can use leatherette, furniture or upholstery fabric. If you want, you can even take the skin.
The material for the inner cover should be light, breathable and smooth.
Some needlewomen have found a simple option - old unnecessary duvet covers. Regarding zippers, it is worth saying that it is undesirable to use metal ones, because a child can easily get hurt by them. They must match the color of the outer case.
Filler for an upholstered chair
Expanded polystyrene, or rather, balls made from it, is perfect as a filler. They are light, soft, non-toxic and fill the inside of the bag well. Thus, sitting in the chair will be very comfortable.
Design and decoration
If you were able to assemble a toy cabinet for your child, this does not mean that the child will like the masterpiece you created.
To do this, it must be beautifully decorated and supplemented with decorative elements. Even if you have a simple box, it should have a pleasant appearance. In this case, you can use the following registration methods:
- painting with a brush;
- pasting with wallpaper or photo wallpaper;
- decoupage with napkins;
- fabric covering;
- stickers, stencils.
Decorate your closet with your favorite characters
Decoration is the most enjoyable moment in work. Before you begin, talk to your child about what he would like to see in his room. You can make a cabinet as a small copy of the main piece of furniture or paste it to match the walls of the room. An original and interesting way is to apply stencils, which you can easily do together with your child.
Don’t forget about the braid, it always looks good along the edge of the product. Various satin ribbons give the product a truly childish, attractive look. Also, beads, sparkles, decorations and rhinestones can visually embellish children's furniture. You can use materials that you have at home, or you can purchase decorations at the store. Where there are a great many of them now.
If you know how to make a wardrobe from various boxes, you can always surprise your child. In addition, this is a great way to save the family budget, because buying such furniture now costs a pretty penny. And spending time with your child will only be beneficial. Don't doubt yourself, take the materials and create!
Manufacturing instructions
Children's pouf
How to sew a baby ottoman in the shape of a bag with your own hands?
Pouf patterns
The procedure is as follows:
- Make two patterns on paper: one for the inner cover, the other for the outer one.
- Lay out the templates on the material and secure with sewing pins, adding one and a half centimeters to the seams.
- Place the shapes on top of each other and sweep them away.
- Zigzag the edges using a machine and sew the two parts together.
- Secure the zippers.
- Make a funnel out of paper and pour foam balls through it.
It’s better to make two or three outer covers at once so that they can be changed for washing and updating the interior. This variety will surely be appreciated by your children.
Additional removable covers can be made
It is not necessary to sew a zipper on the inner cover. After filling in the filler, you can simply sew up the hole. But the outer cover must have a clasp so that it can be removed.
The chair should not be tightly filled. It is better to fill the balls to about 70% of the volume. Then it will be soft to sit in, and the pouf will take the shape of your body.
You can make a bag from a plain fabric and attach (sew/glue) a colorful applique of some cartoon character on top. A chair with a hanger (top handle) can be easily moved to other rooms or stored if it is not needed now.
Doll wardrobe
DIY wardrobe. master classes: 370 photos + drawings
You will need: plywood 4 mm thick, white wood paint, cabinetry veneer, carbon paper, sheets of paper, pencil, ruler, jigsaw, jigsaw blade for straight and radial cuts, glue, sandpaper, brushes and sponges for painting, scissors, screwdriver, construction knife, 2 wooden sticks, furniture fittings (hanger hooks, 3 handles, self-tapping screws, 4 hinges).
Master Class
- Draw a sketch of the cabinet.
- Draw each detail on paper.
- Cabinet parts: 2 side walls and 2 rectangular parts for them, roof, bottom, back wall, partition, 2 shelves, drawer module, 2 doors and 2 patterned parts for them, 4 figured legs, upper horizon (shaped part), drawer (bottom, back, 2 sides, front panel and a rectangular part for it).
- Cabinet size: height 34 cm, width 22 cm, depth 9 cm.
- Transfer the cabinet parts onto the plywood using carbon paper.
- Use a jigsaw to cut out every detail of the future cabinet.
- Sand each piece of the cabinet with sandpaper.
- Glue the redwood veneer to the cabinet sides, drawer fronts and cabinet doors, then leave to dry.
- Paint the patterned pieces for the cabinet doors, the rectangle for the drawer and 2 rectangles for the side walls with white paint, then wait until dry and glue them on as decoration.
- Paint the 4 curly legs with white paint and leave to dry.
- Glue the 2 sides, the back wall of the cabinet and the legs as shown in the photo and leave to dry.
- Glue the box parts together.
- Glue the roof and the upper figured horizon.
- Glue the partition inside the cabinet, visually dividing it in half.
- Glue 2 shelves as shown in the image.
- Glue a wooden stick as a pipe for things.
- Make hangers from pieces of wood and hooks.
- Paint the inside of the cabinet, hangers, top horizon and inside of the drawer with white paint, then leave to dry.
- Attach handles to drawer and cabinet doors.
- Screw the hinges to the cabinet and attach the cabinet doors.
The plywood doll closet is ready!
Materials and tools for work
There is no need to weld or nail anything. You will need a minimum of materials and not much time.
- Three pairs of Japanese chopsticks – if you have them, you don’t need to buy them specially; you can replace them with barbecue skewers or just even twigs;
- Good sharp knife.
- Thick threads and “Moment” type superglue.
- Cardboard, maybe colored.
- Shreds for decorating the seat.
That's all, actually. This is an approximate option; you can use everything that dad has on the mezzanine, balcony or garage - and, of course, your imagination.
Busy dads can, of course, if they have the time and desire, build for their beloved daughter a structure that fully corresponds to an adult swing, but in miniature. You shouldn't interfere with them. But for the time being, you can make a more simplified version from what is at hand.
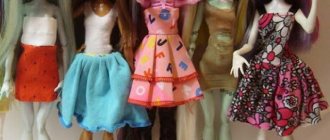
Variety of materials
Every girl probably made a wish to receive as a gift a large house with several floors, many rooms and a huge amount of furniture. With what pleasure they play with their dolls in such miniature houses, with what diligence they make various interesting household items for toys!
It will be a great joy for children to see a new piece of furniture in their dollhouse. And parents can often delight their child by helping to create great furniture. This is a special and interesting way to spend time with a child, during which an interesting product is created.
Almost any furniture can be made in miniature from scrap materials. Matchboxes, plastic bottles, sponges, matches, wine corks, cardboard, plywood, wire - all of this can be used to make amazing furniture. Thanks to imagination, unnecessary trash can be turned into things of incredible beauty.
You can make beautiful upholstered furniture from different materials with your own hands. Using different fabrics and decorative decorations, stylish and beautiful things are obtained.
Soft chairs for dolls can be made from different materials, different shapes and styles. The only expense will be purchasing beautiful fabric to cover them. And if you have pieces of suitable fabric at home, then this wonderful furniture will cost almost nothing.
Vintage elegant chairs are best made from multi-layer cardboard. It can be carved with beautiful carved details and painted golden. Or glue very thin quilling patterns. Monograms can also be made from polymer clay. Cover the cardboard parts with beautiful satin or velvet fabric. Add a little padding polyester or cotton wool under the fabric.
Chairs of almost any shape can be glued together from cardboard and cardboard boxes. Cotton wool or padding polyester is used to make the chair soft. All that remains is to cover it with fabric and decorate it.
Interesting and unusual chairs are made from plastic bottles. The cut out part can be covered with fabric or soft pads can be added to it.
You can also make a chair from foam rubber or polystyrene foam. You can simply cut out the desired shape from these materials, and then paste it over or cover it with fabric.
Dresser
You can use matchboxes to construct a wonderful chest of drawers with your own hands. For this we need:
- 4 matchboxes;
- 4 beads for legs and 4 for arms;
- thin fabric or colored paper;
- beautiful braid;
- glue, paints.
Paint all boxes inside and out with a single color paint. Glue them together and wrap them in cloth or paper. Glue the braid along the contour, 4 bead legs on the bottom, and bead handles on each drawer.