Hi all. I would like to show you a workshop for making a doll-box. After looking through a bunch of information on making boxes on the Internet, I came up with this option. So, we will need the following materials: 1. base for the box (I have a Raffaello box) 2. top from a large bottle (2.5-3 liters) 3. doll 4. fabric, lace (for decoration) 5. padding polyester or foam rubber 6. cardboard 7. glue 8. polystyrene foam
- Share
- Share
- Share
- Share
- Share
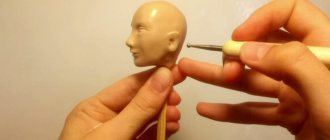
I glue a doll on top of the neck
- Share
I cut out a circle from cardboard with a diameter the size of the base of the box and glue this circle to the bottle with the doll. The bottle should be in the center of the circle
In every family where girls grow up, there are toys that are a pity to throw away, and they are no longer suitable for games. You can have fun with your children and make a doll-box together with your own hands. This way, your favorite toy will find a new life, and the child will receive a wonderful casket for his treasures. No one will guess at first glance that the beautiful doll is a homemade box made from plastic bottles. It's worth learning!
Required materials and tools
Among the list of raw materials used to make a doll-box, it is worth highlighting the basic components of the product, namely a store-made doll or a do-it-yourself doll, as well as any container that will act as a compartment for storing small items.
This role can be played by the lower compartments of boxes whose lids have become unusable for one reason or another; plastic containers, containers, bottles, etc. are also usually used for production. These two components will play the role of the frame and two main parts - the top and bottom of the doll-box. As for the rest of the set of useful materials for creating a box, the master can select it based on his personal preferences, as well as the main idea and work skills. It can be:
- pieces of fabric of any density, color and texture;
- ribbons and lace;
- padding polyester or any other filler for the lower compartment;
- rhinestones and beads, beads;
- sequins, buttons;
- braid.
To make a box using the kanzashi technique, special kits are usually used.
However, all these materials will require reliable fixation with each other, as well as with the base. Therefore, for work they usually use:
As important tools, without which it is unlikely that such an idea will be realized, it is worth noting a stationery knife and scissors.
Made from fur
Quite a rare method, usually used in designer dolls. But, such hairstyles look great and are very pleasant to the touch. If you are interested in this method, you need to buy a piece of animal skin with fur of the desired color and length.
Then squares of leather are cut from a single piece of cloth and glued. But sometimes they are cut out according to special blanks. Great for boy dolls. It looks quite unusual, so fur hair is not suitable for you unless you hate working with the skin of living creatures.
Related article: Crochet jacquard handbags with roses
Features of the box
It’s not difficult to make a Barbie box with your own hands. The principle is to make a storage container - a box. It is made from any materials that can stick together. They are subsequently covered with fabrics: velvet, chiffon, lace, ribbons and much more. The finished shell is decorated with various elements: beads, buttons, rhinestones and sparkles.
You can create such beauty yourself if you have free time and desire.
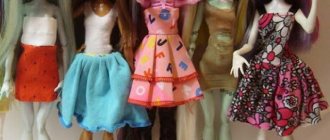
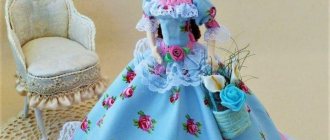
Barbie herself will be attached to the lid, but without legs. Her skirt is the box that is made first. Options with clothes from different eras look beautiful and elegant. These are fluffy skirts, lace, corsets, hats and jewelry.
There are many options for creating a box doll.
External design depends on the imagination of the master.
Important! There is no need to buy a ready-made dress for the doll. When making boxes, clothes for Barbie are made independently
Face design
Now that all the details are ready, all that remains is to draw the doll’s face. But don't rush! Practice on another piece of fabric first using our templates. Happened? Feel free to draw the face of your doll.
Doll box made from a bottle, details with photo
- Cut off the top of the liter bottle. To ensure an even cut, pour water as shown in the photo, draw the outline with a marker, and then drain the water.
- Next, cut off the bottom like the top.
- Cover the bottom part with white crepe satin with hot glue.
- To make the box stable, take a metal lid with a diameter slightly smaller than the diameter of the bottom of the bottle, and cover it with the same cloth.
- Glue the parts together with hot glue.
- Cut the doll to the hips.
- Cut the neck from the top of the bottle so that it is a few millimeters larger than the doll’s belt.
- Glue the doll to the part cut above.
- From a ceiling slab or cardboard, cut a circle equal to the diameter of the lower part of the workpiece with the doll. Glue it.
- From that crepe satin, cut a circle of such a size that when assembled, the edges are at waist level.
- Place the part with the doll in the center of the circle, gather the fabric on the belt, secure it with thread and additionally apply hot glue.
- Cut 2 strips of fabric 1/2 cm wide, glue them to the top and bottom parts on the back side of the doll.
- Tie a piece of satin ribbon 2.5 cm wide and equal to the bottom of the box +5 cm with thread and glue it at the very bottom of the box.
- Next, glue the lace onto the same piece of tape, gather it with thread and glue it with the next layer.
- Glue the next ruffle of ribbon of the same color to the edge of the top of the box.
- Glue the ruffle with lace. You can use the same tape as for the lower layers, or you can choose another suitable shade and mix the colors.
- Use a piece of tape to form the upper part of the dress, covering the doll with it. Glue lace onto your hands.
- Cover the shoulders with a piece of lace, forming a cape, as well as the lower part of the top of the dress.
- Glue on the last layer of ruffles. Form a fan from the lace. To do this, cut a circle out of it, fold it in half several times, and tie the center with a thread.
- Cover the bottle cap with matching fabric. Cut a circle out of cardboard with a larger diameter than the lid so that it looks harmonious with the size of the doll. Cover it with fabric, glue it to the lid, and decorate it with braid. Glue a 0.5 cm wide tape to the bottom.
- Give the doll a hairstyle and glue on a hat.
Wool tresses
An imitation of real tresses is made from goat wool. It won't take you much time, but it will save you money. To start, select some quality goat hair and wash it. After drying, cut into equal pieces and divide into strands.
Article on the topic: Knitting for children: pattern for beginners dresses for baby
Then, you need to take a sheet of tracing paper and draw a line in the middle, along the sheet. Now you begin to lay out the spinning wheels - one opposite the other, so that the base is slightly outside the line. Cover the top with another sheet and turn it over so that the line becomes visible.
Set the machine to the smallest step and start stitching along your mark. Fold the sheet in half and stitch 0.3-0.5 centimeters from the edge. Now all that remains is to free the workpiece from the paper.
Doll box made of satin ribbons, step by step with photos
For this box you will need 5 rings from furniture edges, spools of adhesive tape or a PVC pipe.
- Glue the 4 rings together with Moment glue.
- On cardboard, outline the inner radius of the remaining ring and cut out 2 blanks. They will be needed to create the bottom and lid.
- Wrap the glued rings over the edges with 3 cm wide tape, gluing in places with hot glue. Wrap the remaining ring in the same way with a ribbon of the same color, only 2.5 cm wide.
- Cut off the top part of a five-liter bottle and also wrap it over the edge with 5 cm of tape.
- Insert cardboard circles into blanks covered with tapes and glue them with Moment glue; you can also use hot melt glue.
- When the blank for the lower part is dry, cover the edge with braid.
- Glue a circle of decorative cardboard in the center of the bottom.
- Glue the small ring to the decorated part of the bottle with hot glue.
- Glue the lower part of the box with a ruffle of a suitable shade using hot glue. You can first secure each of the rows with tailor's pins, and only then glue it to the box.
- Blow out the middle of the upper part with foam and insert the doll into it in the center. Let dry overnight. If there is no mounting foam, glue the doll's hips to the edges of the top with hot glue.
- Also cover the upper part with ruffle.
- Make a top for the doll using matching lace. To do this, cut a piece of ruffle equal to a full turn of the doll’s chest and glue it to the back of the doll with hot glue.
- Make sleeves from the same lace. To do this, measure the circumference of your shoulder, cut out the corresponding piece of lace, and sew with thread. Turn it inside out and put it on the doll. To prevent the sleeves from falling off, fix them at the very top point with glue.
- Criss-cross glue the folded pieces of lace to the back and belly of the doll.
- To disguise the transition between the doll and the top of the box, string the ruffle on a thread, assemble and cover the doll.
- Tie a belt around your waist from a 1 cm ribbon.
- Give the doll a hairstyle.
Sequence of work
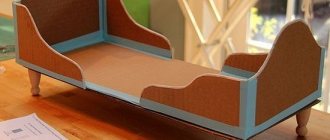
- Cut off the bottom of the plastic bucket - approximately in the middle. We line the inside with cotton pads and the outside with a piece of foam rubber.
- Using a sewing machine or by hand, we sew a cover for the bottom of the box from fabric intended for a dress. Then we glue it to this part of the bucket with a heat gun.
- We cut off the doll's legs at mid-thigh level. Glue the doll to the lid. We wrap the part from the waist with foam rubber to form the upper part of the skirt. We stick the foam to the bottom of the lid. We sew a cover for this part and glue it with a heat gun.
- We sew a cover for the middle part of the box and glue it with a heat gun, having previously wrapped the surface of part of the bucket with foam rubber. We connect two parts of the lid: the upper one with the doll and the middle cylindrical one. The result is a skirt consisting of two parts.
- Next, we proceed to the most creative part of the process of creating a box doll. Using a heat gun, glue on several layers of lace. We create the upper part of the dress - the corset and lace sleeves. We decorate the dress with beads or rhinestones. To create the image of a young lady, we give the doll an appropriate hairstyle. If this is a bride doll, then instead of lace for the skirt, you can use tulle, making gathers on a thread. Here you can show your imagination and use any decorations for the dress.
- We sew beads to the bottom and lid at their junction, which are connected by loops to each other. Due to this, the lid of the box will open.
The doll-box is ready. It is soft inside, you can store all sorts of things in it, including jewelry - they will not get scratched. A box made with your own hands will take its rightful place on your shelf or will be an excellent gift for someone.
Kanzashi technique for creating jewelry
The kanzashi technique is an entire art that was invented in Japan. It involves the origami process, but using silk. The basis of this technique is folding triangles from individual fabric cuttings. Box dolls using the kanzashi style will take on a new life.
In appearance, this is an ordinary Barbie doll in a fluffy dress, but few will guess that this is actually a treasure vault.
Not only your child will like such a small chest for small items.
To make decorative elements for Barbie using the kanzashi technique, you will need a small amount of fabric, scissors, glue and thread with a needle. Silk flowers will look best. For example, let’s carry out a tutorial on making a flower with round petals.
A chic box for trinkets can be made from ribbons using the kanzashi technique.
Fold the square piece of fabric in half. We bend the corners to the bottom vertex to form a rhombus. Turn the workpiece over with the smooth side up and the corners toward the center of the diamond. Fold it in half. Next, straighten the petal, holding the bend.
Popular articles Napkin with embroidered roses
It’s very easy to master; any novice craftswoman can handle it.
We treat the wrong side with glue, connecting the corners to each other. Excess fabric needs to be trimmed to make the flower look neat. Make several such petals. The last stage is joining the petals into a whole flower.
This decoration is added to the doll’s skirt, hat or belt.
Decorating the bottom of the box
Do-it-yourself box dolls are quite simple to make, and, perhaps, the stage of decorating the bottom part will be the most difficult, because the rest can only be done with glue. Here you will also need sewing supplies, fabric, foam rubber or padding polyester. First, sew the inside of the upholstery. To do this, the bottom of the base is outlined on the fabric, seam allowances are made and cut out, the bottom of the fabric is duplicated with a soft filler and stitched with beautiful stitches. Next, measure the height of the plastic base and the resulting circle around the perimeter, cut out a strip of fabric, lay a side seam and sew the finished bottom into this part. After all these manipulations, the stitched inner upholstery is placed inside a plastic base, the bottom of which is pre-coated with glue. Next, a circle of foam rubber is glued to the bottom from the outside to hide the ribbed surface. In this form, the base is placed on top of a pre-cut circle of fabric, folds are laid, and the outer sides of the bottle are covered. At the junction, the inner and outer upholstery are folded, stitched and masked, covering it with a beautiful braid. At this stage, you need to remember to insert a piece of silicone tape into the seam, which will connect the upper and lower parts of the doll-box. It’s easy to make another fastening with your own hands, for example on a chain, which will add charm to the craft.
Sewing a doll with your own hands step by step
Sew the prepared parts of the doll using a sewing machine. It will be difficult to achieve an even seam and neat stitching by hand.
But, if you have experience in sewing, then you can do it by hand. For ease of use, it is better to use zigzag scissors; the fabric will not fray.
Note!
- DIY feeder - step-by-step instructions for creating a feeder + detailed diagrams with photo reviews
- Do-it-yourself rugs - TOP 120 simple patterns with master classes on how to make them yourself + photo reviews of finished rugs
- DIY satin ribbon bows - step-by-step instructions for creating unusual bows + detailed diagrams with photos
When creating blanks, leave small free holes; filler is inserted through them to give volume to the doll’s parts (arms, legs and torso).
The resulting blanks must be turned right side out and ironed. We'll tell you how to make miniature doll ears separately.
Material for the craftswoman
While empty plastic bottles are typically reused, mayonnaise buckets go straight into the trash when emptied. Then they will have a short journey to a landfill and further pollution of the environment for 80-200 years. What if we break this sad algorithm and give these containers a new, rather uncharacteristic life?
You can easily and not very labor-intensively create a doll-box from a plastic bottle.
Let's consider the stages of creating a product.
Take an empty plastic bottle with a capacity of five liters (in the future you can use other types of bottles). From above it is cut parallel to the bottom where the neck goes into the main part of the container, from below - at approximately a height of 15 cm. Excess plastic can be thrown away. At part of the neck, the hard part is cut off along with the place where the thread is located.
The doll's legs (standard Barbie) are cut off at about mid-thigh. Next, the doll is glued to the top of the bottle. To do this, you can use an O-ring (or other available material) and glue or electrical tape. All plastic parts are covered with padding polyester. This work can be done using glue or a stapler, whichever is more convenient for the craftswoman (see photo below).
2 circles with a diameter slightly smaller than the diameter of the bottle are cut out of cardboard.
Satin (it will look best, but if you don’t have it, you can use another fabric) is used to line the top and bottom of the bottle, as well as both cardboard circles.
Using glue, one circle is mounted inside the future box, and the second on the bottom outside. This will give the box neatness and stability.
Next, the top of the doll is shaped. You can sew a top, which will later be connected to a skirt, or you can make a top from ribbons. At this stage everything is in the hands of the craftswoman.
A strip of satin fabric is glued on the outer and inner parts of the bottle, which will act as a connecting element between the top and bottom of the box.
The last stage is the final decoration process. The skirt is decorated with lace ribbons or other materials. This will hide the ignoble origin of the source material and make the finished product look expensive and vintage.
The design in the form of a wedding dress will look very relevant. This bride doll will be an excellent gift for a wedding or anniversary. As an additional bonus, put money or a gift certificate in it. Such a gift will outshine all boring and boring envelopes, even of the most modern design.
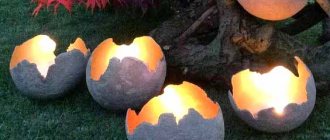
During the New Year, it will be very appropriate to decorate a doll-box in the shape of the Snow Maiden. It will be an excellent independent gift, and if desired, it can be filled with something, for example, sweets.
The same principle is used to make a doll-box from a mayonnaise bucket. The peculiarity will be that the top of the box will be the bottom of the bucket, and the bottom of the product will be the lid.
Making a box doll from newspaper tubes will be especially chic for advanced craftswomen. This is very painstaking work, but it will allow you to create a unique product of the highest level. You can get acquainted with the technique of weaving from this material in this video.
The finished product will show how much work the craftswoman put into it and, accordingly, it will be valued much higher.
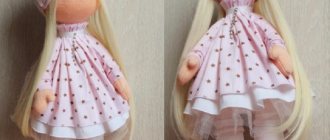
No. 4 Interior fabric doll
Such dolls - in the form of a teenage girl - are now very popular.
And it’s not difficult to sew it with your own hands - look at how simple the pattern is. An additional advantage of a pattern is that you can give it individuality and make it look like a specific person. This makes an interior doll an even more interesting gift. After all, with individual traits, she will be literally unique.
Author: Alina Minina.
Here is a clear example of individualization. Other dolls, sewn according to the same pattern, but so different from each other.
Of course, clothing plays a big role here. Perhaps, sewing an outfit is more difficult than the girl herself. It's especially difficult with shoes. Oh, it would be nice if shoes for textile dolls were sold ready-made somewhere. And you wouldn’t have to tinker with it and do everything yourself