Original crafts for the garden made of cement
Agree, it looks like dragon eggs)) We will make this from cement.
We take the same balloon and cover it with cement mortar. Here you can add a tablespoon of gypsum to the solution, but you need to work quickly.
After the solution has dried, remove the ball and paint the inside of the egg. You can use it as Easter decor in your country house by making a flower arrangement of primroses in it.
Conclusion
Decorating a suburban area is easy. This requires ingenuity and a little patience. We have given you some options for creating little people from available materials.
Sat down to rest after excavation work
The video in this article will provide you with additional materials. Garden dolls made from nylon tights, old rugs, used clothes and other unnecessary things will require minimal investment and will bring a lot of pleasure to both children and adults.
Source
The history of the origin of the manila doll
A manila doll is a talisman that will help attract love.
This is a traditional amulet, a powerful ritual symbol, full of rich sacred meaning. It is difficult to say when the first manila doll appeared in a Slavic home. According to archaeological scientists, women wove such amulets for themselves two hundred, four hundred and even a thousand years ago. They were also found during excavations of Greek cities and Roman settlements. It is possible that similar amulets were made during the formation of the first human communities, because family has always been the main value, and a good match has always been a cherished desire. The dolls were woven with love and bright thoughts.
The craftswomen told the amulets their innermost secrets and asked for the most precious things. They gave manilocks as gifts to loved ones and made them for themselves. It is believed that the first motankas were left bare and were constructed from branches, straw and rags. Then women began to decorate their amulets with silk ribbons and openwork lace, mother-of-pearl beads and even natural stones.
The secrets of making manila were passed down through generations. Each family had its own characteristics, which endowed the amulet with even greater power. Manilka was given as a wedding gift for a quick addition to the family; it was placed in a cradle and given to lonely girls. The little keeper of the family hearth became a symbol of well-being and prosperity.
Original do-it-yourself flower beds
Are you not a sculptor at all? But believe me, you can make these creative flower containers.
We need a plastic container, foam plastic, reinforcing mesh. We make a cement solution by adding a spoonful of gypsum directly into the palm with the solution and thus form our “sculpture”
But not all of us are fans of modern abstract art. You can easily make garden crafts in a classic style.
But, because You are not a sculptor yet, you need a template - it could very well be an old doll.
Because If this is not just a decorative garden figurine, but a flower bed in the shape of a girl’s head, then the top part needs to be cut off.
Then the head is painted. To add texture, the template is first painted with dark gray paint. Allow to dry and apply a layer of lighter paint. After drying, apply a layer of even lighter paint with light strokes.
This is a very simple process, and all the examples of this style that you see in the article were made by teenagers in a craft class.
How to effectively use garden crafts
Plan in advance where to place the figures in the garden. This will make it easier for you to determine the exact size and color of the garden figurine.
Decide what style your garden will be. No matter how beautiful your garden crafts are, they should be in the same style.
Don't overload your garden with crafts. A few simple but funny garden figurines in advantageous places in the garden will make a greater impression than an ill-conceived mass of the most wonderful and interesting garden crafts.
Coordinate the size of the figurine and the garden. Large open spaces require larger figures. And small garden figurines can be interestingly placed near tree trunks, near a small pond or fountain, along garden paths.
DIY garden crafts will add more interesting details to the overall look.
Source: delatsami.com
Choosing a landscape design style (photo examples)
When choosing figures, it is worth remembering the design and following the overall theme, which will be in harmony with the style of the site. If the garden area is decorated in a country style, feel free to place gnomes and figures of domestic animals - roosters and hens, goats, cows, geese, ducks, etc.
The oriental style dictates a limitation in figures, so one large statue of Buddha, a stone lantern, a crane or a dragon will be enough. It can also be almost any creature frozen in meditation. Japanese gardens are designed in the spirit of minimalism, and stones rather than figures should predominate in them.
Provence is similar to a rustic theme, but sculptural elements should not be painted in all the colors of the rainbow; choose white, sand and gray shades. Lavender colors would also be appropriate.
, the high-tech style is the most difficult for the home craftsman. But a couple of concrete balls (cubes, rhombuses, pyramids - other geometric shapes) will successfully emphasize the taste of the owner of the site. Modernism is not very common in Russian regions, but European practice is gradually winning over our owners of private houses. Laconicism, whimsical forms and asymmetry are the main points of this style.
Today there are many fans of the Greek style - to recreate it, sculptures of ancient Greek goddesses, amphoras and fragments of columns are placed on the territory. It is difficult to create such products with your own hands, but it is possible - even a wine bottle can be turned into an amphora.
In English design, garden figurines are practically not used. Lovers of everything British can decorate a flowerbed or lawn with their favorite characters from English fairy tales such as “Alice’s Adventures in Wonderland,” “Harry Potter,” “Winnie the Pooh and All-All-All.”
ECO style does not accept rubber or plastic. Wooden, metal or stone products would be appropriate here. Figurines and garden items with a rustic theme will fit perfectly into the eco-landscape.
Decorating the garden with tires
Do you think that decorating a garden with car tires is bad manners? But no! Take a look at these works of art and you will change your mind. True, not everyone can do this, but creative people are capable of this, if only they had patience and inspiration.
We will teach you how to make simpler figures, but anyone can make such products.
What will you need?
First of all, you will need to take car tires (tires) that have already served their purpose. Winter, summer, studded, universal tires, from a car or truck - it doesn’t matter.
You can even make a swimming pool out of a large tractor wheel. And small but very interesting designs are made from old bicycle tires. Tires from wheels from a car or a children's bicycle will also find their use.
You can cut tires with a grinder (the thickest ones), with a sharp knife, but best of all, with a jigsaw. Fasten with self-tapping screws, bolts, staples - it all depends on your tools, experience and the type of figure chosen.
"Swan": step-by-step instructions
A tire swan is one of the easiest figures to make yourself.
You will need for work:
- tire (one tire per swan);
- electric jigsaw or other sawing tool;
- wire for frame;
- chalk;
- colors - red for the beak and black/white for the eyes and plumage.
Manufacturing scheme:
Procedure:
- Using chalk or a white rubber marker, draw a sketch on the tire. You can work even without a stencil - apply the pattern directly to the tire.
- Cut along the contour with a jigsaw to get the outline of the swan's body in a spread, as shown in the picture above.
- Turn the tenderloin wings side up.
- Insert a wire frame into the body to help the swan hold its shape.
- The swan's beak should be red. If desired, paint the body white. Choose paint for exterior use. Dry the product.
- You can also use a tire as a stand.
The process of creating a swan from a tire with your own hands is shown in the video below:
Very skillful dolls for the garden
Our gardens are beautiful, cozy, well-groomed and... as a rule, too serious. Sometimes you just want to add some fun touch. For example, place homemade funny dolls in it.
Marina Kuzmina, author of books on gardening and handicrafts
We decided to make the dolls with our own hands, and began making them from what we had on the farm. We ourselves didn’t notice how carried away we were, so over time we formed a whole “puppet theater.”
We dressed up our “actresses” and sent them “for a walk” to the most beautiful corners of the garden. Now we carefully look after these people: when it rains, we cover them with film or umbrellas, and those who are lighter, we bring them into the house or under a canopy, and hide them in the house for the winter.
Malvina child of the bouquet
Malvina was created using seemingly completely waste items: packaging from flower bouquets left over from one of the family anniversaries.
The elegant bags made of corrugated paper, trimmed with foil, surprisingly resembled fluffy women's skirts with frills, which, in fact, decided their fate. Making such a doll is actually not difficult. The main thing is to accumulate 15 multi-colored flower bags and prepare a stable stand for the doll’s body. We do it like this: we insert a wooden stick 120-150 cm high into the cross of the New Year tree and secure it firmly. The stand can also be attached to an old car steering wheel.
1. We string flower packages onto the stand, starting with the largest ones. They need to be positioned with the wide part down, each attached with a thin wire - this will create a multi-tiered skirt.
2. At the shoulders, we attach a couple of smart bags with the wide part up, and bend the edges down, as if we were “sewing on” a wide collar.
3. Next we make the head. Take a piece of foam rubber measuring 35x50 cm and 1.5 cm thick. Sew the shorter sides together. Fill the resulting pipe, 35 cm long, with padding polyester or cotton wool, and pull a flesh-colored elastic stocking over it. Next, we tie it in a knot above the crown, and under the stocking in the face area we place a piece of elongated foam rubber.
4. We fix the head “on the neck”. We take a wooden rod 25-30 cm long (with a diameter of at least 3 cm) and insert it into the open part of the foam pipe - to its middle. We pull the bottom of the stocking tightly and fasten it to the rod. The free part of the rod is the neck.
5. Now you can do your face. We sew the base of the nose with small stitches, grabbing the stocking and the foam rubber with the needle at the same time. Attach the plastic eyes using universal glue or use large buttons. You can buy ready-made lips for a doll, but you can also make them yourself. Cover a piece of oval-shaped foam rubber with red knitwear and stitch it in the middle with red thread, forming sponges. We sew them to the doll's face at the corners.
6. The finished head remains to be screwed with wire behind the neck to the stand, covering the attachment point with a lush bow or scarf. Of course, you can’t do without a wig, which is also sewn to the head. Well, the final touch - you need to brown your cheeks with pink powder. Here you have Malvina - in all her glory.
Cheerful gardener
1. We decided to make a tall, stately female figure using a plywood mannequin. For such a torso, it is convenient to use clothes from your own wardrobe, “composing” an outfit from old things.
2. First, we prepared a human-sized “torso”. To do this, we cut out the outline of a mannequin from a piece of hardboard with the following dimensions: an oval head 25 cm high and 20-25 cm wide; neck 10 cm long; shoulders 50 cm wide; torso to waist height 65 cm. Then the hardboard was strengthened on a wooden rod 75 cm long and inserted into a wooden cross. We put a long-sleeved blouse, an underskirt and a sundress on the mannequin. To give the lady a natural rounded shape, we put a bust on the mannequin and put plastic cups into it (you can use the bottoms of plastic bottles).
Options for handmade dolls for the garden
To populate your dacha with cheerful people you will need imagination, patience and some available materials.
Example #1: fashionista
Stylish young lady with a sly look
Before making a garden doll, collect all the necessary material, which will mainly consist of old children's things:
| Name | Purpose |
| Jean jacket | Torso |
| Shoes | Lower legs |
| Hat | Decorating the head, giving the figure an extravagant image |
| A piece of thick knitwear | Palms and head |
| Tights | Upper legs |
| Fabric cut into thin strips | Hair creation |
| Foam rubber | Filling the doll |
Tip: It is recommended to immediately stock up on a large plastic bag or an old umbrella so that you can hide your handicraft from the rain.
Any old umbrella will save the craft from getting wet and will complement its surroundings
The instructions look like this:
- We stuff the jacket with foam rubber, while leaving the arms partially free to maintain greater flexibility.
- We sew palms with protruding thumbs from knitted fabric and sew them to the sleeves.
- We also lightly stuff the stockings with filler and sew them to the bottom of the resulting body.
- We attach boots to the bottom of the stockings.
- Creating the head:
- cut out a circle of knitwear, the diameter of which is twice the expected size of the head;
- we stretch the thread along its edge and tighten it slightly;
- fill a kind of bag with foam rubber and tighten it to the end;
- We take the resulting knot as the back of the head, and on the opposite side we draw eyes, a mouth and make a small nose in a similar way;
- We fix it with a bow of ribbon as hair and sew the finished product to the jacket.
- We put on our hat, thereby finishing the work.
As you can see, the price of such a doll is minimal, but children and adults are guaranteed to enjoy it. (See also the article Decor for the garden: features.)
Example No. 2: wicker man
This option is even easier to implement; you will need the following things:
| Name | Purpose |
| Long elongated basket | Torso |
| Ball of thread | Head |
| Round basket with handle | Headdress |
| Bow | Decoration |
Advice: it is also recommended to equip this doll with a special place of “service” made of wire in order to achieve maximum resemblance to a sentinel.
An example of a suitable “nest” for a doll
Next we do this:
- We turn the long basket upside down and glue a ball of thread to it as a head.
- On the front side of the head we attach eyes from an old doll or large bright buttons.
- We put a round basket on top.
- As a finishing touch, we tie a bow around the neck and place it in the prepared place.
That's it, now a real sentry is keeping order in your area. (See also the article Figurines for the garden: features.)
Example #3: painter
Painter on a smoke break
If you have been doing painting work and you still have some tools left over, then they can also be used to decorate the garden. Prepare:
| Name | Purpose |
| Paint brushes, 4 pcs. | Arms and legs |
| Roll of rope | Torso |
| Decorative bird nest in the shape of an elongated house | Head |
| thick wire | Upper legs |
| Colored paper | Bow decoration |
A set of necessary materials for the doll
Manufacturing proceeds as follows:
- We punch a coil of rope with wire near one of the edges and bend its ends in one direction, after which we attach paint brushes to them, and wrap the metal with rope pieces.
- We sew the remaining two hands with thick threads on the sides of the body as arms.
- We attach the head:
- take a twenty-centimeter round stick and lubricate one of its ends with glue;
- carefully insert into the hole in the socket;
- Lubricate the other end with glue and insert the resulting structure into the middle of the rope skein.
- We fix doll eyes or large buttons on the “face”.
- We make a bow out of colored paper and attach it to the painter’s neck.
- We put a hat or an inverted brush on the head, here you can already dream up.
Example #4: Gypsy
Gypsies have always been famous for their colorful outfits
A great way to give a second life to grandma's old rugs. You will need:
| Name | Purpose |
| Two old rugs of different sizes | Outfit |
| Iron flower girl | "Skeleton" figure |
| Coat hanger | shoulders |
| Colored threads and buttons | Design of individual elements |
| A piece of foam rubber measuring 40 by 60 cm | Head |
Beautiful crafts for the garden. DIY garden figurines
For those who liked the process of making concrete crafts, we will also tell you a simply stunning technique for creating garden figurines.
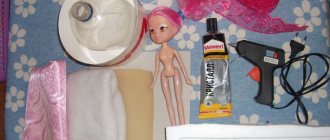
Yes, we will need the old doll again!
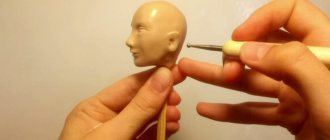
First, we strengthen the doll using hot glue and a bamboo sushi stick on a heavy stand. By the way, we can also make it from cement. We cut out angel wings from foam plastic and attach them to the doll with hot glue. Let's give the doll a new dress and, with the help of strokes of hot glue, create a more interesting texture on the wings and hair.
We coat our template with a solution of cement and gypsum. Let's paint.
Now, with the help of old toys, you can make almost any garden figurine yourself.