Useful tips
Watch the video if you are too lazy to read
Watch the video if you are too lazy to read
Envelope
- This is just a shell or packaging for inserting various objects or papers. Basically, we are used to thinking of an envelope as a “packaging” for letters or documents. But there are also envelopes made of thick fabrics or blankets for newborns.
Today we will learn how to make envelopes for different needs
and let's start, perhaps, with the most common envelope - a paper envelope.
How to make an envelope out of paper?
The simplest envelope
can be made from a square sheet of paper by folding the corners towards the center. To do this, you will need a square sheet of paper of the desired size, a ruler and a pencil.
1) Mark the very center of the sheet
point, measuring the distance to it using a ruler.
2) Fold the left and right sides inward so that the corners touch the center point
.
3) Then fold the bottom side up so that it covers the center and can be glued to the two already folded corners
.
4) Apply glue to the bottom sides of the envelope as shown in the photo. You can also use double sided tape
.
5) Fold the top corner down. The envelope is ready!
This envelope can be made in just a couple of minutes. It is based on the simple principle of adding angles. Here are a few more schemes for making envelopes from sheets of different shapes:
Diamond envelope
Envelope “from the heart”
Envelope with a square
Glue it up
Let's open the top valve. Pay attention to where the bottom flap overlaps the side flaps. This is where the glue needs to be applied. Lay out the bottom flap and apply glue to the sides. Now fold the bottom flap over the side flaps and clamp.
Tip: Use glue carefully. Check that there is no glue on the inside of the envelope.
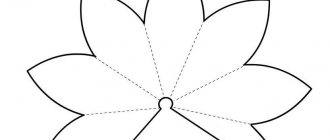
Envelope templates
With this template you can make envelopes from colored cardboard
:
By adding a ribbon, you will get envelopes for different occasions
: For greeting cards, money, invitations, etc.
Long envelope template
:
Envelope template on A4 sheet
:
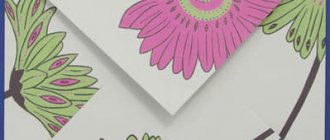
You can decorate envelopes with colored lace or appliqués
:
You can use beads and threads
to close the envelope:
Envelopes are sometimes decorated with various paper details
, made in various techniques: origami, quilling, scrapbooking, etc.
Read more about the quilling technique
you can read here.
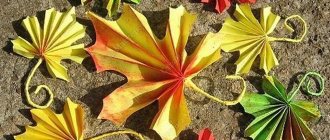
More about paper flowers
you can read here.
An idea made of cardboard with two pockets (compartments)
What do you think of the idea of an envelope with two compartments? Its functionality immediately increases. By the way, if you increase the width of the part, then this craft can also be used to store disks, only two of them can already fit.
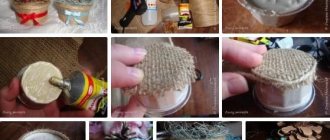
Manufacturing process:
We make a part according to the template and bend its lower ends.
But in advance you need to use the blunt side of a knife to draw fold lines from the inside of the workpiece, this is what it will look like.
We make beautiful curves at the edges. You can cut out parts in advance from a different color and stick them on top of the pockets.
We cut along the contour and glue the edges to the base so that the compartments do not turn back.
To add originality, these same edges can be sewn on a sewing machine or decorated manually with an overcast stitch.
DIY money envelopes
What could be more banal than a gift in the form of money
, but sometimes this is the only thing that comes to mind.
To make your gift unique, you can place it in a handmade envelope
. The envelope can be beautifully decorated and signed like a postcard.
Envelopes for money are usually made of cardboard and have an elongated shape so that the bill can fit completely inside it
. You can draw the templates yourself or use ready-made templates:
Envelope stencils “open when”
When you think
Or when you're lonely
When you're having a bad day
When you can't sleep
For the mood
Important: Such messages carry a positive attitude, give hope for a happy future, and make you think about a more serious step in the relationship. And under no circumstances will they make the recipient feel lonely.
Anyone who will create a “open when” postcard must know that all creative work is carried out only with inspiration, joy and enthusiasm. Even if something doesn't work out, rest a little. Remember for whom you started all this, what emotions served as the impetus for its creation. Wishing you endless creative flights!
Envelopes for money (templates):
Here are some helpful ideas on how to make and decorate money envelopes that make great gifts.
along with their contents.
Complex options
I’ll tell you a little about how to make scrap envelopes not according to a lesson, but simply using master classes for inspiration.
Scrapbooking is good because it allows you to make envelopes, postcards, albums and other amenities from literally nothing. Yes, now you can buy a variety of scrapbooking kits, but if you think about it, this technique came to us from the past, when women simply decorated their personal diaries and albums with lace, cutouts, and stamping. All these techniques can be used now.
If you are into scrapbooking (or, like me, you just periodically buy materials and can’t pass them by), then you have certain supplies - lay them out on the table and try to combine one with the other. For example, select a couple of sheets of paper, match them with cuttings, decorative tape, and ribbons.
If you don’t have all this stuff, don’t be upset, and you don’t have to run to the store. Because you probably have something. And from this something you can most likely make a gift envelope. What may be useful:
- scraps of cardboard, beautiful colored paper;
- felt and decorative fabrics;
- unnecessary postcards and photographs;
- printouts with any patterns;
- paper of different quality and purpose (even pieces of wallpaper will do);
- ribbons, bows, laces;
- buttons (by the way, a very fashionable trend in scrapbooking);
- miniature figures;
- trimmings of lace and thin fabrics;
- nail polishes, decorative glitter and even unnecessary shadows (they are used to make pseudo-craquelure).
I think you already understand - almost anything can be used to make an envelope!
I’ll give a step-by-step video lesson that I liked - I have nothing to add here, except that a DIY envelope for a wedding or an envelope for a gift card using this MK will be very, very beautiful.
Money in an envelope: original ideas
The envelope design allows you to place the money inside in different ways.
.
Here are some ideas to help you make original envelopes. For example, you can use a postcard
, inside which you paste a small envelope with money.
You can write wishes on the card, and when you look inside, the recipient will find a cash gift
.
Another option is to make the envelope also in the form of a postcard, and attach satin ribbons inside that will hold the bills
.
Book of envelopes
. This original idea will appeal to those who would like to learn how to save money. You can make some simple envelopes and sign them, indicating the purpose for which the money is stored in them and the time when it can be spent.
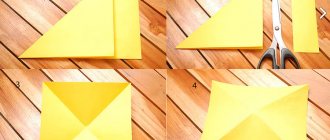
Idea with children using origami technique (step-by-step instructions)
In general, almost any envelope is made using this technique. Except for the fact that some templates are equipped with additional tabs and tabs to better secure the packaging. Therefore, you often need to use scissors to decorate them.
But, if you only have an ordinary standard sheet, then let's start learning the basics of origami. After all, making airplanes, tulips and roses using this technique is much more difficult than a regular envelope.
So, the first scheme allows you to create a very non-standard craft with truncated ends.
The same scheme, but greatly simplified, was used to create this pocket.
A standard envelope can also be made without the use of scissors, all that is needed is your accuracy and evenness of the lines.
And, when you become masters in this technique, then try to make a package that transforms into a box.
Another detailed instruction on how to quickly assemble a package using a completely ordinary square sheet.
You will need a square piece of pretty paper. You need to find the fold line; do this by folding the sheet diagonally.
And bend one end of the resulting triangle towards itself, onto the front part. Then you need to tuck the side and hide the end inside.
Craftsmen do not stop at well-known patterns, but try to create new amazing forms.
Or I saw that the designers have developed a version of the envelope that is also an insert with information.
I offer step-by-step instructions, described in the video, for creating a craft with a heart-shaped edge. You definitely won’t see such packaging from any of the other invited guests. You will be the only owner of such a copy.
This option does not require additional design. With its original edge it already stands out and attracts the eye.
Manufacturing method without glue
Gluing an envelope is not difficult, but simply folding it out of paper is a little more difficult. Of course, the post office is unlikely to accept such an envelope, but for an accompanying card for a gift it is perfect - the congratulations will look cute and touching.
How to make an envelope without glue: you need to look through the origami templates and choose the one you like; make a pattern; cut the workpiece; fold and iron well. Or you can fold the paper as in the video below: no scissors or glue is needed, just an A4 sheet.
At first glance, everything is easy, right? The second one is also easy, but I advise you to still try to make the beautiful envelopes you like with your own hands, first from plain paper, and only then from scrapbooking paper. Of course, you can immediately practice on scrap paper, but it’s not a fact that the envelope will turn out neat the first time, and creases made on thick scrap paper will be much more difficult to correct.
How to decorate an envelope folded from paper without glue:
- punch several holes with a hole punch and tie a beautiful ribbon on the envelope;
- use a figured hole punch to decorate the edges and corners of the envelope;
- make an applique from contrasting paper or special cutting.
Origami
For this you need a piece of paper. It must be rotated so that it takes on a diamond shape. Give it the shape of a triangle. Bend the upper part towards the base of the triangle. Bend the right and left corners. There should be a corner into which your finger can fit freely. Fold the top of the envelope down and insert it into the newly formed pocket. The product is ready.
Different ways
There are many ways to package a postcard, money or letter so that strangers cannot look into it, and, perhaps, talking about all the ways is a bad idea, the post will turn out to be too long and a rare bird will fly to its end. Therefore, we will do the following - I will tell you about the main ways to make an envelope for money with your own hands, and at the same time I will show you the works that inspire me. Using basic techniques and templates, you can make an envelope for any occasion with your own hands.
By the way, about templates: I advise you to save the templates you like, so you can be sure that you always have them at hand. I created a regular folder on my desktop where I put the pictures I like in Word files. However, I will talk about using word further.
Beautiful envelope for a holiday invitation
Making wedding accessories is a troublesome, but quite entertaining task, if you decide to do everything yourself rather than buy ready-made invitations, I will be happy to help you with this. I offer a master class on creating an invitation envelope that you can use not only for a wedding, but also for any other celebration.
To make a stylish wedding envelope you need to prepare:
- standard white envelope without markings or inscriptions;
- fabric glue;
- a square piece of fabric of the desired shade;
- ribbons;
- designer paper;
- pencil;
- ruler;
- scissors;
- iron.
Step-by-step production
First you need to make the inside of the envelope, it will be made of fabric. You shouldn’t be surprised by this choice; in the end, the result will definitely exceed even your wildest expectations.
Fold the fabric in the shape of an envelope, mark the center on the back side with a pencil, drawing a thin line. Fold all the ends of the flap towards the center, creating a full-fledged model of the future packaging.
Carefully trim off the excess material with scissors, fold all the ends and carefully go over the crease lines with a heated iron. Iron the fabric a couple of times, so it will better hold the given shape.
Connect all the edges of the blank with fabric glue, wait until it dries and place the invitation to the celebration inside. Additionally, you can tie the envelope with a thin ribbon - it looks cute and original.
When the inside is completely done, it's time to work on the outside. From colored paper, cut out a piece whose shape completely matches the shape of the paper envelope lid, but is slightly smaller in size. Now take PVA glue and carefully glue this part inside. Look at the photo and do everything exactly the same.
Place the decorated smaller fabric envelope along with the invitation to the celebration in a decorated paper package. At this point, the work is finished, you can start sending invitations to the recipients, I’m sure they will be very surprised to see such unusual and beautiful envelopes.