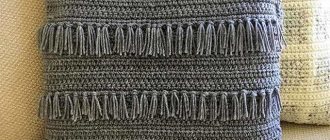
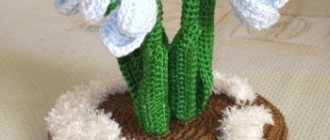
Crocheted leaves can be part of a floral ensemble or form the motifs of an entire canvas. In any case, these decorative elements are always in demand among needlewomen, as they decorate both children's and adult clothing and interior items. They complement bright flowers or berries, which are an interesting decoration for a hat, handbag or shawl.
Can you crochet? Publish your work on kru4ok.ru
Crocheted leaves are widely used in Irish typesetting lace. It is from these motifs that chic canvases are created, to later turn into an exclusive piece of clothing.
Clover Leaf
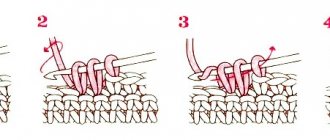
We start with a chain of 4 VPs. Next, knit 1 VP rise, 1 single crochet, 1 double crochet, in the last stitch of the chain knit 10 double crochets. The result is a petal. Knit two more petals in the same way. Then, without breaking the thread, knit a chain of 8 VPs. Next, the scheme is as follows: 1 air. p. lifting, 7 columns b/n, last. We attach the chains to the connection. stem all three parts of the leaf.
Freeform
In Irish lace, freeform is a technique where new elements are tied onto existing elements. This is done in order to obtain a canvas without gaps. Using this technique, you can make the entire product, or you can use individual large elements of it, so that you can then fit them to each other and sew them together.
Due to the density of frifom, they are often used for knitting warm items. They can be used to make a coat, a jacket, a woolen dress. Yarn is usually chosen in different colors.
The tips here are simple: you need to use different designs, but having the same style - you should not combine marine with floral, and the threads should be harmoniously combined in color.
Here are some pictures for inspiration. The left element is just part of the coat you see underneath.
Oval leaf
Knit the original chain of 13 VPs. Further knitting pattern: 1 VP rise, 7 RLS. The remaining 6 VPs remain unknitted. From the last sc we knit a chain of 6 ch. In 1 point of the lower river. connect 3 VP lifts plus 2 dc, 2 dc, 3 dc with one vertex, 1 dc2n in the 7th dc, 3 dc with one vertex, 2 dc, 3 dc with one base.
In one stitch we knit 3 VP rises plus 2 StlbSN, 2 StlbSN, 3 StlbSN with one vertex, 1 concave StlbS2N, 3 StlbSN with one vertex, 2 StlbSN, 3 StlbSN with one base.
Next: 3 air. lifting point, 2 stlbs s/n, 3 StlbSN with one vertex, 1 convex StS2N, 3 StlbSN with a common base.
Next: 3 air. lifting point, 3 StlbSN with a common top, 1 concave post with 2 nak., 3 StlbSN with a common top, 1 StlbSN.
We knit with a common top: 3 VP rise, 1 StlbSN, 1 convex stitch with 2 nak., 2 StlbSN.
Knitting a voluminous leaf: video master class
How to crochet maple leaves? Knitting patterns. Master classes
Shall we banish the slight melancholy on the eve of the first month of autumn?
Crocheted leaves will help you meet autumn with joy.
The leaves, the diagrams of which we bring to your attention today, are conceived as maple and chestnut leaves. Such leaves can perform both a decorative and protective function. You can use them as napkins, but they also work great as a coaster. And if you make them double or place them on a felt lining, you can also adapt them to oven mitts.
For crocheting similar leaf napkins, we have prepared a selection of patterns and master classes.
time to crochet leaves of this type: the pattern is simple and easy to remember. Any yarn is suitable for crocheting a napkin, just keep in mind that the size of the napkin will depend on the thickness of the threads.
- Don’t be lazy, set aside a couple of evenings to crochet this set of napkins: let a note of the romantic and bright of this time of year settle in your home.
- A free crochet leaf napkin pattern is published on the ABC knitting patterns website at the link below:
- Crocheted napkins: leaves. Scheme
A few more patterns and descriptions of leaves crocheted and knitted for those who love autumn: Maple leaves knitted Napkins-leaves crocheted Oak leaves knitted
Chestnut leaf
We start with the middle pattern, then knit the leaf elements one by one. The description describes the pattern of the smallest element. Knit the rest in the same way, adjusting the length by the number of stitches in the chain.
The first stage of knitting is to set a VP chain for the tail and middle. Next, the middle is knitted in circular rows.
Description
Middle
We collect a chain of 28 VPs. We close a chain of 4 VPs into a ring. Further knitting of the pattern:
- 1st row: 1 VP, 7 RLS, 1 VP. We finish the series SS;
- 2p.: 1 VP lifting, 13 RLS, 1 VP, SS in the lifting loop;
- 3p.: 1 VP, 20СБН, 1 VP;
- 4p.: 1 VP, 24 RLS, 1 VP;
- 5p.: 1 VP, 32 RLS, 1 VP.
Tail
We knit the remaining VPs with two rows. Stlb b/n, each attaching to the middle of the SS.
The smallest – bottom right – element of the leaflet
We make a chain of 13 VPs, knit a sc, attach a connection. dc in 3 stitches in the middle from 1p. ponytail We knit a SS in the next one. p. middle instead of 1 VP rise, then - in a chain of VP - 2 stb without / n, 2 half-column. s/n, 2 StSN, 2 columns. with 2n., 2 columns. from 3n., 2nd column from 4n., in the outermost VP and RLS we knit 15 StS4N.
Knit the second half of the element in a mirror manner. We attach the last column b/n to the middle. We skip 1 sc, 3 sc, *pico, 2 sc* - between *-* we repeat 10 times, 8 sc.
Tie the remaining elements of the chestnut leaf using the same principle.
Features of the Irish lace technique
This technique is fundamentally different from the knitting we are used to. Usually we knit the entire product or its parts - front, back, sleeves, and then connect it, that is, we work as if sewing. In Irish lace, we do not create the fabric at once: here, individual motifs are first made - usually flowers or geometric patterns, and only after that we combine them into a single fabric. This approach has both its pros and cons.
The undoubted and main advantage is the imagination and freedom of creativity in composing the pattern. You choose any pattern that suits you - and you can fill it the way you like best. The main thing is to have taste and correctly compose the composition, that is, to prove yourself as an artist.
In addition, you can create any product from the motifs you like - be it a napkin, jacket, decoration or, for example, a cardigan.
The difficulty lies in the fact that a lot of individual elements must be connected to each other, and also in such a way that the part does not deform and looks aesthetically pleasing. This is what we will try to teach you in our lesson. But first, let's prepare everything we need.
Maple Leaf
Knit a chain of 10 VPs and close them into a ring. Further knitting of the pattern:
- 1st row: in each stitch, knit a fragment [2 StC2H plus 3 VP], replacing the first stitch with 2n at the beginning. for 4 VP lift;
- 2p.: in each of the fragments of the previous one. R. tie [3 StsC plus 3 Ch plus 3 StS1H], replacing the first StS3H with 3 Ch rises at the beginning. Total – 10 fragments.
- starting from 3rd p.m. the work is divided. In 9 fragments, knit [4 dc plus 3 ch plus 4 sts. with nak.], at the beginning replacing 1 StSN 3 VP lifting. We complete the r. 1 double crochet. We unfold the work;
- 4p.: 3VP rise, in each of 9 fragments knit [5 DC plus 3 air. p. plus 5 StsN];
- 5 rubles: 1 air. p. lifting, 11 sc, in each of the remaining 7 fragments, tie [6 sc plus 3 air. p. plus 6 StСН], replacing the first StСН with 3 VP lifting at the beginning;
- 6p.: 3 VP rise, knit 7 fragments [7 DC plus 3 air. p. plus 7 StsN]. Complete r. 2 dc, knitted with a common top;
- 7p.: 1 VP lifting, sc in all points of one fragment before. r., 3 air. p.p., tie 5 fragments [8 Sts + 3 air. p. plus 8 Sts.] Complete p. 2 dc, knitted with a common top;
- 8p.: 5 fragments [9 Stsn plus 3 air. p. plus 9 StСН.], replacing the first StСН with 3 VP lifting at the beginning;
- 9p.: 3 fragms. and 10 StSN;
- 10 rubles: 3 fragments. and 11 StSN, replacing the first StSN at the beginning with 3 VP lifts;
- 11r.: 2 fragments. and 12 STSN;
- 12r.: 1 fragment, start 3 VP under., 13 Stsn plus 3 air. p. plus 13 Stsn.
Irish lace for beginners: where to start learning how to knit Irish lace?
crocheted irish lace elements
Like any other knitting techniques, Irish lace comes in 2 types - for:
- beginners
- professionals
In the first case, use a number of tips:
get yourself a hook and yarn and learn the basic elements of knitting - air loops, different stitches, keep in mind that the thickness of the thread is the most important indicator of the future beauty of your work, find simple patterns of patterns in the style of Irish lace and hone your skills in implementing them, think about how to connect the elements and what exactly do you want to knit, for example, a napkin, decoration for a summer T-shirt/T-shirt, start with the simplest ideas, for example, decorate a finished napkin/headdress with a rose in the style of Irish lace, crochet a mesh fabric and distribute fragments made in the considered method on it technique, practice more often to gain experience in implementing more complex works, for example, knitting beautiful things. dress made of Irish lace elements.
Continuous knitting maple leaf
In the image of the pattern diagram, a black dot marks the beginning of knitting.
We make a chain of 15 VP. Below is the scheme of work:
- 1p.: 1 VP under., 13 RLS, in the outer st. knit [1 column. without/n +4 VP + 1 column. no/n], 13th column. with double crochet on the other side of the original chain;
- 2p.: 1 VP under., 13 RLS, tie into an arch from VP [2 columns. without / n +4 VP + 2 columns. no/n], 11th column. without/n.
- knitting the next 8p. leaflet - see diagram. Let's continue:
- 9 rubles: 1 air. p. under., then - RLS according to the scheme, we complete 4 VP;
- 10 rubles: we begin knitting the side left part: 1 VP, 8 single stitches, 1 air. p. above the stlb without / n the lower r., 1 RLS;
- 11r.: 1 VP under., 10 StBN, 4 VP;
- 12r.: 1 VP under., 14 tbsp without/n, 1 air. p. above the stlb without / n the lower row, 1 sc in the sc of the 9th row.
Further knitting of the pattern - see diagram. We attach the even rows with columns without / n to the column without / n of the 9th row.
Without breaking the thread, we knit the second left side of the sheet in the same way, and continue knitting sc until the end of 9 p. on the right, 4 VP.
Next R. we start 1 VP under. and knit the two right parts of the sheet in a mirror image to the left.
Easy option
The process of knitting a lighter leaf for a chamomile can be traced using the example of a master class. To work you will need green yarn, a suitable hook and scissors.
We collect 12 air loops.
Then we knit a half-stitch into the second loop, and again we make another half-stitch.
In the next loops we knit two half double crochets.
We make two connecting loops. Then grab the threads with two half double crochets.
Next, we knit two sc, then make one half double crochet and finish the weaving with a connecting loop.
Using the same pattern, we knit the second half of the chamomile leaf.
Crochet oak leaf
We make a chain of 20 VP. Next, the knitting pattern for the pattern is as follows:
- 1st: in 2nd. from hook 4 Stbn, 4 half stitches. from 1n., 5 tbsp. from 1n., 2 StS2N, 8 StS2N to the outermost point. We turn the work around and knit in the opposite direction - 5 tbsp. with 2n., 5 tbsp. from 1n., 4 half-st. from 1n., 4 tbsp. without/n. semi-st. without n. to the outermost point;
- 2p.: in the 1st column without n. knit 1 half st. from 1n., skip the next one. p., * 3 StS1N, 3 VP, 1 half st. without n.* – next. P. ;
- 1 half tbsp. without n., 1 RLS, 1 P1N, 1 StS1N, *3 StS2N, 4 air. p., 1 half st. without n.* – next. P.;
- 1 half tbsp. without n., 1 RLS, 1 P1N, 3 StS1N, *3 StS2N, 4 air. p., 1 half st. without n.* – next. P.;
- 1 half tbsp. without n., 1 RLS, 1 P1N, 1 StS1N, *2 StS2N, 4 air. p., 1 half st. without n.* – next. P.;
- 1 half tbsp. without n., *1 half-st. with 1n., 1 StS1N, 1 StS2N* - next. P.
The second side is done in the same way:
- 1 tbsp. with 2n., 1 tbsp. with 1n., 1 p/st. from 1n.* – to the next. p., 1 p/st. b/n;
- 1p/st b/n, 4 air. p., 2 StS2N * – next. p., 1 tbsp with 1n., 1 p/s with 1n., 1 st.b/n, 1 p/s b/n;
- 1p/st b/n, 4 air. p., 3 StS2N * – next. p., 3 tbsp with 1n., 1 p/s with 1n., 1 tbsp. b/n, 1 p/s b/n;
- 1p/st b/n, 4 air. n., 3 StS2N* – next. p., 1 tbsp with 1n., 1 p/s with 1n., 1 st.b/n, 1 p/s b/n;
- 1 p/s b/n, 3 air. n., 3 StS1N* – in next. p., skip 1 p., 1 p/s from 1n., 1 p/s w/n in the last. p/s b/n 2nd r.
Stem: 5 VP, 1 st.b/n in 2p. from the hook, 3 p/s b/n, complete 1 p/s b/n to the outermost p/s b/n of the 2nd row.
We secure the end.
Learning to knit simple patterns for beginners
Craftswomen create lace products from wonderful interweavings of plant patterns, surprising with the unusualness and subtlety of the painstaking work of needlewomen who create openwork crochet compositions. The technique of creating ornaments is varied, there are many ways, but the result is striking in the uniqueness and delicacy of the created pattern. Clothes made using this technique look elegant and extravagant.
To learn how to knit, it’s best to start with simple ones:
- ribbed leaf
- round sheet
- openwork leaf
- simple flower
- flower
- twig with leaves
- cord
Today we will look at the technology for making beautiful petals and leaves on a branch.
By learning simple motifs, you can create the custom pieces you want. The main thing is to have patience, perseverance and a well-developed imagination. If you have all this, you can knit unusual colorful plant compositions.
Knitted oak leaf
In the description, the leaf is knitted from three colors of yarn - it is autumn. If you wish, you can turn it into a spring one by knitting it entirely from green yarn.
We knit a cord 2.5 cm long using 3-point knitting needles. Further knitting is carried out on the same loops:
- 1st row: cast on with knitting needles 5 stitches. cord set, 7l., 1i. We only have 8 p.;
- 2 rub. (front side): cast on with knitting needles 5p., 6p., remove 1p. purl, 6l. We have 13p.
In all the following persons. R. The central loop should be removed as a purl stitch. We continue with knitting needles:
- 3rd: persons;
- 4p.: 6p., remove with knitting needles 1p., 6p.;
- 5r.: like 3r.;
- 6r.: like 4r.;
- 7th: closed 2p., 11l. Total work 11p.
- 8r.: closed 2p., 4l., remove 1p., 4l. Total 9p.
Next 2p. we knit with knitting needles, changing the number of loops. Let's continue:
- 11p.: cast on with knitting needles 2p., 9l. Total 11p.;
- 12p.: cast on with knitting needles 2p., 6l., remove 1p., 6l. We have 13p.
Next 2p. we knit with knitting needles without changing the number of stitches. In the second of these rows we move to the next color of yarn. We continue with knitting needles:
- 15r.: close 3p., 10l. Only 10 p.;
- 16r.: closed 3p., 3l., remove 1p., 3l. 7p left.
- Next 2p. we knit with knitting needles without changing the number of loops. Then:
- 19 rubles: dial 2p., 9l. Total 9 p.;
- 20r.: dial 2p., 5l., remove 1p., 5l. Total 11p.
Next 2p. we knit with knitting needles without changing the number of loops. In the second of these rows we move to the next color of yarn. We continue with knitting needles:
- 23r.: closed 3p., 8l. Total 8 p.;
- 24 hours: closed 3p., 2l., remove 1p., 2l. Total 5p.
- Next 2p. we knit with knitting needles without changing the number of loops. Then:
- 27r.: [2p. in 1 p.]x3, remove 1 p., 2 p. in 1l. Total 3p.
Close the remaining loops.
How to knit Irish lace - work order
Making a pattern
If you are planning to knit clothes, then first you will need an ordinary sewing pattern. We transfer it to the fabric, taking into account that we will not need seam allowances - we will connect the parts to each other using a hook.
Choosing motives
It all depends on your taste, the main thing is that the motives are combined with each other. Usually, either geometric shapes or plant motifs are used in one product, and these two types do not combine well with each other.
Knitting samples
To make it easier for yourself to work on the composition, you need to knit one sample of each motif. When they are ready, we will moisten and iron them.
After that, we will outline each motif on paper and cut it out. Let's make several of these templates.
Creating a composition
Now let’s arrange our templates on our pattern the way we like. At this stage, we need to decide not only their location, but also their quantity - after all, it is much more convenient to know in advance how many of which motives we will need. Cutting out unnecessary patterns from paper is much faster than tying up missing motifs.
We knit the required number of motifs
When we have the required number of templates ready, we lay them out on the fabric into the final version of the composition and outline them with chalk. Now all we have to do is count how many motifs of which type we will need, and knit them in the required quantity.
Wash and iron
If you have a laundry bag - that's just great - you don't have to collect motifs all over the washing machine drum. We put our creations in a bag and select the delicate wash mode. We will not dry them with a machine - we need the motifs wet so that we can smooth them out thoroughly with an iron. We iron according to the same rules as described above.
palmate leaf
First sheet
We collect 11VP. Further:
- 1st: 1 tbsp. b/n in 2p., 1p/s with nak., 1 stsn, [1st.s/2n.]x3, 1 stsn, 1p/s with nak., 1stb b/n, ss, turn;
- 2p.: 1 stb/n in each stb of the row, [1 stb in the loop of the original chain] x11.
Without breaking the thread, we knit the 2nd sheet and all subsequent ones. The algorithm is the same, we look at the number of loops in the original chain from the image of the diagram.
Center
- 1 tbsp in the last p. T. o. in it, a total of two stitches are knitted, [1 st.b/nak. to the last point next. sheet]x4, 16 VP, 1 st.b/n. in the 2nd stitch from the hook, [1 dc. next p.] x14 times, SS in the 1st column of the middle.
Interior composition
A small photo selection will tell you in detail how to make a composition of pansies in a pot or basket. They will be a wonderful decoration for a winter window and will cheer you up every morning.
To make this craft you will need:
- Green floral wire;
- Cotton yarn;
- Hook of matching number;
- Scissors;
- Basket or flower pot;
- Styrofoam.
Small petals are made according to this pattern.
And the big ones - according to this one.
Knit the parts of the viola, connect them and embroider the core with yellow threads. Make the desired number of flowers.
Tie the greens (sepals and leaves) according to these patterns.
Fasten the workpieces to the wire.
Cut out the foam base and tie it around.
Stick the flowers in the desired order, cut the wire. Cover the bottom with a knitted square.
All that remains is to place the flowers in the basket, and you can enjoy their bright appearance.
Decorative leaf
Melange yarn is used for knitting. We start with 17 VP. Further:
- 1st row: 1 column without/n. in 3 sts from the hook, 1 stb without/n. in each stitch of the row, [1 tbsp b/n, 3 VP, 1 stb b/n] – to the outermost st., turn the work. On the second side of the original chain we knit 1 stitch without a thread, turn the knitting.
Track. p.: 4 VP, 1 RLS for the back wall in each st. to the arch, [1 RLS, 3 VP, 1 RLS] in the arch, 1 RLS for the back wall in each st. to the last 2 sts, turn of knitting.
Repeat the last row 7 times. Then we knit a SS in the center of the fabric to the arch 1p. We finish knitting.
And now we offer you several options for leaf patterns for interior compositions. These beautiful leaves are knitted according to the proposed patterns, the length is determined by the number of VPs in the original chain.
Tags
Crochet Leaf Crochet Patterns Crochet Leaves and Crochet Leaves Crochet and Crochet Leaf Crochet Leaves Crochet Leaves in Crochet Pillow with Crochet LEAVES part of a floral ensemble bright flowers or is it a flower picture in a flower arrangement
Irishcrochetlinkcategoriesentriesverycommentsarticlesavetagsaddreadlacetimesharelikeworkflowerusedecorationliftinglikedonelikedmessagesmotifscanleafyournapkinquotebabystepbymultiplebasedmotifcraftsflowerreadthreadring
Napkin “Tulips” of original shape - video mk
I was given this wonderful pattern and, of course, I was happy to knit a tulip napkin, which I called “Tulip Mood.” There seems to be nothing special about it and the design is simple, but it attracts attention precisely with its unusual, original shape.
I skip the description, instead my video MK to help in three parts (links to the second and third parts are at the end of the video).
We will need
Irish lace yarn
The beauty of Irish lace is built on the contrast between the rather tightly knit motifs and the openwork mesh with which they are connected. Therefore, we will need at least two types of yarn: thicker for the motifs and much thinner for the mesh.
The most important thing for motifs is that they keep their shape. Therefore, synthetics will not suit us; the classic is cotton, mercerized cotton on average 100 grams per 500 meters.
For the mesh, you can use the thinnest threads - up to 100 grams per 1000 meters.
For laces, yarn of medium thickness is suitable - about 800 meters in 100 grams - and the same one that you knit motifs.
Irish lace hook
Since we will need to knit quite tightly, we choose a hook that is a little thinner than usual - then our Irish lace motifs will retain their shape well. For tying, you will need an even thinner hook - about a number thinner than the one used to make the motif itself. And the hook for making an irregular mesh should be very thin.
Hooks are selected based on the threads you knit with - before starting work, you should definitely knit several samples in order to orient yourself in the knitting density and choose the one that suits you. Of course, the most convenient way to do this is to stock up on a set of hooks, where they are ordered by number.
LiveInternetLiveInternet
—Categories
- PraiseStushki (13)
- . my knitting (12)
- . My translations (6)
- Forest creatures (224)
- . Bunnies, bunnies, bunnies (67)
- . Bears, bears, cubs (54)
- . Chanterelles (27)
- . Ungulates (25)
- . Elephants and hippos (20)
- . Monkey (17)
- . Big cats (10)
- . Hedgehogs, hedgehogs, porcupines (10)
- . Others (7)
- IN THE KITCHEN (163)
- . Vegetables, fruits, herbs, etc. (62)
- . Sweet treats (60)
- . Various utensils and tools (17)
- . Ready meals (15)
- . Jars, bottles, packaging (7)
- . Other groceries (6)
- . Meat, poultry, fish, etc. (6)
- Humans (163)
- . Young ladies (113)
- . Others (55)
- . Babes (14)
- Toy parts (134)
- . Let me hold it in my hands and paws (58)
- . Applications (47)
- . Clothes, shoes, accessories (29)
- . Eyes, hair, fastenings, etc. (15)
- "Small" creatures (112)
- . Insects (38)
- . Frogs, snakes, lizards, etc. (31)
- . Mice and other rodents (25)
- . Snails and other gastropods (13)
- . Turtles (7)
- Vegetation (105)
- . Flowers (31)
- . Christmas trees (26)
- . Cacti and succulents (17)
- . Other miscellaneous (14)
- . Mushrooms (9)
- . Trees (2)
- Fantasy world (77)
- All kinds of birds (64)
- . Free flying birds (31)
- . Owls, owls, scoops (19)
- . Poultry (16)
- Cats, cats, cats, cats and kittens (62)
- Water Dwellers (57)
- . Others (36)
- . Fish (29)
- Items (49)
- . Anything (33)
- . Vehicles - very different (18)
- Farm (42)
- . Sheep and pigs (19)
- . Horses, donkeys (13)
- . Cows, goats (10)
- Dogking (31)
- . Other dogs (20)
- . Puppies (8)
- . Sooooo (4)
- Toy toys (14)
- Amigurumi - introduction into everyday life (181)
- . Jewelry and keychains (86)
- . Other (70)
- . Containers: boxes, caskets, stands, pots (26)
- . Bags, mobile cases (8)
- Photo Collections (38)
- On stage (12)
- Holidays! (226)
- . New Year and Christmas decorations (172)
- . All Saints' Day (33)
- . Easter (22)
- . St.'s day Valentina (20)
- . birthday (5)
- Tips to help knitters (62)
- . Knitting (44)
- . Photography (9)
- . Links to amigurumi sites (3)
- . Color combinations (2)
- Miscellaneous info (9)
- . About amigurumi (3)
- . Whole magazines (2)
- *** Differences - not knitting (55)