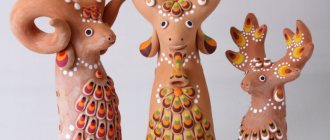
Polymer clay, which appeared in the second half of the last century, is a fertile material for creativity. Flowers and interior toys are sculpted from it, dishes and furniture are decorated. But the most complex products made from polymer clay are dolls. The original works of famous masters cannot even be called handicrafts - these are real works of art. The best ones cost tens of thousands of dollars and are coveted by collectors.
Beautiful dolls made of polymer clay, photo
How to make a face for a doll from polymer clay, step by step
Making the cheeks. Take two small identical pieces and place them on the ball. If we are sculpting a baby’s face, we try not to highlight any cheekbones.
We outline the eye sockets in the middle of the face or slightly lower.
Apply a small layer of clay to the forehead to add volume.
We sculpt a nose from a triangular piece and give it the desired shape with a tool.
We take another small piece in the shape of a plate and sculpt the upper lip, drawing out the nasolabial fold. Next comes the lower lip and chin.
We attach lumps on both sides of the head - these are future ears.
We carefully review the resulting parts and bring them to the desired result.
Head decoration
It's time to start preparing the blank. To ensure that the process does not cause difficulties, the clay must be kneaded well and heated to a plastic state. Perform the following actions based on the instructions:
(Step 2)
- When the clay becomes plastic, shape the part of the head that is covered with foil. The resulting result should be baked in the microwave or oven. If you used clay that hardens on its own, this is not necessary. It is necessary to bake the material so that in further work it does not lose its shape. Important! If foil was used and it is not covered with polymer clay, then it cannot be placed in the microwave oven. Is it dangerous! It can only be heated in the oven.
(Step 3) - We take out the blank of our doll. Using a knife, carefully add volume to the head. Select the nose, cheeks and lips. We smooth out the unevenness so that the face becomes realistic and resembles a living one.
- We make recesses for the eyes. Watch for symmetry, so the work will turn out neat.
(Step 4)
We've finished the head work. It can be decorated with pastel or aerosol paints to give the face a lively tint. We send the doll to bake again and finish the ears on the head.
(Step 5)
How to make eyes for a doll from polymer clay, step by step
Let's take a closer look at the design of the eyes. Before sculpting the eyes, the brow ridges are outlined. Carefully smooth out the unevenness left by the tool with your finger.
The eyes can be sculpted from clay in the form of a circle or simply insert small acrylic half-beads.
We bring the lower and upper eyelids to the desired look.
After all the details of the face are finally sculpted, we will begin painting them. Let's look at how color is given to the eyes.
We cover the whites with white paint and wait for them to dry. Use acrylic paint to paint irises of the desired color. Then we outline the pupil and the rim of the eye, and add white highlights if necessary. After painting, varnish and dry.
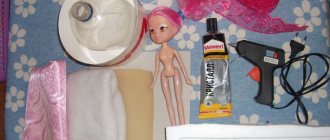
Procurement of materials
To start creating masterpieces, you need not only to be patient and prepare for quite painstaking work, but also to find an interesting idea to implement, as well as prepare the necessary tools and materials.
We will make a doll from polymer clay step by step, and depending on how we see our future doll, different materials may be required.
But an approximate list of necessary materials is approximately as follows:
- Board or special mat for modeling.
- Polymer clay, flesh color. You can start, for example, with Fimo or Cernit, taking a small 40-70 gram block. FimoPuppen and LaDoll are also used for sculpting dolls.
- A sharp thin knife.
- Rectangular metal stack (at least one). Or items that can replace it (needles, pins, ordinary plasticine stacks, knitting needles, hooks, etc.).
- Wire of various thicknesses (preferably copper or other corrosion-resistant wire).
- Aluminum foil, which is used for baking. It is used to make a frame and blanks for different parts of the body.
- Acrylic paints. We will use them to paint our faces. To begin with, you can limit yourself to basic colors: white, yellow, red, black.
- Alcohol-free wet wipes.
- Brushes and sandpaper.
- Primer.
- Wool for felting.
- PVA glue.
- Fabrics for doll clothes and other decorations.
How to make lips on a doll from polymer clay, step by step
Lips are the part of the face on which the doll’s expressed emotions depend; they need to be given special attention.
Lip sculpting algorithm:
- Roll up the ball. Use your finger to flatten it.
- Using the tip of your finger, we move along the edge of the resulting figure, creating the shape of a lip.
- We remove what is unnecessary, leaving what will go to the lower lip.
- Holding the edge, we place the lip where it will be located on the face.
- We carefully fasten it, pressing with a finger first on the left, then on the right corner, removing the excess.
- Use an awl to smooth out the transition of the lip to the chin. Then we do the same with the upper lip.
- We give the final shape and smooth, soften the joints.
- The upper lip needs to be curved by pressing the little finger into its center.
Frame
You need to create an original frame for the future doll from copper wire. It is allowed to twist it, thicken the necessary places with wire of a smaller diameter: usually the pelvis, shoulders, torso.
Mark the head with a loop. Now you need to add volume to the figure using foil: using tools or your hands, add it in the necessary places, carefully removing any irregularities.
How to make hair for a doll from polymer clay, step by step
There are several options for making a hairstyle. You can simply purchase a ready-made wig.
The only difficulty is guessing the size. Another way is to make the hair yourself; you will need wool for felting.
Just carefully separate it strand by strand and glue it onto your head. To make it more convenient, use an awl.
In advance, we cut a parting on the head (with the same awl or needle) and glue the hair into it.
They can be braided into a beautiful hairstyle or left loose.
Finishing touches
When the firing is finished and all the parts have cooled down, you can put our doll together, dress it as originally planned, and start painting the face.
All facial features are painted with acrylic paints and, if necessary, varnished. To top it all off, the doll gets her hair done.
For this, not only yarn is used, but also special doll hair, as well as artificial strands. Experienced needlewomen recommend that when gluing hair, it is better to press it with an awl or a metal needle, because hair and glue threads often trail behind wooden skewers.
The outfit is very important when creating an image - the fabrics must completely match the image. If the doll belongs to ancient fairy-tale characters, then the lace fabric for its clothes can be washed in a herbal decoction. In any case, starched and ironed things, which in themselves may look neat, but will stick out on the doll and create the impression of excessive deliberateness. To get rid of this effect, you can wet the fabric a little and create the desired folds on it.
It is necessary to correctly select parts and accessories for the costume. Even if we want to add a very beautiful bead to the costume, but in proportion to the size of the doll it will look simply gigantic, then we will have to abandon the idea. You should also avoid large lace, because it will seem rough.
How to make a doll's body from polymer clay, step by step
Let's start with the body. The head can already be baked; if something happens, it won’t be possible to fix it. The body is made on the basis of a wire frame.
All convex parts are constructed by felting using padding polyester (you need to felt as tightly as possible).
Cut out a rectangle from flesh-colored knitwear (width = body volume).
From below we will cut the so-called “pants” for the doll’s legs. We put them on the body and make a seam at the back right on the body. To make it fit tighter, you need to tighten it well.
Also, rectangles are cut out for sleeves and sewn to the body.
Types of pupae
To create dolls, craftsmen take as a basis one of three techniques, which determines the future design:
- static – a motionless figure fixed on a horizontal base in a certain position;
- hinged - the joints of this model are made in the form of hinges connected by cords. This technique makes it possible to change the position of the doll;
- combined - a popular option for beginning craftsmen. In this case, the visible parts of the doll’s body are sculpted from clay, and those hidden from view are sewn from material.
How to make hands for a doll from polymer clay, step by step
To make the hands, as well as for the head, you will need foil.
We build a sausage out of it according to the sketch and cover it with clay.
The arm can be made up to the elbow, hand or shoulder - in accordance with the master’s idea. The rest will be clothes. We stick to the body we made.
We start sculpting with the brush, moving higher and reaching the intended length.
You need to carefully iron everything with napkins. We form beautiful hands, make fingers from clay sausages, connecting them and aligning the joints.
Creating a Sketch
This seemingly not the most essential point should not be neglected.
Firstly, this will help you create the right toy as planned: you will not do what you get, but a certain specific image.
Secondly, it is important to maintain proportions, and for this you need at least a schematic image that you can consult from time to time when doing work.
Even if you plan to make a doll in the form of a small child, whose body, as you know, has different proportions than that of an adult: a very large head compared to the whole body, small hands, etc., then distorting the proportions will be too noticeable a mistake .
Therefore, a sketch of the product is necessary.