Home » Jewelry » Chic DIY beaded tiara for a real queen
Decorations
Irina Vyshivaikina 08/29/2019
2
A DIY tiara made of beads and wire will become an original and elegant decoration for important events that will attract the attention of others. By taking advantage of the master class and showing your imagination, you will be able to make a tiara even without much experience in beading.
How to make a tiara?
A tiara is a decoration in the form of a crown or hoop. Its name comes from the word tie, fasten. Another head decoration is the tiara. It is very similar to the tiara, but differs in the style of production.
Tiara with stones
On the Internet you can find a lot of master classes on how to make tiaras and tiaras. They can be built in different shapes from different materials.
If you want to please your little daughter with a beautiful head decoration, arm yourself with the necessary materials:
- wire;
- beads;
- wire cutters;
- glue;
- headband
Making a tiara is quite simple:
- Cut approximately twenty-eight centimeter pieces of thin wire. For this we need wire cutters.
- Place a bead on each piece and make a knot to hold the bead in place. In this way, make several branches with two or three beads at the ends. It will be more interesting if you place them at different heights.
- Place all the branches on the hoop, wrapping them with wire. Wire cutters can easily handle unnecessary pieces of wire. It is advisable to take a headband with teeth to firmly secure the hairstyle.
- Arrange the branches so that everything is harmonious and neat, and only after that fix all the connections with glue.
A DIY diadem or tiara for your princess is ready.
A tiara made of shells and rhinestones will look original. Beads make very delicate products. They are also assembled on wire, only beads are used. The arrangement of beads and beads depends on your imagination and wishes. Most often, tiaras are made of transparent beads and white metal.
Wedding tiara
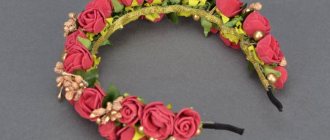
Many needlewomen make tiaras using the kanzashi technique. Using tape you can make petals and flowers that are connected with a glue gun. You can decorate such jewelry with beads or half-beads, stones, and rhinestones.
For those who love to crochet, there are a lot of patterns with which you can create original, unique tiaras or tiaras. They can also be decorated with sequins, beads, and rhinestones.
Tiaras can be made in completely different shapes and heights.
Hair decoration made of beads and seed beads
Professional craftswomen skillfully make unique hair decorations using beads, beads, headbands or wire of different diameters. To frame the bride's head, tiaras are created, consisting of intertwined branches and lace leaves, based on centuries-old traditions.
The photos below show examples of homemade ornate decorations. A variety of models are made with different types of fastenings: side, comb-shaped, rims, etc.
It’s not difficult to weave a simple decoration, so let’s try to create a unique work of art.
Video tiara made of beads and seed beads
Preparatory stage
To weave an unusual elegant crown we will need working material:
- hoop base
- pliers
- thick and thin wire
- four types of beads: large beads, 4x6 mm beads, five large beads and five large drops
Master class on creating a simple tiara from beads and seed beads
The proposed master class will help beginning needlewomen learn the basics of French weaving techniques and learn how to create any desired decorations.
The extraordinary tiara consists of five similar elements of three sizes: one large, two medium and two small. Let's start weaving from a large fragment.
We cut a thick wire, twenty centimeters in size, and string a bead onto it. We move the assembled element to the center of the segment and twist the wire.
- Having made six turns, we connect the ends of the wire and string a drop-shaped bead on them.
- We do several twists.
- Next, cut a piece of thin wire and screw it to the base.
- We string eight large beads onto a length, moving them towards the base.
- We make a couple of turns of wire over the droplet.
- We collect eight more beads and make curls under the drop.
- Thus, the first row was formed.
The next row is formed from twenty-four beads by winding the rod. There are twelve elements for each half.
The next tier is created in a similar way. For it we string thirty-six pieces of beads - eighteen fragments on each side.
To weave the last row, 6x4 millimeter beads are used. For the entire row we collect thirty-four pieces: seventeen on each side. We wrap the prepared set around the rod, carefully fix it and cut off the thin wire. The first part of the crown is ready.
The second part of the product is made identically to the first. Only this element is formed from three rows: the first two, as in the previous description, and the third - from beads six by four millimeters, in the amount of twenty-four pieces. We make two such parts.
- Similarly, the following fragments of the product are weaved, consisting of two rows: the first - beaded (sixteen units), and the second - from 6x4 mm beads in the same quantity.
Having finished creating all the elements of the tiara, attach them to the headband. Carefully screw the parts together, starting from the central part of the product.
With a little effort, we get an unfinished decoration. We cut off the excess ends of the wire.
To make your jewelry sparkle, you need to hide the unsightly protruding wire well. This can be done using a silver thread, simply wrapping it around the rim.
But a bezel entwined with beads will look more beautiful. To decorate a product with beads, you need to string beads onto a fishing line, as shown in the photo below.
- Next, we tie one end of the fishing line to the base and wrap the beaded thread around the rim in a spiral, carefully hiding the unsightly gaps.
- As a result of interesting, painstaking work, we get beautiful hair jewelry.
An elegant headband will beautifully decorate a girl’s head at a gala evening, emphasizing the beauty and majesty of its owner. Homemade jewelry will suit any evening outfit.
Such products will be the best birthday present for a close friend who will be delighted with such a unique present.
After all, in homemade things there remains the positive energy and warmth of the hands of the person who creates fantasy objects.
We invite you to watch a video tutorial on how to make a crown with your own hands. You will learn how to create such an amazing head decoration and make your daughter happy.
The process is simple and will be a pleasure. For a little lady, this will be the best gift for any holiday or celebration.
And all you need is a hoop, wire, a brooch with crystals, droplet beads of different sizes and a little time. Good luck!
Video master class DIY tiara for a princess
Source: https://podelkiruchkami.ru/diadema-svoimi-rukami/
How to wear a tiara?
Tiaras were worn mainly by brides at weddings or debutantes at social balls; Tiaras were worn by women who had high status and wealth. Now girls wear such jewelry to parties and celebrations; little princesses decorate their heads with them at matinees; Tiaras are awarded to winners at beauty contests.
Tiaras and tiaras beautifully highlight your hair and make your face more expressive, so if you want to complement your look, choose earrings in miniature sizes. And the outfit can be complemented with a small bracelet. Tiaras are not worn with bangs; it is better to comb them back. The tiara is worn at a wedding - it ideally emphasizes the delicate image of the bride and secures the veil.
Designers use these decorations to complement fashionable outfits and emphasize their luxury.
The shape of the tiara depends on your image. For weddings and celebrations, go for a more formal decoration. Delicate tiaras are more suitable for little princesses or for a prom.
A headband tiara made of stones and rhinestones will make your look majestic.
By making tiaras with your own hands, you can bring any creative fantasy to life and get pleasure from this exciting process. This decoration will be a great gift for your friends and loved ones, because what is made with love is especially beautiful and valuable.
This article talks about what a tiara is and how to wear jewelry. We will also tell you how to make such decoration yourself.
If you carefully examine ancient portraits or coins, you will notice that there is a diadem on the heads of the nobility. What is this type of decoration?
Master class on creating an elegant tiara
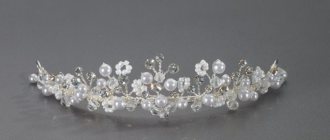
A young girl who is getting married could easily weave such a tiara into her hairstyle. This sophisticated accessory is very popular among brides, and so is the master class on how to make it.
And it's very easy to do. All you need is a base - a thin hair hoop, pearl beads or large white beads, thin wire, superglue and pliers.
First we make branches with beads. To do this, cut the wire: divide it into 25 pieces 8-10 cm in length. We attach beads to each segment at one end: 1, 2 or 3. We fix them by twisting the wire in a loop. To make twigs you need to collect 3-5 wires with beads and twist them together. Moreover, the beads should be located at different levels to make the branch look more voluminous. Carry out all the branches approximately according to the same pattern.
Now we begin to attach the branches to the hoop. We screw them on one at a time, as shown in the photo. We twist the twisted wire almost to the end.
We cut off the excess wire with pliers.
We carefully straighten the branches so that they are evenly located above the hoop.
After this, we fix all the branches on the hoop with glue. We carefully drip a little at the base of each branch.
When the glue dries, the tiara can be put on.
Our lessons on weaving tiaras are designed for those who are just beginning to take their first steps on the path of beading. Here you will find the basics of creating tiaras and tiaras. Over time, you will improve your skill level, we will help you with this. Our website has many video and photo tutorials for creating various jewelry and accessories. By doing beadwork, you will not only enjoy the process of creating beautiful things with your own hands, but also bring your creative ideas to life. You will also make many wonderful products that you will delight your friends and family with.
Description
Previously, it was believed that the tiara was an accessory only for men. In ancient times, women did not wear such jewelry. Then it was customary for Roman kings and Greek gods to wear a diadem on their heads.
What is the significance of the name of this decoration? Diadem is a word that comes from the Greek term "DIA", which was the name given to the headband worn by priests in Greece. Hera, the goddess of family and marriage, was often depicted with this decoration.
Nowadays, a crown (tiara) is also used as a decoration on a wedding veil. The tradition of using the tiara as a wedding crown began in the fifth century. From the beginning of the 17th century, such decorations became popular at balls and receptions. Noble ladies loved to complement their outfits with this accessory. Sometimes the first letters of the hostess’s name were laid out on such decorations.
Nowadays a tiara is an adornment available to everyone. Girls prefer to wear tiaras at proms and charity balls, and little girls love to wear homemade children's models to their schools and kindergartens. Little kids often ask their parents to buy jewelry. However, you can do it yourself. Moreover, the manufacturing process is quite easy.
New Year's crown made of cardboard for Snowflakes
Necessary tools and materials: thick cardboard of golden or yellow color; scissors; glue; decorations.
Step-by-step instruction:
- Print out the crown template, cut out the necessary parts and holes. If there is no printer, then you can redraw the image from the monitor screen.
- Measure the head circumference at the extreme points. For a preschool child, this parameter will be about 20 or a little more. The height of the crown will be 9 cm.
- The crown is attached to the head in different ways, depending on the gender of the child. For girls, the crown can be secured with hairpins, but for boys, you need to cut out another strip of cardboard along the length and circumference of the head, and then glue it to the base of the template.
- Take a hat elastic and tie knots at both ends.
- Using glue, glue the elastic band to the attachment points.
- Glue pieces of cardboard on top.
Do it yourself
A handmade tiara is an original decoration. This accessory will suit any little princess. So, how is a tiara made for girls? Now we'll tell you. To make a children's tiara you need: wire (4 mm thick), multi-colored beads, a metal hoop, wire cutters.
You need to cut 80 centimeters of wire. A large bead should be attached to it and a loop should be tightened. Then you should make a spiral of wire, and secure slightly elongated petals around it. At the end, twist the wire a little and attach a large bead in the form of a tamer. All the petals must be braided with a thin wire, on which small and medium beads have been pre-strung. In the same way, you need to weave two more small flowers
Now you need to decorate the hoop. The first step is to screw on the small flowers.
Now you need to carefully secure all the elements and wrap them with thin wire. Then all that remains is to straighten the flowers, and the wire tiara is ready.
Master class on making a tiara with a flower
As you can see from the picture, the tiara looks original and simple. This is where its beauty lies. Therefore, it fits perfectly with a little princess’s ball gown.
For a tiara with a flower we will need:
- thin metal hair hoop;
- wire 1 mm and 0.4 mm thick;
- golden and silver beads;
- beads of different sizes;
- pliers.
Let's start weaving the tiara by forming the flower itself. Cut a piece of wire approximately 0.8 m long. At the end we attach a beautiful bead and secure it with a loop. Under the bead we twist a small spiral from the wire and begin the formation of flower petals. There will be five of them in total. Try to make them the same size and shape.
We twist the remaining wire and decorate it with a large bright bead. We begin to braid the petals of the flower. We string beads mixed with glass beads and small beads onto a thin wire. We wrap it tightly around the flower petals. You also need to make two more flowers, the same in shape, but smaller in size.
Let's start decorating the hair hoop. First, small flowers are screwed to it, then we attach a large flower.
To make the structure more durable. The flowers are first straightened and then braided with wire strung with large beads. The photo shows what it looks like. How it will be for you - your imagination will tell you.
The beaded flower tiara for the girl is ready. Believe me, beading will take very little time, but will bring you a lot of pleasure.
Wedding decoration. How to make a tiara with your own hands
This tiara is worn on the forehead. Any bride can make such an accessory on her own; you just need to have a chain, earring, or necklace.
You need to put a drawing of the tiara on a napkin and cut out a model of the decoration. Cover the product with rhinestones, and use brocade to make a frame for the stones. It will turn out beautifully and reliably. Having finished with the brocade, you need to make holes for the stones and make a pattern of beads around the outline. A hoop is put on the bottom under the brocade. A wedding tiara should be strict and feminine. It is desirable that it matches the dress.
DIY tiara for prom
Greek style decoration is perfect for prom. The manufacturing process will not take much time. You need to stick pebbles on the small rim. At the same time, string several beads and leave them hanging. If you style your hair appropriately, this tiara will look absolutely stunning. She will please any girl. All that remains is to choose a suitable outfit in the same style and you can shine at the prom. You need to remember that a well-chosen decoration is already half the success.
Frame decorated with tinsel
Tinsel or rain is wrapped very tightly on the finished frame, preferably with glue or 2-sided tape; if possible, add beads to the peaks of the peaks.
It is important to check and remove any sharp or scratched parts using tape or other means. If there are sharp ends, drop them on them using a hot gun or dip them in PVA glue and let them dry.
Talk to your child about what shape of crown she wants, show different options, and choose not the most complex ones.
Tinsel with a steel vein has appeared in stores; if you find it in a store, you will speed up the manufacturing process several times. There is no need to wrap anything, you just need to connect the individual parts.
We make a beaded crown on the frame, but such a crown cannot be called simple and quick, so it was left out of the top, but crowns sometimes turn out simply breathtaking. To make it you will need: pliers, round nose pliers, wire, beads and beads, a lot of time and patience.
Manufacturing
- The first stage of weaving. You need to weave exactly nine pieces of shamrocks with 3 beads, one with four. Collect the trefoil petals in one chain. This must be done in a certain order. First there are 4 trefoils, on which three beads are strung. Then a shamrock in the center. Then you need to repeat 4 trefoils with three beads.
- Decoration assembly stage. The ninth trefoil, on which there are 3 beads, needs to be attached to the central petal. The design will be reliable only with a common green cross for all leaves. To make the tiara look more beautiful, you need to add decor to the right and left sides of the product.
- Final stage. It is necessary to create a strong frame for decoration. To do this, beads should be placed on the iron wire for the entire length of the product. Then you need to attach this frame to the tiara using thin wire. Align all the links and you can start fitting. The DIY tiara is ready.
New Year's crown for Snowflakes made of chenille (fluffy) wire - MK with photo
Necessary tools and materials: 13-14 pieces of chenille wire, 30 cm long; plastic or metal hair hoop; glue gun; rhinestones or sequins that will be used for decoration; ruler; scissors.
Step-by-step instruction:
- First, two wires are twisted together. It is necessary to make 5 such blanks.
- Cut 4 wires in half, make 8 snail-like curls from each part.
- Bend the large wire that remains.
- Twist the pieces in the folded place to fix the shape.
- At the same distance on the left and right, you need to bend the wire so that you get a diamond shape.
- Intertwine the remaining ends of the wire under the diamond.
- Glue two curls in the center of the hoop using a glue gun, and then connect them together.
- Glue the remaining curls in a similar way, gluing them on the sides. The last curls need to be bent more strongly, then glued to the sides of the hoop.
- Glue the diamond behind the two central curls.
- Bend the tail of the diamond and glue it above the curl.
- Use a few pieces of chenille wire to twist the hoop in the places where the notes were glued.
- Decorate the crown with plastic rhinestones and sequins.
How to choose decoration?
If you buy a tiara, it is better to choose a model made of white metal, for example, white gold. You need to wear the accessory like a headband, directly in your hair. It is advisable to buy jewelry that already has teeth. This will be an additional fastening so that the tiara does not fall off.
The tiara should be the only active decoration. Large massive necklaces, earrings or bracelets do not go well with it. It’s worth giving up even rings. If you want to complement the tiara, then you need to do this with the help of miniature jewelry. Mini earrings or bracelets will do.
In modern fashion, the tiara has taken a place of honor. Many famous designers use tiaras in their collections. Using rhinestones from a small open crown, the image of a real princess is created. The designer has a chance to show his imagination. This decoration can be created in any way.
Crown of Autumn
Autumn crowns are another type of individual beautiful jewelry that is the perfect time to delight your girls in the fall, when there are especially many autumn leaves.
How is a crown made from leaves?
There are many options for creating autumn crowns:
- we weave a wreath from maple leaves;
- from maple leaves by darning the tips of adjacent leaves;
- we glue or screw the leaves onto a finished frame made of paper or wire;
- We cut out leaves from paper or other materials and glue or sew them in the desired sequence.
On a rim of leaves
Secure the leaves with tape
Another option with threads for attaching to the rim
Autumn paper crown
Leaf darning method
Hairstyle and tiara
As for the hairstyle, it is important to remember that bangs cannot be worn with this decoration. It would be better if it was removed. The absence of bangs will make it possible to highlight the cheekbones. Most often, hairstyles for the crown are made from long hair, combing the curls and transforming them into a beautiful updo or perm with playful curls.
The tiara looks amazing if you let your hair down. Tiaras look elegant on curls collected in a high hairstyle. The decoration will look good on hair that is gathered in a bun at the top and with a curl hanging down. The main thing is that the hairstyle emphasizes the beauty of the product.
New Year's kanzashi tiara step by step
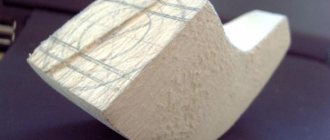
1. Prepare the base of the decoration - the comb. It can be metal or plastic. In the future, it will be convenient to attach a homemade crown to your hair. Recommended hairstyles are a bun, a high ponytail or a bun. Also, the upper metal part of the comb needs to be masked. The first thing you can do this with is thin white tape.
2. Wind a thin ribbon around the supporting part of the comb and glue the ends together. In the future, they will still be covered with felt.
3. The central part of the crown is 5 three-layer white and gold sharp kanzashi petals. To make them, prepare white and gold squares with a side of 5 cm. You need to take 3 pieces for each part, fold them twice.
4. Connect the squares so that the golden part remains inside as a layer. Connect and solder the sharp ends, then cut off the sides and bottom, and solder again.
5. Place a thin piece of white felt on the top of the comb. In the future, it is on this part that the entire white and gold structure will be attached. Make 5 sharp petals. Glue it together with a fan - this is the central part of the tiara.
6. In a similar way, fold small double petals from white and gold squares with a side of 2.5 cm. Leave the gold part inside.
7. Model 7 small petals and glue a flower - the central highlight of the tiara. Glue a hug and a large half-bead into the center of the flower.
8. Place the comb lying down. Glue a fan on top of the felt (perpendicularly).
9. Add a flower to the center.
10. Make loops from gold cord. Assemble triple parts - there should be a large loop in the center, 2 small ones on the sides.
11. Glue triple loops on the back to decorate the tiara.
12. Glue the loops at the back to form a fan.
13. White stripes of satin 2.5 cm, fold across. Disconnect diagonally with a soldering iron. Select those parts that look like little bags. Glue a small half-bead onto the corner of each leaf.
14. Glue the white leaves into a fan at the back, adding fluff to the piece. Also stick 3 small petals on the sides of the main part.
15. Make 3 similar leaves from gold brocade. Apply another layer to the back. Cut strips of the tire to hide the imperfections.
16. Glue the tire along the bottom.
A beautiful New Year's tiara for the young princess is ready.
Face shape and tiara
If a girl has a square-shaped face, then it is best to choose a tiara strewn with stones along its length. Ladies with a triangular face are well suited for jewelry that is evenly shaped and has no sharp edges or hills. It is recommended to pay attention to models with a floral pattern.
Women with an oval face can choose any style of jewelry. However, an asymmetrical headdress will look unusual. To make the oval of the face appear more elongated, round-faced ladies need to choose tall tiaras with sharp edges. Any lady will be able to choose her own special piece of jewelry. It will turn a simple girl into a real princess.
What, like a tiara, best decorates a girl’s hair on the eve of the holiday! Let's look at how to make a wire tiara at home with your own hands.
Snowflake crown from a plastic bottle - making a New Year's crown from scrap materials
Necessary tools and materials: 2-liter plastic bottle; template paper; sharp scissors; scotch; glitter; glue.
Step-by-step instruction:
- Cut off the top of the bottle and cut off the bottom. You will need a middle part, from which it is easy to make a crown.
- Find a template for the finished product on the Internet, print it on thick paper, and cut it out.
- Attach the template to the bottle, outline with a marker, cut out with a stationery knife, starting with small parts.
- Decorate the crown with glitter and wait until it dries.
- Align the headband with scissors, try it on the girl’s head, if necessary, cut the headband and adjust its length to fit the child’s head.
- Secure the crown rim with tape.
How to make a tiara from wire with your own hands: “Eastern”
This tiara model can be used not only for festive balls and carnivals, but also for special occasions such as weddings or engagements.
For manufacturing you need to stock up on the following materials:
Copper wire thread with a diameter of one and a half millimeters, copper wire thread with a diameter of half a millimeter, hammer, pliers with round ends, side cutters, beads, beads, anvil, artificial small roses, decorative gemstone (Golden Drop), schematic drawing.
Consider a master class on making a tiara.
The production of this product occurs in the following stages:
- To begin with, you need to prepare a diagram of the future tiara: draw it yourself or use the proposed diagram (see above);
- Now, we prepare the wire parts, following the resulting diagram;
- The curls should be made separately from the rest of the tiara;
- A hammer will help add volume to the curls;
- In order for the wire thread to form small drops, we will perform the following trick: one side of the wire (more precisely, the sledded initial part of the wire) must be lowered into borax powder; We bring everything to the gas burner. After a drop has formed, the wire must be removed from the drill and boiled in a solution of citric acid. There is no need to bring to a boil. After waiting a little, the carbon deposits on the wire will disappear;
- We continue to work according to the scheme;
- In order to make a towering part, you will need a wire thread fifteen centimeters long and one and a half millimeters wide. It is necessary to make two such parts;
- We bend these parts in half to obtain a triangular shape;
- We trim the edges of the triangles with curls;
- The resulting triangular shapes and curl are wrapped with wire thread (about eighty-five centimeters will be needed);
- We bend the top curls;
- Thus, it is necessary to weave all the other details of the diagram, observing all thoughtful bends and protrusions;
- Don’t forget to attach beads and beads in the right places;
- At the very end, you need to place a golden drop on the glue, which is the center of all other decorations! The wire and bead tiara is ready!
Tiara "Snow Maiden":
To make this model of tiara we will need: eighty centimeters of wire thread; snow-white beads of various sizes; small silver beads; small snow-white beads; thinner wire thread; scissors; hair hoop made of metal material.
Let's look at how to make this tiara at home with your own hands below step by step:
- Take a wire thread eighty centimeters long. At one wire edge we attach a medium-sized bead, securing it with a wire loop;
- Below the attached bead, you need to turn the spiral and form five flower petals;
- The remaining wire thread should be twisted into a spiral and decorated with large beads;
- We braid the flower petals as follows: thread small beads onto a thinner wire thread. We decorate the petals with the resulting thread, wrapping them around;
- In the same way, it is necessary to make two flowers of a smaller size;
- It is necessary to attach the made flowers to the hair hoop (small ones first, large ones after);
- All that remains is to arrange all the details to your liking. The tiara is ready!
Instead of hair hoops, many needlewomen make a headband from wire thread. To do this, cut the wire of the required length in double size, fold it in half and trim the wire ends with bent curls. If desired, such a rim is trimmed with droplets (for information on how to do this correctly, see the text above).
The finished base can be decorated with beads and beads as desired, following pre-made sketches.
Use your imagination and then everything will definitely turn out indescribably beautiful!
The production of models of some other tiaras can be seen in the video below.
New Year's kanzashi tiara for a little princess
Today, Kanzashi craftswomen can create any New Year's accessory to please young princesses, give them a fairy tale, and the confidence that they are the most beautiful queens of matinees and children's parties. Most often, sharp petals are used to model unusual kokoshnik crowns on a hoop. But there is another way to create a chic example - a tiara on a crest. Such decoration can be made not only charming, but also sparkling, noticeable and unique. To make a beautiful New Year's product, you can view the master class below, where the accessories necessary for the work are clearly indicated, repeat all the steps described and demonstrated clearly in the form of a photo.
For the New Year's tiara you will need:
- metal or plastic comb – 9 cm;
- thin white or golden ribbon 0.5 cm for winding the comb - you will select the length as you work;
- white felt rectangle – 9*1 cm;
- 10 squares of white satin ribbon – 5*5 cm;
- 5 squares of gold brocade – 5*5 cm;
- 13 pieces of white satin ribbon – 2.5*2.5 cm;
- 13 pieces of gold brocade – 2.5*2.5 cm;
- 8 pieces of gold cord – 6 cm each;
- 4 pieces of gold cord – 8 cm each;
- 5 pieces of white satin ribbon – 2.5*10 cm (this part of the ribbon will need to be folded in half and cut diagonally with a soldering iron, and then use only one part);
- 3 pieces of gold brocade – 2.5*10 cm (also process with a soldering iron and use one part);
- 5 half beads that change color – 6 mm;
- 1 half bead, color changing – 8 mm;
- 1 gold-colored hug – 2 cm in diameter;
- pieces of gold tire (optional to hide all imperfections and glue points in front).
There is exciting work ahead on modeling the most desired accessory - the New Year's tiara. The color scheme was not chosen by chance; gold with snow-white surface looks very rich, festive, and royal. The decoration will suit any outfit and will not be boring or superfluous when styling your hair.