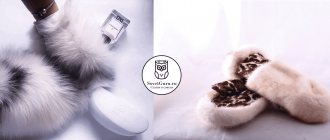
Choosing a headdress for the winter is an important task for a woman: even in heavy snow or bitter cold, you want to look stylish and beautiful. Since the times of Ancient Rus', scarves have been an integral attribute of the national costume of a Russian woman. If at the end of the last century fur scarves in aggressive colors and geometric patterns came into fashion, then by the early 2000s the fashion for this item of clothing with a classic floral pattern returned.
Elegant winter scarf with fur
LiveInternetLiveInternet
-Music
—Categories
- diary(settings,MK) (54)
- multicooker (5)
- sewing and cutting (1363)
- video (694)
- virtual trip (6)
- virtual travel (14)
- all about health (394)
- all about flowers and plants (165)
- all about the profession (158)
- baking (1837)
- knitting (8022)
- home utilities (222)
- magazines (538)
- take care of yourself - beloved (260)
- pictures (21)
- Chinese cuisine (46)
- Korean cuisine (41)
- folk costume (109)
- beauty (332)
- literature, art (86)
- magic (117)
- master class (66)
- technique (11)
- music (589)
- cartoon (15)
- clothing, accessories (241)
- office, documents (14)
- Easter (40)
- crafts (55)
- fasting (48)
- hairstyles, braids (76)
- radio archive (30)
- various interesting (66)
- recipes (1368)
- drawing, templates, paper (39)
- needlework, embroidery (501)
- do it yourself (117)
- Dance, costumes, hairstyles (1)
- learning to draw (43)
- photoshop (41)
- quotes (83)
—Search by diary
—Subscription by e-mail
-Statistics
Some seams need to be taped
Some areas of fur clothing need to be duplicated, for example, hem, collar, hem and others. Duplicating with cushioning material will protect them from stretching and give them the required shape. It is imperative to strengthen connecting seams such as armhole seams, neck seams, and shoulder seams. These areas are subject to stretching and the tape sewn into the seam strengthens and strengthens it. In sewing accessories stores you can buy regular cotton tape 1.5-2cm wide and use it for these purposes. There are also special adhesive tapes, which furriers call “amplifiers”. They are also used when sewing products made from genuine leather. The tape is placed on one side.
How to sew a scarf or hood with fur trim
Even in bitter frosts and heavy snowfalls, a woman tries to look beautiful and elegant. Since time immemorial, Russian women have always had scarves in their wardrobe. Fashion constantly amazes with its new products, and at the end of the last century, fashionistas began to flaunt shawls trimmed with fur. Initially, these were scarves of bright colors with geometric patterns. Today, scarves are preferred in classic floral colors.
https://platoktut.ru/wp-content/uploads/2018/05/454778-300×99.png 300w, https://platoktut.ru/wp-content/uploads/2018/05/454778-768×255 .png 768w, https://platoktut.ru/wp-content/uploads/2018/05/454778-500×166.png 500w" width="932″ />
Use and variety of products
Pavloposad shawls are made from wool and natural silk. The fur edging looks great and goes with any outfit. An amazing product that combines the traditions of the Russian people and modern fashion. Today everyone recognizes the characteristic floral pattern of the Pavloposad shawl. Its popularity is such that every woman dreams of having such luxury.
Patterns of Pavloposad shawls
Of course, craftswomen make modern products with some convenient modifications.
- Silk scarves provide excellent protection on cool summer evenings. They are very light and weightless. Gorgeous patterns will suit the joyful warm atmosphere.
- Woolen products - can serve as a jacket or vest made from Pavloposad shawls with fur. Not only vests are made from them, but also ponchos.
Vest made of Pavloposad scarf
A warm, luxurious accessory that will be additional protection from the cold and will decorate colorless outerwear. To do this, you just need to throw it over your shoulders. Many craftswomen add a fleece lining. Fleece has thermoregulating properties, providing the necessary ventilation, dries quickly and does not absorb moisture.
Scarf with fur as a headdress
Chic patterns and products with them can be seen on the official website. Having chosen the appropriate ones, you can sew Pavlosa Sad shawls with fur.
Fur scarf for cold winter
Fur is the most popular winter material that has never lost its relevance. It gives a rich, luxurious and sophisticated look. Recently, the scarf + fur combination has risen to the top of fashion trends. When using this variation, the product is worn not only on the head, it is used as a cape, vest or poncho. Let's figure out how to make a headdress with a fur element at home, on your own.
Preparation
When creating a fashionable headdress, you are given a full flight of imagination: combination of colors, shape, color scheme, pattern.
At the first stage, decide what shape of shawl fabric you need: square or triangle.
https://platoktut.ru/wp-content/uploads/2018/05/5737345-300×225.png 300w" width="427″ />
Next, you need to decide which part of the fabric will be covered with an expensive accessory. If the product is sheathed completely around the entire perimeter, then such a thing will be extremely difficult to tie on your head. Rich fur will make the fabric heavier and make it bulkier; in this form it is more suitable for wearing on the shoulders.
https://platoktut.ru/wp-content/uploads/2018/05/6457548-215×300.png 215w" width="498″ />
One of the popular options for a fur scarf is a partial trim that frames only the oval of the face. If you look at creative design works, you can decorate the shawl fabric completely with a beautiful pattern or sew on elegant stripes of fluffy material.
Choosing fabric for a fashion accessory.
For winter, thick wool fabric is good; it will warm you and protect you from frost.
In the autumn-spring period, natural and light fabrics are relevant.
For the trim, the fur element can be taken from an unnecessary worn item: jacket, coat, down jacket.
Preferred skins for future headdress: sable, arctic fox, fox, mink.
For a harmonious and sophisticated finished product, it is advisable to select the colors and tones of fabric and fur.
Source
Cut out 2 pieces for the hood and 2 of the same for the lining. Dimensions - choose the length and width based on your preferences. We sew the hood, then the lining. We connect the first with the second, process the edges. You can sew pockets onto the scarf.
Source
The fur strip should be neat and not cover the face and fabric.
Cutting and sewing
Currently, there are no problems with the choice of material and fabric for the future product. For a simplified version, buy a scarf in a store. For the option of a “do-it-yourself” head scarf with fur, a pattern is included.
https://platoktut.ru/wp-content/uploads/2018/05/543647-300×148.png 300w, https://platoktut.ru/wp-content/uploads/2018/05/543647-768×379 .png 768w, https://platoktut.ru/wp-content/uploads/2018/05/543647-500×247.png 500w" width="800″ />
Tools for work:
- tailor's scissors;
- measuring tape;
- furrier's needle;
- machine;
- stationery knife;
- chalk;
- iron.
- Take the necessary measurements. Draw a diagram of the desired size of the finished product.
- Material before cutting: wet, dry, iron.
- Lay out the prepared piece of fabric on the table. Attach the pattern to it and, with a seam allowance of 1 cm, begin cutting. You can use chalk to completely go along the edge of the pattern, then remove it, add 1 cm at a time and cut out the desired part.
- Lay out the pre-prepared skin and grind it to the desired size for the edge. If the skin is not whole, but in pieces, then before starting work they need to be sewn together.
Styles of fur bonnets
Bonnets are mainly made from short-pile fur, such as mink, sable, and honor. However, hoods made of fox and silver fox look very luxurious and will perfectly complement, for example, a mink coat without a collar.
Bonnet
This is the most common style option, which combines a fur hat and bonnet. The headdress is tied with laces, the ends of which are decorated with fur pompoms or long “ears”. Such hats practically never went out of children's fashion; they were and are worn with pleasure by young people.
Bandana bonnet
Designers offer interesting models of headwear, for example, a bonnet that can be tied at the back like a bandana. Its main part is made of whole skin, and the bottom is made of thick silk fabric. The hood is put on the head like a hood, and with the help of a cord it is tightened, becoming a bandana. Thick fabric is quite capable of replacing a shirtfront or neckerchief.
Bonnet scarf
One popular option is a kind of hat-scarf. The loose ends of the hood wrap around the neck for a stunning look. This headdress looks great with a down jacket or coat and does not require wearing a scarf.
Hood-hood
This headdress made of mink fur looks very neat and elegant. It looks like a hood with a small shirtfront. There are no unnecessary elements here. However, designers, using beautiful fur inserts, create luxurious, elegant bonnets, as shown in the photo.
Knitted mink
Models made from mink yarn look very interesting and beautiful. This type of hood is more elastic than one sewn from whole skin. Thrown over the shoulders, it can become a luxurious snood. A knitted mink hood goes well with a natural fur coat, coat or down jacket.
Knitted mink hood
Bonnet trimmed with mink
You can buy a hood inexpensively, the base of which is thick fabric or knitted fabric, and the edge is trimmed with expensive fur.
Bonnet trimmed with mink
We sew a scarf with fur with our own hands
Choosing a headdress for the winter is an important task for a woman: even in heavy snow or bitter cold, you want to look stylish and beautiful. Since the times of Ancient Rus', scarves have been an integral attribute of the national costume of a Russian woman. If at the end of the last century fur scarves in aggressive colors and geometric patterns came into fashion, then by the early 2000s the fashion for this item of clothing with a classic floral pattern returned.
Elegant winter scarf with fur
Benefits of a hood
The practicality of the bonnet has already been appreciated by those who wear this feminine headdress with pleasure in recent seasons, when the fashion for it has revived again.
Fur hood hood
- The main advantage of this headdress is its ability to protect the owner from frost and wind. The hood reliably protects not only the head, but the neck and shoulders from bad weather.
- A fairly spacious hood does not crush the hairstyle, leaving it in its original form.
- The practicality of this thing also lies in the fact that when entering a room there is no need to completely remove it - just fold it over your shoulders like a hood. The result will be the image of a chic wide scarf, hood or snood.
- In addition to its practical side, a bonnet is a very feminine, graceful, elegant headdress. It creates a romantic, fragile image.
Definition of a headscarf, differences from a scarf
There are three main types of women's shawl-type headdresses:
- The scarf is the main option; it is square , not to be confused with a rectangular stole; as a rule, there is fringe at the edges. The fringe can be silk or wool.
- A shawl differs from a scarf in size (it is 1-5 centimeters larger), as well as in density . The shawl is denser and, accordingly, warmer. Pavlovo Posad shawls always have silk fringes.
- The scarf is triangular in shape, it’s like half a scarf . It is a right-angled equilateral triangle. Fringe is often missing.
About the technology of sewing a fur coat or sheepskin coat using a pattern
Sewing fur products begins with preparing the pattern. For sewing, you can use a ready-made pattern for a fur coat or sheepskin coat, or you can borrow a drawing from the Internet. But it’s not difficult to make a pattern yourself.
Pattern
- Each cut piece must match in the direction of the pile.
- Parts of each part must be mirrored;
- Symmetrical design in detail is required;
- Only the base of the fur is subject to cutting (the pile is not cut).
Cutting a fur coat begins with modeling the back (1 part) and the shelves (2 parts). A sleeve pattern is created (they can be single-seam, straight or flared). And then the collar or hood is cut out. A collar pattern, for example, for a mink coat is not difficult to construct. The hood will require diligence.
About sewing a children's fur coat
The material from which fur coats for children are made is inexpensive fur, in the shape of a rabbit, squirrel or cowtail. Sewing a small fur coat is not a painstaking and time-consuming process. Of course, there are features. For example, the width of the sleeves - they should be tailored taking into account the child’s mobility. But the width is normal, not “flying”, so that the baby does not freeze. The length is also averaged.
Children's version
The pattern is initially made from thick fabric and is pre-basted. The “preliminary model” is tried on the child. And only taking into account the shortcomings and their corrections can the pattern be transferred to fur fabric. It should be noted that higher quality fur is used to sew sleeves and collars. Seam allowance is allowed at least 0.4 mm. You should leave up to 2-3 cm for the hem. Next, the process of sewing the product, which includes:
- sewing fasteners;
- stitching of side seams;
- lining hem;
- sewing shoulder seams;
- sewing on the finished collar;
- sewing in sleeves (together with lining).
A wonderful fur coat for the baby is ready. It's safe to say that your baby will be warm in winter.
Choosing fur
The most popular type of scarves made of mink fur are scarves trimmed with fur.
It must be remembered that the color of the fur should repeat any color on the canvas.
What kind of skins could these be?
- Mink is the undisputed leader, often occupying large areas on the scarf.
- Arctic fox - used for edging, including circular.
- Red and silver fox are also sewn around the perimeter of the product.
- Sable.
- Raccoon.
- Rabbit.
Snowman
At the New Year's party, the boys can be anyone, even snowmen. Therefore, parents should definitely learn how to make a snowman’s hat with their own hands.
It doesn't require a lot of time, knowledge or effort. It will be enough to make a cylinder out of cardboard, shaped like a bucket and cover it with foil.
Model options
There are three main ways to decorate with fur:
Circular edge around the perimeter. These scarves are more comfortable to wear on the shoulders; tying them under the chin is inconvenient. Depending on the size, such a model can be an analogue of a boa, or a full replacement for a long-sleeved jacket.
Fur trim around the face. Sewn from mink, sable, rabbit. Suitable as an addition to a fur coat with a hood.
A fur scarf is the warmest option, covering almost the entire head, and in winter it can replace a hat.
We sew a scarf trimmed with fur around the perimeter
Required:
- Finished wool scarf or scarf, canvas size 145 x 145 cm.
- An arctic fox skin or several mink skins or old fur products.
- Threads to match the scarf or the leather part of the fur.
- Furrier's needles.
- Furrier's knife or razor blades.
Progress:
You need to cut the skin along the inside with a thin knife or razor. We use a plastic or metal backing, ignoring the wooden one, since wood particles will get stuck in the pile:
- We find all the abrasions of the fur, thin places of the flesh, and mark them with a ballpoint pen.
- We mark strips of the required width on the sandpaper; the length of all these strips should be equal to the perimeter of your product.
Advice! The direction of the pile must always be observed.
- We cut out our blanks.
- We remove the fringe from the scarf, simply cut it off carefully with scissors, grabbing about a centimeter of fabric.
- Fold our scarf in half and iron it well.
- Can be glued with double-sided interlining.
- We should have a double-sided canvas.
- We process the edges in a convenient way.
Important! If your fur is in pieces, sew them together before joining the fabric. In the same way, we first turn all the fragments of the edging into one large ribbon.
- We sew the resulting strips on our hands to the edge of the fabric with a seam across the edge. We straighten the fabric, stretch it, our seam should not gather.
- We don’t stretch the flesh.
- Sew the skin on all sides of the strip.
- You should be especially careful with the last fragment of fur.
We sew a fur bonnet
A scarf trimmed with fur only in the area near the face is called a hood.
Advice! A fur collar is suitable for this type of work; you don’t even need to rip it open.
Required:
- Ready scarf or scarf.
- Any fur with low pile, preferably mink or sable.
- Fabric for lining - flap.
- Threads to match the scarf or the leather part of the skin.
- Furrier's needles.
- Furrier's knife or razor blades.
Progress:
- We prepare the skin for cutting, marking all the unsuccessful areas on the flesh.
- We cut out the required shape.
- For sewing, it is better to use fur with lining. Lining is fleece or scarf fabric.
- We cut out the lining details and sew them to the fur blank using a seam “over the edge”.
- If you have a ready-made collar with a lining, this is an ideal option.
- When trying it on, we mark on the scarf where the fur should be.
- We sew our lined fur design to the scarf.
Let's try it on.
About calculations of the required footage for a fur coat
First of all, you need to choose a style. Having decided on the model (straight, trapezoid or cocoon), you can begin to calculate the footage.
The main parameters of the product are presented:
- length (distance “upper shoulder point - preferred length”);
- sleeve length (the value “upper point of the shoulder - desired length”).
Depending on what is planned: the fur coat is straight, or the silhouette is flared (size 42 48), - one length is enough in a canvas whose width is 150 centimeters. The size is larger - for a given width, more fabric will be required (up to two lengths). If the product being manufactured is intended to be decorated with structural elements, a reserve of material will be required (0.5–0.8 m). Additional costs for allowances when processing seams and shrinkage (0.1–0.2 m) should be taken into account. Elements in the form of collars (rarely found), lapels, patch pockets - they contain remnants of fur fabric.
Ready product
In the case when the product includes different types of fur, the footage of the fabric is calculated taking into account the height of each part, and separately.
When determining the lining fabric, the calculation is carried out taking into account the style of the product, as with the yardage of the main fur fabric, the length of the product itself and the sleeves are taken as a basis.
Additional Information. Inexpensive fabrics, such as satin or satin, are used as lining material. They are wear-resistant, easy to use and look presentable - they have a smooth shiny surface.
Knitted hat with an original pattern - free description, diagrams and photos
The highlight of this knitted hat is the original pattern with dropped loops. This elegant model is perfect for older women over 60 years old.
Description of knitting the hat is designed for head circumference: 54-56 cm
You will need: 100 g of blue-violet yarn (100% cashmere), sets of double needles No. 3 and No. 3.5.
Knitting patterns for women's hats
Rubber A.
Facial surface.
Garter stitch.
Dropped hinges.
Pattern with holes.
Knitting density. Stockinette stitch, knitting needles No. 3.5: 23 sts and 35 r = 10 x 10 cm.
Description and knitting patterns for women's hats
Further…
How to knit a hat for women over 60 years old
We put 96 loops on the knitting needles and close the knitting in a circle.
Next, we knit a rice pattern (knit 1 stitch and purl 1 stitch; offset in each row) straight 23 cm.
Then we proceed to decreasing the loops and knitting the long upper part, which we lay beautifully and sew to the side of the hat.
We crochet the bottom edge of the hat with a crawfish step.
The black and white photo shows the stages of work.
Hats for women of all ages - free knitting patterns
Knitted hats for women 50-60 years old. A selection of original models for older people.
These practical hats are knitted simply and quickly, without much difficulty. All models come with detailed instructions and diagrams.
To knit a hat you will need: 100 g of wool melange yarn (280 m/100 g); knitting needles No. 3.5 and No. 4.
When finished, the hat has the following dimensions : 51 cm X 21 cm.
Before you start knitting, make a swatch using your yarn and make individual adjustments to the pattern.
The model in the photo is knitted according to patterns and instructions from a Japanese magazine
Further…
Knitted hat with a colorful pattern
An elegant crocheted hat is perfect for ladies over 60 years old.
The classic style of the hat with a small brim and 3 types of threads combined in an openwork pattern turn our model into an ideal tool for creating a sophisticated look.
This feeling is enhanced by the selection of yarn in noble shades in brown and beige tones.
The model is perfect for older women.
To knit a hat you will need: 50 g of dark brown yarn and 20 g of beige and milky yarn, hook number 3.
The knitting description is for size 56.
How to crochet a women's hat with a brim
Further…
Cute hat for a girl
You can sew a cute hat with ears for a girl. To avoid wasting time taking measurements, you can use a baby’s cap. You need to trace it on paper to get two parts of the pattern. (Front and back). Using the patterns, cut out the base and lining. Then cut out triangle ears.
Before sewing, you need to fasten the parts together with the right sides facing inward with pins. Attach the ears to the top seam line, having previously covered them with seams. Then sew them on a machine. You can make an applique in the shape of an animal by sewing on eyes, a nose and a mouth, or you can decorate the product with sequins or embroidery.
Sewing a children's hat from fleece
Cutting and sewing such a hat will take about two hours. You can sew it according to the following pattern:
- Cut out the parts of the cap and secure the seam on the side.
- Turn 5cm inside out. and stitch along the edge.
- Gather the fabric at the top of the head and sew by hand.
- You can use beads or knitted appliques as decoration. The decor should not have piercing or cutting parts.