Bulldozer from Skiper SK-800 walk-behind tractor
In the household, especially in winter, this idea of converting a walk-behind tractor into a bulldozer will be useful.
Snow in the yard will no longer be a problem for you, and cleaning it will turn into an interesting activity. The peculiarity of this model is that this device copes not only with snow, performing the tasks for which it was built, but can also cope with work with soil. It is proposed to make such a bulldozer using the Skiper SK-800 walk-behind tractor as an example. To eliminate slipping, special weights weighing 35 kg each are mounted on the wheels. Now let's install our modification. A hole is drilled and a bushing is inserted. The bushing was welded in a circle to secure it. It does not create any interference with work there, but there are many benefits from it.
Threaded nuts are welded on both sides. The blade body itself is made of a barrel, that is, from the most readily available means. Holes for setting the angle of attack.
Please note that a bulldozer made from a walk-behind tractor starts up easily and the first time. Now let's do a test. As reliably shown in the video, the walk-behind tractor copes with its task easily. And although the blade was designed for snow removal, it is quite capable of functioning as a tractor and bulldozer. Please note that the walk-behind tractor operates at idle speed. As we can see, in skillful hands, a walk-behind tractor turns into a bulldozer and can also be used as an alternative to a tractor.
Let us remind you that this device was made by hand and is intended for clearing snow. As practice has shown, a walk-behind tractor with wide wheels and weights does not slip at all. This simple device attaches quickly with a few bolts. There will be a separate video about weights.
discussion
max kachalkin Will the gearbox break because there is now weight on the wheels? It’s probably the same thing if we hang 10 kg at our feet and walk, and we won’t walk 200 meters, but if the weight is distributed over the body, then everything is fine. What do you think about this?
Kupimtut. By video +max kachalkin is absolutely not the same. The load here is almost exclusively on the wheel tire. But for her, 30 kg means nothing. For the gearbox, additional load occurs only at moments of acceleration. (This is when starting off. Well, move off smoothly and without any load.). During movement, a flywheel effect is used, which provides additional smoothness of movement (as in cars and tractors).
Max Berestov has competent weight distribution, which is much better than weighing down the walk-behind tractor itself, where there will actually be a load on the body, gearbox, and first of all the bearings suffer.
yurkaa kupimtut. By video it’s easier while it’s powdery, I finally put the chains on then I went. But sometimes he tears them up. I would advise you to make a plane on the back side, it will be easier to move the snowdrifts.
kupimtut. By video To be honest, I think so too. These walk-behind tractors lack low gear. I remember once riding on a tracked DT-75, so there was a separate reduction gearbox, in addition to the main one.
Bogdan meedun is very simple and accessible. I have a Tarpan, but it doesn’t have a reverse gear and I also dream of converting it for snow removal in the winter. Question? Where did you get the wheels and how did you adjust the mount?
Kupimtut. By video these wheels were developed specifically for this model at the skiper production site. True, when purchasing, they were not in stock and I had to wait until they appeared and buy more. There was a time when this model was sold out precisely because of the wheels. Theoretically, judging by other reviews, you can say and think anything. But in reality, as I saw, snow, sand, and soil pass confidently and under load. It’s a pity that the owner of this unit has left now; he would have posted a video specifically in the snow. Theory and speculation are one thing, but practice and reality are completely different.
Kupimtut. By video Answer from the kupimtut channel: the blade was made by a Belarusian craftsman for himself personally and is intended exclusively for snow removal. He copes with this task completely. Cleaning the yard and areas adjacent to the house is 100% effortless and hassle-free.
In fairness, I’ll quote the readable part of the deleted text: “for those who are in the know, it’s clear that this is crap. The blade for sand and earth has an incorrect angle of attack, the blade is designed for snow, but it can only paddle snow in a straight line or downhill. The slightest rise and that's it, ass. My walk-behind tractor with a blade and counterweights weighs 270 kg, and it’s very difficult to work on lugs when lifting.”
kupimtut channel answer: the adapter is not intended for sand and earth. The video demonstrates this - due to the lack of snow and for a visual assessment of the power of the walk-behind tractor, a skipper is used. The lugs were sold by the user as unnecessary.
Kupimtut. By video +Boris Yurchenko yes, I was just lucky - I found such a blank. It is attached from the inside with bolts (the blank has a thread cut into it. The same bolts as the wheels. I know someone who can do it.
Class 25
The most common bulldozers belong to class 25. They are based on crawler tractors. The units easily develop frozen soil, regardless of the volume of rocky inclusions, and loosen rock with cracks.
The single-tooth design has a four-link suspension design. It includes:
Each hydraulic cylinder is connected to the hydraulics of the base tractor, and therefore is capable of lowering, performing forced deepening, and also fixing the ripper as required for work. These mechanisms also lift attachments when moving the bulldozer in idle mode.
Construction of bulldozers with mounted ripper equipment based on tractors
The rear axle was chosen as the place for suspending the attachments, where eyes are welded to mount the lower link simultaneously with a pair of brackets on which the upper link is fixed.
The fang is an elongated post with a cast replaceable tip equipped with a wear-resistant pad. Also in the design of this element there is a locking mechanism that reliably secures the installed cover. The stand is mounted in a box to which it is attached with a fixing pin.
The DET-250 bulldozer, equipped with a ripper, is made in a fixed hemispherical or spherical tooth design. The mechanism is equipped with a compensation system - a powerful transverse beam. The working unit has standardized brackets on which it rests, a lower link, and a chain of hydraulic cylinders to ensure changes in the designated loosening angle and canine lifting/lowering.
The single-tooth crossbar has only a single hole in the center for fastening the working element, which ensures maximum penetration into the developed soil.
There are four holes in the tooth, located at a distance of 23 cm. Thanks to this, the depth of penetration of the fang is adjusted. The rack is repositioned by a mechanism controlled by the driver of the car from his cab. The fixed cast overlays required to protect the tooth are unified - they are suitable for any modification of the loosening installation.
All parts of the bulldozer are controlled thanks to sectional distributors. One of them is responsible for lifting and lowering, moldboard misalignment. The second controls the loosening angle. Both hydraulic cylinders have valves that allow you to quickly lower the fang and fix its final stroke.
Here you can download the operating instructions for the SD22 bulldozer-ripper.
We make homemade products for the walk-behind tractor with our own hands
To quickly and efficiently cultivate the soil, you need to make homemade “crow’s feet” cutters for a walk-behind tractor, which will mix the soil to a sufficient depth and break up hard clods.
A homemade rake for a walk-behind tractor is also a useful attachment. It is best to have several of these different types of rakes.
Every gardener will also need a homemade hiller for a walk-behind tractor. The hiller will allow you to form smooth and high ridges in all beds with root crops. A homemade blade for a walk-behind tractor will make it easier to remove snow and sand from the land and create good conditions for further tillage.
Homemade rake for walk-behind tractor
If you wish, you can easily make a homemade rake for a walk-behind tractor. For wide-grip hay rakes, you can use regular water pipes that differ in diameter. You will need to put a special bushing on the round rod, then tap its surface, turning it slightly.
When making, a round rod is best suited. Most parts of the rake are held together by electric welding, since this method is simple, and at the same time a reliable design is obtained.
Greater design simplicity can be achieved if the rotating parts on the axes are fixed without rolling bearings.
It is better to make the hay rake for the walk-behind tractor foldable, as this will simplify their transportation.
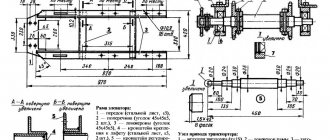
How to make a homemade blade for a walk-behind tractor
The walk-behind tractor can serve as a bulldozer for leveling soil, clearing sidewalks or roads from dirt and snow. To do this, you need to make a homemade blade on a walk-behind tractor, usually sheet metal 1-2 mm thick is used. Four steel ribs (stiffeners) from a sheet 3-4 mm thick are welded inside the blade.
Holes are drilled into them locally to fasten the blade with the rods in a strictly vertical position in relation to the front of the walk-behind tractor. It is also better to sheathe the bottom of the blade with tin so that it does not bury itself in the ground.
- 1 – dump sheet (tin);
- 2 – 4 pcs stand (stiffening ribs);
- 3 – bottom sheet of the dump (tin);
- 4 – knife; 5 – linkage mounting eye.
Bulldozer-loosening unit B-14
Alyona
April 7, 2021
- 0
859
3D model of the B-14 bulldozer in Compass-3D. List of 3D models: Lower beam Upper beam Hydraulic cylinder (cylinder) Hydraulic cylinder (rod) Lock Ripper tooth Frame for attaching to the tractor Ripper frame Balancer of a swamp tractor Drive wheel of a swamp tractor Crawler track 900 mm Double-breasted roller Single-breasted roller Lenivets Tensioner device
Bulldozers / Construction machinery machines / KOMPAS-3D
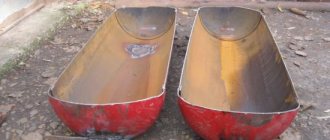
Homemade shovel for walk-behind tractor
The walk-behind tractor often acts as a bulldozer, leveling the soil and also clearing sidewalks or roads of dirt and snow. It is equipped with a blade shovel.
You can make a homemade shovel for a walk-behind tractor without any difficulty if you have a grinder, a drill and a welding machine on your farm.
You won’t have to look for a long time for a suitable metal, since an ordinary two-hundred-liter steel barrel will be suitable for making a shovel-dump. By carefully cutting it into three parts, you will get three curved segments for a shovel. By welding two of them along the contour, you will get a blade shovel with a metal thickness of 3 mm, which is quite enough for the required rigidity of the blade blade.
Modernization of a bulldozer based on MTZ
GInex664
October 11, 2020
- 0
1 398
Educational project. The assignment required the modernization of the MTZ bulldozer with a fixed blade for category II soils. After conducting a patent analysis, it was decided to retrofit the bulldozer with loosening equipment. Next, a general calculation of the machine was carried out, as well as a calculation of its productivity, and a calculation was made of the worker’s hydraulic control system
Bulldozers / Tractors
Making a homemade disc hiller for a walk-behind tractor
We begin to make a homemade disk hiller for a walk-behind tractor by searching for lids from steel pans that are unnecessary on the farm (preferably not enameled, but simply metal). The required diameter is approximately 40-50 cm, taking into account the fact that the depth of germination of potato roots into the ground is no more than 15-20 cm. Next, we sharpen the blades of the lids, and in our case they are already hiller discs, on a grinding machine. If the lids are flat, then they are slightly bent to one side with a hammer.
Next, in order to make a convenient hiller, you need to make a cart to which the disks that move the soil will be attached. This can be a structure made of pipes and bushings; we attach small support wheels to its lower frame.
After this, you can proceed to testing such a hiller directly in the potato plot of the garden.
Double-mouldboard snow plow with side wing
korneichuk_denis
January 15, 2022
- 0
329
The course project examines the classification of road machines, their basic diagrams, drive kinematics, design solutions of domestic and foreign machines, issues of the theory of strength calculations, methods for choosing the type of machine for specific production conditions and calculating the technological parameters of machines using a computer, as well as rational
Bulldozers / Snow removal equipment / Tractors
How to make a homemade plow for a walk-behind tractor
Is it necessary to make a plow for a walk-behind tractor if you don’t have any special metalworking skills? Yes, it's worth it. The design of this agricultural implement is quite simple and therefore anyone can correctly make a homemade plow for a walk-behind tractor.
Before you begin to implement your plan, you need to look through the previous posts on our website, where we described the manufacturing process in detail with drawings.
Professional tools are best suited for the job; they will allow you to perform all technological operations with your own hands at the required level and at the same time maintain their quality. An amateur tool is unsuitable for such work because its level of strength is insufficient to perform some of the operations.
Preparatory stage of work
First you need to decide what kind of excavator you need. There are two types of small earthmoving equipment: self-propelled or trailed. In the first case, you will need an engine so that the excavator can move independently. In the second case, the equipment can be attached to a tractor or other tractor. It is worth noting that mounted models are much easier to make with your own hands than self-propelled ones.
Any work on creating equipment begins with drawings. This will help you better calculate the traction force, determine the amount of material, and think about the appearance of the excavator. You can prepare the drawings yourself, or use ready-made sketches on the Internet.
Homemade crow's feet cutter for walk-behind tractor
This is an all-welded, non-dismountable steel cutter, which gives it significantly greater strength than conventional cultivator cutters. A homemade crow's foot cutter for a walk-behind tractor shows great efficiency and is successfully used when plowing hard soil. It can be aggregated with almost any walk-behind tractor or cultivator with a suitable axle diameter.
The “crow’s feet” cutter is very good to use when plowing the land for planting potatoes, especially if the soil is hard with large clods of earth, or when, to prevent the Colorado potato beetle, wireworms and other garden pests, you need to quickly plow the garden “in the winter.”
“Crow’s feet” are usually sold unsharpened, and many gardeners who have already tested these cutters recommend sharpening them for easier and faster plowing.
Below are drawings of a homemade crow's feet milling cutter with a diameter of 520 mm, a grip of 1250 mm, and a total number of beams of 30 pcs. 3 pcs. per section. The beam is bolted to the coils.
When plowing the soil with such a cutter, it loosens and rises to a depth of an average of 40 to 100 mm, depending on humidity.
The feasibility of homemade products
Despite the fact that there is a greater variety of attachments on the market, they may not always be suitable for certain tasks.
And the price-quality ratio sometimes leaves much to be desired. Therefore, many gardeners make the necessary accessories for walk-behind tractors with their own hands. To do this, it is enough to have a drill, grinder and welding machine on hand, as well as have the skills to work with them. Only in individual cases, when more precise calculations and turning work are needed, do you have to turn to highly specialized specialists.
An advantage to homemade products is that at any disassembly site you can easily find the necessary component or assembly from an old car suitable for construction.
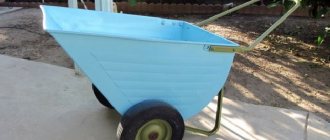
Mini bulldozer
You can turn a walk-behind tractor into a miniature bulldozer capable of leveling small areas or removing snow and debris by installing a shovel blade on it. For this, sheet metal with a thickness of at least 3 mm is used. The lower part of the shovel should be slightly bent forward in relation to the general plane, and a strip of thick rubber should be attached to it for snow removal or sheathed with tin (for excavation work). To strengthen the entire structure at the rear, it is necessary to weld several stiffening ribs from a metal corner.
Self-propelled rake
Despite the availability of factory-made rakes, many farmers prefer to make them themselves, taking into account the characteristics of their farm: the size of the meadow, the relief.
Metal pipes and hardened rods are used as materials for rakes. But as an option, you can use factory manual forks by welding them to the base. For ease of work, it is advisable to install small wheels or ski feet at the edges, which will relieve the load on the entire structure.
Safety precautions when working with homemade garden crushers
No matter how easy it may seem to use garden shredders, working with them can lead to injury:
- Always make sure that there are no small children near it when using a homemade shredder.
- Never load metal, glass objects, or construction waste into the unit.
- Do not put your hands inside during operation.
- If something gets inside or the size of the branches exceeds the power of the device, you need to turn off the engine and remove the unnecessary using some tongs.
- Always wear gloves, a protective mask and safety glasses.
- If the garden shredder is powered, it should be located as far as possible from water sources to avoid short circuits.
- Do not store homemade shredders in places unprotected from moisture or at low or high temperatures.
- Before using the shredder, always check its serviceability, reliability of fastening of parts, and integrity of the wires.
- After using the shredder, clean the body and blades of any remaining garden debris. Damaged knives should be replaced immediately with new ones.
Be sure to read: Chisel cultivator for soil cultivation
Equipment for land cultivation
To cultivate the land, craftsmen have developed a number of devices that are superior in quality to factory products.
Most often, a do-it-yourself plow is used as a device for a walk-behind tractor, since factory prices are quite high. To make it, you should use sheet iron with a thickness of at least 4 mm, from which the knife itself and pipes with walls of the same size for the frame and fastening are cut directly.
Hiller
A device for hilling beds can be made from two metal disks.
They must be the same size with a diameter of at least 50 cm. It is advisable to pre-sharpen the edges of the disks for better soil sampling. Their fastening to the frame should be thought out so that it is possible to change the distance between the disks in accordance with the width of the bed.
Chassis manufacturing
1. Cut a 76x432 mm blank from a 38 mm thick walnut board (or glued together from several layers). From this blank, cut out chassis A according to the dimensions indicated in the “List of Materials”, and set the rest aside. On the chassis, mark the centers of the 9mm holes and chamfers (Fig. 1a). Drill the holes using a drill press. Use a band saw to file the bevels and then sand them down to the marking lines.
Secure chassis A with a clamp on the workbench to prevent the part from swinging. Glue radiator B and press it with a clamp.
2. Make a copy of the radiator template. Take the rest of the walnut blank, use spray glue to fix the template on this edge, aligning with one of the ends, and cut along the contour with a band saw, and then sand radiator B to the final shape. Save the rest of the workpiece for the cabin). Using a drill press, make a 5mm hole. Remove the paper template and wash off traces of glue with white spirit, then mill the chamfers. A and radiator B a final sand with 220-grit sandpaper. Glue the radiator to the chassis flush with the front edge (Photo A).
3. Cut out two blanks for side supports C (Fig. 2) . Make a copy of the appropriate template, attach it to the workpiece with spray adhesive, cut it with a band saw and sand both pieces to the final shape . Drill holes in the indicated locations. Separate the pieces, sand them with 220-grit sandpaper, and then mill chamfers along the top outer ribs.
4. Cut out two spacer parts D for the road wheels (Fig. 2a). Mark and drill holes in the indicated places, and then grind the rounded corners with a radius of 10 mm. Sand the pieces with 220-grit sandpaper and glue them to the side supports C , lining up the ends and back (Figure 2). C/D assemblies to chassis A in the middle of its length (Fig. 1a).
Glue the sides E flush to the back of the radiator B, flush with the outer edges of the chassis A.
E from a 19 mm walnut board . Make a copy of the side panel template, attach it to the piece with spray adhesive, drill a hole, cut along the outline and sand both sides to the final shape. Separate the parts, sand them with 220-grit sandpaper, and then glue them to the chassis A-D and secure them with clamps (photo B).
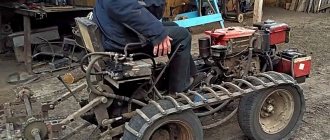
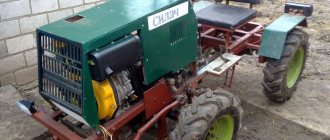
From tractor to boat
The most common modifications from a conventional walk-behind tractor are all kinds of complex equipment and vehicles.
True, the latter can be more called homemade products based on the engine and transmission of the device. Potato planters . If there is a large area for planting potatoes, a device based on a walk-behind tractor would be ideal. It includes several elements at once. First of all, the potato planter is equipped with a small hopper for tubers.
In front of it is a plow that makes a ditch, and behind it is a hiller that fills and forms a bed. All devices must be adjustable in accordance with the planting depth and size of the beds.
Mini tractor . Most often, craftsmen construct all kinds of mini-tractors. In this case, the shift in the center of gravity of the equipment should be taken into account, since the engine is installed in the rear. Therefore, care should be taken to expand the wheelbase of the rear axle.
Currently, you can find on sale all kinds of components and assemblies for creating a tractor based on a walk-behind tractor, such as front axles, brake system, all kinds of rods and levers, pedals. But if you wish, you can make all this yourself, using suitable parts from old cars.
When using more powerful tires, such a tractor can easily turn into an all-terrain vehicle.
Boat motor . The engine from a walk-behind tractor can also be an ideal replacement for a conventional outboard motor. To do this, the necessary fastening should be made on the boat hull, and the standard engine cutter should be replaced with blades. In the right hands, a walk-behind tractor can also become the basis for creating a small buggy-type car. True, it will not be possible to drive in urban conditions - this is due to the official registration of the vehicle with the state traffic inspectorate. But it can be an excellent help in rural areas for fishing trips or hunting for mushrooms. Also, such an “SUV” is ideal for mastering driving skills for beginners.
Most often, the front axle from a “disabled” vehicle is used as the chassis for such a homemade vehicle, the rear axle is a drive axle, it can be installed from an old Zhiguli or from an Ant scooter. By the way, the size of the wheels used will depend on this. The frame shape and body design are made based on the operating conditions of this equipment. But you should not miss such a moment as the need to install seat belts and roof bars.
Get busy with caterpillars
You can carefully position the tracks N, O using a ruler, pressing it against the two wheels. Press the parts for a couple of minutes until the glue sets.
1. Take a nut blank measuring 13x38x330 mm. Make two copies of the templates for the top and rear parts of the tracks, glue them to the edge of the workpiece. of the N, O tracks and sand them with 220-grit sandpaper.
2. Temporarily install the axles and dual wheels on one side of the A-M . Use the wheels as guides to position the track pieces to glue them into place (photo D ). Let the glue dry for 30 minutes and then repeat the operation on the other side of the case.
About the device of the walk-behind tractor
Next, you will find out which walk-behind tractor is better to choose. To make it clearer what the principle of homemade walk-behind tractor manufacturing and its additional components is, you need to consider in detail the structure of the walk-behind tractor as a means of small-scale mechanization. So, this unit includes several main working units:
- The main driving force, i.e. engine.
- Transmission.
- Chassis.
- Basic controls.
Engine
The main driving force in the design of walk-behind tractors is a standard internal combustion engine. Depending on the type and brand of walk-behind tractor, for example Cayman Vario, Patriot Ural, Texas, Foreman, Crosser, Viking, Forza, the engine used may be different:
- Gasoline 4-stroke engine. This engine is used for units belonging to the light and medium class of devices.
- Diesel 4-stroke engine. Motors of this kind are used on heavy and powerful walk-behind tractors designed to work on the most difficult surface areas.
Video: The best diesel walk-behind tractor
For more information about the operation of a diesel walk-behind tractor, watch the video:
Of course, 2-stroke engines are also available, but they are used in fairly old models of walk-behind tractors, being significantly inferior to 4-stroke engines in terms of power thrust. However, most consumers get 4-stroke gasoline engines. Their device includes the following systems:
- The system responsible for supplying fuel. Consists of a fuel tank, carburetor, air filter and fuel hose.
- A lubrication system that carries out the process of lubricating those parts that rub against each other.
- A starter that spins the crankshaft.
- A cooling system that removes heat from the engine cylinder block using air flow.
- An ignition system that produces a spark at the spark plug.
- A gas distribution system that ensures the flow of the air-fuel mixture into the engine cylinder and is also responsible for the exit of exhaust gases.
The important thing is that the engine is sold with all the main operating systems, which greatly facilitates the process of making a homemade walk-behind tractor.
Transmission
The main function of the transmission is to transmit torque from the engine to the wheelbase, as well as regulate speeds and change the movement of the unit. Its design includes several working units: gearbox, clutch, gearbox and differential (not available in all models).
Transmission can be of several types:
Basically, the classic type of gear transmission is used on heavy walk-behind tractors, and it consists of bevel and cylindrical gears.
Other types of transmission are used in light and medium types of walk-behind tractors. At the same time, regardless of the type of transmission, the design contains a PTO - a power take-off shaft, which transmits torque to the working units of the unit.
As for the clutch, it can be different:
- In the form of a V-belt transmission. The essence of the process is the clutch lever, which tightens or loosens the belt, thereby transmitting or stopping the transmission of torque from the motor to the gearbox.
- Single or multi-disc dry or wet clutch.
- Conical coupling.
Most high-quality walk-behind tractors Sadko, Don, Huter, Profi, Plowman, Champion, Carver use the second type of clutch, which is the most reliable.
Chassis
The chassis includes not only the wheelbase itself, but also the frame structure to which these wheels are attached, and where the main working units of the walk-behind tractor are located.
In more modern models of walk-behind tractor, it is possible to change the distance between a pair of wheels, which allows you to adjust the track size of the walk-behind tractor.
Today, there are two types of wheels - pneumatic and metal with lugs.
Basic controls
The walk-behind tractor control is located on the handle of the unit, responsible for changing the speed and direction of movement of the device. The controls include:
- Levers, steering wheel and gear shifters.
- Clutch control.
- Engine stop lever or button.
- Gas supply, etc.
The design of the walk-behind tractor does not have a seat for a person (as in the Salyut walk-behind tractor), so the control itself is carried out by a person with his own hands.
Technical specifications
Let us briefly present in the form of tables the comparative characteristics of typical rippers.
| Options | Basic tractor | ||||||
| B10M | T15 | T20 | TM-25 | DET-320 | DET-250 | ||
| Traction class | 10 | 15 | 20 | 25 | |||
| Hitch | 4 links | 4 links, loosening angle adjustable | 4 links | ||||
| Power plant power, kW | 132 | 206 | 279 | 258 | 237 | ||
| Maximum rated speed, km/h: | 10 (in any direction) | 11 (forward), 14 (backward) | 10 (forward), 13 (backward) | 11 (forward), 13 (backward) | 15 (in any direction) | ||
| Weight, t | 18,4 | 36 | 51 | 45 | 41 | ||
| Options | Basic tractor | |||
| T-35 | T-50 | T-75 | ||
| Traction class | 35 | 50 | 75 | |
| Hitch | Parallelogram, loosening angle adjustable | |||
| Power plant power, kW | 353 | 550 | 603 | |
| Maximum rated speed, km/h: | 12 (forward), 14 (backward) | 1.6 (forward), 14 (backward) | ||
| Blade shape | U | US | Hemispherical | |
| Blade weight, t | 8,95 | 8,25 | 12 | 16,3 |
| Number of ripper teeth | 1 | 3 | 1; 3 | 1 |
| Loosening depth, m | 1,5 | 0,9 | 1,7; 1,1 | 1,8 |
| Dimensions, m | 9.7x5.5x4.7 | no data available | 12.4x6x4.8 | |
| Total weight, t | 61,5 | 95,5 | 106 | |
Ripper bulldozers are used to preliminary loosen soil layers and then move complex soil. These actions are required when arranging construction sites, breaking road surfaces, constructing wide trenches or pits.
The process of rock destruction ensures the forward movement of the machine while simultaneously deepening the teeth to a mark forced by the driver. Due to the impact of the loosening force on the rock mass, the rock is crushed into pieces, which can then be conveniently loaded onto dump trucks for transportation.
The working cycle of the loosening process is performed with parallel cuts. They are produced using one of two technologies:
The shuttle option is more rational when the scope of actions is small and it needs to be performed in a small area. The second technique is advisable when the site has a large area. Maximum productivity is ensured by the grip size, decent moving speed, and the number of ripper teeth.
The minimum depth of single-pass loosening must be one third greater than the layer of rock shavings of the soil that is being developed by the earthmoving machine with which the installation is operating simultaneously. To loosen rocks that are too strong, use a one-tooth attachment.
If we look at the drawing of the attachment, we can see that the working part of the mechanism has a supporting frame, teeth, suspension, as well as hydraulic cylinders for controlling the unit.
Drawing of attachments for loosening equipment
The teeth are equipped with replaceable plates, the front surface of which is covered with a wear-resistant coating. This is required to reliably protect the working area from wear due to abrasive action. To speed up the process, attachments are often mounted on the teeth. They destroy more material in just a single pass, pushing stone blocks out of the ground.
Drawing of a bulldozer with attachments for loosening equipment
These attachments ensure stable movement of the unit and help prevent frequent maintenance of the rear axle by removing some of the load from it. Due to the expansion of the contact zone, the material remaining between adjacent trenches is almost completely destroyed, so the number of passes needs to be made less, which has a positive effect on fuel consumption.
Best DIY Equipment
Homemade products with an engine from a walk-behind tractor (read do-it-yourself harrow for a walk-behind tractor) are also of some interest. Among them, the greatest interest is in the manufacture of a snowmobile. As a running gear, you can use a transport tape on which you need to attach snow hooks.
In addition, interesting are the options for manufacturing other various types of equipment from a walk-behind tractor:
- All-terrain vehicles. The design resembles a mini tractor, but has wheels of a higher diameter. This is necessary so that the unit can pass through the most difficult terrain.
- Mini tractors. We have already considered this design, which includes an additional part of the frame for a second pair of wheels, as well as steering wheels and the driver’s seat.
Add body parts
1. Cut two maple blanks measuring 19x76x76 mm and one walnut blank measuring 6x76x76 mm. Glue the bag of three pieces together, placing the walnut one in the middle and aligning the edges. 11After thoroughly drying, make a copy of the hood template and attach it with spray adhesive. Cut out the hood with a bandsaw and sand to the final shape. Drill a hole for the exhaust pipe (Fig. 1). Sand the piece with 220-grit sandpaper and then rout 2mm bevels on the top front and two vertical ribs. 11Glue the hood on top of the sides E close to the radiator B.
2. Cut out the base of the cabin G , the rear wall H and platform 1 (Fig. 1). The back wall should fit tightly between the two side panels E. To make the cabin, take the remainder of the thick walnut blank and attach a paper copy of the cabin template to it with spray glue. Cut with a bandsaw and sand the piece to its final shape. Then drill a hole in the indicated location and chamfer both sides.