Head
To make the head we will need a hollow ball with a diameter of about 6 cm.
If you don’t have one at hand, you can make it yourself from scrap materials.
For example, soak paper in PVA glue and roll the resulting mixture into a ball of the desired size. The paper you choose should be soft and not very thick, such as toilet paper or napkins.
For the head, you can use foam balls or an old Christmas tree decoration.
I didn’t have either of those at that moment, so I had to get out with the help of crafts made from toilet paper)))
After the ball has dried, wrap it with twine of a natural color.
And glue the abdomen to the cone. Everything is simple here.
Product Features
In ancient times, these shoes were widely used by the poor, regardless of age and gender. The only people who did not wear such items were people living in Siberia, as well as the Cossacks. The material from which bast shoes are woven can vary. Elm, birch, willow or linden were used as it. Bast shoes were made from bast or bast. Sometimes horsehair and straw could be used to make them.
Most often weaving was done from linden bast. Such products were distinguished by durability and maximum strength. Birch bark bast shoes were especially soft. Often such shoes were given a name taking into account the number of strips of bast that were used in the work. For example, seven or five. To make the product as durable and warm as possible, it was woven using hemp ropes. They also had leather soles sewn on them. It was customary to wear shoes made of ligature for celebrations. It was decorated with paintings and ribbons.
Mention of bast shoes is first found in the twelfth century. They have gained immense popularity due to the availability of materials and low cost. Even during the Civil War, which began in 1918, many Red Army soldiers wore such shoes. Nowadays, such products act only as souvenirs and decorative elements. They are often made for dolls, but also for the purpose of recreating a traditional Russian costume. They can also act as practical house slippers.
How to make a tail
And the last thing we need to do is the tail. Well, what is a cat without a tail?
You can use wire for the base of the tail. But I didn’t have that either, so everything had to be made from thread.
To do this, I took 3 strands of twine about 25 cm long, coated them along the entire length with glue and glued them together, twisting them into one rope, giving it the shape of a future tail.
After the part has dried, you need to wrap it with twine crosswise in one row with a thread of the same color.
In the second row of winding you need to add sections of black thread that will imitate stripes on the tail.
We make a hole in the back of the cone and insert the lower end of the tail part, coated with glue, into it. We fix the upper end arbitrarily on the back of our pet.
OK it's all over Now! Your DIY cat made from jute twine is ready! Now we cover it with one layer of varnish and place it in the most honorable place in the house.
You can make a couple for the cat. The cat is made using exactly the same principle. I think when making it you will be able to show all your imagination and make a real young lady.
That's all I have for today. I hope you enjoyed the master class and found it clear. If you have any questions, ask them in the comments. I will be happy to answer.
Coffee cat, hedgehog and candlestick + mini MK
Girls, hello everyone!!! Coffee won’t let me go and here are my new coffee crafts!!!)))
Let's spin around, show off... Barrel... Decorated with my favorite coffee, orange, beads and ribbons...
The dress is closer...
Muzzle... eyes and nose, coffee beans, mustaches and eyelashes, bristles from a brush, something like a bow made from an orange and a butt from a date...
My favorite decoration...
There is a bow on the tail and an lace on the edge)))
There are beads on the neck, at the end of the tail too, and hearts... how could we live without them...
But this is where it all began...)))
I’ll tell you how I made it, maybe it will be useful to someone... I made the muzzle not from foam plastic, but, as always, from ceiling tiles...
Here it’s probably clearer...I cut out the parts, glued them together, and then put some masking tape on top.
The dress was made from a wine glass... wrapped with twine...
I made a neck out of wire, heated the end of the wire and inserted it into the neck. I made a hole in my head, dripped it with glue and put it around my neck. I wrapped everything with twine.
I started wrapping the muzzle, reached the ears, and cut it off. I started wrapping the ears, each one separately...
And I laid out the middle with pieces of twine
And then, wrapping the ears, I closed all the ugly ends (I hope it’s clear)
That's how it happened. A wire tail wrapped in twine. I made a hole in the wine glass, inserted the end and glued it onto a hot gun.
And now the best part))) decorate to your taste!
Here's what I got!! I like!
And now the hedgehog. Ira (I-Rinka) gave me the idea for this hedgehog. Thank you Ira!!! Now this prickly miracle lives with me!!!!
Let's spin...
Our belly)))
Well, working moments... I didn’t have a ball for the pool and I again used tiles))) I cut out a circle and put a ball of foil on it and wrapped everything with masking tape... the spout is also made of foil. I glued it to the belly and wrapped it with twine.
Well, a coffee candle... There are a lot of MKs in the country, but I liked Tatyana’s idea: https://stranamasterov.ru/node/351783?c=favorite She has wonderful coffee works!!!!
Everything is as usual, melt the candle...
But I wanted to make the candle reusable (so to speak)))) and I put a jar inside...
I made the edges as usual, but the jar is needed to renew the candle. Those. the edges of the candle will remain as they were, and the middle can be re-added with paraffin when the candle is all burned out...insert the wick and the candle will be as good as new. (I don’t really know what will come of this))))
View from above…
A closer look at the decoration...
Let's spin...
Well, my beast at once!))
Well, in the light of my newly made candle)))
Still like this!
Master class on making cats from jute thread “Cheerful cat family”
Elena Alexandrovna Bezmaternykh
Master class on making cats from jute thread “Cheerful cat family”
The amazing and wonderful world of handicrafts. But today's progress does not stand still; it is not only modern computer technology, but also new types of needlework. I also want to keep up with the times and keep up with the rapid development of the handicraft world.
This time I decided to try my hand at making cats from jute thread .
To make this craft you need the following materials:
1. Jute thread or twine.
2. Any empty bottle.
4. Multi-colored woolen threads, hook.
7. Beads of different colors and sizes.
8. Styrofoam ball.
Step 1. Take an empty bottle and carefully begin to wrap it with jute thread or twine . Coating the workpiece with glue.
Step 2. Then take a foam ball and also wrap it with thread. Let the parts dry.
Step 3 Let's start making the image of our craft.
Step 4. We begin to gradually assemble and decorate our cat.
Step 5. For this I used a crochet hook and wool threads.
I tied it so that it became a tailcoat. Added a hat and a cane. It turned out to be a cat.
Step 6. And then I decided to try to make a cat.
Gradually my collection grew.
Now I have a whole cat family !
And I want to end my master class with the wonderful words of Evgeny Yevtushenko:
“Under the skin of any person, in a lump called the heart, there is a whole world, the only one worthy of wasting paint on it. No photographer can fit in there. You need to capture the invisible. The artist is not an observer of life, but rather its creation and creator. "
Video “The Basics of Jute Filigree in the Senior Group” Jute filigree is a relatively new direction of needlework. Filigree is a jewelry technique, a type of applied art.
Notes for the lesson “Cheerful Family” Municipal budgetary institution of additional education Mozdok Children's Creativity Center “Cheerful Family” (notes.
Master class on making a firecracker I offer you a master class on making a safe firecracker for children! On New Year's Eve, firecrackers are the best toys in France, Algeria, Na. Master class “Manual from waste material for the sports corner “Fun Fishing” Our children are big dreamers, they love to play and have fun. My students and I very often come up with new entertainment and... Master class on creating a lapbook “Fun Mathematics” Master class: Creating a lapbook “Fun Mathematics” with your own hands Recently, many teachers have successfully used it in their work.
Master class “Fun ABC” for parents of the preparatory group Master class “Fun ABC” for parents of the preparatory group was prepared by: teacher Sedip-ool Ayana Dudey-oolovna Goals: expansion.
Video “Master class “The Cheerful Caterpillar” My master class “The Cheerful Caterpillar” is addressed to parents and teachers. I suggest watching a video about how you can use simple visual arts.
Master class “The Cheerful Caterpillar” Description: this master class will be of interest to teachers of preschool educational institutions, as well as to parents who are interested.
Source
Making the body
The first thing we start with is to roll a square sheet of whatman paper into a cone 25 - 30 cm high. The diameter of the upper base is about 2 cm, and the bottom 10 - 12 cm.
You can choose different sizes for your cat. Instead of whatman paper, you can choose another type of paper. The denser it is, the stronger the base frame will be. By the way, the cone can be replaced with a bottle.
Then we coat the cone with glue and begin to wrap it with twine of a natural color.
At the bottom of the cone we make two strips of black jute.
The base is actually ready. Let's move on to the details.
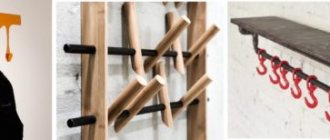
What to crochet from jute - photo ideas
You can knit interior baskets from jute:
Crochet jute - carpets:
Crochet from jute, what else can be crocheted:
Hind legs
We make the paws separately. We drop glue onto a sheet of file and spread it into a circle with a diameter of 2 - 2.5 cm, and then glue a jute thread around it.
We glue the resulting circle from the file and, until the glue has dried, we give the part a small convex shape. Glue black thread along the edge. It will look like this.
Next, we glue the parts to the cone and form the legs using three small circles.
The next stage is tailcoat modeling. We glue the black thread onto the cone in any shape, while creating the outline of the clothing. This is the view from the front, side and back.
Gradually, row by row, we fill the outlined space with black thread.
The finished tailcoat will look like this.
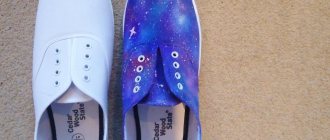
We crochet bast shoes: large and miniature
Lapti are ancient bast shoes that peasants have worn since time immemorial. Quite a few years have passed since then, but the popularity of such shoes is not lost. For some, they remain a sought-after item of clothing. Others use them as interior decor or souvenirs, such as crocheted bast shoes.
Crochet bast shoes - amulets
A talisman is a certain object that takes on all the negative energy, while protecting the home and its owners from the evil eye and ill-wishers. Bast shoes located above the front door of the house protect family happiness and well-being.
Cane
We make a cane from a skewer. Cut the stick to the desired length and wrap it with black twine.
You can glue a large bead to the end of the cane, which you then need to paint with black acrylic paint.
For the bottom on the file, we form a circle of jute twine with a diameter equal to the size of the lower base of the cone.
After it has completely dried, we tear the part off the file and glue it down the base. The side with glue should face inward.
We cover the not very beautiful junction of the bottom with the cone with a ribbon of 3 - 4 strands of twine.
This concludes the first part of the master class. The cat's body is ready and in the next tutorial I will tell you how to make the head and tail.
In order not to miss news, subscribe to blog updates and you will always be aware of Creativity events!
I look forward to your feedback about the master class. I will be very pleased to know your opinion.
I thank everyone for your attention and wish you creative success!
Source
Twine cats mini MK | Country of Masters
Hello, residents of the Country of Masters! This small master class appeared while working on cats. I saw MK, where these cats were sewn from fabric, but this option did not suit me, so I came up with this option myself.
Materials: twine, paper cup, coffee, wire for beads, thick wire, glue (titanium or silicone), decorations (ribbons, beads, flowers, tangerine figures), corrugated cardboard. I will be glad if it is useful to someone.
Cut out the base of the muzzles from corrugated cardboard. There are 2 parts for one face.
To create the volume of the face, cut out two more parts (round, oval)
Trying on for size
We glue a thick wire, which will later become the neck. We cover it with a second similar piece of corrugated cardboard.
Like this:
Forming a voluminous face
Preparing a ponytail from thick wire
Wrap with twine
We make antennae (3 parts) and cilia (2 parts) from thin bead wire. We just twist two wires.
We bend the end of the neck-wire, making a “twig” so that the structure can stand on its own. Turn the cup upside down and glue the base of the neck.
It should turn out like this (here the face is not voluminous yet, just photos from different cats):
We begin wrapping with twine. Ears and a little of the face itself.
At this stage, insert and secure the antennae and eyelashes with glue. And we continue wrapping with twine.
This is the result. And then we continue wrapping the cup to the very bottom. Don’t forget to attach the tail, always with glue, so it will be well fixed.
The eyes and nose are coffee.
Well, then we decorate according to our taste and imagination and WOO-A-LA!