The principle of spot welding is to join two metals under the action of an electric arc created by two movable electrodes (tips). High power electric current is supplied to them. When the electrodes are compressed at the site where the metal is pierced with an arc, a melt of a homogeneous structure is formed.
The spot welding method is often used in auto repair shops and private garages when body work is carried out. Very often, car batteries fail due to a broken contact; in order to change them, conventional soldering is not suitable; a stronger connection is needed.
Spot Welding Technology
The method is suitable for durable joining of heterogeneous alloys. Spot welding is called spot welding because of the size of the contact; it depends on the area of contact between the two tips or electrodes that form the electric arc.
To make spot welding, take two sheets of metal and a welding device. The process consists of several stages:
- the metal to be welded is placed between the tips, to which electric current is supplied;
- the power supply turns on;
- the stings connect with force;
- an electric arc occurs, it passes through metals, heats them up;
- Due to the compression force, the melt is compacted, resulting in a point connection of two sheets of metal.
The strength of the connection depends on the compression force of the tips, the power of the arc and the area of the tangent surface of the tips. They are made from alloys of high electrical and thermal conductivity; non-ferrous metals based on copper have such properties.
Types of resistance welding
Spot welding is one of the most popular types of resistance welding at home. However, there are two more types of welding in this category, which are used most often in factories and in specialized metalworking shops.
- Seam resistance welding.The operating principle of seam resistance welding is no different from spot welding. The tongs we are used to are replaced by special copper rollers. In this case, welding occurs spotwise, but at a certain distance, and the welding seam resembles a path of individual welded sections.
Seam resistance welding is used for welding seams, both on circles and on elongated large sheets. - Butt contact welding. This type of welding is characterized by a larger area of simultaneous welding. An alternating pulse electric current is supplied to the welded products in contact at the joints. Thus, during the application of a pulse, heating occurs over the entire contact area, also called the cross-sectional area. This process is completely mechanized, so it is not suitable for self-assembly at home. Diagram of a resistance butt welding machine
- Capacitor welding. Capacitor welding works on the same principle. It is used in those areas of industry where miniature parts with a thickness of 0.5 to 1.5 mm are fused. This type of welding is used in the field of electronics and instrument making. The advantage is that it leaves virtually no marks and does not burn through the metal.
Homemade capacitor welding machine
Equipment
Ready-made machines for spot welding are either stationary or portable; they are convenient to use when carrying out repair work. Automatic welding machines are used in industry. There are portable lever welding devices called tongs.
Welding equipment is expensive, and you rarely need to use it. Craftsmen found a rational way out of the situation.
It is quite possible to make a spot welding device for batteries and a body yourself. It can be used to repair household appliances and create decorative metal products.
The principle of operation of the design
In order to start assembling welding of this type with your own hands, you need to familiarize yourself with the principle of its operation. The whole process can be divided into several key points:
- Mechanical connection of surfaces or parts that need to be fastened.
- Mechanical fixation of parts using pliers or lips, in the center of which there is an electrical current supply area.
- Applying an electrical discharge followed by bonding adjacent surfaces.
The operating principle is quite simple and is the same for all models of spot welding machines. In practice, only the outer contours of the structure (handle for the master, shape of the clamps, housing) can be modified.
Welding of small parts
Sometimes it can be problematic to attach small contacts: a regular soldering iron is not suitable for this; the connection obtained by tinning is very fragile and cannot withstand high dynamic loads.
You can spot weld two small contacts using a low-power mini-welder. It is made according to the same principle as pliers, only the lower handle of the clamping device is permanently fixed, only the upper one moves.
The current source is fixed on a dielectric base, it can be:
- tree;
- plywood;
- non-flammable plastic;
- textolite
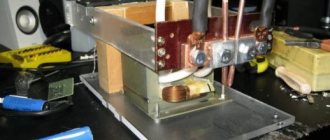
A transformer from a microwave oven or a ready-made TR1 is suitable as a current rectifier. If a transformer from a microwave oven is used, a wire with a cross-section of at least 8 mm2 in a durable heat-resistant braid is used as an additional winding.
When selecting electrodes, it is important to compare their thickness with the size of the wire. D The ends of the electrodes are sharpened to the required size. The smaller the contact area, the stronger the connection.
- DIY fan: how to make a homemade powerful fan. Basic parameters and properties of fans (130 photos)
- Why do you need a security alarm, what functions does it perform?
- How to choose winter workwear and not make a mistake - recommendations from the pros
The following is used as an electrode for spot welding:
- soldering iron tips;
- solid brass products (rods, hexagons, capillary tube);
- rods made of cadmium chrome bronze.
When choosing a lever, take into account the length of the working area - this is the depth to which the welded metal can be inserted into the welding device. To attach the tip to the handle, terminals are used: current is supplied to one end, the other part is secured with a self-tapping screw.
To select the correct pulse time, a resistor is included in the electrical circuit of the power supply. The power button is located on the handle or fixed on the power supply box. The wires and housing can be hidden in a single electrical insulator housing.
Seam welding
This type of installation is used either in professional workshops or in private workshops, where large units, parts, and structures are subjected to processing. The end part of the welding machine is a roller equipped with point electrodes.
The movement of the roller along the surface is accompanied by a uniform supply of electrical discharges, which leads to instantaneous melting of the metal and the formation of a connection point. The result is an original seam consisting of point joints, but located at regular intervals.
Battery device
A do-it-yourself mini-spot welding device is made using a car battery. Its power is enough to weld a contact to another one that requires restoration.
Two brass or bronze rods are attached to a block with a copper alloy terminal block; they are insulated in the area of contact with the hand. It must be taken into account that during welding the rods will become very hot; the insulator-connector should not melt.
The disadvantage of this device is the lack of a switch and high battery power. You must work with the device carefully so that there are no burns in the contact area.
How to choose an air conditioner for your home or apartmentDo-it-yourself bait - composition, application features and storage methods (115 photos and videos)
DIY sliding gates - how to build simple and automatic gates. Schemes, drawings and review of the best ideas (90 photos)
general information
A spotter is a welding machine used in body repair. At its core, a spotter is very similar to spot welding, but externally these are two completely different devices. Spot welding has two metal electrodes with sheet metal placed between them. In the case of a spotter, the technology is different. Let's take a closer look at it. The spotter has two terminals: ground and a wire with a working “gun”. The mass must be attached to the car body (do not forget to remove the battery from the car in advance). At the end of the “gun” there is a special clamp where you can install a special nozzle. When you press a button on the working “gun”, the welding current begins to flow. During the process, the welding site begins to gradually heat up. The resistance increases and the metal begins to melt in a certain area. At the same time, the rest of the body does not overheat. Metal is stuck, which can then be pulled out.
Let's explain it more simply. The spotter does not heat the entire part, but only a certain point (as is the case with spot welding). The heating is small, slightly less than the melting point of the metal. The fastening nozzle is pressed against the metal surface and at the moment of resistance it is securely attached, thanks to which you can then pull out the same dent in the opposite direction. Later the nozzle can be easily detached from the metal.
From spot welding there is both heat and force. The heating is carried out by the device, and the force is carried out by the master, who presses the nozzle to the metal. Therefore, this type of welding is not called spot welding, but resistance welding.
DIY spot welding photo
Homemade spotter or factory one: which is better?
Many craftsmen may have a reasonable question: “Why assemble a homemade spotter if you can buy it in a store?” Logical. But it's not that simple.
Factory spotters are very expensive. This is highly specialized equipment, so it is not produced on the same scale as inverters or semi-automatic machines. Buying a factory spotter is not advisable if you are a garage mechanic and will use the device a couple of times a year. In such cases, it is better to assemble the spotter yourself from available parts.
A homemade spotter will be reliable and repairable. You will know exactly what components it is made of and how much they cost. Therefore, you can calculate the repair of such a device in advance and not worry about having to go to an expensive service center.
However, assembling a spotter with your own hands is not always justified. For example, at a service station it is better to use a professional factory-made device. It will give you much more options and allow you to correct even the most serious body defects. You must understand that a homemade spotter is a low-power device. It is suitable only for modest repairs.
Also keep in mind that assembling a spotter requires certain skills. In this article we provide very simple instructions, where there are no complex electrical circuits and no need to bother. But you must understand that even such a simple device needs to be assembled with skills and knowledge. And even better experience. Otherwise, you will not get an assistant, but a potentially dangerous device.
To summarize: a homemade spotter is an excellent option for a garage or cottage. It is unpretentious, inexpensive, and easy to repair. But at service stations it is better to use professional factory-made spotters. Their functionality is much greater, which is important when performing professional body repairs.
What can you cook with?
The best welding option for new 18650 batteries is an industrial machine. For most users it is not available, so you have to do something of your own.
Battery
The essence of the spot welding method, as a type of resistance welding, is the rapid heating of the metal parts being connected by current passing through the joint. This releases a large amount of heat, which melts the metal at the point of contact, and compression promotes the diffusion of molten areas and the formation of a strong connection. The task is to obtain a sufficiently high current at the interface. This current can be obtained from a battery - for example, the current output of a fully charged car battery can be 700+ amperes. But the highest current depends on the transition resistance at the contact point of the welded surfaces, so it is important to pay attention to the cleanliness of the contacting faces. Also, the current limits the cross-section of the wires, so you need to take wires with a cross-section of at least 10 sq. mm. (preferably 16 sq. mm.).
Nickel tape.
First you need to prepare the tires - they are cut from nickel tape (more precisely, the tape is made of nickel-plated steel). Next you need to connect to the battery - it is better to do this using standard car clamps. Conductors of the appropriate cross-section must be connected to them. You can make special tips on the reverse side, or you don’t have to - it’s not very convenient, but there will be no additional transition resistance.
Welding the tire.
You need to cook at several points - usually at 3..5. At the end of the process, you need to check the quality of the connection - pull it with your hand. The shank should not come off.
Welded nickel strip.
Transformer device
If you don’t have a battery at hand, you can make a welding machine from a step-down transformer. A transformer with an overall power of 150..200 W is suitable. This means that the cross-section of the central rod of the core should be 17...20 sq.mm. It is necessary to remove the secondary winding and wind another - 2..3 (possibly 4) turns with a wire of the appropriate cross-section. On the Internet you can find advice on winding the secondary with a cable from a welding machine, but to weld busbars to batteries, a conductor with a cross-section (not thickness!) of 10..16 mm is enough .
Transformers from faulty microwave ovens are good for this purpose, and they can be bought for the price of scrap. First of all, you need to remove the secondary high-voltage winding and knock out the shunts (they take up space, which is already small, and somewhat reduce the power of the transformer).
Transformer from a microwave oven with the secondary winding removed and shunts knocked out.
At least three turns of wire must be laid in the vacant space. If you take a conductor with a cross-section of 16 sq. mm, you can try and lay 4 turns.
Laying the secondary winding.
The brought out ends of the winding can be equipped with lugs. They must be secured by crimping, not soldering - when heated, the solder may flow.
Secondary winding terminals with cable lugs.
To control the current and pulse duration, you will need a NY-D01 module, and to power it, a small transformer with an output voltage of 9..12 VAC. All this must be connected according to the diagram attached to the board and hidden in a suitable housing.
NY-D01 controller board.
After final assembly, you can try out the device. Welding parameters may need to be adjusted to obtain optimal results.
Welding tires using a homemade machine.
The design of the transformer from the microwave oven is such that it heats up noticeably even at idle. You cannot keep the primary winding under mains voltage for more than half an hour.
Homemade capacitors
If there is no transformer of sufficient power, you can try using a battery of oxide capacitors. A capacitor has the property of storing energy for a relatively long time and then releasing it almost instantly. You can assemble a battery of sufficient capacity from oxides, charge it from any available voltage source, and discharge it onto the contacts of the welding device.
Operating principle of a capacitor-based welding device.
Resistance R depends on the highest current source. It can be calculated using the formula R=U/Imax , where:
- U – source voltage;
- Imax – the highest output current.
So, if there is a 12-volt source with the highest current of half an ampere, then the resistor should be 24 Ohms and its power should be U*I=6 watts. You can install a resistor with a lower power - calculations show that a 100,000 uF battery will be fully charged in 12 seconds, and the highest current will flow only at the first moment, then it drops according to an exponential law. Even a lower power resistor will not have time to burn out .
The initial current depends on the voltage to which the capacitors are charged, and the duration of the discharge current (and, therefore, the energy transferred to the welding site) depends on the battery capacity. It is chosen according to necessity - how massive the parts to be welded will be, how difficult it is to warm them up.
Capacitors must be able to withstand the operating voltage with a reserve. So, for a 12-volt source it is necessary to use capacitors of at least 16 volts.
Transformer production stages
Assembling the transformer is a mandatory step in the manufacture of a spotter from a welding machine. This kind of work is the most difficult. Winding requires a lot of time, but this step is not necessary. The winding is carried out on a ring iron. The wire for the secondary winding should be made of aluminum or copper. High-quality insulation should be laid between the coils. Transformer paper in several layers is suitable for this. For maximum reliability, it is impregnated with paraffin.
The pistol is made from a semi-automatic machine . It will require some additions to secure the tool to the drawing device. To make pliers, a simple 20 by 20 mm pipe will do. The power wires connecting the transformer and the gun must have an identical cross-section. Alternatively, they must exceed the tire cross-section. Do not use wires that are too long. Their maximum size should be 2.5 m. The operating cable connecting the transformer and the gun should be made on the basis of a thermally insulated commutation cable. Each time it is heated, this layer will shrink.