Homemade 18650 Battery Spot Welding Assembly Information, Parts List and Assembly Instructions
TEST:
To understand whether you have sufficient information about assembling a homemade battery welding machine:
- What working elements does the device for connecting batteries consist of?
a) Power supply and controls
b) Power supply, controls, grounding.
- Why can't I use battery soldering?
a) The process is too labor-intensive and time-consuming.
b) During the soldering process, an excessively high temperature is created - the lithium drive will overheat as a result and fail.
- What is the purpose of making a device from a car battery?
a) To simplify the process, there is no need to rewind the transformer.
b) We will get a higher charge level.
c) It will be possible to control the voltage of the supplied current.
- How to check the reliability of the bond after welding?
a) Pull the connection point with your hands once.
b) Hit with a hammer several times and make sure that the parts do not move relative to each other.
- What safety precautions should be taken when working with a weld made from a car battery?
a) Do not come close to the device, perform all actions at the maximum safe distance.
b) Wear protective gloves to prevent the unit from discharging into a person.
Answers:
- a) The welding machine is a power source and a control element.
- b) Under the influence of high temperatures created during soldering, lithium cells will burn.
- a) A battery from a car is used to simplify the assembly of the unit. The ability to not have to rewind the transformer saves a lot of time. As a result, the connection will be of the same quality as when completely assembling the device from new parts, but the design will be simpler, and therefore the fastening process will be accelerated.
- a) To ensure the reliability of the connection, it is enough to pull the welded parts with your hands once - if the components do not move, then the process was successful.
- b) To protect yourself from electric shock, it is enough to use protective gloves when working.
Spot welding
If the battery has used up its lifespan, it will have to be replaced. The battery is located in various blocks, where the connection is made by welding. To replace old elements, various welding options are used: spot or capacitor. This can be done at home if you read the instructions.
Definition:
Battery spot welding is the process of obtaining a quick discharge to hold multiple parts together.
The essence and application of spot welding - 3 steps during installation
The welding fixture consists of a control element and a power source.
The power source is the current, the control element is the parts with which a person carries out the entire process of connecting parts.
- The battery needs to be placed on a flat surface, a small plate should be placed on the contacts, connecting several containers into one.
- When welding, you will need to use several copper electrodes, which are arranged in parallel and applied to the plate.
- When the current begins to flow to the electrons, a small short circuit will occur, and the plate will join the battery - noticeable small dots will appear on top of it.
This is a good option for assembling a battery, replacing soldering. The fact is that when soldering, the lithium drive will overheat greatly, and as a result it will deteriorate.
Using this type of welding, we obtain an instantaneous discharge that will qualitatively bond the material, but the product will not overheat. In this way you can repair the battery of a screwdriver, laptop and other equipment.
Advantages and disadvantages
Spot welding is reliable and aesthetic; the time of application of force, current supply and compression is calculated using a cyclogram of the metal joining process.
Advantages of spot welding:
- It is permissible to work with a wide variety of elements (including miniature ones) from various metals.
- The structure of the metal at the fixation point does not change.
- High productivity (up to 800 points/min.).
- Possibility to automate the process.
- A welder of low qualifications is capable of performing the work.
However, welding is dangerous and care must be taken. The worker may be burned by hot splashes. The fumes may damage the lungs. There is a risk of electric shock.
How to avoid 4-5 mistakes when working with a device for 18650 batteries
After the device is assembled, it is necessary to conduct a test. To prevent mistakes, this is done in a certain sequence:
- On the prepared base we place several used batteries that needed to be connected into a block. For convenience, they are wrapped with tape so that they are already located in the form of a finished product.
- We place a connecting plate to the upper edges of the contacts. Make sure that the plate is evenly distributed along the entire length of the future structure.
- We press the electrodes. Turn on the current and welding should work.
- We make several points on each battery - 2 is enough to make the fixation more reliable.
The control element is removed from the battery and the reliability of the grip is checked - we pull the contact once with our hand. If it does not come off, then the structure is connected securely.
If you use a car battery, you only need to wear protective gloves. There will always be a constant current at the electrodes. That is why you need to work very carefully so that it does not become isolated on foreign objects or a person.
Contact (spot) welding for batteries, do it yourself
Diagram and what parts the device consists of
Spot resistance welding is called thermomechanical.
Its operation scheme is as follows:
- The parts are joined in a given position and pressed tightly between the electrodes.
- An electric shock is applied.
- At a given point, the workpiece is heated to the melting temperature of the metal.
The contact device is assembled from used blocks; they can be removed from various devices. The device works simply: the capacitors are charged up to 30 V, and the potential on the welding fork increases. Press the “Start” button located on the plug. To weld 2 metal fragments, they should be pressed tightly together. After this, the cooking process starts, during which the temperature of the material increases many times and becomes sufficient to melt even refractory metal.
Diagram of a spot welding device.
The device is simple in design and reliable, includes 2 blocks:
- contact;
- current source.
We recommend reading: How to make a welding machine from a microwave
It is also important to know 4 nuances about capacitor welding
Capacitor welding
Capacitor welding
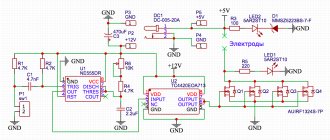
Capacitor welding can also be used to ensure a secure fit. As a basis we use 6 capacitors of 10000 uF at 35 Volts. Several 70TPS12 thyristors serve as keys; they must be connected in parallel.
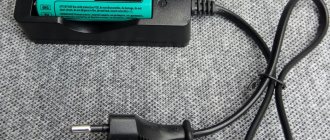
The capacitor is charged using a dc-dc boost converter from a lithium-ion battery. The current is limited by a 130 ohm resistor. The charge should be obtained with a voltage of 32 Volts.
The charge is monitored visually - that is why several LEDs are added to the circuit. The calculated initial current is 2000A, if the energy in the compensators is 30 J.
It is important to ensure that during the welding process all energy moves to the welding point, and not to various “visual effects” in the form of sparks. This deficiency can be observed if the plate is poorly pressed to the electrodes. As a result, the electrode will burn and the plate will not be able to weld. Use chrome bronze alloy electrodes.
Ways to avoid mistakes
When working with spot welding, beginners often make mistakes; they can be avoided if the following factors are taken into account:
- Under harsh welding conditions, it is unacceptable for cracks and burns to occur. The reason is too much current.
- Dents from electrodes should not be more than 10% deep.
- Excess metal should not be squeezed out.
- Excessive boiling of the treatment area is unacceptable.
- To prevent internal defects from appearing, the processing parameters remain constant.
- If the degree of melting is insufficient, this results in an incorrect formation of the fixation point.
Answers to 5 frequently asked questions.
- Do I need to use flux?
- No, this is unnecessary. - Do I need to wear respirators when working?
– There will be little smoke, and respirators are not needed. - Can electric shock strike a person when welding with a car battery?
- Maybe if you don't wear gloves. - Can I use conventional welding to connect the battery?
– You can’t, the battery will deteriorate from the strong current. - Why won't soldering work?
- Because of the high heat.
Requirements
The technology is differentiated into soft and hard methods of fixing the material.
With the soft method, gradual heating of the workpiece is practiced. At the electrodes, the current value is about 100 A per 1 mm². In such cases, less energy and power are used. With such indicators it is good to process high-strength steel.
In severe modes, large short-term currents are used, for example 300 A per 1 mm². The contact duration is 0.1-1.6 seconds. The pressure of the electrodes per 1 mm² increases to 8 kg. For such work, high-power devices are required.
The mode is used for workpieces made of copper, aluminum, and high-alloy metal.
Making welding equipment yourself
Do-it-yourself spotter from a welding machine
Before you begin manufacturing the device, you need to decide on its design. The Internet publishes a lot of options on how to make resistance welding for AA batteries. One of the device options is made in this order.
Preparation of equipment and materials
Before starting work, you need to prepare the necessary equipment and materials:
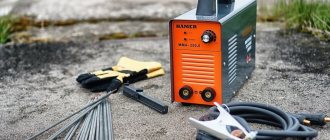
- transformer;
- variable resistance - resistor;
- power cable 2 m long, the cross-sectional area of which is approximately 32 sq. mm;
- copper crimp lugs;
- tray with holes ø 18 mm;
- plexiglass sheet measuring 300 x 300 mm;
- hardware;
- two springs;
- two-core wire;
- contactors in the amount of 2 pcs.;
- two cylinders ø 45 mm x 30 mm turned from copper;
- microswitch;
- Nickel welding strip.
Transformer
Important! In the article, the dimensions and number of assembly elements are given abstractly. Here we offer only recommendations on how best to make a welding machine.
Instructions for making a welding device
- Plexiglass is cut with a circular saw or jigsaw into pieces according to the drawing;
- Holes are made in them, inside which threads are then cut.
- Connect the parts into a transparent box of the power unit;
- The secondary winding in the transformer is dismantled;
- Two turns of power cable are wound onto the primary winding.
- The free ends of the cable are stripped. They are crimped with tips.
- The ends of the contactors are sharpened with an abrasive disc until “spots” with an area of about 1 mm2 are obtained.
- The cores of the network wire are connected to the primary winding of the transformer.
- A microswitch and a resistor are connected in series to one of the wires.
- At the other end of the power cord, a plug is attached to connect to a household electrical outlet.
- The transformer is secured with screws in the device body.
- The microswitch is fixed on one of the sides of the box.
- The resistor is also attached.
- Mounting holes are drilled in the copper cylinders on the side and in the center.
- Contactor electrodes are threaded into the cylinders.
- Through the mounting holes, screws are used to secure the tips to the sides of the barrels.
- A lifting and lowering mechanism is assembled from two plexiglass platforms, springs, and barrels with electrodes, which is fixed on the body of the power unit.
- The plug is connected to the socket.
- Lowering the spring-loaded plate with electrodes, press the contact strip to the battery pole.
- All that remains is to weld the batteries, combining them into a block.
Instructions for using the welding machine
- The device is placed on a workbench or desktop so that the operator can comfortably control the welding process:
- Finger batteries are inserted into the platform openings. The sockets are made so that, in addition to the batteries, the contact tape can be freely placed (see video below).
- The platform is placed under the electrodes.
- Lower the top bar with copper contactors by hand, pressing the tape to the next terminal.
- Using the finger of the other hand, press the microswitch button. The nickel strip is spot welded to the battery terminal.
- The bar is returned to its original position.
- The platform is moved, introducing the next connection.
- The welding process is repeated.
- After the upper terminals are welded, the block is turned over and the tape is folded upward, leading it onto the next terminals.
- Weld the pole terminals with a nickel strip.
- All that remains is to weld the connecting terminals to the final welded joints of the block, with the help of which the block is connected to the consumer.
Welding process
Do-it-yourself semi-automatic inverter
Important! Before starting work, it is necessary to check the welding on unnecessary parts. If a burnout or lack of penetration is detected by the resistor (dimmer), the correct current strength of the installation is set.
At home
For convenience and to improve the quality of welding at home, additional elements are used.
The stranded power wire is connected to a working battery using clamps, and the other ends are connected to a normally open relay contact and to a soldering iron tip.
The second contact of the relay is connected to the second tip. The result is such a circuit that when the relay contacts are closed, the voltage of the working battery will be present at the ends of the tips (electrodes).
A large capacitor, a resistor and a switch are used to control the relay. The capacitor and resistor are connected in series. One terminal of the capacitor is connected to the battery. The common terminal of the switch is connected to a resistor.
In the initial state, the switch should be in the position where it is shorted to the working battery. The capacitor will charge. The relay control winding is connected with one contact to the terminal of the container connected to the battery, and the second is connected to the free terminal of the switch.
When switching, the voltage from the capacitor is supplied to the control winding. While the capacitance is discharging, the relay is closed, and current can flow through it in the event of a short circuit.
To weld, it is enough to place a nickel connecting tape on the lithium battery cell, two tips on it, press it and press the switch . The relay contacts will close and voltage will appear on the electrodes.
Since they are shorted through the plate, a short circuit current will flow through it, which will cause the metal to melt between the points of contact of the electrodes. The welding has been completed.
Using a resistor, you can adjust the duration of the control pulse. Adjustment can be done experimentally. It is necessary when the voltage of the working battery and the thickness of the material being welded change.