Metal box for tools
This option is most suitable for experienced locksmiths who have the necessary equipment and material.
Factory-made metal tool boxes are made from lightweight metals such as aluminum. As a result, the product is as light and durable as possible. But working with aluminum at home is much more difficult. Even a beginner can make this version of a metal box. After all, the most ordinary box and special partitions will be made of metal. Initially, you need to prepare the main material - galvanized steel (0.4 mm thick). Tools you need to prepare:
- Marking caliper.
- Metal square.
- Ruler.
- Hammer.
- Pliers.
- File.
- Sharpened core or marker.
- Anvil.
Next, drawings and markings are made. You only need to mark those places that will later need to be deleted. Now you can start cutting using metal scissors. After trimming all the excess, you should get a kind of geometric figure (winged rectangle).
Next you need to use an anvil. Tapping with a hammer, gradually bend the edges of the workpiece. It is better not to work in a chaotic manner; all actions must be consistent. First one side is bent, and then the other. To wrap protruding parts, pliers are used.
After these manipulations, you need to go over the entire structure with a hammer to level it. In this case, you will get a small metal box for storing tools. In the future, you can experiment not only with the sizes, but also with the shapes of such boxes.
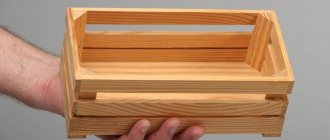
Almost every home has some kind of tool. When there are too many of them, you can make your own multifunctional box to store them. Experienced craftsmen believe that this type of box is considered an essential attribute for storing various devices. Such boxes can be stored in the workshop and even taken with you on a long journey.
Preparatory work and necessary tools.
How to repair leather furniture at home
Before you start, you need to prepare everything you need. Of course, this stage is required for any work, but in this situation it is worth understanding the specific case. A homemade plywood box can generate income if you make enough of them to sell. But in such a situation you will have to be patient and have the following tools:
- Woodworking Machine. Its price is high and not everyone has it, but when creating batch products it’s worth stocking up on it. Its capabilities are impressive; it is a substitute for a plane, circular saw, and several machines. It is powered from a simple network, so everyone will appreciate the ease of use.
- A drill and a screwdriver, and sometimes just one thing.
- A jigsaw (there is no need for a professional one), but if you have one, the work will go faster.
- Stapler for furniture.
Many of the tools can be rented, but the purchase will be considered profitable, because they will be useful even after the work is completed, but if you have few ideas on how to make a box, we recommend looking at them here: https://fb.ru/article/306910/ yaschik-iz-faneryi-svoimi-rukami-chertej-instrumentyi-i-osobennosti-izgotovleniya.
Tools and drawings
How to make a lampshade (plafond) at home
To make the box you will need the following tools and materials:
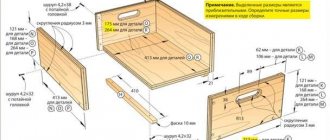
Drawing of a box with dimensions.
- plywood;
- jigsaw with a supply of files;
- screwdriver;
- hammer;
- set of files;
- sandpaper;
- varnish;
- rollers;
- pom-poms;
- tassels.
To make such an exclusive product, you will need a jigsaw and a supply of files for it. A wood saw is used to cut plywood and roughly process blanks for the future item. If the box is made using self-tapping screws, you need a screwdriver. A set of files for woodworking, a hammer, and sandpaper will also be needed. If the finished product is to be painted or varnished, you must initially take care of the availability of varnish, dyes, rollers, tassels, pompoms and other devices with whose help the operations are carried out. To make a product look aesthetically pleasing, you need a drawing and a drawing.
The first step is to draw a sketch of the item, where the estimated dimensions of the plywood box are indicated. If you are making a box for the first time, there is a high probability that somewhere in the calculations there will be an inaccuracy. To avoid wasting time, it is best to first make the box (its layout) out of paper. If you like the paper box and its dimensions are considered suitable, the drawing of the item is transferred to graph paper.
Diagram of parts of a multifaceted box.
Plywood is cut based on this drawing. The parts that will make up the box are placed closer to each other. This will make cutting much easier. Plywood can also be cut using paper templates. To speed up and simplify the production of the box, it is better to draw the templates using a computer and print the drawings on a printer. As soon as the wall, bottom, and lid of the future item are cut out, they begin to assemble it.
Types of structures
The idea of a mailbox as a closed metal or wooden box hanging on a wall, door or gate is very outdated.
Of course, privacy and the need to secure content are still important, but these goals are achieved in different ways.
- The box may have a door at the front or a hinged flap at the bottom or top; it can be hinged, built-in, mounted on a special podium or rod.
- The American tradition offers boxes with a rounded top, fixed on a special support. Correspondence is placed in them horizontally, rolled up (except for envelopes).
- The English version is a welded metal or brick cabinet or house model. They are quite convenient due to their strength and durability.
Based on these traditional options, it is worth developing your own exclusive design design.
How to create a beautiful box?
How to restore an old wooden chair at home with your own hands
There are many options for boxes, each person tries to create the design they need. But the decorative item is unique and is used in many ways. The main thing is that the process does not require additional knowledge or extensive construction experience. The box is spacious and can be used for different needs.
It is better to decide on the dimensions before starting work and draw up a rough diagram of the future structure. The outer walls are cut out with a jigsaw. In order not to make mistakes with the size and not spoil the material, it is better to make blanks from thick cardboard. After this, transfer them to plywood and cut them out. It's also easy to make interesting lines, giving the drawer special patterns.
To prevent unpleasant odors from accumulating in the box, it is worth making ventilation holes in the bottom. They are also cut out neatly (can be symmetrical or chaotic). Now, when creating pens, everyone will be able to realize their fantasies, especially if they have all the necessary tools, this will not be difficult.
Scheme for making plywood boxes
Before making plywood boxes, you need to think about what function they will contain.
- To think over the design solution for the future product, for this you need to draw a drawing of the box.
- Make measurements and necessary calculations.
- Transfer measurements onto sheets of plywood.
- Having drawn the pattern of the product on the surface of the plywood, we cut out the component parts using a jigsaw or a circular saw.
- We process the edges of the sawn blanks with sandpaper or a grinding machine until there are no roughness or burrs.
- We draw lines of grooves on the walls of the parts (if you use a groove connection), in those places where they will be connected, this method will help keep the future structure in one integrity.
- After preparing the parts, a plywood box is assembled; for reliability, the seams are first glued with glue for wooden surfaces. After the gluing process, the walls are fastened with self-tapping screws or confirmats.
- For fittings, holes are drilled in the places where the handles are attached.
- As an addition, internal partitions can be installed. But a simpler option, the so-called catalog storage, is more in demand. These are small, durable boxes that can be removed and replaced in the usual way.
- Larger plywood boxes may have wheels to make them easier to move. Wheels will also add individuality to this furniture.
If you have experience, such boxes will be made quite quickly.
In cases where plywood boxes are supposed to have a lid, the blank for it is made in such a way that in size it should either cover the assembled sides or be recessed inside. In the second option, you need to provide additional strips to hold the lid.
The piano hinges are attached to the middle of the back wall of the assembled box. Then carefully attach the lid of the product.
An option with a retractable lid is also possible, but it requires at least a little carpentry experience. Then the lid is made smaller than the box itself and grooves are cut for its unhindered movement.
Using the knowledge of how to make a box from plywood, it becomes possible to purchase a lot of exclusive useful devices for the household, which can be used as a box for documents; the housewife will have a box for small items or handicrafts. And by making your own wooden structure with drawers for tools, you will get your own drawer organizer, where every item will be in its place.
Finishing
Depending on the place of use and decorative functionality, the made box must be varnished or additionally decorated with decorative overlays. The overlays can be made of the same wooden material as all products and form a single composition with it.
Regardless of the functional features that the item will bear, all its walls must be coated with wood varnish; this will not only give an aesthetically finished look to the structure, but will also help preserve the wood from the effects of environmental influences. If in the future the product will be considered as an interior item, then the outer sides are covered with a color scheme that harmoniously fits into the decor of the room.
Before decorative finishing, all holes are puttied with a special wood compound. Then performing a final sanding process with soft, fine-grain sandpaper.
Making a box from plywood yourself is quite simple. And having received excellent results and acquired professional tools, it becomes possible to put the production of plywood boxes on an industrial scale. Handmade wood products are quite valuable and are in great demand. And what begins as an ordinary hobby may well become a professional activity.
Determining the dimensions of the box
Before you start designing the box, you can draw up a sketch and/or decide on the dimensions of the walls and bottom of the future storage product
It is important to consider the linear dimensions of the plywood that you can purchase. There are two types of sheets on sale:
square, for example, 1.5 by 1.5 meters or 1.2 by 1.2 m;
rectangular 1.5 by 1.2, 3 by 1.5 or 2.4 by 1.2 meters.
By thinking in advance about the overall dimensions of the future box, you can minimize material consumption. The best option is if at least one of the parts of the box - the bottom or a pair of walls - is equal in size to a plywood sheet. But given the standard sizes, you will have to make a fairly large box.
As practice shows, in most cases it is impossible to do without cutting sheets. But in general, to make a sufficiently spacious and practical container, it is enough to purchase two sheets of plywood. So, one of them is cut out for the back and front walls, and the second - for the bottom, end parts and lid (if one is planned at all).
Plastic bottles
A beautiful and original plastic mailbox can be easily made from an ordinary plastic canister or other container, bottle or jar.
When using such consumables, it is imperative to provide methods for filling and removing the finished box and ensure that the printing is protected from snow and rain.