The first work in the “Crafts” category for our competition! These are snowdrop flowers... from disposable spoons .
The master class was prepared by: Olga Alekseevna Pivneva, teacher of the BDOU “General Developmental Kindergarten No. 10” in Gryazovets, Vologda Region.
Many of you have probably admired and admired the beauty of the first spring flowers - snowdrops. The snowdrop is a proud and brave flower that grows next to the snow, but, despite everything, it is delicate and fragile. We can meet the symbol of spring and warmth in clearings, in thawed patches in the forest.
People created legends and fairy tales about snowdrops.
Flower vase
An artificial or natural bouquet, as well as ikebana, are in perfect harmony with a vase made of plastic spoons.
As its basis, you can use any tall container of the required volume, for example, a 0.5 or 1 liter jar (glass or plastic). Manufacturing is carried out in the following sequence:
- Handles of plastic spoons are carefully cut off.
- Assembling the vase starts from the top. The topmost tier is made by sequentially gluing spoons end to end. Only their lower base is located on the jar, and the larger part is placed above the jar neck. Given the shape, the neck of the spoon will be slightly inclined inward.
- The next tier is superimposed with an overlap of the upper tier by 20-30%. The spoons in it are located between the top spoons.
- All rows are glued in the same way to the very bottom of the can.
You can safely pour water into such a vase and place fresh flowers. If desired, it can be painted in any color.
New Year's crafts
Incredible do-it-yourself things made from waste material: crafts and remakes
When preparing for the New Year celebration, it is worth showing special imagination. You can make various crafts from plastic spoons for this joyful event:
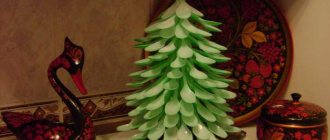
- Christmas tree. The easiest way to make it is to use a frame in the form of a cardboard cone. Spoons freed from handles are glued to it, starting from the bottom. Each subsequent row is overlapped. A more complex option is to make several cones with a gradual decrease in their diameter as the height increases. Essentially, a cardboard frame forms a stepped Christmas tree, and spoons glued on top imitate pine needles. Confetti, sparkles, and “rain” will provide decorations for the Christmas tree.
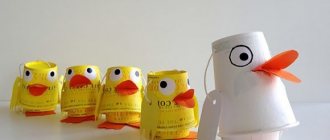
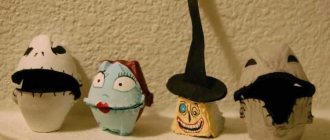
- Snowmen for kids. A clay pot or plastic glass is used as the base for the craft. It is given a New Year's look (blue color, snowflakes). A snowman's face is drawn on the spoon. A scarf made of a felt strip 1-1.5 cm wide and 4-6 cm long is placed on his “neck”. A hat (triangular or round) is also made from felt. Snowman spoons are installed in a base, inside which pieces of foam plastic or cotton wool (imitation snow) are placed.
On top you can put additional gifts for the child - candy, cookies, and other sweets.
Christmas tree decorations provide a large area for activity. The photo shows Santa Claus for the New Year tree. The face is drawn on the scoop. The handle is carefully wrapped with red ribbon. For convex elements, you can use paper and cardboard.
Using your imagination, patience and a little skill, unusual crafts can be made from disposable plastic spoons. The manufacturing process is not very complicated and is accessible even to children
It is important to choose an idea you like and implement it successfully
Flowers made from plastic spoons
DIY Christmas tree decorations: what you can do for the New Year
The simplest option for crafts made from a spoon are flowers. There are many options here: you can make bluebells, daisies, dahlias, water lilies and water lilies. The operating principle is similar in most cases:
- Cut off the blade from the handle of the device.
- If necessary, paint the devices.
- Using a glue gun, glue the spoons together in a circle.
- Make a core from colored paper in the center.
For snowdrops, the sequence of actions is slightly different:
- Trim the spoon according to the above principle.
- Fold three or four devices into a bud.
- Glue them together using glue.
- Cut out leaves from colored paper.
- Wrap protruding spoon handles with floral ribbon.
- Make stems using floral tape and wire.
- Attach leaves to stems.
To create flowers you will need:
- Colored paper
- Disposable spoons of different sizes
- Acrylic paint if necessary
- Scissors
- Floral tape (if required)
- Wire
- Glue gun
These flowers will be a great craft for Mother's Day. Educators and teachers can take note of this idea. Flowers can also be presented to teachers themselves on Teacher's Day. An original and unusual gift from students.
DIY snowdrops made from ribbons
This is very painstaking work, but the ribbon craft looks gorgeous, so it’s worth spending time on creating it.
To make a snowdrop from satin ribbons, we will need:
- Satin ribbon 0.8 cm wide
- Rep ribbon 0.5 cm wide
- Stamens
- Ruler
- Hot glue
- Scissors
We cut the white satin ribbon into 4 cm pieces. For one flower you need 3 pieces of ribbon. Round them at the edges and scorch them over the fire.
Stamens can be bought ready-made, or you can make them yourself.
We make the centers of the flowers.
We need a piece of light green ribbon to wrap the stamen. Glue it and cover the stamen with petals.
At the bottom of the flower we make several turns of green grosgrain ribbon and secure it with glue. We make several flowers this way.
Cut off pieces of green grosgrain ribbon for the leaves. Thin and singe the edges of the segment.
Fold the future leaf in half and glue it to the bottom of the flower bud.
Such snowdrops can be used to create a wreath, topiary, or decorate some kind of craft.
New Year's crafts
What kind of homemade items you can make for the household with your own hands?
Of course, not a single holiday in a family with children is complete without creativity. If you are tired of banal crafts, you can create a unique masterpiece from disposable tableware. You can make a Christmas tree or pineapple out of plastic spoons for the New Year. You can entice children into the process by saying that Santa Claus will really like this craft.
Christmas tree made of plastic spoons
For the craft you will need:
- Green or white spoons
- Superglue for plastic
- Disposable triangular champagne flutes, or a ready-made foam cone.
There is no need to explain how to assemble a Christmas tree. It is only necessary to clarify that any tree is assembled from the bottom up. First wide rows, then narrow ones. If there were no green plastic spoons, you can paint the product using spray paint. The spray will create an unusual effect and be more evenly distributed throughout the product.
Pineapple from plastic spoons for the New Year's table
How to decorate the New Year's table? Of course pineapple. If a person does not eat this fruit, you can create a plastic pineapple that will look unusual on the holiday table.
To create you will need:
- Plastic spoons white or yellow
- Hot glue
- Colored paper
- Colored cardboard
- Scissors
- Plastic bottle 3-5 liters
- Green ribbon
Progress:
- Cut leaves from green paper for the top of the pineapple.
- Cut out a small circle from colored cardboard.
- Cut off the handle from the spoon.
- Remove the cap from the bottle and, if present, the plastic handle.
- Glue spoons in a circle from bottom to top. The top row should overlap the bottom rows.
- Once the pineapple scales are ready, you can start working on the foliage. To do this, put a circle on the neck.
- Attach leaves on top in a circle. For greater reliability, first tie with a thick thread (this will create the effect of real foliage).
- Decorate the top with ribbon.
Plastic dishes can be used to make not only plants, but also animals and birds. The most common representatives of the fauna of the plastic world are peacocks and firebirds.
Snowdrops applique: spring flowers made of paper
Why is this flower known even to small children? After all, in early childhood they watched a cartoon about 12 months, when the stepmother sent the girl in winter to pick up snowdrops.
To make a clearing with snowdrops, use the templates.
Transfer the template onto colored paper and make as many colors as you like
You can not only plant them on the grass, in a clearing, but also collect them in a bouquet.
Snowdrop applique in the senior group
Every child will be able to make a similar applique if they are told the steps. Applications teach kids how to work with scissors, making children's fingers more obedient. Creativity makes children become more careful and develop imagination.
There are not many stages in this snowdrop craft for children. Therefore, a few minutes will be enough to do this kind of work.
Depending on the background you choose, the picture will look different.
Snowdrop applique: senior group
Even in the older group, children know that the best gift for their mother or grandmother on March 8 is a postcard or craft. Snowdrops can be the best theme for creativity on this occasion. You can make a craft in different ways and choose different materials for this.
Materials:
- Blue cardboard
- Green colored paper
- White paper
- Scissors
- Glue
Divide a white sheet of paper into 8 equal parts
Glue a light green stripe to the middle of the rectangle, or paint this area green. We fold the sheet like an accordion and bend it in the middle.
We glue the edges of the fan inside
We cut out randomly shaped pieces from white paper and glue them to the bottom of the sheet to imitate snowdrifts through which the flowers are hatching. We cut out strips for stems and leaves from green paper. Glue the accordions onto the stems.
Using a disposable paper plate, you can make an original panel with snowdrops in the lead role.
Snowdrop: applique for middle group children
All children learn from an early age to notice changes in nature. They will be able to see how the first flower buds appear from under the snow, and how they soon bloom.
To quickly make a beautiful card or appliqué with flowers, use templates.
Rug in a children's room - fish
If a child loves the sea or fishing, he will love a rug in the shape of any fish. Templates can be found in a children's book, coloring book, or on the Internet translated with a simple pencil onto a sheet of white paper.
We enlarge the template several times for the carpet. Cut out 2 identical fish from the material.
The filler can be batting; rolled padding polyester is suitable.
Outline the pattern - scales throughout the carpet. For the tail there are longitudinal semicircular lines, inside the body there are small scales - semicircles. Be sure to outline the large eyes and mouth.
After marking with a pencil, sew the lines on a sewing machine. Use bias tape to trim the edges of the product.
Snowdrops using paper origami technique: folding diagram
Such a bouquet made from a simple sheet of white paper can please the owner for a long time; snowdrops made using the origami technique will last a long time and will not wither.
To place such a bouquet in your home, all you need is a sheet of paper and a little patience.
Each snowdrop will consist of three parts (modules) called trefoils.
In addition to a white sheet of paper, you need to stock up on wire and green paper.
The first step will be three modules
Lubricate the small petal with glue. Let's insert it under the right petal of the second module, into the pocket.
We will also glue the third module into the pocket.
The modules need to be closed by gluing the outer petal into the pocket opposite. Space must be left between modules.
You will need 23 cm wire and 1 cm wide corrugated paper. We wrap the paper on the wire. The finished flower needs to be put on it. Make thickenings at the base of the flower.
Glue the leaves to the flower, created from a thin strip of crepe paper.
Painting with giant flowers
Using plastic plates you can make a panel with interesting and beautiful large flowers.
In order to implement this original idea, you need to prepare the following materials:
- Plastic white plates – 15 pieces;
- Plastic yellow plates - 3 pieces;
- Large wooden board;
- Brown felt-tip pens or markers;
- Blanks - butterflies, bees, drawings with flowers, grass.
In order to make giant flowers you need to do the following:
- Draw funny smiley faces on yellow plates using felt-tip pens and markers;
- Place plates painted with smiley faces in the middle;
- Glue white plastic plates to the painted smiley faces;
- To ensure that crafts made from plastic plates do not stand alone, you can build a picture, decorating them with cheerful butterflies and bees, placing drawings with flowers in the center. You can also place grass in the middle. On a large wooden board, lay out all the details of flowers, herbs and other elements to your liking.
Flowers
Plants are a pleasant decorative element in a family nest, but they cannot live long, so they are replaced with plastic analogues, which are crafts from disposable spoons and are made with your own hands.
Tulips
Let's start with the simplest flowers - tulips. The product will require five spoons, a sheet of green paper, PVA, scissors, electrical tape, and cocktail tubes.
We cut equal squares, wrap spoons in them and seal them so that they look like petals. Then, we simply glue the ladle together and assemble a full-fledged flower.
To fix the result, attach a stem from a tube and cover it with tape. Glue the pieces of paper onto a tube and the masterpiece is ready! Such tulips made from disposable spoons will not leave anyone indifferent and are suitable as an element of decoration or a hand-made gift.
Lotus
Let's move on to a more beautiful, but also complex - lotus. You should have spoons of different sizes, a glue gun, hot glue gun, yellow watercolor, scissors and a plastic bottle on hand.
We completely cut off the handles of small spoons so that only the petals of the future lotus remain. We glue them together with a gun. In the same way, we make the next rows, using spoons in ascending order, then glue all the layers into one flower.
We create the core from bottle plastic. We cut the lid and paint it yellow, then glue it to the center. Take a green bottle, cut out the leaves and glue it to the flower. This is such a wonderful water lily made from plastic spoons that we made.
Rose
Rose, another craft made from disposable plastic spoons. Required: spoon, lighter, scissors, pliers, glue gun. Hold the spoon over the flame, giving it the appearance of a bud
It is important not to overexpose it, otherwise the plastic will start to drip.
We repeat the same with the rest of the scoops, but they will be petals, so we shape them more voluminous. Cut off the stems, leaving the stem with the bud. We stick all the petals to the bud, and then paint it in any colors.
Snowdrops
The next artificial plant will be snowdrops. To make them, you need spoons, plasticine, tubes, scissors, cardboard, colored paper, a jar of cream, woolen threads and double-sided tape. Cover the jar with tape. We glue woolen threads to the second side of the tape.
We make a cake from plasticine and place it on the bottom of the jar. Cut off the handles from the spoons. We make a receptacle from green plasticine. Using white and yellow, we sculpt the pistil of the flower. We connect the receptacle and pistil, after which we attach three petals to one base. We make the stem from tubes.
We connect everything together and then insert the resulting flower into the pot, fixing it tightly in plasticine. We cut out thin leaves from cardboard and place them next to the flowers. Snowdrops made from plastic spoons are ready.
Bouquets of snowdrops with candies: a sweet craft
Lately, crafts have often been made with candies hidden inside. The most convenient way is to hide them in flower buds. Snowdrops are ideal for this type of craft.
Such a bouquet of snowdrops with sweets has many advantages: beautiful, tasty, original.
Materials:
- Green and white corrugated paper
- Nonwoven
- Candies
- Pot
- satin tape
- Scissors
- Hot glue
- Toothpick
- Decor
We cut out squares from corrugated paper: from white - 6*8 cm in size, and from light green - 6*7 cm.
Fold the 6*7 rectangles in half and cut off the top corners, making the edges round.
Stretch the middle, making a depression in which to place the candy.
Wrap the candy in paper and close the edges at the top. At the bottom, place glue in the hole by inserting a toothpick and wrap the edges of the paper around it.
We fold the part measuring 6*8 cm into 3 equal parts, cutting out the blank in the shape of a petal. Stretch each petal down the middle.
Glue the petals around the bud.
The interlining needs to be folded just below the bud, folding the square into a cone. Secure with glue.
Place polystyrene foam on the bottom of the flower pot and cover the top with green paper. We will insert the flowers with polystyrene foam.
You can decorate the bouquet with willow branches and a satin ribbon.
Step-by-step instructions on how to make a snowman with your own hands
When making a spherical figure, a material that is not at all round in shape is used. Cups, fastened together in a certain way, form spheres. Before making a snowman, study the master class on how to make New Year's crafts from plastic cups. Needlewomen recommend taking photographs of the process so that you can remember everything next year. The scheme for making New Year's decor is very simple. First you must make the torso, then the head. Next, fasten both parts and decorate your New Year symbol.
Scheme
You can make a New Year's craft from cups using the following ingredients:
- disposable glasses – 300 pcs.;
- stapler or glue;
- packaging of paper clips for a stapler.
Manufacturing scheme:
- Lay out 25 pcs. disposable cups in a circle with the bottom inward. Fasten their edges with a stapler or use glue.
- The second row needs to be laid out in a checkerboard pattern in relation to the first, fastening not only the dishes on the side, but also on top. Stability of the workpiece will be ensured by moving each line a little back. In total you need to lay out 7 rows. The structure must remain open to attach the head.
How to make a head
To make a snowman's head you will need:
- disposable glasses;
- stapler;
- tennis balls;
- plasticine.
Production in stages:
- The first row should have 18 vessels that need to be fastened together, just like for the body.
- Lay out all other details in a checkerboard pattern. A hole will form in the ball; you can hide it under the hat by putting the accessory on the snowman.
- You can make his eyes using tennis balls painted black. If there are none, cut out paper eyes and attach with glue.
- Make the snowman's carrot-shaped nose with plasticine. The head is ready.
How to fasten a snowman
To attach the head and body, use a stapler or glue, placing the small ball on top of the large one. This creates a seam. You can hide it by wearing a scarf over your holiday item. Unevenness will not be visible under the accessory, and the snowman will become more comfortable. Place a regular Christmas tree garland inside the craft made from disposable cups. When you plug it in, the toy will begin to glow, which will create a special holiday atmosphere.
Products for kindergarten
When children start going to kindergarten, parents understand that they cannot do without products. Especially for such an occasion, there are several trinkets that will delight everyone, especially adults, because they are so simple that even a child can make them.
This does not mean that the child will do them himself, but he will do most of the work himself. The main thing is to make sure that he does not eat the adhesive. In this article you will learn how to make cones, a snowman and a peacock from plastic scoops.
Photos of crafts made from spoons
Gift boxes
You will need: two 2 liter plastic bottles, a stationery knife, scissors, satin ribbon, marker, candy.
Master Class
- To create a semicircular box with legs: take a bottle, measure 8cm from the bottom up, mark with a marker, then cut.
- Make 5 vertical slits using scissors.
- Each cut must be at least 3 cm in order to conveniently close the box.
- Fill the box with sweets and close it by folding 5 parts.
- Tie the box with ribbon.
- To create a square box: Take a bottle, then cut off the center piece.
- Squeeze the piece on both sides, turn it 90 degrees and squeeze again to form a square.
- Make the second blank in the same way.
- Insert one square into the other with the open sides facing the closed sides as shown in the image.
- Fill the box with sweets and tie with a satin ribbon.
Gift boxes made from plastic bottles are ready!
Pineapple made from plastic utensils
An original piece of decoration in a child's room. It is easy to make, practical and fits into almost any room interior. To make it you will need: an oval lamp, a glue gun, spoons, yellow gouache, a knife, green cardboard, a bottle.
We cut out a cylinder from the bottle, cutting it off on both sides. We paint the devices in a yellow shade, after cutting them and leaving only the top side. We take the deep sides of the tools and attach them to the bottom row.
Glue another layer to cover the gaps between the petals. Thus, we glue the entire bottle. We make leaves from green cardboard and glue them to the base of the bottle. Finally, place the pineapple on a suitable lamp.
Steps for creating ladybugs from disposable spoons
Performing such crafts will certainly be very interesting for children, but some manipulations can only be done with adults.
- All spoons need to have their handles cut off, but it is best to do this after the spoons have been painted and the paint has dried.
- One spoon should be painted black, and two should be painted red. For red spoons you need to add black dots.
- To create the “head” of a ladybug, you need to put 2 white dots on the lid or button.
- We glue the “insect” - two red spoons are glued onto a black spoon in an A-shape - the “wings” of a ladybug.
- Glue a button or lid to the base of the structure. And here we have the cutest craft, which will take no more than 10 minutes to make.
Any craft made from plastic spoons is always attractive for its simplicity and at the same time beauty. No special tools are required for production, and almost every craft can be completed even by the youngest inventors.
You can absolutely not limit your imagination and go beyond the master classes you study, creating unique products. In addition, such crafts can be incredibly useful in everyday life, which makes them especially valuable.
https://youtube.com/watch?v=hMNGw4PaAUs
https://youtube.com/watch?v=VJS1rjKZMxw
Mirror frame
This frame will refresh your old mirror and give it a new look, and most importantly, you can choose the color to your taste. To create such an element you need: plastic scoops, hot glue, scissors, spray can, cardboard.
We take measurements, transfer them to cardboard, and cut them to the desired shape. We take the power tools and cut off the main side. We connect the spoons with the cardboard with the concave side, in several rows, to add fluffiness.
When the structure is dry, paint it in the desired color. Then we glue the mirror into the center and enjoy our design move from plastic devices.
A few final ways
A disposable product opens up new boundaries for creativity and creation. Plastic forks and spoons can be used as hangers, hooks or coasters. Crafts from such material can be made in two ways. The first method is based on the use of glue.
As a result, you can get a fan or an umbrella. Another method is to heat the feedstock. This way you can make flowers or a Christmas tree. These are unique New Year's crafts made from forks. The integrated use of different types of disposable tableware makes it possible to create complex designs.
Kitchen utensil masterpieces pave the way for unleashing creativity. The main component of success is improvisation and the desire to move forward. There are many video lessons and master classes on similar topics. Crafts made from disposable forks deserve special attention.
Snowdrop made from cotton pads: craft for children
Children love to take objects that adults use. Therefore, they will like to use cotton pads or sticks for crafts, which mom usually uses.
Materials:
- Green paper
- Sheet of cardboard for background
- Scissors
- Glue
- Cotton pads
We need cotton pads to make flowers and snowdrifts.
By changing the details of such a craft, you can get a variety of options.
Lamp
Another craft with practical application is a lamp. It is convenient to use a plastic bottle with a volume of 5-10 liters as a frame for the craft. In total you will need about 110-130 spoons.
Manufacturing procedure:
- The top part of the eggplant is cut off. The conical section and the cylindrical part, if necessary, are completely preserved.
- Holes are made in the lid of the eggplant for the wire and fastening of the cartridge.
- The handles of the spoons are removed.
- Gluing the spoons begins from the top, from the point where the threaded part transitions into the cone. The elements are laid in a circle, in tiers with a gap of 5-10 mm.
- The placement of spoons in the shape of a lampshade is carried out similarly to the placement when forming a vase.
In the final version, you can use staining. In this case, the lamp can be monochromatic or with inserts of a different color.
Ideas for crafts made from spoons with descriptions
In creating crafts, both entire plastic spoons and the upper parts cut off in the form of petals are used.
The material can be given any color using gouache or acrylic paint applied to parts before work or to finished products.
Ladybug
To work you will need two plastic spoons. Cut off the handles from them and glue them at an angle, folding them like half-open wings. Cover them with red paint.
Simple DIY crafts - instructions for creating products from paper, cardboard, pine cones, fabric, bottles
DIY crafts from plastic bottles - types, manufacturing features, photo ideas
Make the body of the beetle from the same cut off head of a spoon, painted with black paint.
Glue the finished wings onto the black body. Paint the wings with black round spots, like a real ladybug.
Cut a small neck with a cap from a plastic bottle and cover it with black paint. Instead, you can make the head from a large convex button.
DIY military crafts - creative ideas, tips, photo examples
Crafts from plastic cups - features of work, photo examples, ideas for children
After drying, draw small eyes and glue the part to the body. Make mustaches and legs from pieces of wire.
Lamp
The basis will be a plastic five-liter bottle. Cut off the bottom and cover the bottle with spoons, from which you should first cut off the legs.
Glue the petals one after another in circles. Other crafts, such as pineapple, are also created using similar techniques.
The finished product is suitable as a lampshade or lamp. You can place LED bulbs or a garland in the center.
DIY crafts for kindergarten - tips on choosing materials, photo ideas for autumn, winter, spring products
DIY crafts for boys - cool product ideas, photo examples, tips
Frame
Cut a circle-shaped base from cardboard or wood and paint it with colored paint.
Cover the surface with colored spoon petals, placing them one after another with the convex side down. Use a similar frame to decorate a mirror, photographs, clocks or other interior items.
Christmas tree
An original idea would be to create a Christmas tree from plastic spoons.
Use a wooden block as a base and attach a cardboard or paper cone to it. Glue the spoons, separated from the legs, to the surface of the cone from bottom to top, laying their base down to form curved spruce branches.
Paint the finished Christmas tree green or any bright color, decorate it with sparkles, rain, tinsel and other small New Year's decorations.
Maracas
To create this famous musical instrument, place a few grains of cereal or peas in a plastic egg.
Place two spoons with the concave side around the container and wrap them with adhesive tape.
Spoon paintings
Plastic spoons can be used as a material for laying out entire paintings and wall panels. For example, compositions of flowers laid out from spoons and painted with bright paint.
They can be easily supplemented with decorative elements in the form of insects made of wire, butterflies made of cardboard, and other details.
Flower garland
Using scissors, cut out several small triangles from a sheet of colored cardboard and cover them with multi-colored paint. Using petals from plastic spoons, place a circle-shaped flower in the center of each triangle.
Glue a fluffy bright pompom in the center of the petals of each flower. Pull a thick thread through the cardboard triangles, connecting them to each other in the form of a garland.
Flower vase
- Use a small jar, vase, glass or other suitable container as a base.
- Paint the frame with thick colored paint.
- Separate the spoons from the legs and paint.
- After the paint has dried, cover the surface of the jar with spoon petals.
- Decorate the finished vase with ribbon, beads, rhinestones and other decorative elements.
Decorating with plastic
With a small budget you can create a beautiful, original design in your home. It is enough to have the desire and free time. Decor made from plastic spoons includes many elements.
Of these, the following stand out: paintings, flower pots, vases, candlesticks, clocks, decorative roses, signs with plant names, garlands and much more.
The most uncomplicated of the many products are: a lamp in the shape of a pineapple, a frame for a mirror, a candlestick.
DIY bell for the New Year
New Year is a fabulous time. And what would a winter fairy tale be without a bell? A plastic cup is the ideal basis for creating a New Year's bell. You just need to use your imagination and a unique decoration will soon appear in your home.
The bell can be made in different ways. Let's look at the main methods:
Paints. Decorate the glass with a beautiful color. Then you can decorate it with a variety of snowflakes, wizards, gnomes, and so on.
Cling film. Take regular foil and wrap the cup in it. And you can glue a bow on top.
Self-adhesive paper. She needs to stick around the glass. You can hang a button on a thread inside and tie a bow on top.
Master class: water lily
The product will be a wonderful decoration for a garden pond.
You will need:
- cardboard base in the form of a green water lily leaf;
- a circle of thick paper (its size should be slightly smaller than the desired size of the flower);
- disposable spoons (the quantity depends on the volume of the water lily);
- glue gun;
- acrylic paints.
Manufacturing process
Cut the spoon cuttings to half their length. Paint the remaining wide part in the desired color and let dry. Now you need to secure the spoons to a round base so that there are no gaps between them. You need to start from the outer edge in a circle, gradually moving towards the center. The next circle is made with an indentation of about 2-3 cm from the top one so that the petals do not completely overlap each other. A bud is constructed in the center of the figure, inside which a core made of yellow paper, napkin or wire is placed.
You can also use tablet candles instead of the core. Acrylic paints can be replaced with aerosol ones. Then the product is painted after production.
@svoimirukamy.com
For flowers, you can also make a vase from a regular plastic container. Choose a copy of a suitable shape and cover it with felt. Secure the ends of the fabric to the bottom, and cover the top with more felt, selected to fit the size of the bottom of the improvised vase. All is ready!
Creating crafts from disposable spoons is a fascinating process, and in some places even exciting. This is an opportunity to take a break from routine and show your creativity. Moreover, this hobby does not require a lot of money.
MK snowdrops made of threads
- Inflate small balloons or rubber fingertips.
- Place the spool of thread in the jar and insert the thread into the needle. Use a needle to pierce the PVA jar. This is necessary so that the thread is always sticky.
- The needle, after passing through, is removed. We constantly pull the thread through a jar of glue and wrap it tightly around each ball, like a ball.
- Cut the dried balls into five segments.
- Remove the ball and unfold the petals.
- Sew the lace along the edges of the petals by hand using a blind stitch.
- Cut the yellow and orange threads, fold them into a double-sided bun:
- Glue the stamens with instant glue inside the snowdrop:
- From a larger ball and green threads we make another ball - for the leaves.
- Cut out the leaves:
- And a cup of flower:
- Wrap toilet paper around a skewer as follows:
- Dip in glue.
- Wrap with corrugated paper tape:
- Glue one or two leaves to the stem:
- First glue the cup, then the snowdrop:
- Very spring-like!
The video often describes in great detail the process of making something, so it is recommended that before starting any new needlework, you still look into these lessons, if only to make sure that everything is understood correctly.
Water lilies
White plastic spoons work well for creating water lilies. To do this, you need to prepare 11-13 spoons, yellow paint, a green and transparent plastic bottle and PVA glue. The craft is made in this order:
- The handles of spoons are cut off.
- First, 3 spoons of the smallest size are glued together.
- 4 spoon petals are glued to the core of the flower.
- 5-6 spoons are glued together, and then this crown is glued to the workpiece.
- A strip measuring 12x3 cm is cut out of a transparent bottle. A fringe is formed on one side by making frequent cuts. The strip is painted yellow, and after the paint dries, it is rolled into a spiral and glued in the center of the flower.
- Leaves are cut out of a green bottle and glued to the bottom of the flower.
Such a water lily will look great not only in water, but also on the lawn. Flowers will add original features to the design of your dacha plot.
Snowdrops from foamiran: DIY master class
On the eve of the winter holidays, the topic of snowdrops becomes quite acute. Everyone remembers the fairy tale about 12 months and wants to bring a piece of the fairy tale into their home. Foamiran is one of those materials that more accurately conveys the real appearance of a flower.
Let's look at how to make a flower from foamiran below.
Materials:
- Candle
- Tweezers
- Wire
- Toothpick
- Foamiran
- Pastel green
- Tape
- Hot gun
- Stamen
- Scissors
Petals should be of two types. Those in the middle should have the shape of an elongated heart 1.5 * 0.8 cm. The second petals will be located outside and measure 2.5 * 1.5 cm.
You need to make three petals of each size
Now we need a candle. We need to hold each petal over the fire so that they become voluminous.
The upper edges of each petal must be tinted with green pastel
Glue the stamen to the edge of the wire and glue three smaller petals with green edges in a circle. Next we will attach three large petals.
Wrap the wire with tape, starting from the place where the flower bud is formed.
We cut out leaves from green fom and glue them to the stem of the flower.
Amazing turtle
For the turtle shell you will need to paint the plastic. Use sparkles or beads to decorate it. It is advisable to decorate the paws with a geometric pattern.
The work is done in this way:
- Paint white plastic green or brown. Let the paint dry (20 minutes).
- Draw and cut out the head and paws of the turtle (you can use patterns). Come up with a color for them, taking into account the color of the turtle shell.
- Color the turtle's head and legs.
- Turn the plate upside down and glue sparkles or beads to its surface.
- Secure the paper paws, tail and head of the turtle with tape to the body.