- June 30, 2019
- Crafts
- Natalia Penchkovskaya
A paper swing is made for girls to play with dolls. Learning to work with paper is not difficult, but you need to know the principle of performing such crafts. They are different. This is a carousel with hanging seats, a rocking chair with a round bottom, a rocking chair for two dolls, or a swing that swings back and forth. You can make a whole playground for your favorite fairy-tale characters by placing all the crafts on a thick sheet of cardboard or plywood.
In this article we will look at how to make a swing out of paper. This is an easy craft made from newspaper tubes, as in the main photo above, and more complex options for folding a swing using the origami technique according to diagrams. After a detailed description of the work, you can quickly make similar products for your children. Be sure to involve even the little ones in helping with the work as much as possible.
How to make a comfortable swing yourself
Before you begin the work process, you need to decide on an idea; for this you can use the photos presented on our website. These are ready-made and implemented projects that are distinguished by their aesthetic design, high level of operational safety and wear resistance.
Read also: Tuna and Avocado Sandwich recipe
The second stage of the preparatory process will be the correct choice for the swing and determining how to install or hang it. And before assembling the structure itself, it is necessary to decide on the materials of manufacture and calculate their required quantity, select the necessary tools.
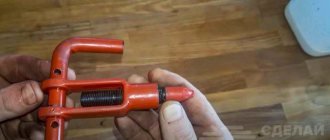
Work on the cross member
If a DIY children's swing involves the use of such components, then you need to pay attention to the fastenings, the reliability of which should be at a high level. Some elements may not look very aesthetically pleasing and beautiful, but the strength of the connection will be as good as possible.
If you fasten the racks in the upper part with a cross, then the crossbar will easily fit into the resulting groove and such a connection will be reliable and without additional devices. It will be enough to minimize its movement to the left or right with nails or screws.
Origami diagram
A square is cut out of a sheet of A-4 format and folded in four. This is necessary to determine the center lines. Next, the workpiece is turned back and the paper is folded from below to the center line. This part is cut with scissors, since it is with such a thin part that the work is carried out further.
By making folds according to the serial numbers of the diagram, you can easily make a craft for your child.
DIY baby swing
All existing swings can be divided into three groups: for outdoors, indoors and portable models.
Children's swings for home
There are no swings just for indoor use, since if desired, they can always be taken outside. The peculiarity of swings for home use is that they most often do not have a frame, but are suspended directly from the ceiling, from a door frame or from a metal crossbar.
Children's swing in the doorway.
Ordinary ropes are most often used as hangers for home swings.
As for the swing seat, it can be soft or hard, depending on your wishes and capabilities. The main thing is that this seat is durable. For this, you can use any materials; even part of the window sill from a plastic window is suitable for these purposes. But usually a piece of board or plywood is used for a hard seat, and strong strips of fabric or tarpaulin are suitable for a soft seat.
It is important to install the swing in the widest part of the apartment where possible. The greater the distance from the edge of the seat to the wall, the less chance the child will hit.
What to make
Before starting a lesson, every parent thinks about what can be made from plasticine.
Fantasize a little, imagine yourself as a child, think about what will interest your son or daughter most. Children's crafts may involve the use of many additional materials, which include: flowers, leaves, acorns, cones, and chestnuts. Take note of what you can make from plasticine:
- and birds. Interesting and funny hedgehogs, bunnies, and turtles will delight your little one. In addition, such plasticine crafts for children are made very quickly and simply.
- Thematic figures. Undoubtedly, for every child it is a special, long-awaited event, because it is associated with toys and various gifts. Simple crafts made from plasticine in the form of a Christmas tree decoration, a snowman and, in fact, the Christmas tree itself will lift your spirits on the eve of the holiday.
- Flowers. Mesmerizing compositions made with a child will look as if they were alive. Depending on the age of the baby, you can make flowers with a minimum number of details, as well as more complex volumetric compositions.
- Trees. Having mastered easy crafts from plasticine, you can move on to more complex figures. Of course, a child will not be able to mold a tree on his own; he will need the help of an adult. But after taking a few steps in creating a craft, the child will be able to easily complete the job he started.
- Vegetables, fruits, sweets. Even novice craftsmen will be able to master the process of creating miniatures of their favorite delicacies. Select the necessary colors of plasticine, then you can safely start creating.
Isn't it fun and interesting to make crafts from plasticine with your own hands? Let's get started with this exciting activity right now. Prepare plasticine, glass, cardboard and some available materials and you can start working. We will teach you how to make a wide variety of crafts from colored plasticine; such an activity for kids will be entertaining and will cause a lot of positive emotions. Well, let's get down to business?
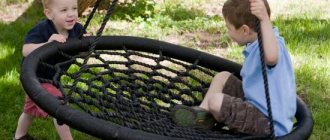
Comfortable hanging swing for children
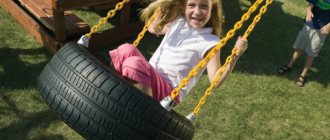
To properly assemble them in the garden as in the picture, you will need a frame. We will only make a seat that needs to be hung on a chain or rope to the ceiling or thick branches. A diagram must be prepared. The simplest hanging swing is an old tire tied with a rope and attached to a tree branch. Products on ropes are very strong. Rope swings are suitable for older children. You can also use a chain and fasten it with screws and nuts.
Another manufacturing option:
- We place the tire horizontally.
- We cut out 3-4 holes, install metal hooks in them, which must be secured with washers and nuts.
- We thread ropes or chains into the loops of the hooks.
On such a swing you can swing children in the presence of their parents.
Making a sandbox model using the paper-plastic technique during labor lessons
Sandbox
- one of the objects on the playground: a special place intended for young children to play with sand when using toys. Usually the sandbox is fenced with sides, most often made of wood: logs or boards. Moreover, the sides often have a flat surface so that Easter cakes can be sculpted on them. Often in the center of the sandbox there is a “fungus” that protects playing children from rain and sun.
The attached file contains a template for creating a sandbox model.
Alexey Rubin
, primary school teacher at secondary school with in-depth study of mathematics, computer science, physics No. 444 in Moscow, laureate of the All-Russian competition “Teacher of the Year in Russia-2015”
“Rocking chair and sandbox” technology 3rd grade
The Perspective technology textbook is full of interesting master classes. But the fact is that the authors of the textbook successfully scanned them from somewhere, without going into details, whether they drew everything there correctly or not. Without a textbook, and most schools don’t issue technology textbooks, it’s even more difficult to figure it out. Here, for example, is the topic for grade 3, “Rocking chair and sandbox.” There is only a rectangle from the rocking chair and it is said that this is only 1/2, that is, half. How is a child without a textbook supposed to find out what this outlandish rocking chair is? We are coming to your aid, you will have a rocking chair and a sandbox with fungus.
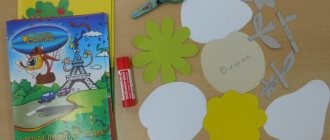
We will need: a rocking chair and sandbox template from a 3rd grade technology notebook, scissors, a pencil, glue, colored paper and colored cardboard, a toothpick and the most original thing - a popsicle stick! Where can I get a popsicle stick when a child starts making a craft at 21 zero zero or even later?? We will look for a replacement for her. Replace it with a cardboard strip.
Instructions for making a rocking chair and sandbox
This is what the part templates look like in the workbook:
It is said that you need to transfer the template through carbon paper onto colored paper. For those who don’t have carbon copies, you can print out our picture, cut it out and put the details on colored paper and cardboard, and trace it.
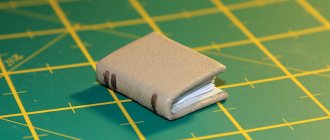
The sandbox with the mushroom should ultimately look like this:
And the mysterious rocking chair is like this:
Step-by-step master class
We cut out the parts according to a template from colored cardboard or paper. A piece of 7 by 7 cm is the side of the sandbox. We need 4 of these squares. But the question arises: why is the square divided into 6 stripes when we need 5? 1 strip will bend unsightly inside, and we personally cut it off as unnecessary. We bend the parts along the fold lines and glue the “blocks”.
Next in the textbook it says to glue them onto a sheet of cardboard and then cut them out. You can do it this way, but we’ll do it simpler - first we’ll cut out the bottom of the sandbox from cardboard - a square of 8 by 8 cm, and glue the sides along its edge to make it even.
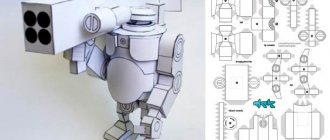
We also glue the semicircle together - we get a cone-shaped fungus roof.
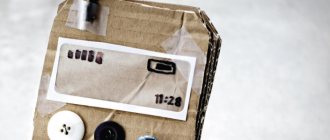
We screw the “fungus stem” part onto a pencil, coat the edge along the entire height with glue and glue it so that the tube holds its shape.
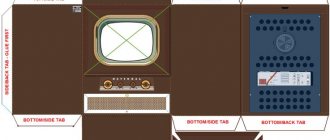
It is easier to attach the stem to the cap if you make several cuts at the end of the stem, as we did in the lesson about the TV tower. But here the fastening is different. Cut out 3 thin strips. We glue each end into the middle of the cone with one end, and glue the other end to the tube-leg.
Attaching the bottom of the leg: glue the strips crosswise to each other.
Next, you can glue the middle of this cross into the center of the sandbox and then insert and glue the fungus. But the round leg is difficult to glue, and therefore it is easier to glue this cross to the leg first.
And only then glue it all to the base of the sandbox.
Actually, the fungus is ready, all that remains is to decorate it and you will do it yourself at your own discretion. Let's move on to making the rocking chair.
We cut out the template strips, taking into account that only half of the template is drawn in the workbook and in fact your stripes will be twice as long. You need 2 of these strips of colored cardboard. We bend them along the fold lines, glue them together, we get triangles. These are the bases of the rocking chair.
Instead of an ice cream stick, we took a strip of cardboard, rounded it and made small notches in the middle on both sides to tie it more tightly to the toothpick. You can tie it with a thread or with an elastic band.
We put a toothpick in the center, tie it crosswise with a string (elastic band), and tie it at the bottom.
In the bases of the swing, at the points indicated on the template, we make holes with a thick needle or awl. In principle, they can be made directly on the template, but if you forget, it’s okay.
Insert the ends of the toothpick into the holes. You can already swing, but there are no seats.
We cut out squares or rectangles from something soft - felt, foam rubber or velvet paper, and glue them to the edges of the rocking chair.
The craft is almost ready.
You can decorate it by gluing spots and flowers. And then in the textbook it is supposed to make swings and other attractions, so don’t throw away the craft and you will have a whole children’s playground