A fairly old tradition is to give gifts to newlyweds. But, unfortunately, not every person is able to fully guess the wishes and tastes of the bride and groom. Moreover, such large-scale events are often attended by strangers who know absolutely nothing about the couple in love.
Therefore, there is an optimal gift option - money. But such gifts do not look at all solemn and many people are even embarrassed to give them in a regular postcard. Therefore, we recommend creating a special chest for wedding money with your own hands. It will contain all the donated funds, which the lovers can later spend on their needs.
Types of wedding chest design
In order to make your life easier, you can, of course, order a ready-made box. But this is decor into which you have not invested your own strength and emotions. The design can be absolutely anything.
Some people create a box in a classic style, covering it with white satin fabric and adding artificial pearls. But you can choose fabrics to match the wedding, which will also look harmonious. The main thing is that all this is arranged as neatly as possible. Therefore, for the outer part, buy beautiful ribbons. An excellent solution is to decorate with fresh flowers. To complement the composition, choose dried berries and various plants. Delight your guests with your own piece of art.
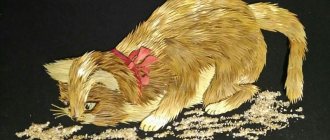
– Money carpet
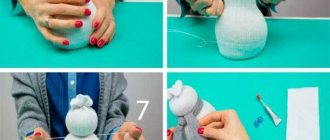
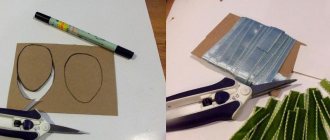
Making such a gift yourself is not at all difficult. We offer a good idea that can be easily implemented - make a wedding money carpet. How to do:
- Place the bills inside the transparent files, staple them all together to make a large square.
- In the middle you can place several photos that are included in the couple’s joint photo album (choose cool photos for the wedding).
- Sew a ribbon around the perimeter of the carpet, its design will become much more interesting.
We were thinking, wondering,
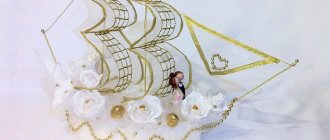
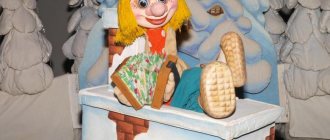
They chose a microwave oven for you, Then a food processor, So that the design would be great And then they decided: no! Let them go on a cruise, Where they like. We would be happy to send them To Turkey or to the Emirates. Let them walk in the open air, All they need is a lot of money! But here we are on the safe side, we contacted the fabulous gin!
They asked him for help And then we received the parcel (take out the box) We don’t know what the genie sent, We open the parcel in front of everyone (take out the carpet and unroll it). Oh, what a fashionable gift, an excellent carpet made of money! If you spread it over your shoulders, it will warm your soul (depict). And if you take a camera, you won’t find a better nature (stage the photo shoot in front of the carpet). You can take pictures with this carpet in the background until the morning!
Our gift is very beautiful, we give you this exclusive. Just pray that she doesn’t eat It, sprinkle it quickly Young, glasses in hand For the gift on this day!
How to make a chest from a regular cardboard box
In order to make a bright wedding chest without much difficulty, you should use the following recommendations:
- preview a detailed master class;
- prepare all materials;
- decide on the design.
The easiest way to create a ceremonial box is to use any box, maybe from shoes or some other wardrobe items. To do this, you will need to first purchase accessories, a stationery knife, glue and a box of suitable size.
Start by cutting a hole in the lid of the box. Do everything according to the principle of a classic piggy bank. Once the hole is made, you can complement the appearance with a special dome. The entire product should look like a real “grandmother’s” chest in which jewelry and money will be stored.
After the necessary structure has been created, the final stage follows - decor. Here you need to show your imagination. The panels on the sides can be decorated with ribbons or delicate lace. You should not skimp on additional decorations that will emphasize the solemnity of the box. They will highlight the appearance of the chest. If you want to make a unique box, decorate the side panels with photographs of the newlyweds.
Photo of a money box for a wedding
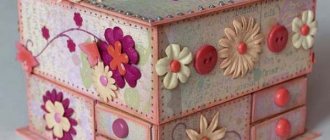
Nowadays, money is one of the most common gifts and, it would seem, there is nothing simpler than. But sometimes you really want to add something unusual to such an ordinary gift. And this is not at all difficult to do; all you need is the desire and the simplest materials. So, we suggest you make a money box with your own hands, following our master class.
Money box scrapbooking – master class
Required tools and materials:
- 2 types of scrap paper (backgrounds for it can be found on the Internet and printed or bought ready-made);
- white and colored cardboard;
- watercolor paper;
- pencils and watercolors;
- brush, pencil, stationery knife, metal ruler, scissors;
- an inscription or picture (you can also print them yourself);
- glue (preferably “moment-crystal”);
- double-sided tape (you can limit yourself to glue);
- decorations (beads, half-beads, buttons, pendants - whatever you see fit);
- ribbon.
Performance:
- First, using a ruler and a stationery knife, you need to cut cardboard and paper. The dimensions of paper and cardboard, as well as the principle of distribution of colored and white cardboard, are shown in detail in the photo.
- Next, we take the largest square (18x18 cm) and line it. The next step is to do the creasing (mark the places of the folds) - in addition to a special stick, many objects are suitable for this (a non-writing pen, a plastic card, and even the handle of a simple teaspoon). I used an ice cream stick. The principle of ruling and scoring is shown in the photo.
- The next step is to make cuts and trim off the excess.
- And finally, we coat the necessary parts with glue and fold our main box.
So, all the most difficult things are left behind, but it’s too early to stop, because only half the way has been completed.
It's time to make the second part of our box, and for this we will line and crease the largest rectangle of cardboard. This must be done as shown in the photo.
This is the kind of box we should get. Now it's time to start decorating.
We glue narrow strips of paper (1x9 cm) onto strips of cardboard (1.5x9.5). The next step is to glue these double borders onto the box (2 each for the inside and outside), and also sew on a bead that will serve as a handle.
Now take 2 11x11 cardboard squares and two 13x13 paper squares.
We coat the cardboard square with glue, glue it to the wrong side of the paper and cut off the corners.
We fold the excess paper and glue it to the cardboard. We do the same with the second pair and get two neat squares.
We glue our dense squares to the outside of the box so that an equal amount of cardboard protrudes along the edges.
It's time to decorate our creation:
We crease a 10x20 cm cardboard rectangle and fold it in half - this will be a card for wishes.
Now you need to glue the ribbon and the top layer of paper - a 9x9 square.
We paint the inscription with a thin layer of watercolor paint, outline it along the edge with a pencil and glue it to a cardboard rectangle 0.5 cm larger than the inscription itself.
Flowers are great for decoration and you don’t have to buy them - you can make them yourself. Let's draw a few large flowers and a few smaller flowers on the wrong side of the watercolor paper, and then cut them out.
We wet our flowers with a damp brush. Immediately after this, add color to taste (saturation depends on your desire), and then we give shape to the petals - twist them around a pencil or (as in my case) the shaft of a brush.
Let's add clarity and volume to our flowers - lightly outline the petals and draw veins, and then glue them in pairs and stick a rhinestone or half-bead in the middle.
And here’s the finale: we attach all the decorative elements to the postcard, and glue the postcard itself to the box.
Our box may well become a package not only for money, but also for other small gifts, and later it will not get lost, becoming a place to store useful and pleasant little things.
Each wedding guest gives a gift to the newlyweds. Currently, the most popular gift is money. With them, newlyweds will be able to buy exactly what they need most. To ensure that not a single bill gets lost, it is proposed to make a money box (chest) for the wedding with your own hands. This material will discuss exactly this.
Making a chest with your own hands
Most couples use standard trays where guests place all their gifts and envelopes. But this option is completely unsafe and not original. Therefore, we advise you to work a little and create a box with your own hands. Choose a design in the form of a rectangle or a suitcase.
The casket can be decorated with various decorative elements. If you want to create a box that is as close as possible in appearance to the chest, then paint it white, black or brown. In order for the product to look original, we recommend decorating the casket in an unusual shape.
Even products with complex shapes do not need the help of a craftsman; everything can be done independently.
Choice of color and shape
Regarding the shape, options in the form of a fairy-tale casket or a magic chest look especially harmonious. All this will resemble a cozy family “nest”. Regarding color, we recommend choosing fabrics in the same color as the wedding. Nowadays, most couples create a wedding in one color. Therefore, even small decorative elements must be in the same shade.
Materials used
To create a unique casket, you will need the following materials:
- high-quality glue;
- cardboard box of suitable size;
- stationery knife;
- stapler and tape.
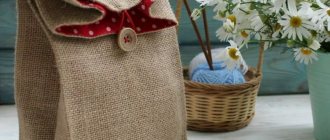
Of course, buy various beads, ribbons, and stones in advance. Velvet fabric may also be required for the external and internal decoration of the box.
Money chest diagram
To create a chest, you cannot do without a special diagram. It is not needed only if you are creating a casket from a shoe box, since it already has the required format. If you haven’t found a suitable box, you will need to take a large sheet of cardboard and select a suitable diagram for the box. Then draw it on the surface and cut it out. Once completed, you will need to connect each element to each other using high-quality glue, a stapler or tape.
Patterns for such chests are not at all difficult to find. The main thing is to choose the appropriate size option so that guests can throw not only bills, but also envelopes with money into the casket.
Selecting size and shape
The casket, in which guests will place monetary gifts during the wedding celebration, should look impressive and be as convenient as possible. To ensure
that this accessory does not catch the eye of everyone who will be present at the celebration, it is important to choose its size correctly. A chest that is too small will make it difficult to collect envelopes and cards, and a chest that is too large will stand out, which will provoke a variety of ambiguous conversations.
In addition to the usual convenience, the size of this box is important due to the safety of the contents. A container that is too small can easily be stolen while guests and newlyweds are busy.
The optimal dimensions of a money chest are 20-30 cm with a height of no more than 20 cm. Such standards are designed for a ceremony not exceeding 80 guests. If the wedding is planned to be very large, then you can increase the size of the product or provide several drawers for financial gifts to the newlyweds. The size depends not only on the number of guests, but also on the shape of the chests.
The most common option is a round and square greeting box, purchased or made by hand. Usually, preparing for a holiday takes quite a lot of time, so making such an accessory will not be difficult, especially if you know what exactly needs to be done. If you want something unusual, you can design the product in the shape of a heart or a barrel. If the couple is already expecting their first child, then they can make a stroller-chest, and those who are planning a trip after the ceremony can create a box in the shape of a car or a ship, which will look original and interesting.
Depending on the purpose of fundraising at the wedding, the color of the product may also differ. For future children, the box can be blue or pink, taking into account the gender of the future baby. For travel, the chest can be colorful and bright, like the emotions that a couple should receive on vacation. In case of collecting finances for the family hearth, a pure white color is usually provided, symbolizing purity and harmony, which is so necessary and important in family life.
Master class on creating a wedding treasury
If you don’t have a ready-made box, use a template to cut a blank out of cardboard, then glue it together and proceed to further work.
- Use a pencil to mark a semicircular outline on the side edges and cut off the excess.
- Cut the front edge flush with the bottom point of the round part.
- Using a ruler, crumple the lid every centimeter so that it takes on a semicircular shape. The length should be such that it slightly overlaps the top of the front edge. If the length is not enough, then it can be “increased” using cardboard and glue.
- Using masking tape, glue cut-out cardboard elements, semicircular on one side and straight on the other, to the sides of the lid.
- Tape all edges of the chest with masking tape.
- Make a hole in the lid for money approximately 5-7 mm wide and no more than 15 cm long.
- No matter how beautiful the base is, in its original form it is not suitable for a wedding, so the box needs to be covered. Leather, any textiles or designer paper are suitable for this. Here the flight of imagination is not limited.
Decorating a money chest
Particular attention will need to be paid to decorating such an attribute. Here you should not save and choose the cheapest; on the contrary, if you buy ribbons, then choose the most expensive and widest. In addition, we recommend combining satin ribbons with beautiful velvet. If joints or glue are visible somewhere, take a glue gun and decorate the seams with beads.
If you are worried that you won’t be able to make the money chest for your wedding as luxurious as you would like, invite your relatives and your significant other to create it.
Choice of color and shape
A wedding chest can have any color design, from snow-white to black. It all depends on the wishes and preferences of the heroes of the occasion. However, if this accessory is made for a specific purpose, it is necessary to choose the right color:
- If the chest is used to collect money for a future son, this accessory should be made in blue or light blue.
- If you are collecting funds for your future daughter, you should give preference to shades of pink.
- If the money box is intended to raise funds for a honeymoon, it should be bright and colorful.
- If this attribute simply acts as a family bank, it is made in white or another neutral color.
In addition, depending on the purpose of collecting money, a certain shape of the chest for the wedding is chosen:
- For future children - in the form of a stroller or cradle.
- For travel - in the form of a car, plane or map.
- For a house, car, etc. - in an appropriate form illustrating the desired object.
What should freelancers do?
Since the method is based on building a budget with regular cash flows, those who work remotely and freelance may think that it is not suitable for them. Of course, everything depends on each specific case, but as a rule, each freelancer has one or more regular customers, cooperation with whom forms the majority of his monthly income. Enter into the table the most pessimistic amounts and the latest dates of receipt of funds from each regular client. It is on these cautious forecasts that the expenditure side of the budget should be calculated. Income received from random customers, as well as amounts from regular customers that exceed the pessimistic level you define, are automatically included in the unpredictable part of savings.
Photo: mforussia.ru, arsenalmastera.ru, ozon.ru, kakprosto.ru, nice-pics.ru
Tags
Wedding chest Chest. Wedding chest If the chest is intended a ready-made chest of any kind, make a chest from a wedding chest to cover the chest decoratively and the chest should make a wedding treasury colored paper with different colored paper. drape with thick paper sandpaper with sandpaper with your own hands with your own hands with your own hands in your hands tools with your own hands wedding How to make a wedding How to make it yours or make it yoursBut do it yourself All you have to do is make a slot to make them
internal
Expenses
The left column lists all the family's regular expenses. They need to be listed in sufficient detail, but you shouldn’t go into very small details. For example, in our budget, the item “food and accommodation” includes the amounts that we leave in the supermarket once a week, purchasing groceries, household chemicals and household goods for seven days in advance. To figure out how much to budget for these expenses, I multiplied our average check amount by 4.5 (number of weeks) and added another 10% for small purchases during the week. If you buy groceries several times a week, calculate the approximate number of trips to the store during the month, multiply by the amount of the average check and add another 10%-20% just in case.
Each family member must have money for personal expenses (travel, meals at work/school, refueling the car, buying things for personal use, etc.). As a rule, these are not very large amounts. After creating a budget for the first month, you can see if the money allocated is enough and, if necessary, adjust the amounts for the next month.
Unforeseen expenses include all funds that are not spent on a regular basis: for example, on the purchase of clothes and shoes (you don’t buy a pair of shoes for all family members every month?), minor repairs, treatment, etc. When planning my first budget, I budgeted almost the same amount for unexpected expenses as for “room and board.” However, in practice it turned out that unforeseen expenses, oddly enough, are not so large - for us they amount to approximately 20% of “accommodation and food”. In other families, of course, everything may be different, so include an approximate amount in the first budget, and then, if necessary, adjust it up or down.
Having compiled a list of expenses, determine when and from what amount of income you will allocate funds for each of these items. For example, it is convenient to save money for food twice a month. If the amount to repay the loan cannot be painlessly allocated from one receipt of funds, it can be “collected” from several receipts of money. For not very reliable sources of income, it is better not to plan any serious expenses. For example, you receive funds for renting an apartment, cottage or garage, and your tenants suddenly move out or delay payment. This means that you will not receive this money on time and will not be able to pay the expenses that you planned.
Where to begin?
To make a chest with your own hands, you will need your own imagination and some free time. Such an attribute must be done carefully and with love, as it will become the central element of the celebration and will symbolize the future treasury of the newlyweds. By putting your whole soul and good intentions into its production, you can attract financial well-being to the family.
Before you start making a money chest, you need to determine:
- The shape of the future wedding chest: square, rectangular, barrel-shaped, heart-shaped, etc.
- Product color and size.
- What materials will be needed to make this holiday attribute with your own hands?
- Related decor.