Corrugated paper makes very realistic and bright copies of flowers, of any variety. The variety of options is so great that it can sometimes be difficult to make your choice. They are most often made on the basis of a wire frame using tape, thread or the same paper, and you also need scissors and glue, which will allow you to connect all the parts into a bud and attach it to the stem.
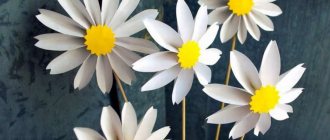
This lesson shows a master class on modeling bright asters from corrugated paper. These are flowers that are quite familiar to us, they are not exotic, but they look fresh and elegant. Such a bouquet can be placed in a vase and watered with fragrant water, attached to a gift, or simply made for fun to practice working with such a wonderful material as crepe paper.
What you need to prepare for modeling flowers with your own hands:
- Lilac (pink, yellow, red or any other color) corrugated paper for buds;
- Green corrugated paper for stems and leaves;
- Thin but rigid wire - the frame of the stems;
- Scissors with ruler;
- Thread - preferably the color of the selected paper for the buds;
- Glue.
How to make paper asters with your own hands
1. Prepare materials for work. In nature, there are buds of this plant variety that are completely different in color, so you can choose a roll that you like. Scissors must be well sharpened so that they can easily cut corrugated paper. And the stem frame, made of wire, must be rigid and not bend.
2. Start by creating the aster heads. Cut bright paper into long strips, the width of which is approximately 6 cm. The length can be arbitrary; the longer the prepared strips are, the more magnificent the flowers will be.
3. Make as many long strips of the same width as you want to make flowers.
4. Fold each piece like an accordion, bending it across. You should get the flat tubes shown in the photo from the strips. Cut one side with scissors in a zigzag pattern.
5. Again, use scissors to cut the prepared fringe strips. Do this on the side from which you already cut the tubes in the previous step.
Step-by-step photo lesson:
Take a sheet of yellow paper and begin to create the bottom layer of petals. They will be the longest. Their length will be 21 cm, and their height will be only 1 cm. 18 such strips should be cut out.
Now we glue them together in droplets using office glue.
Cut out a circle from yellow paper, the diameter of which will be 3-4 cm. Glue all the petals of the first tier onto it.
Now let's move on to the second layer and cut out nine strips of paper 15 x 1 cm.
Glue them together in the form of droplets and let them dry.
We attach nine petals to the center of the aster, which will create a second layer.
A third tier should definitely be created. Therefore, we will cut out nine strips of 10 x 1 cm.
Glue them one by one to the very center of the flower.
Finally, let's make the last layer of petals. They will be both shorter and narrower. To do this, take a sheet of yellow paper and cut out five stripes 6 x 0.5 cm. Glue them in the middle of the flower.
Not a single flower is complete without a leaf. Therefore, we cut out a large sheet of green paper and glue it to the back.
Now the paper aster is ready. Such a bright and voluminous craft will certainly decorate your home and attract the attention of every guest.
Panel: Asters for decorating a group in kindergarten on September 1st.
Master class with step-by-step photos. Chasovskikh Svetlana Olegovna.
Purpose: Decoration of the group for the holiday “Day of Knowledge” Purpose: Making panels from colored paper using the quilling technique. Objectives: Continue to introduce the quilling technique. Teach new techniques for working with paper: carefully cut strips of paper with “grass.” Improve the ability to roll strips of paper into a tight roll. Cultivate perseverance and accuracy. Develop fine motor skills of the hands. Develop children's compositional skills. Asters Earthly stars, so familiar. Asters are simple, double... Various. Unusual in their diversity.
Near the houses, a low picket fence, whitened by thunderstorms, is leaning from old age, And in the front gardens - from time immemorial, I remember - Asters in fawn and pink constellations.
The day will flash by unfamiliar faces. The sun is falling with ripe Antonovka. At dusk, the last lightning will flash Blue asters, burgundy, white...
Motley autumn lives with carnivals, Extending summer into stormy weeks, Pampering with bright days and colors - Purple, yellow, red asters... Author: Elovikova Diana.
Asters are the last smile of autumn. These unpretentious flowers evoke different feelings in people: joy and sadness, because winter is about to come. Asters can withstand frosts down to -7 degrees. There is a belief: if you stand among the asters at night and listen carefully, you can hear a subtle whispering - this is how asters communicate with their sisters - the stars in the sky. This is not surprising, because according to legend, the aster grew from a speck of dust that fell from a star. This legend was originated by the Parisian astronomer Alexandre Henri Gabriel Cassini. As a young man, Cassini studied the science of celestial bodies, but devoted his entire life to botany. In 1826, he isolated a new genus from the aster family - callistephus, which translated from ancient Greek means “beautiful flower”. In flower science practice, callistephus are called annual or Chinese asters, and true asters are called perennials. The aster flower is a symbol of women born under the astrological sign of Virgo. Aster is a symbol of sadness. This flower was considered a gift to man from the gods, his amulet, amulet, a piece of his distant star. Therefore, the sadness it symbolizes is sadness for the lost paradise, for the inability to rise into the sky.
Autumn over the shady park... The gold of the maples lies on the waters of the pond. The leaves are spinning... The birds have fallen silent... Aster looks into the cold sky, a radiant aster - a star.
The aster with its straight petals has been called a “star” since ancient times. That's what you would call it yourself. The petals in it scattered like rays
From the core it's completely golden. Dusk is approaching. Subtle and sharp Light sways in the sky of the constellations. An aster in a flowerbed, fragrant and colorful, watches the distant sisters shine, and sends them greetings from the earth. (Sunday Christmas)
The mysterious light of a star is not the same: sometimes it is pinkish, bluish, sometimes golden, and the stars also twinkle.
Romantically minded people are sure that the stars transmit signals to the Earth with their twinkling and receive them in return. And sometimes, stars fall from the sky and fall down. Ancient people began to look closely at the trees and flowers on the ground, trying to find out where she was, the fallen mysterious beauty? And they saw small flowers, blue, with yellow circles in the middle, and then they realized - here it is - a star, swaying from a light breeze! This flower came to Europe, or more precisely to France in 1728, from China. It took a whole 22 years for the first terry aster to appear! The genus of asters has several hundred species. The simplest asters resemble daisies, and there are stunningly beautiful peony-shaped asters. These flowers are annual and perennial, blooming from late summer until frost. Aster is an autumn flower. Among the asters there are both low and tall, their inflorescences have all kinds of colors: snow-white, blue, cream, yellow, dark red and even multi-colored! According to the structure of the inflorescences there are: peony-shaped, rose-shaped, chrysanthemum-shaped. The inflorescences can be small, or can reach 17 or more centimeters in diameter. Aster is a very ancient plant. The ancient Greeks considered it an amulet. In the language of flowers of Hungary, the aster represents autumn and is called “ostiroza”, which translated into Russian means “autumn rose”. Materials required for work:
Colored paper of different colors, scissors, glue, quilling tool or toothpick, frame and shampoo bottle (optional).
Step-by-step process for making the work:
To make asters, you need to cut strips of paper with a width of 2,3,4, and 5 centimeters. If you need to make smaller flowers, you can skip the size of 3 centimeters, since it goes into the middle and does not affect the size of the petals. Glue the strips together into one long strip. If we want to make the centers of a different color, then the 2 and 3 centimeter strips should be of a different color. Cut one edge of the strip finely, “grass,” as we call it with the children. We cut the edge that is not smooth, then we will twist the smooth one. Take a quilling tool or a toothpick and start twisting from a side of 2 centimeters. We twist it as tightly as possible so that the flower does not crumble. We remove the twisted flower, seal the edge, and coat the bottom with glue. Only after this we begin to “fluff” the petals. This process must be done very carefully and therefore preschoolers at this stage need the help of an adult. Using scissors, we twist the petals 4 centimeters inward and 5 centimeters outward. I drew the leaves myself, folded a sheet of paper like an accordion, traced the leaf and cut it out. I folded the leaf in the middle and along the veins to give it volume. I made the frame myself from gray packaging cardboard. I painted the frame and glued wallpaper in the middle.
I decorated the frame with strips of corrugated cardboard.
I cut a bottle of suitable shape to the height I needed.
Asters are perfect for creating chic bouquets and compositions. The variety of shades and shapes of these flowers is simply huge, which allows you to create even the most complex compositions. In addition, autumn “stars” are very versatile plants that fit into any bouquet, organically combining with even the most exotic flowers. In today's master class we will show you how to make asters from corrugated paper with your own hands.
Master class on creating flowers “Do-it-yourself asters from corrugated paper”:
1) So, first you need to create an aster peduncle. We wrap a small crepe strip around the prepared piece of wire. To prevent the stem from losing its original appearance in the future, secure the tip of the tape with a small amount of glue.
Roll the first piece into a ball.
2) Pierce the resulting ball with the tip of a thin wire.
Then we wrap the ball with the second piece, and secure the lower part with thread.
We wrap the base of the bud with a short strip of crepe paper.
Now you can start creating the aster petals. Cut a strip of about 5 cm wide from a roll of crepe paper.
Then we lay out the tape and cut it into several parts.
To create the inner petals we will need two or three of these strips. Using scissors, carefully curl the ends of the petals. To prevent the petals from coming off, it is better to twist several strips at once.
4) Now we apply glue to the end of the workpiece and attach it to the ball at the end of the stem. When the glue dries a little, we begin to slowly wind the strip.
5) Please note that the inner petals should curl inward. In the same way we attach two more stripes.
We wrap the base of the blanks tightly with thread.
We also stretch the ribbon itself at the base of the petals.
6) We wind these blanks with the reverse side so that the petals are turned outward.
When all the blanks are attached to the stem, their lower part needs to be processed with threads.
Then we hide the threads with green crepe tape.
7) Cut out the sepals from a green strip of crepe paper. Just like the petals, we curl the leaves.
We divide the resulting workpiece into two parts. Then, one by one, we attach them to the aster’s receptacle.
You need to cut out two or three round-shaped leaves from colored paper.
Glue the leaves with glue to the middle of the stem.
Fresh flowers are always great. And in winter, homemade ones can be used as an alternative. The ones made look especially good
Corrugated paper aster
There are several ways to make a beautiful flower called aster. For the specific case under consideration you will need:
- corrugated paper (green, yellow and purple);
- wire 20 cm;
- scissors;
- glue.
Step-by-step instructions for making a paper aster:
- Cut 2 strips of lilac paper 4 cm wide and one yellow.
- Fold them several times and make deep cuts: for the yellow one - often, and for the lilac ones - less often.
- Cut out green leaves.
- Wrap the wire with a thin strip of green paper, while wrapping the leaves. For strength, lubricate with glue. We received a stem.
- Wrap the yellow strip of stamens tightly onto the end of the stem, coating the edge with glue.
- Twist the ends of the petals of the purple stripes inward using scissors or a pencil.
- Glue the edge of the tape to the stamens 1 cm above the base, bending inward. Do the same with the second lilac strip, gluing its edge to the first.
- Spread the middle of the aster so that the yellow stamens are visible.
- Cut sepals into petals from green paper and glue them to the bottom of the flower.
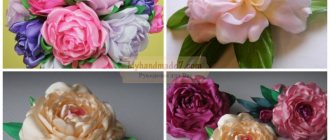
Volume peony
This kind of work is more difficult. But it's worth it. The flower looks amazingly beautiful.
How to make such a peony. Cut a strip across the entire width of the paper roll. The width of such a strip is 15-18 cm.
Fold the strip in half. We round the edges, narrow the bottom.
Make small folds at the base. We fix these folds with glue.
We bend the middle of the workpiece inward.
Separate 2 leaves.
We will need 10 pieces of such blanks.
We will need a plate-shaped base to which we will glue our blanks.
We distribute 10 blanks along the edges of the base.
We make smaller petals in the same way. We will need 7 pieces of such blanks.
We fill the middle part with them, gluing them in a circle.
The middle of the base remains free. We fill it in 2 rows with yellow blanks.
The first row is petals, only very small.
Second row - fold a strip several times as wide as the previous petals. We cut the edges.
Straighten the strip, roll it into a roll and glue the edge.
On the side where the cuts are, fluff them up and bend them slightly with the palm of your hand. Glue it in the middle.
We bend the edges of each leaf in a wave-like manner.
Thanks to the durable base, the flower can be hung on a wall or door. You can choose the dimensions of your design yourself.
Author of the master class
Aster made of colored paper
For production you will need:
- green corrugated paper;
- wire;
- scissors;
- pencil;
- ruler;
- compass;
- colored paper;
- glue.
Step by step instructions:
- Prepare pieces of wire for aster stems.
- Cut out green leaves.
- Make strips of green corrugated paper 2 cm wide.
- Wrap the wire with ribbons of paper, inserting leaves into it.
- Cut a strip of yellow paper 3 cm wide.
- Fold it in half and make herringbone cuts.
- Roll in a circle to create stamens.
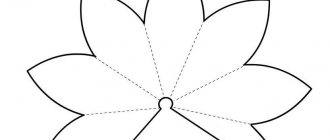
- Draw two concentric circles with a common center and radii of 4 and 1.5 cm.
- Divide the small circle into 16 equal parts, continue the lines until they intersect with the large circle and lay equal segments on each ray. Connect the resulting points to the middle of 1/16 of the large circle.
- Cut out the resulting triangles, cut the petals along the rays to a small circle and bend the petals in half. Make 6 such blanks.
- Make two identical pieces of slightly smaller size from green paper; this will be a sepal.
- Glue all the parts of the aster together, starting with the green ones. To do this, coat the central circle with glue and press the workpiece tightly.
- Pierce the stem and secure it.
- Glue the stamens on top, and the paper aster is ready.
Bouquet
Autumn flowers, which include asters, have particularly bright colors. But after they bloom, nature begins to fade. In order to preserve the warmth and memory of sunny fine days with a variety of autumn colors longer, you can make a bouquet of beautiful asters from paper.
To make it you will need:
- double-sided colored paper (pink, purple, orange, yellow, red and green);
- scissors;
- glue;
- wire.
Instructions:
- Fold a sheet of paper into quarters.
- Cut into small strips, without cutting through to the end of a centimeter and a half.
- Glue all four strips together.
- Bend the petals with scissors.
- Cut a strip 1.5 cm wide from yellow paper and also cut the fringe. These are stamens.
- Twist a narrow strip and glue it. Wind a wide strip onto it, gluing it.
- Using the same principle, make a sepal from two green ribbons. Twist them into wide strips, gluing them.
One paper aster is ready. And so do the rest. Place them on stems and place them in a vase. You can admire the bouquet all winter.
Flowers using Origami technique
Creating flowers using the origami technique will be a great entertainment for a child on the road on a plane or train, in line or at the table. Origami crafts can even be made from napkins.
The procedure for creating a simple flower:
- Fold the square diagonally twice. Then fold a two-layer triangle.
- Bend the corners up. Straighten the diamond.
- Fold the edges towards the center.
- Make a hole and inflate the flower.
- Bend the outer petals.
A simple and uncomplicated craft is ready.