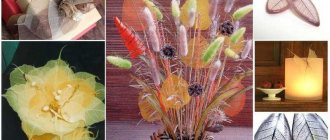
Outside, the golden season of autumn is in full swing, which means it’s time to decorate everything that surrounds us in autumn style. Decorations in the autumn style include: topiary made of autumn leaves, paintings depicting yellow leaves, autumn bouquets, autumn decorative wreaths, window decoration, etc.
In this article, the News portal “Vtemu.by” has prepared for you another good option for interior decoration - an autumn garland. And it is best to make the garlands proposed in our article in the company of your beloved children.
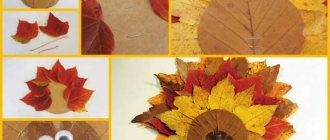
Garland of autumn leaves
Many people make garlands from real fallen autumn leaves, but we suggest you use ready-made templates and make autumn leaves from colored paper yourself.
So, print out the proposed template. Then carefully cut it out.
Using the template, cut out as many colorful leaves as possible from colored paper.
Use a black marker to draw veins on each leaf.
Connect the leaves together using the holes in the paper leaves and protruding tails.
Hang finished paper garlands of autumn leaves from the cornice, window frame, doorway, ceiling or hang on the walls. You will get a bright and original decoration.
Colorful fall inspiration
Elsie from A Beautiful Mess made this gorgeous fall wreath. A gold yarn base runs through each leaf, making this decoration fun and whimsical. Use floss instead of yarn to speed up and make the sewing process easier.
A natural garland perfectly conveys the beauty of fallen leaves. For ease of installation and to ensure long exposure, you can use artificial foliage instead of natural foliage. Then you won't have to worry about the leaves wilting and the structure collapsing.
Thu (of The Flair Exchange) presents typographic art installations in her garlands symbolizing fallen leaves. Another hint of autumn is the correctly chosen copper shade of the letters.
If you want to get a more festive mood, we recommend an alternative color scheme, primarily a combination of orange, red, and yellow.
Cristina from Remodelando la Casa created a one-of-a-kind garland. The designer used a technique of remaking an item in such a way that the resulting sample becomes more expensive and better than the original version.
The former wooden wreath received a second life in the form of a wooden garland. When reworking old furnishings this way, even small touches like a new coat of paint can update your project.
Bring the charm of fall colors with a colorful wreath of fall harvest fruits. Afke from Afke at Happy House turns physalis flowers into mini jack-o'-lanterns.
Rose of Adore Prep decided to showcase her personal memories when decorating her home for fall. Shiny cards with photographs pasted on them, depicting the exciting moments of the author's life, are strung on twine mixed with leaves cut out of cardboard in autumn colors. Bring this garland into winter by replacing the gold and leaves with blues, whites and snowflakes!
Instead of using leaves to make fall garlands, Kristen of Ella Claire Inspired uses old pine cones for her decorating exercises.
Ribbons as a decoration complete the formation of this charming project. To add a rustic touch, jute is used as an element of connection and suspension, imitating frayed burlap.
Ray from Armommy took a multimedia approach when designing her garland. Felt balls strung on two-color twine are easy to make. Large letters are made from old books.
Making garlands is not difficult, you won’t spend even a day on it! But the role of these decorative elements is invaluable, because they can bring the enchanting colors and aromas of autumn into your home!
Similar garlands of artificial autumn leaves look great at some distance from the wall, around flat chandeliers and lamps in the center of the room, and also as curtains in doorways. Another similar garland can be hung over an unused large dining table right up to the surface of the table, so that it conditionally divides the tabletop in half along its entire length. Colorful fabric leaves cascading down from the ceiling create the most breathtaking, magical fall look.
You will need
: - Artificial (you can try real ones - see below) autumn leaves of different colors and preferably shapes - made of fabric; — Sharp scissors; — Strong (silk or silk-like) threads of a pale autumn shade (any of the palette, preferably beige or muted gold - more inconspicuous); — Large needle; - Stationery, or craft, or hot glue (any transparent glue after drying that will not damage the fabric); — Mastic for posters (for mounting on the wall it is safe for wallpaper and whitewash - “Poster putty”), wall staples, small suction cups or any other convenient point method for hanging light things from the ceiling (not required if you are hanging a garland like a panel on wall - you can use a wooden beam for the top base of the panel, on the chandelier itself, or nail a garland to the door frame at the top); — Roulette; — Decoupage glue as needed and desired (for real leaves).
1. We buy sets of artificial leaves in supermarkets for handicrafts, home and garden stores, or various RuNet stores. You can also purchase easily disassembled garlands. Choose leaves from fabric of any density, perhaps with small plastic parts, or even plastic or plastic-coated. But the last 2 options are not suitable for curtains, because they will severely scratch the skin and cling to hair and clothes. So, if this is a garland, we cut ourselves a lot of individual leaves with small cuttings.
You can try to work with real leaves, but they are too fragile when dried, and when strung “living” on a thread, they will quickly curl into dull rolls and turn brown. Here you can try experimenting with decoupage glue, covering it in 2-3 layers (drying each layer completely before applying a new one) all sides of the leaves, both “live” and dry (very carefully so as not to damage), then you MAY have something it will work with real fallen leaves. But natural leaves, of course, are also not suitable for curtains.
2. Using a tape measure, measure the distance from the ceiling to the desired length of each level of the garland, write down the data obtained. If you decide to hang a garland over the festive table, it is optimal that it ends 30-45 cm before the tabletop, so as not to get into the food and not interfere with the guests’ communication. Don’t forget that the garland should not hang above lit candles or close to them - it will start a fire!
3. Cut the required number of threads (depending on the thickness of the garland) according to the lengths obtained in step 2. The color of the thread should be such that it practically disappears visually when suspended with leaves. When threading the needle, leave a short tail of at least 10 cm, since such a thread slips out of the needle very easily during this type of work.
4. On each thread, depending on its length, we string 4-5 leaves through the center of the latter. Try to immediately determine the point approximately in the center of the sheet where it will be suspended in a balanced manner. Change the distance from the upper end of the thread to the first leaf and between the leaves on the threads so that your garland does not end up looking monotonous with wide stripes of empty “holes” along its entire length.
In the place where the thread comes into contact with each leaf, apply a drop of suitable glue from below (under the leaf) so that all the leaves are more or less securely fixed in place. Before lifting and hanging the garland, leave it on the table overnight until the glue has completely dried.
5. If, in order to hang it, you have to move the finished garland to another room, take your time and be careful, because the leaves get tangled VERY easily, and they are not fixed well enough on the threads so that they can be quickly and easily untangled. It is best to pack each individual thread with leaves in a separate bag, large envelope, or roll it in wax paper before moving it around the house or, especially, transporting it to another building.
6. We fix the garland on the ceiling in any convenient way. The easiest and most harmless thing (for the ceiling - it won’t leave any traces behind and can be easily removed) is to use the modern mastic described above in the list (you can buy it on eBay): it is pinched off from a block, rolled into a ball and the upper tip of one thread is placed in it with leaves.
7. Then the ball with the tip of the thread is simply pressed against the ceiling - and that’s it! It will hold on! Do not forget to make equal large spaces between the threads, because leaf fall is not very dense. But you can use any other method of attaching to the ceiling. By the way, remember that suction cups fall off pretty quickly from almost any surface, even if there is almost no weight on them.
After hanging about 4-5 strands, step away from the garland and check if you like how it is distributed in space. In the photo below, 20 garlands of the same length are hung. Once hung, cut off any ends of the string that hang down after the last leaf on each garland. And if there is a purely aesthetic reason, you can cut some of the garlands even higher, cutting off the last 1-2 leaves.
Add-ons
:
— At other times of the year, instead of autumn leaves, you can use artificial pink petals made of fabric or snowflakes;
— If you have a certain frame hanging above the dining table (with lighting, dishes, etc.), it is easiest to hang such threads on the frame;
- No matter how hard you try, a couple of threads from the garland will still get tangled and/or damaged. This is life, accept this fact with universal calm, and unravel the threads VERY slowly and carefully!
Autumn garlands made by children with their own hands are a great decoration for any home, apartment, school or kindergarten.
To make such garlands, you can use a variety of materials, but you should take into account where the craft will be located.
An autumn garland made with your own hands from multi-colored felt is suitable both for the street and for the home. Each needlewoman has pieces of this fabric that accumulate over time and seem to want to be used. By selecting the brightest, most colorful pieces, you can make a pretty nice autumn decorative pendant out of them.
Such an autumn garland for or school can be used to decorate the hall for the traditional Autumn Festival.
To create it, first of all, you will need to cut out small leaves of approximately the same size from each piece. We select the size of the leaves based on what we want to decorate with our products - for the street and a large hall you can make a larger garland, and for small rooms - a small one. To cut out the leaves, you can use a template or simply shape the leaves by cutting off the extra uneven corners. You can give the leaf a different shape (for example, the shape of an oak or maple leaf), then it will turn out more interesting. The more leaves you can cut out, the longer the garland will be.
Now we fold each leaf in half and, using scissors, make a small cut in its upper part. We make the same cut at a short distance from the first one, placing them parallel to each other.
When we unfold the leaf, we will see two holes on it into which we will need to thread a fairly strong thread or cord. We alternately string all the leaves that we managed to prepare onto this thread.
Outside, the golden season of autumn is in full swing, which means it’s time to decorate everything that surrounds us in autumn style. Decorations in the autumn style include: paintings depicting yellow leaves, autumn bouquets, autumn decorative wreaths, etc.
In this article, the News Portal "site" has prepared for you another good option for interior decoration - an autumn garland. And it is best to make the garlands proposed in our article in the company of your beloved children.
Garland of apples
Autumn is harvest time! And of course, tasty and aromatic apples are included in the list of fruits that are harvested in the fall. We propose to make such an unusual apple garland!
For this craft you will need one apple, paints and paper.
Cut the apple in half! Coat the inside of the half thoroughly with paint, and then apply it to white paper. Use half an apple as a stamp.
Decorate the finished apple prints with a green tail, which you paint with a brush. Now cut the apples with scissors and connect them together using a needle and thread.
Construction of a drawing of gloves
The value of the dimensional attribute Palm circumference divided by 8.
19.2:8 = 2.4 cm.
Draw five vertical lines about 20 cm long with an interval of 2.4 cm. Draw a horizontal line approximately in the middle (to mark the finger lengths).
On the little finger area, move 1 cm down from the horizontal and draw another horizontal line here (the base of the little finger on the hand is lower than the other fingers).
From the horizontal lines, plot the resulting finger length values upward. Draw horizontal lines through the resulting points and divide them in half.
Create rounded lines for your fingertips.
Draw a hole for the thumb; to do this, along the 0/1 line, move 5 cm down from the horizontal (Аmpon). From the resulting point, set aside another 5 cm (the length of the muscle tubercle at the base of the thumb).
Set aside 0.5 cm inward from the right outer line and line 2/3.
From a point on the 0/1 line, 5 cm away from the horizontal, set aside 2 cm upward. From the resulting point, set aside 1.1 cm horizontally to the left and right (if your palm is wide, you can set aside a larger value). Make the top section of the hole for the thumb.
From the resulting horizontal line, move 1 cm upward along the 0/1 line. Through this point (on the 0/1 line) draw a line 2.1 cm long from the upper left point - a slot for the thumb (if you have a large hand, the line may be longer). Draw line segments c and d.
From the mark corresponding to the lower point of the hole for the thumb (from the lower point of the muscle tuberosity), place the Rebras (corresponding to the length of the glove). Connect the bottom point of the thumb hole with points 0.5 cm away from the vertical lines.
The following materials are cut out (for one glove):
- 1 piece with thumb hole;
- 1 piece without thumb hole - for the upper part of the glove.
Drawing a thumb drawing
Draw mutually perpendicular vertical and horizontal lines. Vertically from the intersection point, put the length of the thumb up, down - the length of the muscle tubercle at the base of the thumb.
Horizontally set aside from the vertical line to the left and right the value of the circumference of the thumb plus 1 cm.
From the top point of the vertical line, set aside 1 cm to the left and right and draw rounded lines for the fingertip. Draw a smooth line (see drawing) on the lower section of the part for the thumb through the bottom point of the drawing.
The length of the line should be the circumference of the thumb hole plus 2.1 cm.
From the horizontal line, set aside 2.1 cm (b) upward along the outer contour of the part to determine the location of the segment d/c.
Along a horizontal line, set aside 1.5 cm to the left from the right side of the outer contour of the part.
From the end point of segment b (2.1 cm up the outer contour of the part from the horizontal) towards a point 1.5 cm away from the outer contour of the part, draw a segment 2.2 cm long.
Middle finger parts
Draw the middle parts for the fingers in accordance with the drawing. The base line of the fingers is equal to the width of the fingers in the glove drawing (2.4 cm).
All middle parts for the fingers, shown in the drawing once at a time, are cut out of the material (for one glove).